
This section describes how to configure Cisco CE Series endpoints for monitoring by Skylar One using the "Cisco: Video Endpoint" PowerPack.
Configuring Cisco CE Series Endpoints for Monitoring by Skylar One
Skylar One uses two protocols to monitor Cisco CE Series endpoints: SNMP and HTTP. This section describes how to configure Cisco CE Series endpoints for both of those protocols.
Configuring SNMP Settings
To monitor Cisco CE Series endpoints in Skylar One, you must configure the SNMP community string and other information that Skylar One uses to connect to the endpoints. You use this information to create an SNMP credential to monitor the endpoints.
To configure the SNMP settings on a Cisco CE Series endpoint:
- In a browser window, go to the IP address of the Cisco CE Series endpoint. A prompt for a username and password appears.
- Go to the Network Services page (Setup > Configuration > Network Services). Under the SNMP subheading, enter values in the following fields:
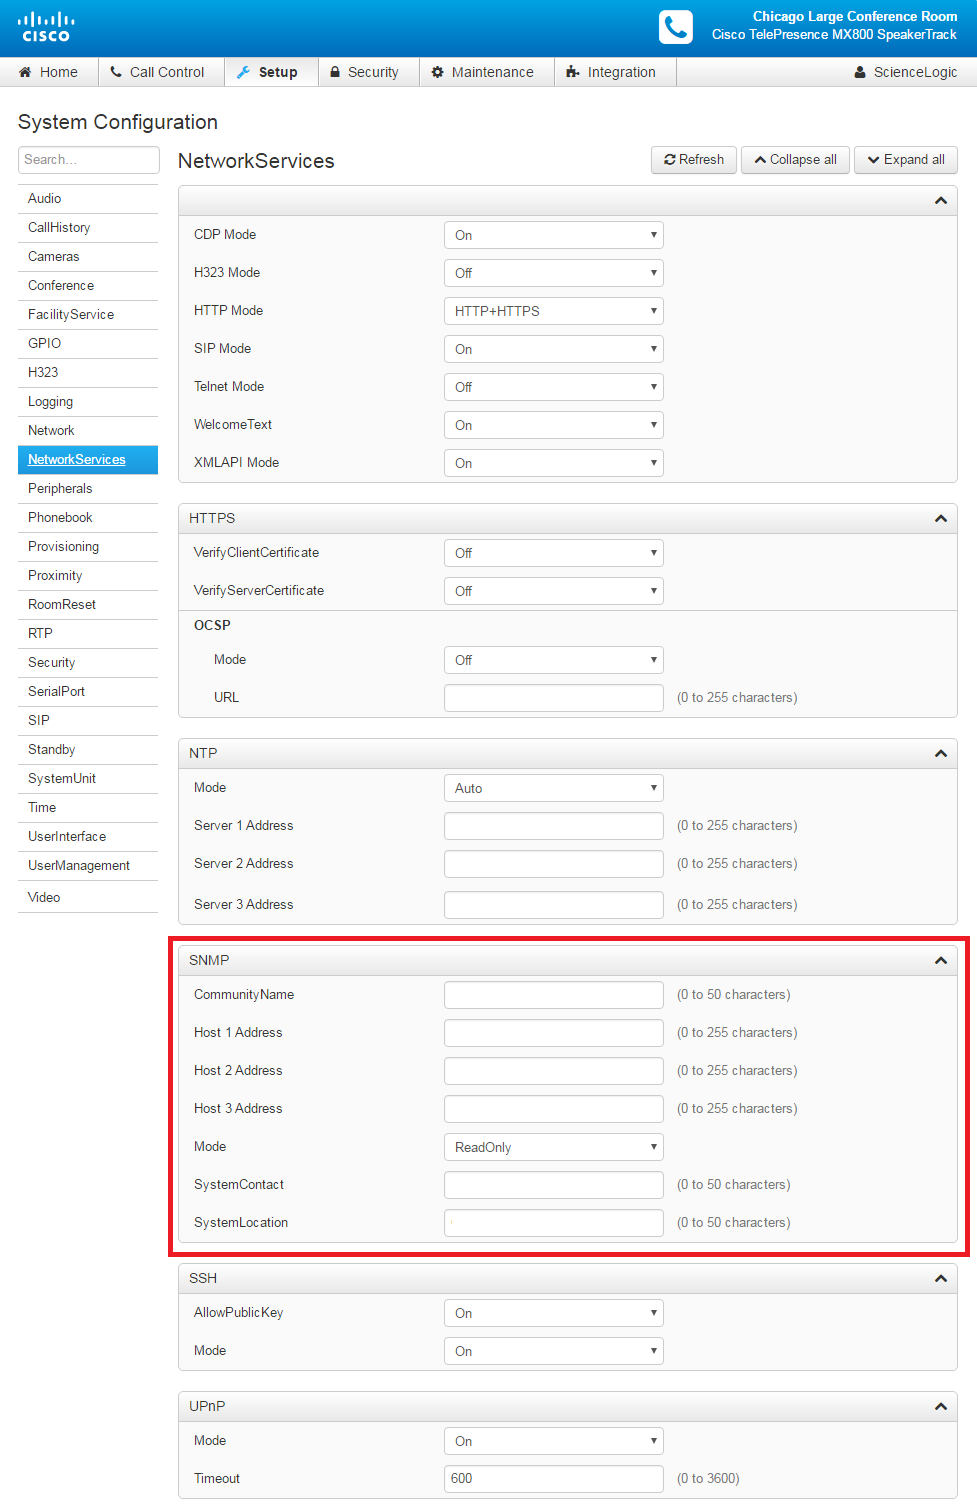
- Community Name. Enter a new SNMP community string for this device. When you configure an SNMP credential for this Cisco CE Series endpoint in Skylar One, enter this community string in the SNMP Community (Read-Only) field.
- Host 1 Address. Enter the IP address of the Message Collector or Data Collector that collects SNMP trap messages from the device. If the device already sends SNMP traps to another IP address and you want to keep those settings, enter the IP address of the Message Collector or Data Collector in the Host 2 Address or Host 3 Address field.
- Mode. Select ReadOnly.
- SystemContact. Optionally, enter the contact information for the device's administrator.
- SystemLocation. Optionally, enter the device's location.
- Click .
Configuring the HTTP Request Password
Optionally, if you use a SOAP/XML credential to collect configuration and performance data from a Cisco CE Series endpoint, you can configure the password for the account Skylar One uses to send HTTP requests to the endpoint.
To configure the HTTP request password:
- Go to the Users page (Security > Users) and select the username of the account Skylar One uses to perform HTTP requests to this device. The Edit User page appears.
- On the Edit User page, enter values in the following fields:
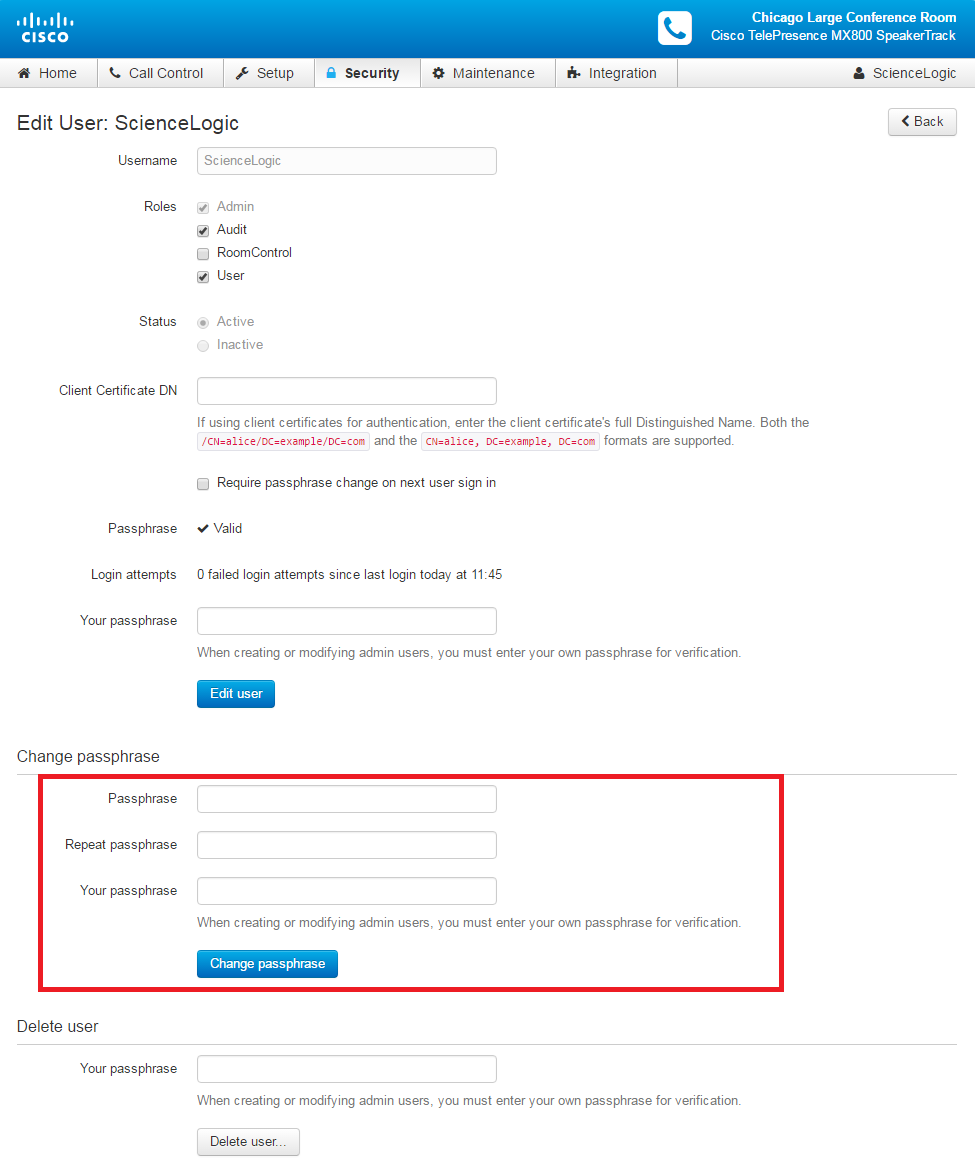
- Passphrase. Enter the user account's new passphrase.
- Repeat passphrase. Retype the user account's new passphrase.
- Your passphrase. Enter your current administrator passphrase.
- Click .
Creating an SNMP Credential
To monitor Cisco CE Series endpoints in Skylar One, you must create an SNMP credential for each endpoint.
To create an SNMP credential:
-
Go to the Credentials page (Manage > Credentials).
-
Click the button and select SNMP Credential from the drop-down menu. The Create Credential page appears.
-
Enter values in the following fields:
-
Name. Enter a new name for the credential. This field is required.
-
All Organizations. Toggle on (blue) to align the credential to all organizations, or toggle off (gray) and then select one or more specific organizations from the Select the organizations the credential belongs to drop-down field to align the credential with those specific organizations.
-
Timeout (ms). Enter the time, in milliseconds, after which Skylar One stops trying to communicate with the Cisco CE Series endpoint. The default value is "1500". This field is required.
-
SNMP Version. Select SNMP V2 from the drop-down list.
-
SNMP Retries. Keep the default. The default value is "1".
-
Port. Keep the default. The default port is "161".
-
SNMP Community (Read-Only). Enter the community string for the Cisco CE Series endpoint you want to monitor.
-
SNMP Community (Read/Write). Optional. Enter the community string for the Cisco CE Series endpoint to grant read/write permissions.
-
-
Click .
Creating an SNMP Credential in the Classic Skylar One User Interface
To monitor Cisco CE Series endpoints in Skylar One, you must create an SNMP credential for each endpoint.
To create an SNMP credential for a Cisco CE Series endpoint in the classic Skylar One user interface:
- Go to the Credential Management page (System > Manage > Credentials).
- Click , and then select Create SNMP Credential. The Credential Editor modal appears.
- Enter values in the following fields:
- Profile Name. Enter a name for the credential.
- SNMP Version. Select SNMP V2.
- SNMP Community (Read-Only). Enter the SNMP community string you configured on the Cisco CE Series endpoint.
You can optionally change the values in the Timeout (ms) and Retries fields. For more information about all fields in the Credential Editor page, see
- Click .
Configuring SOAP/XML Credentials
To monitor Cisco CE Series endpoints in Skylar One, you must configure three SOAP/XML credentials for your Cisco CE Series endpoints. The three credentials are:
- "Cisco CE Series Configuration"
- "Cisco CE Series History"
- "Cisco CE Series Status"
These credentials enable Skylar One to collect configuration and performance data along with call detail records using unique combinations of a URL, username, and password.
If you have multiple Cisco CE Series endpoints, you need one set of credentials for each unique password. For example, if you have configured three Cisco CE Series endpoints with the same password, you need only one set of credentials. If you have configured three Cisco CE Series endpoints with three unique passwords, you need three sets of credentials.
Modifying the SOAP/XML Credential Templates
The "Cisco: Video Endpoint" PowerPack includes a template for each SOAP/XML credential that you can edit for use with your Cisco device.
To modify the SOAP/XML credential:
- Go to the Credentials page (Manage > Credentials).
- Locate the "Cisco CE Series Credential", then click its icon (
 ) and select Duplicate from the drop-down field. The "Cisco CE Series Credential copy" credential appears.
- Click the actions icon () for the "Cisco CE Series Credential copy" credential, then select Edit. The Edit Credential page appears.
- Enter values in the following fields:
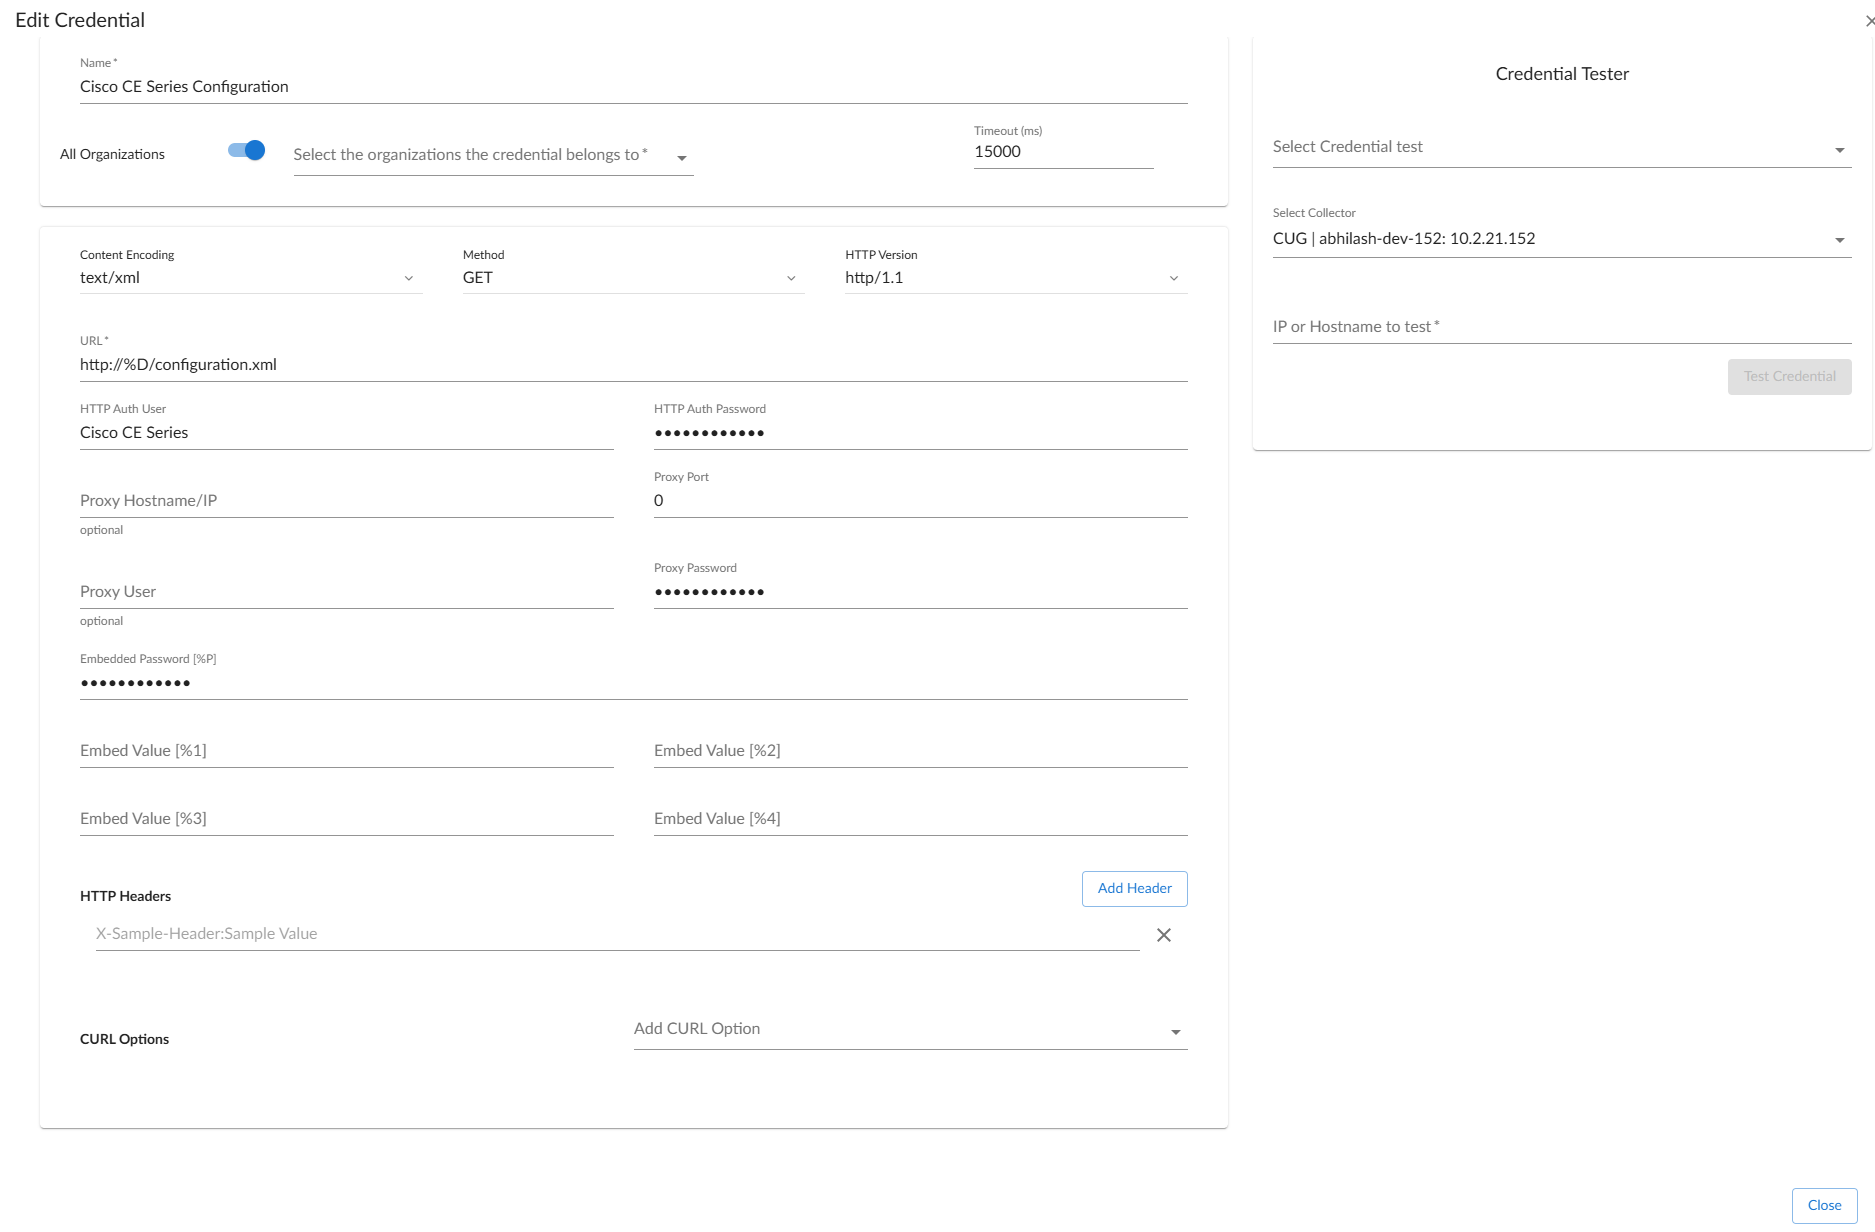
- Name. Enter a new name for the credential. This field is required.
- All Organizations. Toggle on (blue) to align the credential to all organizations, or toggle off (gray) and then select one or more specific organizations from the Select the organizations the credential belongs to drop-down field to align the credential with those specific organizations.
- Timeout. Enter the time, in milliseconds, after which Skylar One stops trying to communicate with the Cisco CE Series endpoint device. The default value is "15000". This field is required.
- URL. Keep the default URL of http://%D/configuration.xml.
- HTTP Auth User. Enter the Cisco CE Series endpoint username associated with the administrator account.
- HTTP Auth Password. Enter the password associated with the Cisco CE Series endpoint administrator account.
- Embedded Password [%P]. Enter the embedded password associated with the Cisco CE Series endpoint administrator account.
-
Click .
Modifying the SOAP/XML Credential Templates in the Classic Skylar One User Interface
The "Cisco: Video Endpoint" PowerPack includes a template for each SOAP/XML credential that you can edit for use with your Cisco device.
To modify the SOAP/XML credential templates in the classic Skylar One user interface:
- Go to the Credential Management page (System > Manage > Credentials).
- Click the wrench icon (
 ) for the "Cisco CE Series Configuration" credential. The Credential Editor modal appears.
- Enter values in the following fields:
- Profile Name. Enter a name for the credential.
- HTTP Auth User. Enter the username of the HTTP user account that you configured on the Cisco CE Series endpoint.
- HTTP Auth Password. Enter the password of the HTTP user account you configured on the Cisco CE Series endpoint.
- Click .
- Repeat steps 2-4 for the "Cisco CE Series History" and "Cisco CE Series Status" credentials.
Discovering Cisco CE Series Endpoints
Skylar One uses Dynamic Applications from the "Cisco: Video Endpoint" PowerPack to discover and monitor Cisco CE Series endpoints. Some of the Dynamic Applications for Cisco CE Series endpoints use the caching feature:
- Two Dynamic Applications only collect and cache data from Cisco CE Series endpoints.
- Nine Dynamic Applications use the cached data. For these Dynamic Applications to display data, you must align the Dynamic Applications that collect and cache data to the same device.
- Three Dynamic Applications that do not use the caching feature.
For more information about the Dynamic Application caching feature, see
The following table lists the Dynamic Applications for Cisco CE Series endpoints, the dependencies between the Dynamic Applications that populate cache and the Dynamic Applications that use the cache, and the credential you must align with each Dynamic Application:
| Dynamic Application | Credential | Caching Type | Dependencies |
| Cisco: Active Call (CE Series) | N/A | Consumes Cache | Cisco: Status Cache (CE Series) |
| Cisco: Audio/Video (CE Series) | N/A | Consumes Cache | Cisco: Status Cache (CE Series) |
| Cisco: Call Detail Records (CE Series) | Cisco CE Series History | No Caching | N/A |
| Cisco: Call Quality Statistics (CE Series) | N/A | Consumes Cache | Cisco: Status Cache (CE Series) |
| Cisco: Configuration (CE Series) | N/A | Consumes Cache | Cisco: Status Cache (CE Series) and Cisco: Configuration Cache (CE Series) |
| Cisco: Configuration Cache (CE Series) | Cisco CE Series Configuration | Populates Cache | N/A |
| Cisco: Configuration Discovery (CE Series) | Cisco CE Series Configuration | No caching | N/A |
| Cisco: Device Discovery (CE Series) | N/A | Consumes Caches | Cisco: Configuration Cache (CE Series) |
| Cisco: Environmental (CE Series) | N/A | Consumes Cache | Cisco: Configuration Cache (CE Series) |
| Cisco: IC Detail (CE Series) | N/A | Consumes Cache | Cisco: Status Cache (CE Series) |
| Cisco: Remote Management (CE Series) | N/A | Consumes Cache | Cisco: Status Cache (CE Series) and Cisco: Configuration Cache (CE Series) |
| Cisco: Status (CE Series) | N/A | Consumes Cache | Cisco: Status Cache (CE Series) |
| Cisco: Status Cache (CE Series) | Cisco CE Series Status | Populates Cache | N/A |
| Cisco: Status Discovery (CE Series) | Cisco CE Series Status | No caching | N/A |
The "Cisco: IC Detail (CE Series)" Dynamic Application is disabled by default. To enable it, go to the Dynamic Applications Manager page (System > Manage > Applications). Locate the Dynamic Application and click its wrench icon (). Select Enabled in the Operational State field, and then click .
When Skylar One runs the "Cisco: Device Discovery (CE Series)" Dynamic Application, the Dynamic Application triggers a run book action that aligns the appropriate Cisco CE Series Device Classes to your devices.
Discovering Cisco CE Series Devices
To monitor Cisco CE Series endpoints, you must run a discovery session to discover each endpoint.
To create and run a discovery session for a Cisco CE Series endpoint:
- Go to the Devices page (
 ) or the Discovery Sessions page (Devices > Discovery Sessions) and click the button.
- Click the button. Additional information about the requirements for discovery appears in the General Information pane to the right.
- Click . The three-step wizard appears starting with the tab.
- Enter values in the following fields:
- Discovery Session Name. Enter a unique name for this discovery session. This name displays in the list of discovery sessions on the tab.
- Description. Optional. Enter a short description of the discovery session. You can use the text in this description to search for the discovery session on the tab.
- Select the organization to add discovered devices to. Select the name of the organization to which you want to add the discovered devices.
- Click . The tab of the wizard appears.
- On the tab, locate and select the SOAP/XML credential you created for the Cisco CE Series endpoints.
- Click . The tab of the wizard appears.
- Enter values in the following fields:
- List of IP/Hostnames. Enter the IP address for the Cisco CE Series endpoint.
- Which collector will discover these devices?. Required. Select an existing collector group to monitor the discovered devices.
- Run after save. Toggle on (blue) to run this discovery session as soon as you save the session.
- Advanced options. Click the down arrow (
 ) to complete the following fields:
- Discover Non-SNMP. Toggle on (blue) to enable this setting.
- Model Devices. Toggle on (blue) to enable this setting.
- Select Device Template. If you configured a CE Series device template, select it here. Otherwise, leave the default selection.
- If you enabled the Run after save option, click the button. The discovery session runs and the Discovery Logs page displays any relevant log messages. If the discovery session locates and adds any devices, the Discovery Logs page includes a link to the Device Investigator page for the discovered device.
- If you did not enable the Run after save option, click the button. The Discovery Sessions page (Devices > Discovery Sessions) displays the new discovery session.
Discovering Cisco CE Series Devices in the Classic Skylar One User Interface
To model and monitor your Cisco CE Series devices, you must run a discovery session to discover the Cisco device that Skylar One uses as the root device for monitoring.
Several minutes after the discovery session finishes, the Dynamic Applications automatically align to the root device. They then discover, model, and monitor the remaining Cisco CE Series devices.
To discover the devices that you want to monitor:
- Go to the Discovery Control Panel page (System > Manage > Classic Discovery or System > Manage > Discovery in the classic user interface).
- Click the button. The Discovery Session Editorpage appears.
- Enter values in the following fields:
- IP Address/Hostname Discovery List. Enter the IP address(es) and/or hostname(s) for the device(s) you want to discover.
- SNMP Credentials. This field is optional. Select the SNMP credential you created for the Cisco CE Series endpoints.
- Other Credentials. Select the credentials you created using the following templates:
- Cisco CE Series Configuration
- Cisco CE Series History
- Cisco CE Series Status
- Discover Non-SNMP. Select this checkbox.
- Optionally, you can enter values in the other fields on this page. For more information about the other fields on this page,
- Click the button to save the discovery session.
- Close the Discovery Session Editor page. The discovery session you created appears at the top of the Discovery Control Panel page.
- Click the lightning-bolt icon (
 ) of the discovery session you created to run it. The Discovery Session window appears.
- After Skylar One discovers the devices, click the device icon (
 ) to view the Device Properties page for each device.