![]()
Version 121 of the Amazon Web Services PowerPack adds new guided discovery workflows for SL1 version 11.2.0 and later, updates to Dynamic Applications, and new Alerts and Event Policies.
- Minimum Required SL1 Version: 10.2.0
Before You Install or Upgrade
Ensure that you are running version 10.2.0 or later of SL1 before installing Amazon Web Services version 121.
For details on upgrading SL1, see the appropriate Release Notes.
If your SL1 system is not currently running version 10.2.0 or later, you must upgrade to 10.2.0 or later as part of the upgrade process for version 121 of the PowerPack.
If your SL1 system has been upgraded to a later release, you should go to the PowerPack Manager page (System > Manage > PowerPacks) and ensure that the Amazon Web ServicesPowerPack has been upgraded to the most recent version.
Additionally, the Data Collectors used to monitor the AWS account must be running the Oracle Linux 7.2 operating system.
Upgrade Process from PowerPack version 100 or Later
This section describes the upgrade process when upgrading from version 100 or later of the Amazon Web Services PowerPack.
By default, installing a new version of a PowerPack will overwrite all content in that PowerPack that has already been installed on the target system. You can use the Enable Selective PowerPack Field Protection setting in the Behavior Settings page (System > Settings > Behavior) to prevent local changes for some commonly customized fields from being overwritten.
To upgrade from version 100 or later of the Amazon Web Services PowerPack:
- Familiarize yourself with the Known Issues for this release.
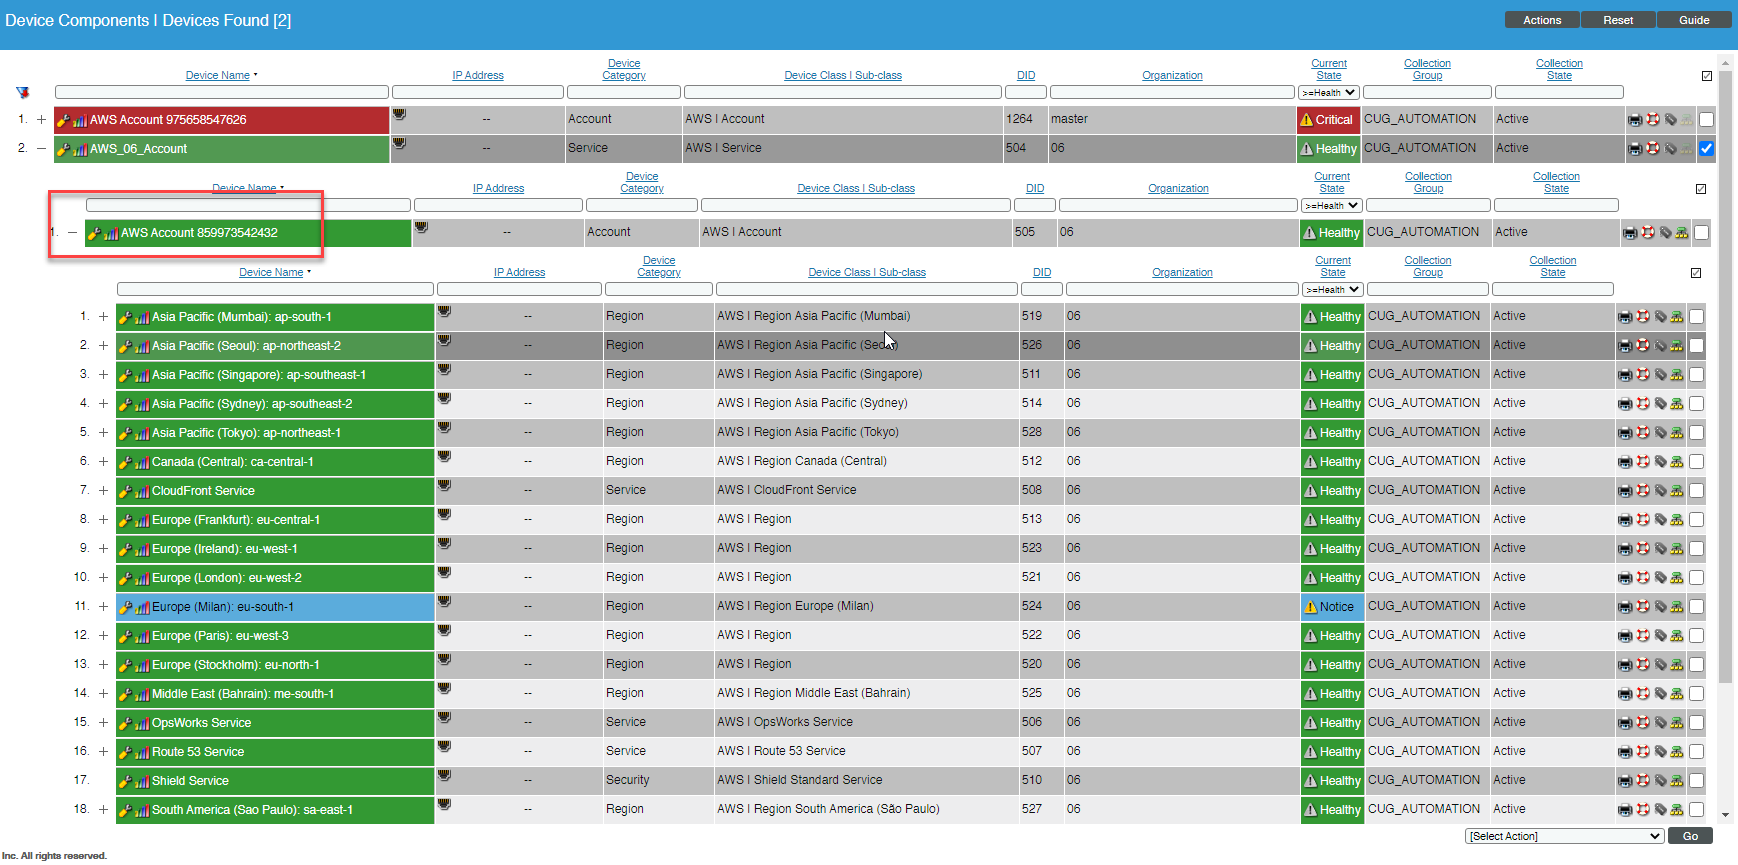
- Disable collection for AWS devices. To do so, go to the Device Components page (Registry > Devices > Device Components) and then select the checkbox for all Amazon Web Services root devices. In the Select Actions drop-down list, select Change Collection State: Disabled (recursive), and then click the button.
- If you are upgrading from a version of the Amazon Web Services PowerPack prior to this version, you must ensure that the Preserve Hostname checkbox is not selected for any Storage Gateway Instances. To do so, go to the Device Manager page (Registry > Devices > Device Manager) and then type "AWS | Storage Gateway Instance" in the Device Class | Sub-class column filter field. For each Storage Gateway Instance component device in the list, click the wrench icon (
 ), uncheck the Preserve Hostname checkbox, and then click .
If desired, you can select the Preserve Hostname checkbox again for these devices after you have completed the upgrade to this version of the PowerPack.
- Delete the "AWS: Health" Dynamic Application. To do so, go to the Dynamic Applications Manager page (System > Manage > Applications) and then select the checkbox for the "AWS: Health" Dynamic Application. In the Select Actions drop-down list, select DELETE Application, and then click the button.
You should not delete any of the AWS Service Health Dynamic Applications, nor any other Dynamic Applications that include "Health" in the name. Only the "AWS: Health" Dynamic Application should be deleted.
- If you have not done so already, upgrade your version SL1 system to 10.2.0 or later.
For versions 8.6.0 and later of SL1, the Amazon Web Services PowerPack content library will not update until you enable collection for your AWS devices.
- If you are upgrading from a version of the Amazon Web Services PowerPack between versions 104 and 107, you must delete any LightSail Instances that were previously discovered by the "AWS: LightSail EC2 Instance Discovery" Dynamic Application. To do so, go to the Device Manager page (Registry > Devices > Device Manager), type "LightSail EC2 Instance" in the Device Class | Sub-class column search field, and then select the checkboxes for all of the devices listed. In the Select Action drop-down list, select DELETE Selected Devices, and then click the button.
Deleting these devices results in the loss of any historical data collected by the beta EC2 LightSail Dynamic Applications between versions 104 and 107.
- Download the latest version of the Amazon Web Services PowerPack from the Support Site to a local computer.
- Go to the PowerPack Manager page (System > Manage > PowerPacks). Click the menu and choose Import PowerPack. When prompted, import the Amazon Web ServicesPowerPack.
- After importing the PowerPack, you will be prompted to install the PowerPack. Click the button to install the PowerPack.
- If you have updated to this version of the PowerPack and already have an account discovered that is part of an organization, you can use your AssumeRole to have your devices associated with that organization. After you upgrade and the "AWS: Account Creation" run book action runs, you'll see the account name change to reflect the organization account in the Device Manager and Device Components pages.
ScienceLogic recommends turning off collection of the parent device if you are upgrading to use this new feature.
Upgrade Process from PowerPack version 8.1.0 or Earlier
This section describes the upgrade process when upgrading from version 8.1.0 or earlier of the Amazon Web Services PowerPack to this version.
To upgrade from version 8.1.0 or earlier, you must perform the following general steps:
- Disable collection for AWS devices.
- Uncheck "Preserve Hostname" for Storage Gateway Instances.
- Delete the "AWS: Health" Dynamic Application.
- Upgrade to SL1 10.2.0 or later release.
- If you have made changes to the AWS PowerPack, optionally enable selective PowerPack field protection.
- Install this release of the AWS PowerPack.
- If you enabled selective PowerPack field protection, edit collection objects.
- Clear the cache on all Data Collectors.
- Unalign the AWS: Custom Metrics Dynamic Application.
- Enable collection for AWS devices.
- If you enabled selective PowerPack field protection, optionally disable selective PowerPack field protection after the installation.
Step 1: Disable Collection for AWS Devices
To disable collection for AWS devices:
- Go to the Device Components page (Registry > Devices > Device Components).
- Select the checkbox for all Amazon Web Services root devices.
- In the Select Actions drop-down list, select Change Collection State: Disabled (recursive).
- Click the button.
Step 2: Uncheck the "Preserve Hostname" Option for Storage Gateway Instances
To ensure that the Preserve Hostname checkbox is not selected for any Storage Gateway Instance component devices:
- Go to the Device Manager page (Registry > Devices > Device Manager).
- In the Device Class | Sub-class column filter field, type "AWS | Storage Gateway Instance".
- For each Storage Gateway Instance component device in the list, click the wrench icon (). The Device Properties page appears.
- Uncheck the Preserve Hostname checkbox.
- Click .
If desired, you can select the Preserve Hostname checkbox again for these devices after you have completed the upgrade to this version.
Step 3: Delete the "AWS: Health" Dynamic Application
To delete the "AWS Health" Dynamic Application:
- Go to the Dynamic Applications Manager page (System > Manage > Applications).
- Locate the "AWS: Health" Dynamic Application and then select its checkbox.
- In the Select Actions drop-down list, select DELETE Application.
- Click the button.
You should not delete any of the AWS Service Health Dynamic Applications, nor any other Dynamic Applications that include "Health" in the name. Only the "AWS: Health" Dynamic Application should be deleted.
Step 4: Upgrade to the 10.2.0 or Later Release
If you have not previously done so, upgrade or migrate your SL1 system to an 10.2.0 or later release using the documentation applicable to your current version:
- For systems running an 8.x release, see the 10.2.0 Release Notes.
- For systems running a 7.x release, see the 10.2.0 Migration Steps document.
For versions 8.6.0 and later of the ScienceLogic platform, the Amazon Web Services PowerPack content library will not update until you enable collection for your AWS devices.
Step 5 (Optional): Enable Selective PowerPack Field Protection
If you have made changes to the Amazon Web Service PowerPack on your system, you can use the Enable Selective PowerPack Field Protection option to preserve changes to some fields. For a full list of fields that are preserved by this option, click the button on the Behavior Settings page (System > Settings > Behavior). If you use the Enable Selective PowerPack Field Protection option, you must perform the steps listed in the Step 7 (If Applicable): Edit Collection Objects section after installing this version of the Amazon Web Services PowerPack.
To enable selective PowerPack field protection:
- Go to the Behavior Settings page (System > Settings > Behavior).
- Enable the Enable Selective PowerPack Field Protection checkbox.
- Click the button.
Step 6: Install this Version of the Amazon Web Services PowerPack
To install this version of the Amazon Web Services PowerPack:
- Go to the PowerPack Manager page (System > Manage > PowerPacks).
- Click the button and select Import PowerPack. The Import PowerPack modal page appears.
- Click the button and select the PowerPack file in your file browser.
- Click the button. A confirmation dialog appears.
- Click the button. The PowerPack Installer modal page appears.
- Click the button. A confirmation dialog appears.
- Click the button.
Step 7 (If Applicable): Edit Collection Objects
If you performed the steps listed in the Step 5 (Optional): Enable Selective PowerPack Field Protection section, you must perform the following steps:
- Go to the Dynamic Applications Manager page (System > Manage > Application).
- Click the wrench icon () for the "AWS: CloudFront Origin Configuration" Dynamic Application. The Dynamic Applications Properties Editor page appears.
- Click the tab.
- Click the wrench icon () for the Distinguished Name collection object.
- Select the Hide Object checkbox.
- Click the button.
Step 8: Clear Data Collector Cache
Beginning with Amazon Web ServicesPowerPack version 112, ScienceLogic libraries are delivered with the PowerPack. However, you must ensure that Amazon Web ServicesPowerPack versions 108-111 that were installed on Data Collectors prior to updating to SL1 version 8.11.0 still work and that the silo_aws system library is set to 2.9.5.
All versions of the ScienceLogic libraries appear on the ScienceLogic Library Manager page (System > Customize > ScienceLogic Libraries). The default silo_aws library is indicated by a System setting of True.
After validating the ScienceLogic library versions on the Data Collectors, you must also clear the Data Collectors' cache.
Perform the following steps for every Data Collector used to monitor an AWS account:
- Log in to the command-line of the appliance as the em7admin user.
- Validate the versions of the ScienceLogic libraries on the Data Collector at the paths below:
- The library versions might be the same if you have not yet upgraded the Amazon Web ServicesPowerPack to the latest version that was delivered in SL1.
- The library versions might be different if you have upgraded the Amazon Web ServicesPowerPack to the latest version that was delivered in SL1.
$ cd /opt/em7/envs/<PP GUID>/lib/python2.7/cl-packages/silo_aws
$ cd /opt/em7/envs/system/lib/python2.7/cl-packages/silo_aws
- On the Data Collector, ensure that the current content library version matches the version installed in the PowerPack:
$ cat version.txt
For versions 8.6.0 and above of SL1, the content library version listed in the version.txt file will not update until you enable collection for your AWS devices.
- Execute the following command to open a MariaDB prompt:
$ sudo bash
[sudo] password for root:
# silo_mysql
- Execute the following command:
DELETE FROM cache.dynamic_app WHERE `key` LIKE 'AWS_SELF_MONITOR_%';
Step 9: Unalign the AWS: Custom Metrics Dynamic Application
A previous release of the Amazon Web Services PowerPack erroneously aligned the "AWS: Custom Metrics" Dynamic Application to certain types of devices. To unalign the "AWS: Custom Metrics" Dynamic Application from these devices:
- Copy the provided aws_unalign_custom_metrics_app.py file to the home directory of the em7admin user on an appliance in your system:
- If your system includes All-In-One Appliances, use the primary All-In-One Appliance.
- If your system includes Database Servers where the user interface/API has not been disabled on the Database Servers, use the primary Database Server.
- If your system includes Database Servers where the user interface/API has been disabled on the Database Servers, use an Administration Portal.
The aws_unalign_custom_metrics_app.py file can be found by clicking the "Contrib Files" link for the most recent version of the Amazon Web Services PowerPack at the ScienceLogic Support site.
- Log in to the command-line of the appliance as the em7admin user.
- Execute the following command:
sudo python aws_unalign_custom_metrics_app.py --base-url http://[IP address of appliance] --username [username of administrator user] --password [password of administrator user]
The output will show information about each device from which the "AWS Custom Metrics" Dynamic Application was unaligned.
Step 10: Enable Collection for AWS Devices
To enable collection for AWS devices:
- Go to the Device Components page (Registry > Devices > Device Components).
- Select the checkbox for all AWS Web Services root devices.
- In the Select Actions drop-down list, select Change Collection State: Enabled (recursive).
- Click the button.
Step 11 (Optional): Disable Selective PowerPack Field Protection
If you performed the steps listed in the Step 5 (Optional): Enable Selective PowerPack Field Protection section and want to disable the option for future PowerPack updates, perform the following steps:
- Go to the Behavior Settings page (System > Settings > Behavior).
- Disable the Enable Selective PowerPack Field Protection checkbox.
- Click the button.
Features
Version 121 of the Amazon Web Services PowerPack includes the following features:
- Dynamic Applications that discover, model, and collect data from AWS component devices
- Event Policies and corresponding alerts that are triggered when AWS component devices meet certain status criteria
Many of the Event Policies included in this PowerPack are disabled by default. You must manually enable the Event Policies that you want to use. To do so, go to the Event Policy Editor page (Registry > Events > Event Manager > create or edit) and change the Operational State to Enabled.
- Device Classes for each of the AWS component devices monitored
- Sample credentials for discovering AWS component devices
- Reports and dashboards that display information about AWS instances and component devices
- Run Book Action and Automation policies that can automate certain AWS monitoring processes
- The ScienceLogic Libraries that are utilized by this PowerPack:
- aws_explorer
- boto3
- content
- recordreplay
- silo_apps
- silo_aws
- silo_aws_args
- silo_credentials
- silo_snippet
- silo_vmware
- urllib3
Enhancements and Issues Addressed
The following enhancements and addressed issues are included in version 121 of the Amazon Web Services PowerPack:
- Support was added for guided discovery of Amazon Elastic Kubernetes Services (EKS).
- Support for Maximum Database Connections was added for Aurora Databases.
- The following guided discovery workflows have been added:
- AWS Assume Role
- AWS EC2
- AWS IAM
These guided discovery workflows are available only in SL1 version 11.2.0.
- The following content libraries were updated to the following versions:
- aws_explorer 0.3.0
- silo_apps 3.1.4
- silo_aws 6.5.0
- silo_aws_args 1.1.0
- All Performance Dynamic Applications now have the Collector Affinity set to Assigned collector, except for the following Dynamic Applications that still have Collector Affinity set to Root device collector because of a cache dependency:
- AWS: CloudWatch Alarms Performance
- AWS: KMS Performance
- AWS: Region Resource Count Performance
- AWS: S3 Service Performance
- AWS: WAF Global WebACL Instance Performance
- AWS: WAF Regional WebACL Instance Performance
- The following Alerts/Event Policies were added to the "AWS: EC2 Instance Configuration" Dynamic Application:
- AWS: EC2 Instance is Pending
- AWS: EC2 Instance is Running
- AWS: EC2 Instance is Shutting Down
- AWS: EC2 Instance is Stopped
- AWS: EC2 Instance is Stopping
- AWS: EC2 Instance is Terminated
- The "AWS: EKS Cluster Virtual Device Discovery" Dynamic Application was updated to have the Collector Affinity field set to Assigned collector to address an issue in which discovery would not complete. (Support Case: 00210944; JIRA ID: SOL-15733)
- The "AWS: Account Creation" Run Book Action and Run Book Automation Policy were updated to retain the account ID when the name of the Assume Role device is edited.
- Empty Zones will no longer be discovered and services that are not supported by GOV will no longer be called, addressing an issue in which unhandled exceptions occurred for the "AWS: Zone Discovery" Dynamic Application.
- Device components for Availability Zones that do not have any resources will now vanish.
- All Alerts in the PowerPack have been updated to have their Active State set to Enabled by default, and most of the Event Policies in the PowerPack have been updated to have their Operational State set to Disabled by default.
- The following Dynamic Applications were updated to collect "0" when no data is returned, to address an issue in which gaps were appearing in graphs when no datapoint was returned: (Support Case: 00232589; JIRA ID: SOL-17801)
- AWS: Application ELB Instance Performance
- AWS: ELB Instance Performance
- AWS: ELB Target Group Instance Performance
- AWS: Network ELB Instance Performance
- Support for tags was added to the following Dynamic Applications:
- AWS: Auto Scale Group Instance Configuration
- AWS: ElasticCache Cluster Configuration
- AWS: ElastiCache Redis Node Configuration
- The following items in the "AWS: RDS Instance Performance" Dynamic Application will now work with RDS Aurora:
- Alerts and Event Policies:
- AWS: RDS Connection Usage Major Exceeded Threshold
- AWS: RDS Connection Usage Major Returned to Normal
- AWS: RDS Connection Usage Minor Exceeded Threshold
- AWS: RDS Connection Usage Minor Returned to Normal
- Threshold Objects:
- AWS: % Connections Usage Major
- AWS: % Connections Usage Minor
- "Max Database Connections" Collection and Presentation Objects.
- Collection Objects:
- DB Default Max Connections
- DB Parameter Groups
The value of "default_max_connections" follows the formulas defined on the AWS support page (https://docs.aws.amazon.com/AmazonRDS/latest/UserGuide/CHAP_Limits.html). This value can be customized by editing the "aws_rds_instance_performance" snippet in the "AWS: RDS Instance Performance" Dynamic Application for each DB engine (MAX_MYSQL_CONNECTIONS, MAX_MARIADB_CONNECTIONS, MAX_POSTGRESQL_CONNECTIONS, MAX_ORACLE_CONNECTIONS or MAX_SQLSERVER_CONNECTIONS). If you edit this value, it must be an integer number and ensure that you don't leave it empty. If edited, this value will also be overwritten the next time you upgrade the PowerPack.
- The following Dynamic Applications were added to the PowerPack:
- AWS: Pre-Discovery
The "AWS: Pre-Discovery" Dynamic Application must be aligned manually to the virtual device, collecting data for the regions that have the configuration service enabled when running the Dynamic Application in debug mode.
- AWS: Service Health
- AWS: VPN TG Virtual Private Network Configuration
- The "AWS: Account Creation" Dynamic Application was updated to address an issue in which it was not clearing error messages once the errors were fixed.
- An issue was addressed in the "AWS: Elastic Beanstalk Application Performance" Dynamic Application in which an error was occurring when the Elastic Beanstalk service was set to basic health reporting.
It is required to set the Elastic Beanstalk service to enhanced health reporting to collect data for the "AWS: Elastic Beanstalk Application Performance" Dynamic Application.
- An issue was addressed in which the "AWS: Get EC2 Instance Configuration" and "AWS: Vanish Terminated EC2 Instances" Run Book Actions were encountering errors when Assume Role or IAM credentials were used. The Run Book Actions will now work with any credential. (Support Case: 00234617; JIRA ID: SOL-18011)
- An issue was addressed in which STS tokens were unable to make requests to new regions.
- An issue was addressed in which the EKS component, when upgrading from using an IAM key to Assume Role, would not take the new credential.
- All Configuration Dynamic Applications in the PowerPack were updated to address an issue in which modifying upper and lower case letters in AWS tags was causing collection problems.
- An issue was addressed in which only one component was created when the Auto Scale Group and Auto Scale Launch Configuration devices have the same name.
It is not recommended to have Auto Scale Goup and Auto Scale Launch Configuration devices have the same name, and names must not be more than 118 characters.
When upgrading the Amazon Web Services PowerPack to version 121, Auto Scale Launch Configuration devices that already exist will be re-created.
Known Issues and Workarounds
The following known issues affect version 121 of the Amazon Web Services PowerPack:
- The following Run Book Actions may fail to run for Assume Role and IAM accounts in SL1 MUD systems:
- AWS: Discover from EC2 IP
- AWS: Disable Instance By Tag
- AWS: Vanish Terminated EC2 Instances
-
Upgrading a credential from IAM key to Assume Role may cause an issue in which discovering an Assume Role account on a different Data Collector or Collector Group will cause a cloned account to be created on the root device. To move the services and regions between the two account devices, disable the AWS account inside the root device with the old name.
- In AWS Dynamic Applications that produce API results containing special characters, if a character cannot be normalized, SL1 will display its unicode values inside brackets as a normalized string.
- Some disk-related alerts and events were removed from the "AWS: LightSail Instance Performance" Dynamic Application as of Amazon Web ServicesPowerPack version 108. If you are upgrading from a version prior to version 108, then you must manually delete the thresholds relating to these removed alerts and events. To do so, go to the Dynamic Applications Threshold Objects page (System > Manage > Applications > wrench icon > Thresholds) for the "AWS: LightSail Instance Performance" Dynamic Application, and then click the bomb icon (
 ) for the following thresholds:
- AWS: LightSail Disk IOPS High
- AWS: LightSail Disk GB Usage High
- AWS does not currently support IPv6 addresses for LightSail services. However, the "AWS: LightSail Instance Configuration" Dynamic Application includes support for IPv6 addresses in the event that AWS adds support in the future.
- SSL EOF error messages might appear in the system log when connecting to AWS through a proxy server. The error does not seem to prevent or cause issues with data collection.
- "Read operation timed out" and "Connection reset by peer" error messages might appear in the system log and device logs when upgrading the Amazon Web ServicesPowerPack from versions prior to 108.