Agents allow a Skylar Compliance (formerly Restorepoint) appliance to manage devices located on a remote or otherwise disjoint network, not directly routable by Skylar Compliance, without complex firewall changes, Network Address Translation, or VPNs. For instance, a Service Provider can set up a central Skylar Compliance appliance, deploy agents on customer networks, and enable device backups on remote sites.
You can deploy an agent as a virtual or hardware appliance on the remote network. The agent executes fast operations by performing all the tasks locally that would typically require extensive network interaction. Configurations, logs, and other processes, are handled locally by the agent, and are uploaded to the master Skylar Compliance appliance.
Agent support is provided for a variety of platforms. You can deploy the agent on VMware, AWS, Azure (available in the Azure Marketplace), via Docker, or through our RPM Agent for Linux. Support for a Hyper-V Agent is scheduled for a future release.
Device firmware updates via agents are not yet supported.
Agents are only available with an Enterprise license.
Agent Firewall Requirements
An agent initiates and maintains an SSH connection to the master Skylar Compliance appliance to receive tasks to execute, upload and download device configurations, task output and logs, and download software updates.
Your firewall policy must allow SSH traffic (TCP port 22) from the agent to the master for an agent to function correctly.
Agent Installation
An agent virtual appliance is deployed in a similar manner to a Skylar Compliance appliance (for more information, see the section on Restorepoint Virtual Appliance). Agents are kept up-to-date with software updates via the connection to the master appliance.
Connecting the Agent to the Master
The agent initially establishes an SSH connection to the master using a one-time password that is generated when creating the agent on Skylar Compliance. After the password is accepted, the agent and the master communicate via a secure socket using the agent's RSA key.
Initial Setup
To set up an agent, you must configure the network parameters and the details of the connection to the master:
- Open the virtual machine console in your Virtual Infrastructure client.
- In the login prompt, enter the default username and password for the agent. If you are unsure which username and password to use, contact ScienceLogic Support.
- Follow the prompts to change the agent shell password.
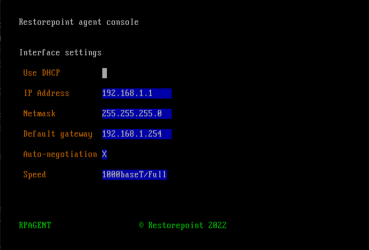
- Select IP Address Configuration at the console menu:
- Enter the settings for IP Address, Netmask, Default gateway, and DNS Server and Domain settings as prompted.
- Enter Y to confirm the settings. If the settings are applied successfully, the console menu will be redisplayed.
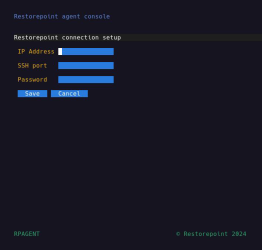
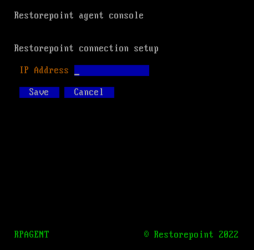
- Next, select Initial Restorepoint Master Setup:
- Enter the IP Address of the master Skylar Compliance appliance, and a one-time password to verify the agent to the master (used only for initial pairing). Optionally, you can also specify which SSH Port and Agent IP Address you want to use for the connection.
Adding an Agent to Skylar Compliance
To add a configured agent to Skylar Compliance, navigate to the Agents page (Administration > Agents) and click Add Agent. The Add Agent dialog appears:
Enter the following details:
- Name. Type a name for the agent.
- Location. Choose a new or existing location for the agent.
- Domain. (Optional) The domain of the devices that this agent will manage. For more information, see Administration Domains.
- Email. (Optional) The email for the user that is responsible for the upkeep of the agent.
- Config Policy. Defines the backup storage policy. Select from one of the following options:
- Keep on master. Backups are stored only on the master appliance.
- Keep on agent. Backups are stored only on the agent appliance.
- Keep on both. Backups are stored on both the master and the agent appliances.
- Alert on disconnect. Select this checkbox to automatically email an alert if the agent goes offline. If the Email field is not filled in, the default notification address is used.
- Alert on reconnect. Select this checkbox to automatically email an alert if the agent comes back online. If the Email field is not filled in, the default notification address is used.
- Disable TFTP Server. Select this checkbox to disable TFTP servers.
- Disable FTP Server. Select this checkbox to disable FTP servers.
- Secondary To. Type the ID of an agent this agent is secondary to in a HA setup.
- Secondary Master IP Address. Type the IP address of the secondary master IP in an HA setup.
- Use Agent Address. Select this checkbox to enter the IP Address into the Address field.
- Address. The specified address must be the address the agent uses to connect to the master. The address option for agents will not work if multiple agents use the same NAT address.
Skylar Compliance will generate an eight-character password upon registering a new agent.
After the agent is added, Skylar Compliance will display the agent list. The address and port will be automatically filled in once the agent has connected successfully for the first time. Note that only one agent can be set up at a time.
Changing the Master IP Address
If the IP address of the master Skylar Compliance appliance changes, any agents connected to that master need to be reconfigured with the new master details. To reconfigure an agent with the new master details:
-
SSH to the agent (or open the virtual machine console).
-
Log in using the agent’s admin account.
-
Select Change Restorepoint Master IP address in the console menu, and apply the new master IP address.
Do not use the option Initial Restorepoint Master Setup to set the new master IP address. If you use this option, it invalidates the master-agent authentication and would require re-pairing the agent to the master Skylar Compliance appliance.
Remote Operations Using Agents
Once you configure an agent, you can perform any operation (backup, restore, control etc.) on a device via the agent. The Skylar Compliance appliance will not connect directly to the device, the appliance will instruct the agent to perform the operation on its behalf.
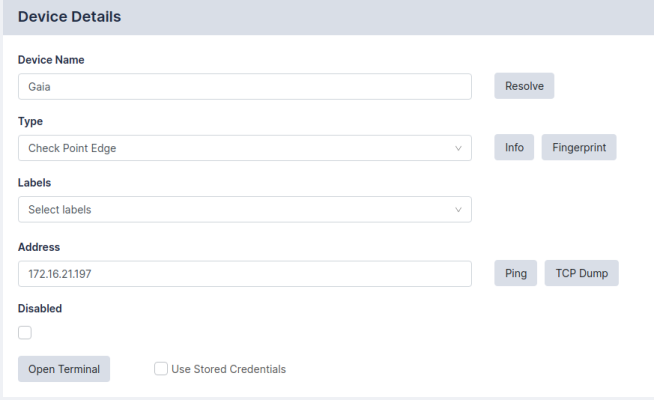
To move an existing device to an agent, select one or more devices from the Device Management List, and click Edit, then select the correct Agent in the drop-down menu as shown:
Operations using agents are completely transparent for the user. For instance, bulk operations can be started for agent-managed and directly-managed devices simultaneously.
Managing Agents
You can view a list of the paired agents from the Administration > Agents page. To edit an agent’s settings, click the name of the agent.
The settings include the Name, Location, Domain, Email, whether to Alert on Disconnect/Reconnect, or allow you to factory Reset the Agent for re-pairing. There are additional settings for Debugging agent connections.
- Debug > Start works similarly to Appliance Debugging. It records a debug log that can be viewed using the Debug > View button.
- Debug > Info collects and displays a series of system information from the Agent, such as RAM usage, Disk usage, and Uptime.
- Debug > Remote allows remote management of an agent. This option will displays a port number. You can connect to that port on your Restorepoint master appliance to redirect to the agent so that trickier issues can be diagnosed.
Azure Agent
The Azure agent enables you to perform post-deployment configurations of virtual machines, collect data for monitoring, and facilitate communication and management between Skylar Compliance and Azure.
Installing the Azure Agent
To install the Azure agent:
- Log in to your Azure account at https://portal.azure.com/#home.
- On the Azure Services page, click the button. The Virtual Machines modal opens.
- On the tab, click the + Create drop-down menu and select Virtual machine.
- On the tab on the Create a virtual machine page, complete the following sections:
- Project details. Select the Subscription and Resource Group you want to use from their respective drop-down menus.
- Instance details. The following options are required.
- Virtual machine name. Enter the name of your Virtual Machine.
- Region. Select the region in which your virtual machine is located from the drop-down menu.
- Availability zone. Select the zone in which your virtual machine is located from the drop-down menu.
- Security type. Optional. Select Standard from the drop-down menu.
- Size. Select the size of your virtual machine. You can click the See all sizes link for a preview of your options. The minimum requirement for the Azure agent is 2vCPUs 8GiB memory.
- Image. Select the virtual machine image you want. Click the See all images link under the Image drop-down menu to search for your options. The Select an image: Marketplace page appears.
- In the Marketplace section, type Skylar Compliance into the Search field. Results for your search will appear in a tile below the Search field.
- Click the Select drop-down menu at the bottom of your results tile and select Skylar Compliance Agent -x64 Gen 2 from the drop-down menu.
- Administrator account. The following fields are required.
- Authentication Type. Select the radio button for the type of authentication you want to use.
- Username. Enter the username for the administrator account.
- Inbound port rules. The following fields are required.
- Public inbound ports. Select theAllow selected ports radio button.
- Select inbound ports. Select SSH (22).
- Click the button.
- On the Disks page, verify that you have multiple disks, and that Pre-defined by the selected image appears in the Data disks for {Virtual Machine} section.
- Click the button to create your Azure agent virtual machine.
RPM Agent
The RPM agent is a standalone agent that you can deploy onto your operating system to connect to various devices.
RPM Agent Limitations
The following features are not supported on the RPM agent:
- Storage on the agent
- Encryption on the agent
- Collection from plugins that use FTP or TFTP
- Auto-upgrade of the RPM Agent
Installing and Updating the RPM Agent
To install or update the RPM agent, perform the following:
- Set SELinux to permissive.
- Run rpm -Uvh rpagent_standalone.X.rmp.
- A new, unprivileged user will be created along with a new group rpuser:restorepoint. This user and group are the owner of the Restorepoint installation under /var/restorepoint.
Configuring the RPM Agent
To run the RPM agent you must configure rpagent_standalone. You can choose to keep rpagent_standalone under the default directory /var/restorepoint/bin/agentconf.json or you can store it in a directory of your choice. To configure the RPM agent, perform the following:
- Follow the default configuration given in agentconf.min.json and store it under agentconf.json:
{
"SpoolDir": "/var/restorepoint/spool",
"BackupDir": "/var/restorepoint/backups",
"BinDir": "/var/restorepoint/bin",
"PluginDir": "/var/restorepoint/plugins",
"CertsDir": "/var/restorepoint/certs",
"ConfDir": "/var/restorepoint/bin",
"MasterAddress": "HOST",
"MasterPort": "",
"NATAddress": "",
"Password": "PASSWORD",
"ChangedAdmin": 0,
"SecondaryAddress": "",
"PushDevices": "",
"DisableTFTP": false,
"DisableFTP": false,
"RPPath": "/var/restorepoint"
}
- Replace HOST and PASSWORD (one-time password) to connect the agent for the first time. Keep the remaining configuration as is.
- A new service has been created for rpagent. Run the following:
systemctl enable rpagent
systemctl start rpagent
- The agent's logs are stored under /var/log/rpagent. If desired, you are able to configure the agent service to show the logs directly in journalctl. The agent service is stored under /usr/lib/systemd/system/rpagent.service.
Optional RPM Agent Configurations
Device Back-Connection
The Device Back-Connection optional configuration is a Beta feature.
To set up a Device Back-Connection, perform the following:
- Create a user with the correct SSH credentials and permissions. This user must be part of the restorepoint group to be able to access the spool directory.
- Add the following configurations to agentconf.json:
If you are using Cisco devices, the back connection username length must not exceed six characters.
"BackConnectionUser": "",
"BackConnectionPassword": ""
Back-connection has only been tested for ssh/scp protocols.
If you want to rotate the BackConnectionPassword, complete the following:
- Add a new password to the agentconfig.json file in the form "BackConnectionPassword": "{NEW_PASSWORD}" .
- Restart your agent service.
Initial Master SSH Connection Port
To connect to a port other than Port 22 when performing initial SSH connection to the master, add the following to agentconf.json:
"MasterSSHPort": ""
You can also connect to multiple ports using the agent configuration option ADDITIONALMASTERSSHPORTS when you add ports separated by commas:
"AddtionalMasterSSHPorts": "1,22,23"
The port you choose must be outside of system ports range (>1023).
Back Connection NAT
If needed, the agent can have a NAT address set for back connection. Devices that are managed by the agent will use the NAT address you set unless it is already set in Skylar Compliance. To set the agent's NAT address, update the following configuration value in agentconf.json:
"NATAddress": ""
Upon connection with the master, the agent will encrypt the back connection password. It will remove the plain text variant from the configuration file and replace it with the encrypted version in the form "EncryptedBackConnectionUserPassword": "{ENCRYPTED_BACK_CONN_PASSWORD}".
TFTP and FTP Servers
This agent does not directly start TFTP and FTP servers. If you manually start a TFTP server on Port 69 on your appliance, these plugins may work as intended but they are untested.
Disable Strict SSH Host Key Configuration
To disable the Strict SSH Host Key configuration on the agent, enter:
"DisableStrictHostKeyChecking":true
Troubleshooting the RPM Agent
If you experience issues connecting the RPM agent, for example, by not correctly configuring SELinux before trying to connect the agent to the master, complete the following:
- Delete the contents of the folder /var/restorepoint/certs.
- Reset the agent in Skylar Compliance.
- Setup the new password again on /var/restorepoint/bin/agentconf.json.
- Delete the auto-generate port if it exists.
If you are using the back connection feature, perform the following:
- After installing the RPM agent update, update your agentconf.json file.
- Next, enter your plain text password for the BackConnectionPassword and delete the value posted for the EncryptedBackConnectionPassword .
- Restart the rpagent to encrypt the back connection password.
Docker Agent
The Docker agent allows you to run multiple agents simultaneously and under any operating system you choose because you can run applications in different environments.
Installing and Configuring the Docker Agent
To install the Docker agent you must have a Harbor account so that you can acquire an API token to access the images contained in the ScienceLogic registry.
Acquiring the API Token
To use the Docker agent you must first acquire an API token from Harbor to authenticate via CLI.
To get your API token:
- Got to https://registry.scilo.tools
- Click the button
- The Harbor home page will load after authentication has been completed.
- Click on your username, found in the top-right corner, and then choose User Profile. The User Profile prompt appears with your username to authenticate.
- You will also see the CLI Secret field with contains your API key. Be sure to copy and paste this somewhere for later use.
- After you have your API key, click the button to close the session.
You are now able to use this username and API token to authenticate with the Harbor services.
Configuring rpagent
To run an rpagent image:
- Log in with your Harbor username and API token to authenticate to the ScienceLogic container registry:
docker login registry.scilo.tools -u <USERNAME> -p <API_TOKEN>
- Create an .env file (or any other name) and set the following two environment variables to run the image:
MASTER=<hostname|address>
PASSWORD=<password>
- MASTER. Enter your Skylar Compliance appliance address or hostname.
- PASSWORD. Enter the password generated by the Skylar Compliance appliance upon registering a new agent.
Skylar Compliance will generate an eight-character password upon registering a new agent.
- Run the container as follows:
docker run \
    -d \
    -it \
    -v $PWD/tmp:/mnt/cryptfs:Z \
    --network=host \
    --tmpfs /mnt/ram \
    --env-file .env \
    --name rpagent \
    --restart unless-stopped \
    registry.scilo.tools/sciencelogic/rpagent
- -d. Daemonizes the container
- -it. Allocates an interactive terminal (good for initial verification)
- -v $PWD/tmp:/mnt/cryptfs:z. Mounts tmp in the current directory in the container as /mnt/cryptfs (tmp must be writable)
- :Z. Configures the SELinux label for hosts that support SELinux.
ScienceLogic recommends you use caution with the :Z option as you can render your host machine inoperable which may require you to relabel host machine files by hand.
- --network=host or --network=bridge. In host mode, the container will share the host's network stack. For more information, see Host Networking.
- --tmpfs /mnt/ram. This is the in-memory storage for runtime data.
- --env-file <file>. This file contains environment variables.
- --name <name>. Name the running container.
- --restart unless-stopped. This allows the container to keep running unless stopped by the Docker daemon.
Host Networking
ScienceLogic recommends that, because the Skylar Compliance agent container is required to accept incoming connections from other devices (SSH, SCP, SFTP), the preferred networking model is to assign an individual IP address to the container. When the container has its own IP address, you can run the SSH server on the standard Port 22 instead of Port 2222. It is possible to run with --network=host, however the Docker host firewall must be configured to forward the incoming connections to the container.
Additional Run Options
You have the option to override default options when configuring the Docker Agent. The following options can be set to override the defaults:
- SSHDPORT. This is the port for the SSH/SCP/SFTP server. Bind port for SSHD (default: 2222).
- CONFDIR. This is the path where the agent configuration file is stored (default: /var/restorepoint/bin)
- SSHDHOSTKEYDIR. This is the path where SSH host keys are stored (default: /etc/ssh)
- DEBUG. Setting DEBUG=1 will enable debug mode. This is useful for testing the setup for the first time.
- DISABLESSHSTRICTHOSTKEYCHECK. Setting this option to DISABLESSHSTRICTHOSTKEYCHECK=1 disables the SSH host key validation for all devices and logs when the key changed.
- SECONDARY. This is the secondary appliance address.
- MASTERSSHPORT. This option allows you to change the default port (Port 22) used to connect to the master appliance.
- NATADDRESS. This is the NAT Address option.
- NOANONFTP. Setting this option to NOANONFTP=1 disables the anonymous FTP authentication.
- ADDITIONALMASTERSSHPORTS. This option expects a string with multiple comma-delimited ports. For example: Enter Port 1, Port 22, and Port 23 as 1,22,23.
The CONFDIR and SSHDHOSTKEYDIR parameters can be used to store configuration files on a mounted volume which makes them persistent if the container is replaced.
Troubleshooting the Docker Agent
If you experience a failed handshake between the agent and device, try resetting the agent in Skylar Compliance.
- Go to the agent's configuration modal and select the Reset checkbox.
- Re-enter the password you previously chose and click .
Retrying in 10 seconds ssh: handshake failed: ssh: unable to authenticate, attempted methods
[none password], no supported methods remain
Configuring CrowdStrike Using Agents
If you have CrowdStrike Sensor installed, you can configure the Sensor on the agent console menu. To configure CrowdStrike using your Skylar Compliance agent:
- SSH to the agent (or open the virtual machine console).
- Log in using the agent’s admin account.
- Select CrowdStrike Sensor in the console menu and select Enter CS Customer ID.
- Type your CrowdStrike Customer ID and click .
If you type an invalid Customer ID, an error message appears.
- Using the CrowdStrike Sensor menu, you can also select the following options:
- Enable/Disable CS at boot (currently disabled). Select this option to enable Crowdstrike to start when you boot the agent. The value changes to Enable/Disable CS at boot (currently enabled) when enabled.
- Start/Stop Crowdstrike Sensor (currently stopped). Select this option to start the CrowdStrike Sensor. The value changes to Start/Stop CrowdStrike Sensor (currently started) when enabled.


