![]()
A “Single Sign On” (SSO) option is available via SAML authentication. You can configure SSO in the tab (Administration > Auth Servers):
On the tab there are two fieldsets:
- Service Provider Settings
- Identity Provider Settings

To set up SAML take note of the following entries:
- ACS URL. Enter this URL value into the relevant field of your SAML IdP.
- Entity ID. Enter this URL value into the relevant field of your SAML IdP.
- IdP Metadata. Add the ACS URL and Entity ID to your SAML IdP to generate the IdP Metadata. Enter the IdP Metadata (usually XML) into the IdP Metadata field in the Identity Provider Settings window.
- Groups Claim. To use the custom SAML groups, enter the groups claim according to your XML provider schema. If this claim remains unfilled, new users will be created without roles.
- Email Claim.This field will populate the user's email address field on the User page.
- Given Name Claim. This field will populate the user's given (first name) name field on the User page.
- Surname Claim. This field will populate the user's surname (last name) field on the User page.
Click to store your input. The metadata is then uploaded to Restorepoint. For more information, see SAML Authentication.
Now that SAML is setup, a new button will appear on the login page called “Login with SSO”. You can click this button without entering values in the other fields and it will either:
- Redirect the user to their SAML IdP to login
- Log them in to Restorepoint if the user already has a valid SAML SSO session
SAML Groups
You can add, edit, or delete SAML Groups on the Users menu (Administration > Users).
Adding a SAML Group
To add a new SAML Group:
- Navigate to the Users page and click the tab (Administration > Users).

- Click the button. The Add SAML Group dialog appears:

- Enter the following information:
- Name. SAML Group name. You can set any name to identify this group. You must specify the Group name as this is information Restorepoint cannot access from the SAML provider.
- ID. Identifier of the SAML group. (e.g. Microsoft Entra ID uses the Object ID as the group identifier). The group identifier claim is set on https://yourapp/ui/auth-servers/saml.
- Roles and Domains. Multiple roles and domains can be assigned to the SAML Group using the menu options.
- Click to save your changes.
Editing an Existing SAML Group
To edit an existing SAML Group:
- Navigate to the Users page and click the tab (Administration>Users>SAML Group).
- Click on the SAML Group name that you want to edit. The Edit SAML Group dialog appears:
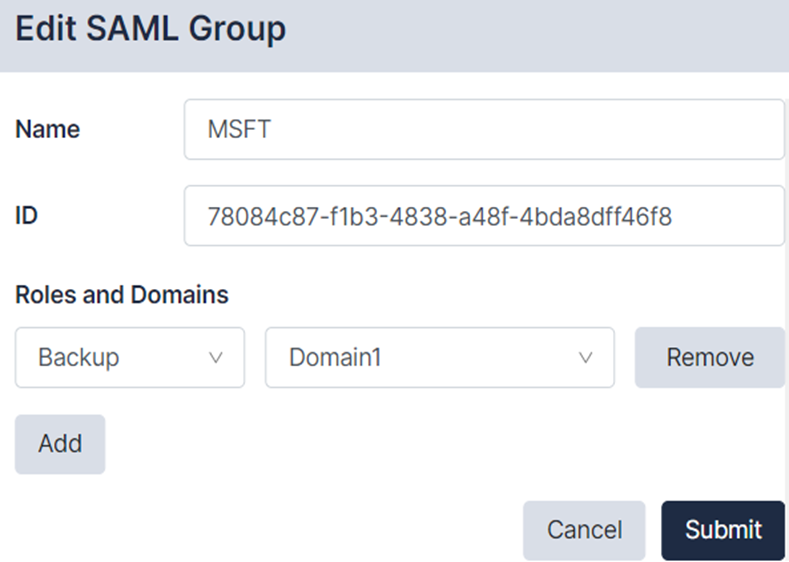
- Enter the following information:
- Name. SAML Group name.
- ID. Enter the identifier for your SAML Group.
- Roles and Domains. Multiple roles and domains can be assigned to the SAML Group using the menu options.
- Click to save your changes.
Editing an Existing SAML User
You can assign specific roles for each SAML user and see roles inherited from SAML groups. Roles assigned to SAML users remain intact even if the SAML group is changed or updated.
This feature is currently only available for SAML users.
To edit an existing SAML user:
- Navigate to the Users page (Administration > Users).
- Click on the user you want to edit. The Edit User dialog appears:
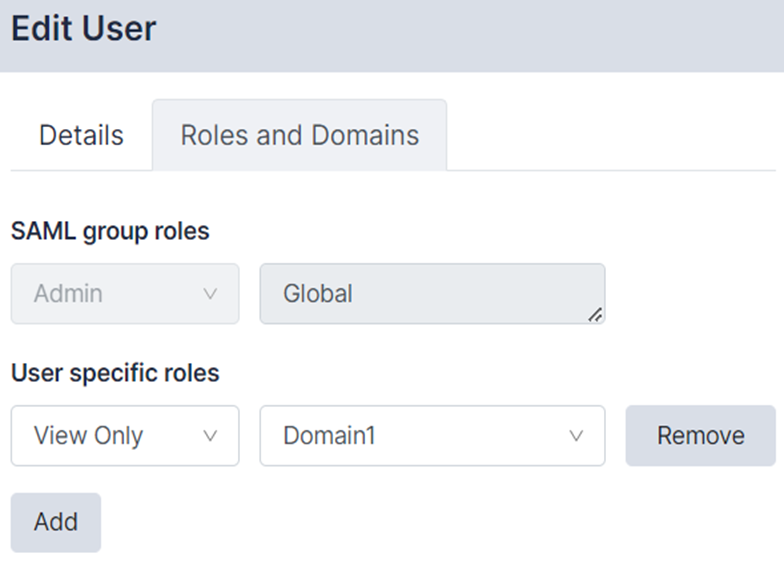
- Click on the tab.
- Click the button to assign a new role and domain to the user. You can add or remove as many user specific roles as needed.
- Click to update your user profile.