![]()
This
For more information about Device Sync, see Configuring Device Sync for the CMDB SyncPack.
For more information about using configuration objects with this SyncPack, see Creating and Aligning a Configuration Object.
Syncing Business Services
Depending on where you have your business services configured initially, you can use one of the two following methods to sync business services between Skylar One and ServiceNow:
To avoid duplicate services, you should only use one of the above processes in the Skylar Automation user interface. The Skylar Automation application you use depends on in which application (Skylar One or ServiceNow) you initially configured your services, before syncing.
For example, if you have Business Services, IT Services, and Devices Services set up in Skylar One, you would use the "Sync Business Services from Skylar One to ServiceNow" application, and Skylar One would be the "source of truth" after the sync.
Syncing Business Services from Skylar One to ServiceNow
The Sync Business Services from Skylar One to ServiceNow application reads Business Services, IT Services, and Device Services from Skylar One and syncs them with business services in ServiceNow. This application creates and updates services, but it does not delete services.
The "Sync Business Services from Skylar One to ServiceNow" application does not currently support deleting or disconnecting services within ServiceNow. The application logs for the "Post to ServiceNow" step might contain information regarding disconnects, but you can ignore that information.
If a Device Service does not have a parent IT Service, the CMDB Group will be created, but the CI will not be created because of the way PowerFlow pulls each of those items. At the time of the Group creation, PowerFlow does not know if a service has a parent or not. At the time of the CI creation, PowerFlow does not directly pull Device Services; it only pulls Business Services and IT Services and their children.
Skylar Automation only syncs business services that are aligned with devices that are already synced with ServiceNow. Before setting up business service sync, you must first sync devices between Skylar One and ServiceNow.
To sync Skylar One business services with ServiceNow:
-
In ServiceNow, create an identifier rule for syncing services by typing "CI Identifiers" in the filter navigator and clicking on the Identifiers page.
- Complete the following fields:
- Name. Type a relevant name for this rule, such as "Business Service".
- Applies to. Select cmdb_ci_service.
- Independent. Select this option.
-
Right-click the gray header and click Save to save the record.
-
On the tab, click and add the relevant values from the Criterion attributes field for this business service, such as name, service_classification and correlation_id.
-
Click .
-
Repeat steps 4-5 for each identifier you want to add.
-
Go to the Applications page of the Skylar Automation user interface and run the "Cache ServiceNow Companies, CIs and Skylar One Orgs, Device Classes" application. This application reads all existing Skylar One Device Classes, Organizations, ServiceNow CIs, and Companies and writes them to a cache.
The "Cache ServiceNow Companies, CIs and Skylar One Orgs, Device Classes" application was removed from version 4.0.0 of the "ServiceNow CMDB" SyncPack and moved to the "ServiceNow Base" SyncPack version 4.0.0. In order to run the application, you must have version 4.0.0 of the "ServiceNow Base" SyncPack installed.
-
When that application completes, go to the Applications page and run the "Sync Devices from Skylar One to ServiceNow" application to sync devices and their properties and relationships from Skylar One to ServiceNow.
-
When that application completes, go to the Applications page and select the "Sync Business Services from Skylar One to ServiceNow" application.
-
Click to open the Configuration pane:

-
Complete the following fields, as needed:

-
Configuration. Select the relevant configuration object to align with this application. You cannot edit fields that are populated by the configuration object. Required.
The region field is populated by the configuration object you aligned with this application. If you need to update this value, you will need to define the region variable in the configuration object that is aligned with this application, or align a different configuration object that has the correct region value.
- read_timeout. Specify the maximum amount of time in seconds the application should wait for a response before timing out. The default is 20 seconds.
- sl1_chunk_size. Specify the number of services to include in each chunk sent to ServiceNow when you run this application. The default chunk size is 500.
- snow_request_limit. Specify the number of CIs fetched from ServiceNow in each request. The default is 500 objects per chunk.
- sl1_url_override. Specify a URL that is different from the standard Skylar One URL that gets sent to the ServiceNow CI record. Optional.
- business_service_ci_class. Specify the ServiceNow CI Class for Business Services. The default is cmdb_ci_service.
- it_service_ci_class. Specify the ServiceNow CI Class for IT Services. The default is cmdb_ci_service_technical.
- business_service_classification, it_service_classification, and device_service_classification. Use these fields to update the default service classifications. Optional.
- relationship_type. Specify the relationship type string to use between services. The default is Depends on::Used by.
- discovery_source. Specify the ServiceNow Discovery source. The default is "Other Automated".
- verify_snow_ssl. Toggle on (blue) this option to enable verification of the SSL certification when you run this application.
- snow_batch_size. Specify the total number of CIs being sent to ServiceNow in each triggered application. The default is 150 objects per batch.
- snow_chunk_size. Specify the number of CI objects to send in each chunk or in each sub-payload with a batch (specifed in the snow_batch_size field). The default is 150 objects per chunk or sub-payload.
- retry_max. The maximum number of times Skylar Automation will retry to execute the step before it stops retrying and logs a step failure. For example, if retry_max is 3, PowerFlow will retry after 1 second, then 2 seconds, then 4 seconds, and stop if the last retry fails. The default is 0.
- retry_backoff_max.The maximum time interval for the retry_backoff option, in seconds. For example, if you have retry_max set to 15, the delays will be 1, 2, 4, 8, 16, 32, 64, 120, 240, 480, 600, 600, 600, 600, and 600. The default is 600.
- Domain_Separation. Select this option if your ServiceNow environment is domain-separated, where the data, processes, and administrative tasks have been organized into logical groupings called domains. If your ServiceNow instance is domain-separated, the user listed in the snow_user field must be a member of the top domain and have access to all of the domains you intend to integrate. Also, ServiceNow should be the "source of truth" for organizations if your environment is domain-separated.
- Simulation_Mode. Select this option if you want to perform a simulated run of this application to show you the potential results of that run.
-
In the Company Mapping Override section, you can create a new mapping for the ServiceNow company field. You can override the company field with a different ServiceNow field where you can read and write the company_sys_id for CIs.
- Click . The Configuration pane automatically closes.
- Click to run the "Sync Business Services from Skylar One to ServiceNow" application.
Syncing Business Services from ServiceNow to Skylar One
The Sync Business Services from ServiceNow to Skylar One application syncs services that were defined in ServiceNow with Business Services in Skylar One. When you sync services from Service Now to Skylar One, Skylar Automation recreates the service structure in Skylar One, where you can see the relationships between the service components, the application components, and the infrastructure components. You can also sync any asset fields on the service using an attribute mapping on the Configuration pane.
Aspects of Syncing Business Services from ServiceNow to Skylar One
- This process syncs the business service structure or map from ServiceNow, and the device services created in Skylar One as the result of the sync can contain multiple devices.
- An aggregate service in Skylar One will only be created with services as children and a device service in Skylar One will only be created with devices as children.
- Depending on the actions taken in ServiceNow, an aggregate service can be inserted above or a device service may be inserted below certain services when the aggregate service is created in Skylar One.
- This process creates device services in Skylar One, but it does not create devices in Skylar One.
- Services are not merged in this process, so when you use the "Sync Business Services from ServiceNow to Skylar One" application, the "source of truth" will be set to ServiceNow, not Skylar One.
- If a ServiceNow service has no child services or child devices, that service will not be created in Skylar One.
- If a ServiceNow service was previously synced to Skylar One when it was not empty, but it is now an empty service ServiceNow, the service is deleted in Skylar One.
The following tables in ServiceNow are treated as services in a sync to Skylar One:
- cmdb_ci_service
- cmdb_ci_service_technical
- cmdb_ci_query_based_service
- cmdb_ci_service_discovered
- cmdb_ci_service_auto
- cmdb_ci_service_group
- service_offering
- cmdb_ci_service_manual
- cmdb_ci_service_calculated
All other tables will be treated as devices.
The cmdb_ci_query_based_service table contains the device services within ServiceNow. For any other service with a CI as a direct child, a device service will be inserted in between this service and the child CI in Skylar One.
Syncing services from ServiceNow to Skylar One requires Skylar One 10.2.0 or later.
To sync ServiceNow services with Skylar One Business Services:
-
In ServiceNow, configure your business service structure or map so it is ready to by synced to Skylar One:

-
For each service that you want to sync with Skylar One:
-
Ensure that the Skylar One Region field in ServiceNow matches the region field in Skylar Automation.
-
Set the Skylar One Monitored flag to True.
-
-
Go to the Applications page of the Skylar Automation user interface and run the "Cache ServiceNow Companies, CIs and Skylar One Orgs, Device Classes" application. This application reads all existing Skylar One Device Classes, Organizations, ServiceNow CIs, and Companies and writes them to a cache.

The "Cache ServiceNow Companies, CIs and Skylar One Orgs, Device Classes" application was removed from version 4.0.0 of the "ServiceNow CMDB" SyncPack and moved to the "ServiceNow Base" SyncPack version 4.0.0. In order to run the application, you must have version 4.0.0 of the "ServiceNow Base" SyncPack installed.
-
When that application completes, go to the Applications page and run the "Sync Devices from Skylar One to ServiceNow" application to enable Skylar Automation to use the mappings and additional attribute options from Device Sync.
-
When that application completes, go to the Applications page and select the "Sync Business Services from ServiceNow to Skylar One" application.
-
Click (
 ) to open the Configuration pane:
-
Complete the following fields, as needed:
-
Configuration. Select the relevant configuration object to align with this application. You cannot edit fields that are populated by the configuration object. Required.
The region field is populated by the configuration object you aligned with this application. If you need to update this value, you will need to define the region variable in the configuration object that is aligned with this application, or align a different configuration object that has the correct region value.
-
read_timeout. Specify the maximum amount of time in seconds the application should wait for a response before timing out. The default is 20 seconds.
-
verify_snow_ssl. Toggle on (blue) this option to enable verification of the SSL certification when you run this application.
-
attribute_map. In this section, click if you want to create a mapping for any other asset fields that you want to sync between Skylar One (the first column) and ServiceNow (the second column).
-
-
In the Company Mapping Override section, you can create a new mapping for the ServiceNow company field. You can override the company field with a different ServiceNow field where you can read and write the company_sys_id for CIs.
-
Click . The Configuration pane automatically closes.
-
Click to run the application. When the application completes, the ServiceNow business services will be available on the Business Services page of Skylar One:


Syncing CI Attributes from ServiceNow to Skylar One
The "Sync CI Attributes from ServiceNow to Skylar One" application imports CI attributes from ServiceNow to the relevant asset and attribute fields in Skylar One. The CI Sync supports assets, asset configuration, asset maintenance, location, production statuses, and custom attributes.
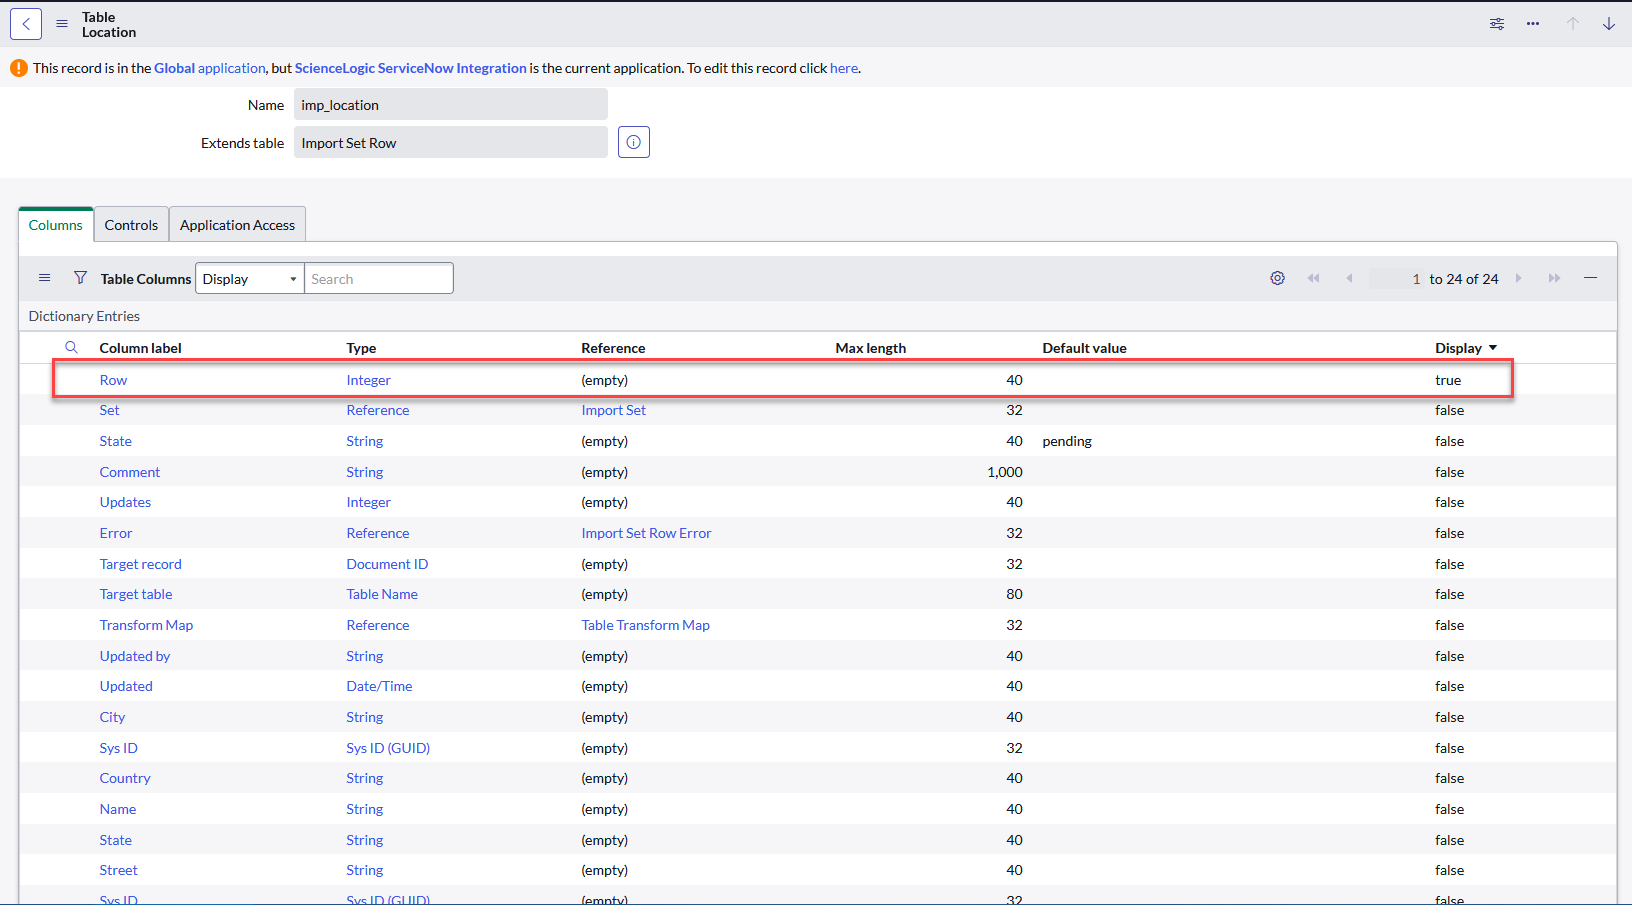
The "Sync CI Attributes from ServiceNow to Skylar One" application can sync the display value and sys_id of Reference fields, such as location, as well as the value and label of Choice List fields, such as operational_status. These values can be accessed by appending _label to the desired field name.
Reference Example:
"location": "240f6630db993300dc44f00fbf96196f"
"location_label": "Corporate Headquarters"
Choice List Example:
"operational_status": "1",
"operational_status_label": "Operational",
The following image shows the Location table, and the Display column shows the Name marked as true. Only one field on the table can be marked as true, and that is the field that will be returned to Skylar Automation :
When this application runs, if no mappings are provided, Skylar Automation queries the "Sync Devices from Skylar One to ServiceNow" application and uses the mappings from that application.
To sync CI attributes from ServiceNow to Skylar One:
-
Go to the Applications page of the Skylar Automation user interface and run the "Cache ServiceNow Companies, CIs and Skylar One Orgs, Device Classes" application. This application reads all existing Skylar One Device Classes, Organizations, ServiceNow CIs, and Companies and writes them to a cache.
The "Cache ServiceNow Companies, CIs and Skylar One Orgs, Device Classes" application was removed from version 4.0.0 of the "ServiceNow CMDB" SyncPack and moved to the "ServiceNow Base" SyncPack version 4.0.0. In order to run the application, you must have version 4.0.0 of the "ServiceNow Base" SyncPack installed.
-
When that application completes, go to the Applications page and run the "Sync Devices from Skylar One to ServiceNow" application to enable Skylar Automation to use the mappings and additional attribute options from Device Sync.
-
When that application completes, go to the Applications page and run the "Sync CI Attributes from ServiceNow to Skylar One" application.
-
Click . The Configuration pane appears:

-
Complete the following fields, as needed:

-
Configuration. Select the configuration object with the relevant Skylar One and ServiceNow credentials to align with this application. You cannot edit fields that are populated by the configuration object. Required.
The region field (along with other fields related to user names and passwords) is populated by the configuration object you aligned with this application. If you need to update this value, you will need to define the region variable in the configuration object that is aligned with this application, or align a different configuration object that has the correct region value.
-
read_timeout. Specify the maximum amount of time in seconds that the application should wait for a response before timing out. The default is 20 seconds
-
chunk_size. Specify the number of devices to include in each chunk sent to ServiceNow when you run this application. The default chunk size is 500 devices.
-
Include_Orgs. If you want to include Skylar One Organizations in the sync, add the Organization IDs from Skylar One in this field, separated by commas. Leave this field empty to sync all Skylar One Organizations. This option filters on the ServiceNow CI sync as well as the Skylar One Device sync.
-
Include_CUGs. If you want to include Skylar One Collector Groups (CUGs) in the sync, add the Collector Group IDs from Skylar One in this field, separated by commas. Leave this field empty to sync all Skylar One Collector Groups.
-
snow_request_limit. Specify the number of CIs fetched from ServiceNow in each request. The default is 500 objects per chunk.
-
retry_max. The maximum number of times Skylar Automation will retry to execute the step before it stops retrying and logs a step failure. For example, if retry_max is 3, PowerFlow will retry after 1 second, then 2 seconds, then 4 seconds, and stop if the last retry fails. The default is 0.
-
retry_backoff_max.The maximum time interval for the retry_backoff option, in seconds. For example, if you have retry_max set to 15, the delays will be 1, 2, 4, 8, 16, 32, 64, 120, 240, 480, 600, 600, 600, 600, and 600. The default is 600.
-
verify_snow_ssl. Toggle on (blue) this option to enable verification of the SSL certification when you run this application.
-
sync_empty_fields. Select this option if you want to include empty fields on ServiceNow CIs when you run this application. This option is disabled by default.
Skylar One does not return extended custom attributes for devices if no value is present. As a result, if the value for the custom attribute is empty in ServiceNow, Skylar Automation will continually send updates for those devices, because the empty value written to is not returned in subsequent runs of the application. When the sync_empty_fields option is selected, the application sends a 0 or '', depending on the attribute type for the custom attributes in the mappings for all devices.
-
snow_attributes_created. Select this option to show that custom attributes for ServiceNow sys_id and ci_class already existing in Skylar One.
-
retry_jitter. When selected, instead of using a defined interval between retries, Skylar Automation will retry the step execution at random intervals. The default is unselected.
-
retry_backoff. When selected, instead of using a defined interval between retries, Skylar Automation will incrementally increase the interval between retries. The default is unselected.
-
gql_filter. Specify a custom GraphQL filter to apply to the devices in the sync. An example of a Device Search GraphQL query is: {"name": {"doesNotBeginWith": "jc-is-ma"}}
-
In the Mappings section, click the button (Skylar Automation 2.7.0 or later) or the expand button (
 ) to view and edit the mappings between ServiceNow CI classes and Skylar One device classes. You can map a single ServiceNow CI class with multiple Skylar One device classes.
 If no mappings are provided in this section, the application will only pull CI classes provided in the "Sync Devices from Skylar One to ServiceNow" application. If you add mappings in this section, only CI classes that were included in this section will be returned from ServiceNow.
For more information about how to view, edit, and create mappings, see Editing Mappings in a Skylar Automation Application. This topic also covers how to use the Company Mapping Override and the Attribute Mappings sections, below.
-
In the Company Mapping Override section, you can create a new mapping for the ServiceNow company field. You can override the company field with a different ServiceNow field where you can read and write the company_sys_id for CIs.
-
In the Attribute Mappings section, click the button (Skylar Automation 2.7.0 or later) or the expand button (
) to view and edit mappings for any other custom attributes you want to sync between Skylar One (the first column) and ServiceNow (the second column). For more information, including lists of default and available device attribute mappings, see Device Attribute Mappings.To sync a user-defined field on the ServiceNow CI record to the device notes table in Skylar One, create a custom attribute mapping for that field in this section. This option works best if you only want a single value synced over so that value can remain in the notes.
For the Attribute Mappings section, you can use a Jinja2 Template for device attribute fields on the Skylar One side (the left column). For more information, see Using a Jinja2 Template.
When an attribute value is "0" in Skylar One, the corresponding field in ServiceNow might display as empty.
-
Click . The Configuration pane automatically closes.
- Click to run the "Sync CI Attributes from ServiceNow to Skylar One" application.
Creating a Link in a Skylar One Device to a ServiceNow CI
To help you mange your Skylar One devices and their corresponding ServiceNow CIs, you can create a link in a Skylar One Device that goes directly to the synced CI in ServiceNow.
The "Create Custom Attributes and ServiceNow Custom Link in Skylar One" PowerFlow application creates servicenow_sys_id and servicenow_ci_class custom device attributes in Skylar One, and then Skylar One uses those two attributes to create a custom link in Skylar One titled ServiceNow that redirects to the ServiceNow CI.
In Skylar One, the link appears as a custom link on the Tools menu for the corresponding device:

The application only creates the custom attributes if the attributes do not already exist. Additionally, if the custom link functionality is disabled by default on Skylar One, the application will enable the feature before creating the necessary attributes and link.
To create a link for the Skylar One device:
- In the PowerFlow user interface, go to the Applications page and open the "Sync CI Attributes from ServiceNow to Skylar One to ServiceNow" application.
- Click the button. The Configuration pane appears.
- Enable the snow_attributes_created toggle and click .
- Click to run the application.
- On the Applications page, open the "Create Custom Attributes and ServiceNow Custom Link in Skylar One" PowerFlow application, align a configuration object if needed, and click to run the application.
You only need to run the "Create Custom Attributes and ServiceNow Custom Link in Skylar One" application once.
Adding Related Items and Lists to the CI Record in ServiceNow
In ServiceNow you can add Related Items and Related Lists to CI records so you can see all related records in ServiceNow. The following image shows the Related Items pane on a CI record for a VMware Virtual Machine Instance:

The following image shows how to add Related Items for a VMware Virtual Machine instance by selecting the CI relations option.

The following image shows the related lists for network adapters and files systems:

The items highlighted by the red boxes below are the most commonly used items:

For more information, see the ServiceNow Documentation at https://docs.servicenow.com/bundle/paris-platform-user-interface/page/use/using-forms/concept/c_RelatedLists.html.
Deleting Devices
The "Delete Devices from Skylar One" application lets you delete devices in a specific Virtual Collector Group (VCUG) if those devices have not been modified in Skylar One for a specified time, such as one day or five days. You can update this time in the max_age configuration value, which is described below.
To delete devices from a Skylar One Virtual Collector Group:
- In the Skylar Automation user interface, run the "Sync Service Requests from ServiceNow to Skylar One" application to pull a list of decommissioned devices that you no longer want to monitor.
The "Sync Service Requests from ServiceNow to Skylar One" application was removed from version 4.0.0 of the "ServiceNow CMDB" SyncPack and moved to the "ServiceNow Service Catalog" SyncPack version 2.0.0. In order to run the application, you must have version 2.0.0 of the "ServiceNow Service Catalog" SyncPack installed.
-
On the Applications page, select the "Delete Devices from Skylar One" application and click on the application detail page. The Configuration page appears:


- Complete the following fields, as needed:
- Configuration. Select the relevant configuration object to align with this application. You cannot edit fields that are populated by the configuration object. Required.
- read_timeout. Specify the maximum amount of time in seconds the application should wait for a response before timing out. The default is 20 seconds.
- max_age. Specify how long (in days) that you want to keep the devices in the VCUG before deleting the devices. The default is 0 days. If this setting is 0, all devices in the VCUG will be deleted as soon as this application runs. If this setting is null, the application will fail. If all device children are in the same VCUG, the application will delete the target device and all of its children.
-
target_vcug. Specify the ID of the Skylar One Virtual Collection Group (VCUG) you created to hold the devices on the Collector Group Settings page (System > Settings > Collector Groups). Set this value to -1 if you want this applications to use the target_vcug value from the "Sync Service Requests from ServiceNow to Skylar One" application.
If you specify a value to target_vcug here, the "Delete Devices from Skylar One" application will use that value instead of the target_vcug value from the "Sync Service Requests from ServiceNow to Skylar One" application.
- Click . The Configuration pane automatically closes.
- Click to run the application.
Syncing File Systems from Skylar One to ServiceNow
You can map and sync file systems in much the same way you sync devices between Skylar One and ServiceNow. The "Sync File Systems from Skylar One to ServiceNow" application reads file systems discovered in Skylar One and then maps them to a parent CI record in ServiceNow.
For a file system to be synced from Skylar One to ServiceNow, the class of the file system's parent device must be included in the mappings parameters for the "Sync Devices from Skylar One to ServiceNow" application. File systems with parent CIs that have className values of cmdb_ci_ip_switch" or cmdb_ci_ip_router" will be sent to ServiceNow, but by default they will not be created in ServiceNow due to missing relationship information.
Skylar Automation only syncs file systems that are aligned with devices that are already synced with ServiceNow. Before setting up file system sync, you must first sync devices between Skylar One and ServiceNow.
To sync Skylar One file systems with ServiceNow:
- In the Skylar Automation user interface, go to the Applications page and run the "Cache ServiceNow Companies, CIs and Skylar One Orgs, Device Classes" application to read all existing Skylar One Device Classes, Organizations, ServiceNow CIs, and Companies and write them to a cache.
The "Cache ServiceNow Companies, CIs and Skylar One Orgs, Device Classes" application was removed from version 4.0.0 of the "ServiceNow CMDB" SyncPack and moved to the "ServiceNow Base" SyncPack version 4.0.0. In order to run the application, you must have version 4.0.0 of the "ServiceNow Base" SyncPack installed.
- When that application completes, go to the Applications page and select the "Sync File Systems from Skylar One to ServiceNow" application.
-
Click to open the Configuration pane.
-
Complete the following fields, as needed:
-
Configuration. Select the relevant configuration object to align with this application. You cannot edit fields that are populated by the configuration object. Required.
-
Include_Orgs. If you want to include a specific set of Skylar One Organizations in the sync, add the Organization IDs from the Skylar OneOrganizations page (Registry > Accounts > Organizations) in this field, separated by commas. If this field is enabled, Skylar Automation will pull only the Organizations listed in this field; Skylar Automation does not pull all Organizations and then drop those not on the list. Leave this field empty to sync all Skylar One Organizations. Optional.
-
snow_request_limit. Specify the number of objects fetched from ServiceNow in each request. The default is 500 objects per chunk.
-
read_timeout. Specify the maximum amount of time in seconds the application should wait for a response before timing out. The default is 30 seconds.
-
disconnect_field. Acts as the boolean field on the Configuration Items table to determine "True/False" for the Skylar One monitoring status.
-
snow_batch_size. Specify the total number of objects being sent to ServiceNow in each triggered application. The default is 150 objects per batch.
-
discovery_source. Specify the ServiceNow Discovery source. The default is "Other Automated".
-
snow_chunk_size. Specify the number of objects to send in each chunk or in each sub-payload with a batch (specifed in the snow_batch_size field). The default is 150 objects per chunk or sub-payload.
-
retry_max. The maximum number of times Skylar Automation will retry to execute the step before it stops retrying and logs a step failure. For example, if retry_max is 3, PowerFlow will retry after 1 second, then 2 seconds, then 4 seconds, and stop if the last retry fails. The default is 0.
-
retry_backoff_max.The maximum time interval for the retry_backoff option, in seconds. For example, if you have retry_max set to 15, the delays will be 1, 2, 4, 8, 16, 32, 64, 120, 240, 480, 600, 600, 600, 600, and 600. The default is 600.
-
include_hidden. Select this option to sync hidden file systems. This filter is only applied on the Skylar One side of the sync. By default, this option is not selected.
-
include_stale. Select this option to sync stale file systems. This filter is only applied on the Skylar One side of the sync. By default, this option is not selected.
Be cautious when applying these include options, as enabling one or both options might cause unwanted disconnects if the File System Sync is run with these options enabled and then run with the options disabled.
-
sync_unsupported_file_systems. Toggling this on will allow file systems that have a parent device class of Network.Switch or Network.Router to sync when the application is run.
-
Domain_Separation. Select this option if your ServiceNow environment is domain-separated, where the data, processes, and administrative tasks have been organized into logical groupings called domains. If your ServiceNow instance is domain-separated, the user listed in the snow_user field must be a member of the top domain and have access to all of the domains you intend to integrate. Also, ServiceNow should be the "source of truth" for organizations if your environment is domain-separated.
-
change_fs_organizations. Toggle on (blue) this option to allow file systems to change companies with an Interface Sync if the companies are within the same domain in ServiceNow. If you change the Organization/Company and another field, but do not enable this parameter, Skylar Automation will not apply any changes to the file system. By default, this option is not selected.
-
drop_company. Toggle on (blue) this option to remove the sys_id in existing companies from the sync. This will prevent the "Company" field from sending to ServiceNow. This option has no effect if the domain_separation parameter is enabled for this application. By default, this option is not selected.
If you select this option, the ServiceNow company sys_id for the file system and the Skylar One organization crm_id for the Skylar One device will not be compared when determining if an update has occurred. Do not select this option if you selected the Domain_Separation option, as ServiceNow requires PowerFlow to send the "company" field in domain-separated environments. Also, do not select this option if you selected the change_interface_organizations option, as changing the company for a file system in ServiceNow requires the "company" field to be sent.
-
verify_snow_ssl. Toggle on (blue) this option to enable verification of the SSL certification when you run this application.
-
sl1_org_filter_only. Toggle on (blue) this option to apply the organization filter to only the Skylar One side of the data pull.
Enabling this toggle will only apply organization filtering to the Skylar One side of the data pulls, while all file systems for the provided region in ServiceNow will be returned. Be cautious using this option, as enabling it may cause unwanted disconnects in ServiceNow.
-
generate_report. Select this option to create a "Sync File Systems from Skylar One to ServiceNow" report. This report contains counts of the number of file systems gathered from Skylar One and ServiceNow, the number of unchanged file systems, and the number of creations, updates, and disconnects sent to ServiceNow. Detailed file system information for the file systems sent to ServiceNow is also displayed. Finally, the report contains file systems that are in an unsupported format. The reports are available on the Reports page of the Skylar Automation user interface.
Due to the differences between how Skylar One and ServiceNow discover file systems, only certain formats of file systems contained in the Skylar One database will be synced to ServiceNow. Only file systems where the name and the mount point can be determined from the name database field stored in the Skylar One will be synced.
- Simulation_Mode. Select this option if you want to perform a simulated run of this application to show you the potential results of that run.
- retry_jitter. When selected, instead of using a defined interval between retries, the PowerFlow system will retry the step execution at random intervals. By default, this option is not selected.
- retry_backoff. When selected, instead of using a defined interval between retries, Skylar Automation will incrementally increase the interval between retries. By default, this option is not selected.
- disconnect_type. Specify the disconnect method for disconnecting Skylar One entities from ServiceNow. Enter either flip_boolean_field or remove_sources_entry to determine the behavior for disconnects.
-
In the Company Mapping Override section, you can create a new mapping for the ServiceNow company field. You can override the company field with a different ServiceNow field where you can read and write the company_sys_id for CIs.
-
In the Attribute Mappings section, click the button (Skylar Automation 2.7.0 or later) or the expand button (
) to view and edit the mappings for any other custom device attributes you want to sync between Skylar One (the first column) and ServiceNow (the second column). When an attribute value is "0" in Skylar One, the corresponding field in ServiceNow might display as empty.
-
Click . The Configuration pane closes.
-
Click to run the application.
Syncing Installed Software between Skylar One and ServiceNow
You can use the following application to sync your installed software assets between and ServiceNow:
- "Sync Installed Software from Skylar One to ServiceNow". Reads all software packages from Skylar One and creates new CIs in ServiceNow. Reads all available software packages from Skylar One and the devices aligned to that software by region and syncs them with ServiceNow.
The application does not currently support domain separation.
The Software Asset Management (SAM) application in ServiceNow is not supported with the current level of installed software data acquired with Skylar One. As a result, syncing installed software data with ServiceNow Discovery and other Software Asset Management software is not currently supported.
To sync installed software between Skylar One and ServiceNow:
- Make sure that you have recently run the "Sync Devices from Skylar One to ServiceNow" application to populate the device cache.
- In the Skylar Automation user interface, go to the Applications page and select the "Sync Installed Software from Skylar One to ServiceNow" application.
-
Click (
) to open the Configuration pane:

- Complete the following fields, as needed:
-
Configuration. Select the relevant configuration object to align with this application. You cannot edit fields that are populated by the configuration object. Required.
The region field is populated by the configuration object you aligned with this application. If you need to update this value, you will need to define the region variable in the configuration object that is aligned with this application, or align a different configuration object that has the correct region value.
-
read_timeout. Specify the maximum amount of time in seconds the application should wait for a response before timing out. The default is 20 seconds.
-
snow_request_limit. Specify the number of objects fetched from ServiceNow in each request. The default is 500 objects per chunk.
-
snow_chunk_size. Specify the number of objects to send in each chunk. The default is 150 objects per chunk.
-
verify_snow_ssl. Toggle on (blue) this option to enable verification of the SSL certification when you run this application.
- region. The region value is populated by the configuration object you selected. The region value must match the value in the SL_Region field in ServiceNow. If you need to update this value, you will need to define the region variable in the configuration that is aligned with this application, or align a different configuration that has the correct region value.
- chunk_size. Specify the number of services to include in each chunk sent to ServiceNow when you run this application. The default chunk size is 500.
-
Click and wait for the "App & Config modifications saved" pop-up message to appear. The Configuration pane automatically closes after this message appears.
- Click (
 ) to run the application.
Syncing Interfaces from Skylar One to ServiceNow
You can map and sync network interfaces in much the same way you sync devices between Skylar One and ServiceNow. The "Sync Interfaces from Skylar One to ServiceNow" application collects interface data from ServiceNow and Skylar One and runs multiple CI syncs for each interface to be synced.
Version 3.5.0 and later of this SyncPack requires Skylar One version 11.2.0 or later.
The speed of ServiceNow processing is reduced by ServiceNow errors generated when consuming payloads. If you experience slow processing or "maximum execution time exceeded" messages, you must review and address any ServiceNow errors reported to resolve. If there are significant ServiceNow errors in Device Sync, those errors will also impact Interface sync processing. When running dependent syncs at large scale, such as Interface Sync and Device Sync, ScienceLogic recommends that you run them serially, not at the same time. Running both syncs at the same time will greatly hinder ServiceNow processing and scalability.
Skylar Automation only syncs network interfaces that are aligned with devices that are already synced with ServiceNow. Before setting up network interface sync, you must first sync devices between Skylar One and ServiceNow.
To sync Skylar One network interfaces with ServiceNow:
-
In the Skylar Automation user interface, go to the Applications page and run the "Cache ServiceNow Companies, CIs and Skylar One Orgs, Device Classes" application to read all existing Skylar One Device Classes, Organizations, ServiceNow CIs, and Companies and write them to a cache.
The "Cache ServiceNow Companies, CIs and Skylar One Orgs, Device Classes" application was removed from version 4.0.0 of the "ServiceNow CMDB" SyncPack and moved to the "ServiceNow Base" SyncPack version 4.0.0. In order to run the application, you must have version 4.0.0 of the "ServiceNow Base" SyncPack installed.
-
When that application completes, go to the Applications page and select the "Sync Interfaces from Skylar One to ServiceNow" application.
-
Click . The Configuration pane appears:

-
Complete the following fields, as needed:

-
Configuration. Select the relevant configuration object to align with this application. You cannot edit fields that are populated by the configuration object. Required.
The region field (along with other fields related to user names and passwords) is populated by the configuration object you aligned with this application, using the Configuration field. If you need to update this value, you will need to define the region variable in the configuration object aligned with this application, or align a different configuration object that has the correct region value.
- sl1_chunk_size. Specify the number of interfaces to pull from Skylar One in each chunk. The default is 500.
- read_timeout. Specify the maximum amount of time in seconds the application should wait for a response before timing out.
- disconnect_field. Acts as the boolean field on the Configuration Items table to determine "True/False" for the Skylar One monitoring status.
-
Include_Orgs. If you want to include a specific set of Skylar One Organizations in the interface sync, add the Organization IDs from the Skylar OneOrganizations page (Registry > Accounts > Organizations) in this field, separated by commas. If this field is enabled, Skylar Automation will pull only the Organizations listed in this field; Skylar Automation does not pull all Organizations and then drop those not on the list. Leave this field empty to sync all Skylar One Organizations. Optional.
A misconfiguration in the Include Orgs field field might change the monitoring flag for one or more devices. In other words, a misconfiguration in this field could switch the Skylar One Monitored flag from "true" to "false", removing that interface or interfaces from the device sync.
- snow_request_limit. Specify the number of objects fetched from ServiceNow in each request. The default is 500 objects per chunk.
- snow_batch_size. Specify the total number of objects being sent to ServiceNow in each triggered application. The default is 150 objects per batch.
- discovery_source. Specify the ServiceNow Discovery source. The default is "Other Automated".
- snow_chunk_size. Specify the number of objects to send in each chunk or in each sub-payload with a batch (specifed in the snow_batch_size field). The default is 150 objects per chunk or sub-payload.
- max_count_for_relationships. Specify the maximum number of device IDs to query for sets of relationships in a single chunk from Skylar One.
- retry_max. The maximum number of times Skylar Automation will retry to execute the step before it stops retrying and logs a step failure. For example, if retry_max is 3, PowerFlow will retry after 1 second, then 2 seconds, then 4 seconds, and stop if the last retry fails. The default is 0.
- retry_backoff_max.The maximum time interval for the retry_backoff option, in seconds. For example, if you have retry_max set to 15, the delays will be 1, 2, 4, 8, 16, 32, 64, 120, 240, 480, 600, 600, 600, 600, and 600. The default is 600.
- enabled_only. Select this option only sync enabled interfaces. When enabled, this filter is applied to both the Skylar One and ServiceNow side pulls. By default, this option is not selected.
- override_snow_mappings. Toggle on to send all interfaces to the "cmdb_ci_network_adapter" table in ServiceNow, ignoring the user-entered IANA type mappings and skipping the hardcoded mappings. However, the interface will be ignored if it is missing the required fields to be correctly created and identified in ServiceNow on the cmdb_ci_network_adapter table. The required fields are "ip", "macAddress", and"hardwareDescription".
If the override_snow_mappings toggle is toggled off, the following IANA types have hard-coded mappings that cannot be overwritten. This is done to match ServiceNow discovery:
-
"ethernetCsmacd"
-
If the parent type is "Servers", maps to the cmdb_ci_network_adapter table in ServiceNow
-
If the parent type is "Network.Firewall", maps to the cmdb_ci_network_adapter table in ServiceNow
-
If the parent type is "Network.Switches", maps to the cmdb_ci_network_adapter and dscy_switchport tables in ServiceNow
-
If the parent type is "Network.Router", maps to the cmdb_ci_network_adapter and dscy_router_interface tables in ServiceNow
-
If the parent type is "Network.Balancers", maps to the cmdb_ci_network_adapter and cmdb_ci_lb_vlan tables in ServiceNow
-
-
"slip"
-
If the parent type is "Network.Switches", maps to the dscy_switchport table in ServiceNow
-
-
"propVirtual"
-
If the parent type is "Network.Switches", maps to the cmdb_ci_network_adapter and dscy_swtch_partition tables in ServiceNow
-
If the parent type is "Network.Router", maps to the cmdb_ci_network_adapter and dscy_swtch_partition tables in ServiceNow
-
-
"tunnel"
-
If the parent type is "Network.Router", maps to the cmdb_ci_network_adapter table in ServiceNow
-
- Domain_Separation. Select this option if your ServiceNow environment is domain-separated, where the data, processes, and administrative tasks have been organized into logical groupings called domains. If your ServiceNow instance is domain-separated, the user listed in the snow_user field must be a member of the top domain and have access to all of the domains you intend to integrate. Also, ServiceNow should be the "source of truth" for organizations if your environment is domain-separated. By default, this option is not selected.
- change_interface_organizations. Toggle on (blue) this option to allow interfaces to change companies with an Interface Sync if the companies are within the same domain in ServiceNow. If you change the Organization/Company and another field, but do not enable this parameter, Skylar Automation will not apply any changes to the interface. By default, this option is not selected.
- drop_company. Toggle on (blue) this option to remove the sys_id in existing companies from the sync. This will prevent the "Company" field from sending to ServiceNow. This option has no effect if the domain_separation parameter is enabled for this application. By default, this option is not selected. If you select this option, the ServiceNow company sys_id for the interface and the Skylar One organization crm_id for the Skylar One device will not be compared when determining if an update has occurred. Do not select this option if you selected the Domain_Separation option, as ServiceNow requires PowerFlow to send the "company" field in domain-separated environments. Also, do not select this option if you selected the change_interface_organizations option, as changing the company for an interface in ServiceNow requires the "company" field to be sent.
- verify_snow_ssl. Toggle on (blue) this option to enable verification of the SSL certification when you run this application.
- generate_report. Select this option to create a "Sync Interfaces from Skylar One to ServiceNow" report. This report contains counts of the number of interfaces gathered from Skylar One and ServiceNow, the number of unchanged interfaces, as well as the number of creations, updates, and disconnects sent to ServiceNow. Detailed interface information for the interfaces sent to ServiceNow is also displayed. The reports are available on the Reports page of the Skylar Automation user interface.
- Simulation_Mode. Select this option if you want to perform a simulated run of this application to show you the potential results of that run. This option is not selected by default.
- enable_advanced_topology. Select this option to allow the pull and process advanced topology step to be executed when the sync is run. If disabled, this step will be skipped. This toggle defaults to a value of False.
- disconnect_type. Specify the disconnect method for disconnecting Skylar One entities from ServiceNow. Enter either flip_boolean_field or remove_sources_entry to determine the behavior for disconnects.
- retry_jitter. When selected, instead of using a defined interval between retries, the PowerFlow system will retry the step execution at random intervals. By default, this option is not selected.
- retry_backoff. When selected, instead of using a defined interval between retries, Skylar Automation will incrementally increase the interval between retries. By default, this option is not selected.
- gql_filter. Using JSON, you can optionally define a custom GraphQL filter to apply to the interfaces in the sync. To test out a GraphQL filter, go to the GraphiQL interface in Skylar One by typing the URL or IP address for Skylar One in a browser, add /gql to the end of the URL or IP address, and press . Search the built in GraphQL docs for InterfaceSearch and determine how to set up your custom filter.
- interface_table_relations. Using JSON, define the relationship for any ServiceNow tables used in the mappings parameter, below. If a table is included in the mappings, but the relationship is not defined in the interface_table_relations, the Interface Sync application will fail.
- interface_advanced_mappings. Using JSON, define the mappings for the combination of interface IANA type and parent device type to a specific ServiceNow table. This configuration option is blank by default, and must be configured to define the combination of specific mappings for splitting relationships.
An example value for the interface_advanced_mappings field is as follows: { "ethernetCsmacd": { "Servers": [ "dscy_router_interface" ], "System.Skylar One": [ "cmdb_ci_network_adapter", "dscy_router_interface" ] }, "l2vlan": { "Network.Router": [ "dscy_router_interface" ] } }. In this example, an additional split is added to the ethernetCsmacd / Servers mapping. This will cause the two server splits (even if one is thrown out) to be tagged as "duplicates", which will affect the relationships they defined. Additionally, a new parent device type mapping of System.Skylar One to ethernetCsmacd is added. Also, a new IANA/parent device type mapping is added for 12vlan.
The hardcoded mappings will take priority and cannot be overwritten. If accidentally added to the user-inputted mappings, it will be ignored. The tables defined in the advanced mappings must be one of the following:
[
"cmdb_ci_network_adapter",
"dscy_switchport",
"dscy_router_interface",
"dscy_swtch_partition",
"cmdb_ci_lb_vlan",
]
The tables defined in the mappings have required fields (field names are Skylar One interface fields) which cannot be ignored. Any interface missing these fields will be thrown out:
{
"cmdb_ci_network_adapter": ["ip", "macAddress", "hardwareDescription"],
"dscy_switchport": ["index"],
"dscy_router_interface": ["macAddress", "hardwareDescription"],
"dscy_swtch_partition": ["index"],
"cmdb_ci_lb_vlan": ["hardwareDescription"],
}
- interface_relation_mappings. Using JSON, define which specific interface relationships to send to ServiceNow. This configuration option is blank by default, and must be configured to define the relationships you want to send directly.
-
In the Mappings section, click the button (Skylar Automation 2.7.0 or later) or the expand button (
) to view and edit the mappings between specific Skylar One interface types to different tables in ServiceNow. These mappings can be used to send an IANA type to a specific ServiceNow table if its parent is not included in the hardcoded list above. The hard-coded mappings will supersede any user-input mappings.For more information about how to view, edit, and create mappings, see Editing Mappings in a Skylar Automation Application. This topic also covers how to use the Company Mapping Override and the Attribute Mappings sections, below.
-
In the Company Mapping Override section, you can create a new mapping for the ServiceNow company field. You can override the company field with a different ServiceNow field where you can read and write the company_sys_id for CIs.
-
In the Attribute Mappings section, click the Edit button to view and edit the mappings for any other custom device attributes you want to sync between Skylar One (the first column) and ServiceNow (the second column).
When an attribute value is "0" in Skylar One, the corresponding field in ServiceNow might display as empty.
-
Click . The Configuration pane closes.
-
Click to run the application.
-
When the application completes, go to ServiceNow and type "cmdb_ci_network_adapter.list". The Network Adapters page appears with a list of synced interfaces.
-
You can add additional columns to this page using the Update Personalized List button (
 ) to add columns like Operational status, which is synced from Skylar One. The Operational status value is different from the value, but Skylar Automation tracks both values.
 -
Select a network interface from the list tab to see more information about the interface.
Scheduling Skylar Automation Applications
Using the Skylar Automation user interface, you can configure Skylar Automation applications to run on a schedule instead of manually running the applications. As a best practice, if you use any of these applications, ScienceLogic recommends that you schedule those applications, in the following order:
- "Cache ServiceNow Companies, CIs and Skylar One Orgs, Device Classes"
The "Cache ServiceNow Companies, CIs and Skylar One Orgs, Device Classes" application was removed from version 4.0.0 of the "ServiceNow CMDB" SyncPack and moved to the "ServiceNow Base" SyncPack version 4.0.0. In order to run the application, you must have version 4.0.0 of the "ServiceNow Base" SyncPack installed.
- "Sync Devices from Skylar One to ServiceNow"
- "Sync Interfaces from Skylar One to ServiceNow"
ScienceLogic recommends that you schedule these applications to run at least every 23 hours. You can also schedule additional applications as needed.
You can create one or more schedules for a single application in the Skylar Automation user interface. When creating each schedule, you can specify the queue and the configuration file for that application.
To schedule an application:
-
On the Applications page (
 ), click the button for the application you want to schedule. The Schedule window appears, displaying any existing schedules for that application:
If you set up a schedule using a cron expression, the details of that schedule display in a more readable format in this list. For example, if you set up a cron expression of */4 * * * *, the schedule on this window includes the cron expression along with an explanation of that expression: "Every 0, 4, 8, 12, 16, 20, 24, 28, 32, 36, 40, 44, 48, 52, and 56th minute past every hour".

- Select a schedule from the list to view the details for that schedule.
-
Click the + icon to create a schedule. A blank Schedule window appears:


- In the Schedule window, complete the following fields:
- Schedule Name. Type a name for the schedule.
- Switch to. Use this toggle to switch between a cron expression and setting the frequency in seconds.
- Cron expression. Select this option to schedule the application using a cron expression. If you select this option, you can create complicated schedules based on minutes, hours, the day of the month, the month, and the day of the week. As you update the cron expression, the Schedule window displays the results of the expression in more readable language, such as Expression: "Every 0 and 30th minute past every hour on the 1 and 31st of every month", based on */30 * * /30 * *.
- Frequency in seconds. Type the number of seconds per interval that you want to run the application.
- Custom Parameters. Type any JSON parameters you want to use for this schedule, such as information about a configuration file or mappings. The values in this field will override any application variables that exist in the PowerFlow application you are scheduling.
-
Click . The schedule is added to the list of schedules on the initial Schedule window. Also, on the Applications page, the word "Scheduled" appears in the Scheduled column for this application, and the button contains a check mark:

After you create a schedule, it continues to run until you delete it. Also, you cannot edit an existing schedule, but you can delete it and create a similar schedule if needed.
To view or delete an existing schedule:
- On the Applications page, click the button for the application that contains a schedule you want to delete. The Schedule window appears.
-
Click the down arrow icon (
) to view the details of an existing schedule:
- To delete the selected schedule, click .
Log Messages for the "Generate Required CI Relations for ServiceNow" Application
This section describes the different types of log messages you might see in the Step Log when you run the "Generate Required CI Relations for ServiceNow" application. Please note that this application is a report used by PowerFlow, and it does not send any data to ServiceNow.
The following message displays if there are devices in a device tree that do not currently have a CI class mapping assigned.
Warning: 2751 Relations with missing mappings detected. Please re-run app with log level 10 to troubleshoot.
In this situation, the device tree cannot be built in ServiceNow. To address this issue, make sure that you have your entire technology tree mapped out in the mappings section of the "Sync Devices from Skylar One to ServiceNow" application or in the mappings section of the "Generate Required CI Relations for ServiceNow" application.
If you do a Custom Run of the "Generate Required CI Relations for ServiceNow" application in Debug mode (log level 10), the application will create a log that displays the parent and child class, CI, and device ID. For example:
Debug: Missing Mapping for Device. Parent: {"class": "VMware | Cluster", "ci": None, "id": 76}, Child: {"class": "VMware | Host Server", ci: "cmdb_ci_esx_server", id: 363 }
The following message appears if the GraphQL payloads had bad data for parent and or child devices:
Warning: 10 bad payloads received from Skylar One. Re-run app in debug to troubleshoot.
If you do a Custom Run the application in Debug mode, the application will create a log that displays these payloads.
The following message appears if all relations are mapped:
Flow: No missing relations found!
The following message appears if there is a parent/child relation between ServiceNow CI classes that does not currently exist in ServiceNow and is required to sync those devices:
Flow: Missing Relations: [{"parent": "cmdb_ci_vcenter_folder", "child": "cmdb_ci_esx_server"}, {"parent": "cmdb_ci_vcenter", "child": "cmdb_ci_vcenter_datacenter"}]
Refer to the labels in the log (above) to determine which CI class is the parent type and which is the child type. To address this issue, navigate to your ServiceNow instance and create the required service rules based on the recommendations in the Step Log.
The following message appears if the application encounters a list of relations that are required, but were successfully found in ServiceNow:
Info: Found Relations: [{"parent": "cmdb_ci_vcenter_folder", "child": "cmdb_ci_esx_server"}, {"parent": "cmdb_ci_vcenter", "child": "cmdb_ci_vcenter_datacenter"}]
This message lets you verify that your mappings and relations are configured correctly.