![]()
This
For more information about the other syncs in this SyncPack, see Configuring Additional Syncs for the CMDB SyncPack.
Creating and Aligning a Configuration Object
A configuration object supplies the login credentials and other required information needed to execute the steps for an application in Skylar Automation. The Configurations page (![]() ) of the Skylar Automation user interface lists all available configuration objects for that system.
) of the Skylar Automation user interface lists all available configuration objects for that system.
You can create as many configuration objects as you need. A Skylar Automation application can only use one configuration object at a time, but you can use (or "align") the same configuration object with multiple applications.
To use this SyncPack, you will need to create one or more configuration objects in the Skylar Automation user interface and align that configuration object to the applications that let you sync data between Skylar One and ServiceNow.
Depending on your Skylar One and ServiceNow environments, you might be able to use the same configuration object with other ServiceNow SyncPacks.
Each unique stack that includes a Skylar One, Skylar Automation, and a ServiceNow Instance requires an individual configuration object with a unique region.
Creating a Configuration Object
For this SyncPack, you can make a copy of the "ServiceNow SyncPack" configuration object, which is the sample configuration file that was installed with the "ServiceNow Base" SyncPack.
The "ServiceNow SyncPack" configuration object contains all of the required variables. Make a copy of the configuration object and update the variables from that object to match your Skylar One and ServiceNow settings.
To create a configuration object based on the "ServiceNow SyncPack" configuration object:
- In the Skylar Automation user interface, go to the Configurations page (
 ).
). -
For the "ServiceNow SyncPack" configuration object, click the button (
 ) and select Edit. The Configuration pane appears.
Click to show the JSON code. Click the button again to see the fields.
-
Click . The Create Configuration pane appears.
This step is required. Do not use the original configuration object to run Skylar Automation applications.
-
Complete the following fields:
- Friendly Name. Name of the configuration object that will display on the Configurations page.
- Description. A brief description of the configuration object.
- Author. User or organization that created the configuration object.
- Version. Version of the configuration object.
-
In the Configuration Data field, include the required block of code to ensure that the applications aligned to this configuration object do not fail:
  {
    "encrypted": false,
    "name": "sl1_db_host",
    "value": "${config.sl1_host}"
  },
For example:
  {
    "encrypted": false,
    "name": "sl1_db_host",
    "value": "10.2.11.42"
  },
-
In the Configuration Data Values field, update the default variable definitions to match your Skylar Automation configuration.
The region value is a user-defined variable that identifies your Skylar One instance within ServiceNow.
- To create a configuration variable in the JSON Editor, define the following keys:
- encrypted. Specifies whether the value will appear in plain text or encrypted in this JSON file. If you set this to "true", when the value is uploaded, Skylar Automation encrypts the value of the variable. The plain text value cannot be retrieved again by an end user. The encryption key is unique to each Skylar Automation system. The value is followed by a comma.
- name. Specifies the name of the configuration file, without the JSON suffix. This value appears in the user interface. The value is surrounded by double-quotes and followed by a comma.
- value. Specifies the value to assign to the variable. The value is surrounded by double-quotes and followed by a comma.
- If you want to use OAuth2 for authentication with ServiceNow, complete the following Configuration Data Values fields:
- snow_oauth_client_id. Enter the OAuth2 Client ID from ServiceNow.
- snow_oauth_client_secret. Enter the OAuth2 Client secret from ServiceNow.
- snow_oauth_token_url. Enter the full authentication URL, including host and protocol from ServiceNow. For example, "https://<test-instance-name>.service-now.com/oauth_token.do"
- snow_auth_method: Enter oauth or http_basic. If no value is provided, http_basic will be used for connection.
The configuration options listed above are included by default with the sample configuration object provided in the "ServiceNow Base" SyncPack. The configuration options are only required in the configuration object if you plan to use OAuth2 to authenticate. If the values are not present in the configuration object, normal "http_basic" authentication will be used.
- If you want to adjust the version of the ServiceNow IRE endpoint to send CI payloads to, complete the following Configuration Data Values field:
- snow_api_version. If no value is entered, Skylar Automation will default to use v2. For proper interface handling, ScienceLogic recommends entering v3. The only possible values are v2 or v3.
In order to use "v3" for the snow_api_version, you must install the latest version of the "ScienceLogic ServiceNow Integration (v1.0.81)+ Interface Hotfix" update set in ServiceNow. Ask your ScienceLogic contact for access to this update set.
- Click . You can now align this configuration object with one or more applications.
Aligning a Configuration Object
Before you can run the applications in this SyncPack, you must first "align" a configuration object with the application you want to use.
To align a configuration object with an application:
- From the Applications page of the Skylar Automation user interface, open the relevant application and click . The Configurations pane for that application appears.
- From the Configurations drop-down, select the configuration object you want to use.
- Click to align that configuration with the application.
- Repeat this process for every other application you want to use.
The values for the parameters that display in the Configuration pane with a padlock icon (![]() ) are populated by the values in the configuration object.
) are populated by the values in the configuration object.
Creating an OAuth2 Credential Record in ServiceNow
In order to use OAuth2 for authentication with ServiceNow, you must create an OAuth2 credential record in ServiceNow. To configure the ServiceNow credential that will be used by the Connector Instance:
- Navigate to System OAuth > Application Registry. The Application Registries page appears.
- Click .
- Select Create an OAuth API endpoint for external clients. A new record appears.
- Complete the following fields on the new record:
- Name. Type a unique name for the credential. Required.
- Client ID. The Client ID is automatically generated by the ServiceNow OAuth server.
- Client Secret. Leave this empty. ServiceNow will auto-generate this when the record is saved.
- Refresh Token Lifespan. Enter the length of time in seconds the Refresh Token will be valid.
- Access Token Lifespan. Type the length of time in seconds that the Access Token will be valid. ScienceLogic recommends setting this to 3,600 seconds to avoid known issues for longer ServiceNow REST interactions.
In a scenario where the value is shorter than the duration of a Skylar Automation step that makes multiple REST interactions with ServiceNow, the access token will expire and need to be refreshed. As a result, retries were added to several Skylar Automation steps where this issue may occur. This issue will hopefully be addressed in future versions of the Base Steps SyncPack.
- Under the Auth Scope section at the bottom of the page, double click Insert a new row.
- In the search box that appears, click the magnifying glass icon, select the useraccount record, and click the checkmark icon to save.
- Click to save the new record.

Syncing Devices from Skylar One to ServiceNow
The "Sync Devices from Skylar One to ServiceNow" application syncs devices and virtual device relationships from Skylar One to ServiceNow. You can also sync devices based on organization and collector group.
The Device Sync process use rules or "mappings" that you can define in the "Sync Devices from Skylar One to ServiceNow" application. These mappings connect a Skylar One device class to a ServiceNow CI class, which determines the CI class that ServiceNow uses when creating the CI in ServiceNow.
For more information about building service rules (containment rules and hosting rules) for devices and CIs, see Configuring Service Rules for Device Sync.
The "Sync Devices from Skylar One to ServiceNow" application can also collect manufacturer and model attributes from asset records aligned with devices in Skylar One and sync that information with ServiceNow.
Merged Devices in Skylar One
When the "Sync Devices from Skylar One to ServiceNow" application encounters a merged device in Skylar One, it splits the record into two objects to allow for correct default relationships in ServiceNow.
Starting with version 3.2.0 of this SyncPack, the "Sync Devices from Skylar One to ServiceNow" application syncs both the physical and the component device in Skylar One to ServiceNow. When a merged device is encountered in Skylar One, the "Sync Devices" application splits the device in Skylar Automation and creates two CIs in ServiceNow. This action does not impact the source device record in Skylar One.
In ServiceNow, the physical CI includes the relevant asset information. A relationship also exists between the physical CI and the virtual CI. The asset information is directly copied between both CIs, so the data will essentially be duplicated across both devices, and the data will be submitted to two separate tables. The sl1_url will also be the same on both devices, so that both CIs will point to the same device in Skylar One.
Using Other Data Sources with Merged Devices
If you have other data sources syncing into the ServiceNow CMDB and you have merged devices in Skylar One, ScienceLogic recommends caution when integrating to the CMDB.
Also, ScienceLogic recommends that you ensure that configuration of the Identification and Reconciliation (IRE) within ServiceNow affects all data sources that are integrating into it. In the case of ScienceLogic, this is most apparent when syncing merged devices. Modifications to the IRE to handle merged devices affects all other data sources that sync to those specific class tables. It is your responsibility to understand each data source, how that data source integrates with the ServiceNow CMDB, and how to leverage that knowledge to understand the impact IRE changes may have.
ScienceLogic cannot be held responsible for any duplicate, lost, or incorrect CI information as a result of merged devices when multiple data sources are involved. This scenario will also affect your Support SLAs, as this practice deviates from recommended best practices.
For more information about the ServiceNow Identification and Reconciliation module, see the ServiceNow documentation: https://docs.servicenow.com/bundle/orlando-servicenow-platform/page/product/configuration-management/concept/c_CompsandProcessIDandReconcil.html.
Running a Device Sync
To perform a Device Sync between Skylar One and ServiceNow, run the following applications in the Skylar Automation user interface, in the specified order:
- Cache ServiceNow Companies, CIs and Skylar One Orgs, Device Classes. Reads all existing Skylar One device classes and ServiceNow CI classes and caches them for the Device Sync. This application uses this data to populate the mappings drop-down values in the "Sync Devices from Skylar One to ServiceNow" application. Before version 3.5.0 of this SyncPack, this application was named "Cache ServiceNow CIs and Skylar One Device Classes".
The "Cache ServiceNow Companies, CIs and Skylar One Orgs, Device Classes" application was removed from version 4.0.0 of the "ServiceNow CMDB" SyncPack and moved to the "ServiceNow Base" SyncPack version 4.0.0. To run the application, you must have version 4.0.0 of the "ServiceNow Base" SyncPack installed.
- Generate Required CI Relations for ServiceNow. Determines if you are missing any class mappings or service rules that might be required in ServiceNow.
- Sync Devices from Skylar One to ServiceNow. Syncs devices and virtual device relationships from Skylar One to ServiceNow.
To sync Skylar One devices with ServiceNow:
-
In the Skylar Automation user interface, select the "Cache ServiceNow CIs and Skylar One Orgs, Device Classes" application from the Applications page, click , align a configuration object, and then click .
If you change any of the containment rules or hosting rules in ServiceNow, you will need to run "Cache ServiceNow CIs and Skylar One Orgs, Device Classes" again. For more information, see Configuring Service Rules for Device Sync.
-
Select the "Generate Required CI Relations for ServiceNow" application from the Applications page, click , align a configuration object, and then click .
Skylar Automation uses the Device Class mappings you are going to configure in step 6, so you do not need to set up any mappings on the Configuration pane for the "Generate Required CI Relations for ServiceNow" application. Any mappings you add to this application will overwrite mappings in the "Sync Devices from Skylar One to ServiceNow" application.
-
When the "Generate Required CI Relations for ServiceNow" application completes, review the log information in the Step Log for the "Pull and Process Relations" step. You should see a log message stating that no missing relations were found. For more information, see Log Messages for the "Generate Required CI Relations for ServiceNow" Application.
If needed, address any missing class mappings or service rules. For more information on service rules, see Creating a ServiceNow Update Set.
-
Select the "Sync Devices from Skylar One to ServiceNow" application from the Applications page and click . The Configuration pane appears:


- Complete the following fields, as needed:
-
Configuration. Select the configuration object with the relevant Skylar One and ServiceNow credentials to align with this application. You cannot edit fields that are populated by the configuration object. Required.
- read_timeout. Specify the maximum amount of time in seconds that the application should wait for a HTTP Read response before timing out. The default is 300 seconds.
- sl1_chunk_size. Specify the number of devices to pull from Skylar One in each chunk. The default is 500 devices per chunk.
- snow_request_limit. Specify the number of CIs fetched from ServiceNow in each request. The default is 500 objects per chunk.
- snow_encoded_query. Specify the filter expression for the ServiceNow GraphQL encoded query.
- disconnect_field. Acts as the boolean field on the Configuration Items table to determine "True/False" for the Skylar One monitoring status.
- ci_query_time_duration. Determines the lookback window in days for pulling ServiceNow CIs determined by the last scan field on the sys_object_source table. If a CI is not returned on this query, but is still active in Skylar One, a "create" request will be sent for the CI which will update the timestamp.
- sl1_url_override. Update this field if you want to use an URL that is different from the standard Skylar One URL that gets sent to the ServiceNow CI record. Optional.
- cache_lookup_chunk_size. Specify the number of CI correlation documents to pull from the PowerFlow cache in a chunk. The default is 1000 documents per chunk.
- discovery_source. Specify the ServiceNow Discovery source. The default is "Other Automated".
- snow_batch_size. Specify the total number of CIs being sent to ServiceNow in each triggered application. The default is 150 objects per batch.
- snow_chunk_size. Specify the number of CI objects to send in each chunk or in each sub-payload with a batch (specifed in the snow_batch_size field). The default is 150 objects per chunk or sub-payload.
- max_count_for_relationships. Specify the maximum number of device IDs to query for sets of relationships in a single chunk from Skylar One.
- Include_Orgs. If you want to include a specific set of Skylar One Organizations in the device sync, add the Organization IDs from the Skylar One Organizations page (Registry > Accounts > Organizations) in this field, separated by commas. If this field is enabled, Skylar Automation will pull only the Organizations listed in this field; Skylar Automation does not pull all Organizations and then drop those not on the list. Leave this field empty to sync all Skylar One Organizations. Optional.
-
Include_CUGs. If you want to include Skylar One Collector Groups (CUGs) in the device sync, add the Collector Group IDs from Skylar One in this field, separated by commas. Leave this field empty to sync all Skylar One Collector Groups. Optional.
A misconfiguration in the Include Orgs field or the Include_CUGs fields might change the monitoring flag for one or more devices. In other words, a misconfiguration in this field could switch the Skylar One Monitored flag from "true" to "false", removing that device or devices from the device sync.
- selected_devices. If you want to sync a sub-set of all discovered devices, type a comma-separated list of the Device IDs from Skylar One for only the devices that you want to sync. Leave this field empty to sync all Skylar One devices.
- excluded_devices. Type a list of comma-separated device names or device IDs for any devices that you want to exclude from the device sync. A device on the excluded list will still be queried, but it will be dropped during the Skylar Automation sync process. Optional.
- verify_snow_ssl. Toggle on (blue) this option to enable verification of the SSL certification when you run this application.
- enable_makes_and_models. Toggle on (blue) this option to enable the makes and models query and sync.
- exclude_inactive. Select this option to prevent syncing devices to ServiceNow that are not enabled, unavailable, or in maintenance. By default, this option is not selected.
- enable_device_active. Select this option to enable the Device Active block in the device GraphQL query, which contains information about the active state of the Skylar One device. By default, this option is not selected. Accessing this data in the attribute mappings requires a Jinja2 Template. For more information, see Using a Jinja2 Template.
-
enable_asset_networks. Select this option to enable the assetNetworks block in the device GraphQL query, which returns a list of asset networks. By default, this option is not selected. Accessing this data in the attribute mappings requires a Jinja2 Template. For more information, see Using a Jinja2 Template.
Please note that enabling this option might cause performance issues on the Skylar One side.
- Domain_Separation. Select this option if your ServiceNow environment is domain-separated, where the data, processes, and administrative tasks have been organized into logical groupings called domains. If your ServiceNow instance is domain-separated, the user listed in the snow_user field must be a member of the top domain and have access to all of the domains you intend to integrate. Also, ServiceNow should be the "source of truth" for organizations if your environment is domain-separated. If this option is selected, Skylar Automation syncs the ServiceNow company sys_id with the corresponding Skylar One organization.
-
drop_company. Select this option if you want to remove the sys_id in existing Companies from the sync, which prevents the "company" field from being sent to ServiceNow. Selecting this option has no effect if you selected the Domain_Separation option for this application. By default, this option is not selected.
If you select this option, the ServiceNow company sys_id for the CI and the Skylar One organization crm_id for the Skylar One device will not be compared when determining if an update has occurred. Do not select this option if you selected the Domain_Separation option, as ServiceNow requires PowerFlow to send the "company" field in domain-separated environments. Also, do not select this option if you selected the change_device_organizations option, as changing the company for a CI in ServiceNow requires the "company" field to be sent.
- change_device_organizations. When enabled, this parameter allows devices to change companies with a Device Sync if the companies are within the same domain in ServiceNow. If you change the Organization/Company and another field or fields, but do not enable this parameter, PowerFlow will not apply any changes to the device. By default, this option is not selected.
- retry_jitter. When selected, instead of using a defined interval between retries, the PowerFlow system will retry the step execution at random intervals. By default, this option is not selected.
- retry_backoff. When selected, instead of using a defined interval between retries, Skylar Automation will incrementally increase the interval between retries. By default, this option is not selected.
- use_ap2_url. Select this option if you want the device URLs in the Skylar One URL field in ServiceNow CIs to point to the corresponding Device Investigator page in the Skylar One user interface:
/inventory/devices/<Skylar One_device_ID>/investigator. This option is enabled by default. If you turn off this option, the device URL points to the classic EM7 user interface:/em7/index.em7?exec=device_summary&did=<Skylar One_device_ID>. - unmerge_devices. De-select this option if you want to turn off the "unmerge" behavior added in version 3.2.0 of this SyncPack, where PowerFlow splits a merged device record into two objects to allow for correct default relationships in ServiceNow. This option is enabled by default.
- generate_report. Select this option to create a report about the devices that you sync with ServiceNow. Skylar Automation generates a report every time you run the device sync application, and the reports are available on the Reports page of the Skylar Automation user interface.
- Simulation_Mode. Select this option if you want to perform a simulated run of this application to show you the potential results of that run. By default, this option is not selected.
- enable_advanced_topology. Select this option to allow the pull and process advanced topology step to be executed when the sync is run. If disabled, this step will be skipped. This toggle defaults to a value of True.
- enable_disconnects. If toggled on (blue), deletes the sys_object_source record for the ServiceNow CI. The "Sync Devices from SL1 to ServiceNow" application no longer uses a "monitored" field.
- disconnect_type. Specify the disconnect method for disconnecting Skylar One entities from ServiceNow. Enter either flip_boolean_field or remove_sources_entry to determine the behavior for disconnects.
-
gql_filter. Using JSON, you can optionally define a custom GraphQL filter to apply to the devices in the sync. To test out a GraphQL filter, go to the GraphiQL interface in Skylar One by typing the URL or IP address for Skylar One in a browser, add /gql to the end of the URL or IP address, and press . Search the built in GraphQL docs for DeviceSearch and determine how to set up your custom filter. An example of a Device Search query using JSON: {"name": {"doesNotBeginWith": "jc-is-ma"}}
You can use this field to filter devices by Device Group. For more information, see Filtering Device Sync by Device Group.
A misconfiguration in this field might change the monitoring flag for one or more devices. For example, a misconfiguration in this field could switch the Skylar One Monitored flag from "true" to "false", removing that device or devices from the device sync. This field is an advanced feature that requires a basic knowledge of the Skylar One GraphQL implementation. For more information, ask your ScienceLogic contact for access to the ScienceLogic GraphQL documentation.
-
customer_ci_relation_overrides. To override existing relationship linking and directly control the link between Device Classes and attributes, add JSON code to this field. The JSON for this field includes default relationship overrides for VMware instead of direct parent/child relations. For more information, see Mappings between Skylar One, ServiceNow, and Other Applications.
-
In the Mappings section, click the button (Skylar Automation 2.7.0 or later) or the expand button (
 ) to view and edit the mappings between ServiceNow CI classes and Skylar One device classes. This section is pre-loaded with a large number of default device class mappings. You can map a single ServiceNow CI class with multiple Skylar One device classes.
The "Sync Devices from Skylar One to ServiceNow" application will only sync a device from Skylar One if the device class for that device is mapped to a ServiceNow CI class in the Mappings section. The default mappings in this section do not cover all technologies, however, and syncing additional technologies from Skylar One to ServiceNow might require additional research to understand the class structure.
For more information about how to view, edit, and create mappings, see Editing Mappings in a Skylar Automation Application. This topic also covers how to use the Company Mapping Override and the Attribute Mappings sections, below.
-
In the Company Mapping Override section, you can create a new mapping for the ServiceNow company field. You can override the company field with a different ServiceNow field where you can read and write the company_sys_id for CIs.
-
In the Attribute Mappings section, click the button (Skylar Automation 2.7.0 or later) or the expand button (
) to view and edit the mappings for any other custom device attributes you want to sync between Skylar One (the first column) and ServiceNow (the second column). For more information, including lists of default and available device attribute mappings, see Device Attribute Mappings.To sync Device Notes between Skylar One and ServiceNow, create a custom attribute for the device note in this section. This option works best if you only want a single value synced over so that value can remain in the notes. All custom attributes for each Skylar One device are automatically synced.
For the Attribute Mappings section, you can use a Jinja2 Template for device attribute fields on the Skylar One side (the left column). For more information, see Using a Jinja2 Template.
When an attribute value is "0" in Skylar One, the corresponding field in ServiceNow might display as empty.
-
Click . The Configuration pane closes.
-
Run the "Sync Devices from Skylar One to ServiceNow" application.
-
When the application completes, open the Step Log and review the log messages for the "Compare Skylar One Devices and ServiceNow CIs" step to see if any Device or CI records were added, updated, or disconnected from the sync. As needed, select the other steps to review the logs on the Step Log for those steps.
ScienceLogic recommends that you schedule a Device Sync to run every 24 hours. For more information, see Scheduling PowerFlow Applications.
Using a Jinja2 Template
The attribute mappings in Device Sync applications now support Jinja2 Templates, which let you sync complex, concatenated (linked) fields from Skylar One to ServiceNow. For example, you can add these complex values in the Skylar One side of the attribute_mappings section of the Configuration pane for the "Sync Devices from Skylar One to ServiceNow"application, and that value is mapped to one or many fields in ServiceNow. For more information about Jinja2 Templates, see the Template Designer Documentation.
In the "Sync Devices from Skylar One to ServiceNow" application, the Skylar One side can be a Template. In the "Sync CI Attributes from ServiceNow to Skylar One" application, the ServiceNow side can be a Template.
Example: A Basic Template for Device Attributes
This example is included in the "Sync Devices from Skylar One to ServiceNow" application as the first default value in the attribute_mappings section of the Configuration pane:

This template, when used on the Skylar One side of the attribute_mappings section, populates the short_description field in ServiceNow:
"Description: {{device.device_category}}, Device Class: {{device.device_class}}": [ "short_description" ]
In the above example, for a device with a category: Testing and a Device Class of Testing | Testing, the end result would be Description: Testing, Device Class: Testing | Testing, which will be posted to the short_description field in ServiceNow.
The Jinja2 Templates will have access to all properties on the Device.
Any item that is generated by a template is always a string.
Example: An Advanced Template for Device Sync
The following example lets you get the active status of Skylar One Devices:
{%- set output = [] -%}
{%- if device.active.unavailable == True -%}{%- set output = output + ['Unavailable'] -%}
{%- endif -%}
{%- if device.active.userDisabled == True -%}{%- set output = output + ['User Disabled'] -%}
{%- endif -%}
{%- if device.active.userInitiatedMaintenance == True -%}{%- set output = output +
['User Initiated Maintenance'] -%}{%- endif -%}
{%- if device.active.userMaintenance == True -%}{%- set output = output +
['User Initiated Maintenance'] -%}{%- endif -%}
{%- if output|length > 0 -%}
{{ ", ".join(output) }}
{%- else -%}
{{ "Active" }}
{%- endif -%}
Example: Another Advanced Template for Device Sync
The following example shows another way to get the active status of Skylar One Devices:
{%- set prettify = {"userInitiatedMaintenance": "User Initiated Maintenance", "systemDisabled":
"System Disabled", "maintenance": "System Maintenance", "unavailable": "Unavailable",
"userDisabled": "User Disabled"} -%}
{%- set ns = namespace(maint=[]) -%}
{%- for k,v in device.active.items() -%}
{%- if v -%}
{%- set ns.maint = ns.maint + [prettify[k]] -%}
{%- endif -%}
{%- endfor -%}
{{", ".join(ns.maint) if ns.maint else "Active"}}
Example: Advanced Template for Device Class, Sub Category, and Model
The following example shows how to gather device data based on Device Class and Sub Category if available, or Model if Device Class and Sub Category are not available:
{%- set output = [] -%}
{%- set output = device.device_class.split('|') -%}
{%- if (output[0]|trim) in ['Checkpoint', 'ScienceLogic', 'Microsoft'] -%}
{%- set output = output[1]|trim -%}
{% else %}
{%- set output = device.model -%}
{%- endif -%}
{{output}}
Filtering Device Sync by Device Group
You can use the gql_filter field on the Configuration pane of the "Sync Devices from Skylar One to ServiceNow" application to add a block of JSON code that lets you define a custom filter to apply to the devices in the sync.
You cannot enter GraphQL code in the gql_filter field in Skylar Automation. The field only accepts JSON.
Using GraphQL to Create the Custom Filter
In this example, you will create a custom GraphQL filter in Skylar One based on Device Groups. This filter will prevent Devices that belong to specific Device Groups from creating CIs in the ServiceNow CMDB.
To create a JSON filter for the gql_filter field:
-
Go to the GraphiQL interface in Skylar One by typing the URL or IP address for Skylar One in a browser, adding /gql to the end of the URL or IP address, and pressing .
-
Create a GQL query that uses a search variable, such as the following example:
query DeviceFetch($search: DeviceSearch, $order: [ConnectionOrder], $first: Int) {
  devices(first: $first, search: $search, after: "", order: $order) {
    pageInfo {
      hasNextPage
      matchCount
    }
    edges {
      cursor
      device: node {
        ...
} } } } -
After the query gives you the results you want, copy the resulting JSON variable definitions from the Query Variables section:

-
Paste that JSON code into the gql_filter portion of Skylar Automation and save the Skylar Automation application.

JSON Code Template
Instead of using the GraphiQL user interface in Skylar One, you can use the following JSON code as a template for filtering based on Device Group; simply paste the code into the gql_filter field on the Configuration pane and edit the search criteria and group names as needed:
{
  "deviceGroup": {
    "has": {
      "or": [
        {
          "name": {
            "contains": "group1"
          }
        },
        {
          "name": {
            "contains": "group2"
          }
        }
      ]
    }
  }
}
Tips for customizing the JSON code:
-
To add or remove additional Device Groups, copy or delete the following block of code and edit the group name as needed:
        {
          "name": {
            "contains": "group2"
          }
        }
-
If you add additional name blocks, add a comma after each name block except for the last name block. If you delete a block, delete the preceding comma.
-
You can change the "or" to an "and" if you want to block syncing for devices that are in more than one Device Group.
-
The "contains" can be changed to "eq" to make the name an exact match. For example, "contains": "office" would match "The Office," "HQ Office," and "Office235."
Adding Device Class Mappings
You can dynamically set the device mappings on a per-run basis using the API. You can also persistently save device mappings with the API. You can find these mappings in the mappings section of the Configuration pane for the "Sync Devices from Skylar One to ServiceNow" application.
The following image displays an example of using Postman to send the mapping data to Skylar Automation:

This example only maps device classes to ServiceNow for VMware, Skylar One devices, and a few Cisco devices. If the your environment contains other device classes, you must manually create the mappings.
To add device class mappings using Postman, POST the following JSON file to trigger the required applications in the Skylar Automation user interface to model Skylar One devices to ServiceNow:
{
"name": "device_sync_sciencelogic_to_servicenow",
"params": {
"mappings": {
"cmdb_ci_ip_switch":[
"Cisco Systems | Catalyst 3850-48P",
"Cisco Systems | Nexus 9372PX"
],
"cmdb_ci_linux_server": [
"ScienceLogic, Inc. | EM7 Message Collector",
"ScienceLogic, Inc. | EM7 Customer Portal",
"ScienceLogic, Inc. | EM7 All-In-One",
"ScienceLogic, Inc. | EM7 Integration Server",
"ScienceLogic, Inc. | EM7 Admin Portal",
"ScienceLogic, Inc. | EM7 Database",
"ScienceLogic, Inc. | OEM",
"ScienceLogic, Inc. | EM7 Data Collector",
"NET-SNMP | Linux",
"RHEL | Redhat 5.5"
],
"cmdb_ci_esx_resource_pool": ["VMware | Resource Pool"],
"cmdb_ci_esx_server": [
"VMware | ESXi 5.1 w/HR",
"VMware | Host Server",
"VMware | ESX(i) 4.0",
"VMware | ESX(i) w/HR",
"VMware | ESX(i) 4.0 w/HR",
"VMware | ESX(i)",
"VMware | ESX(i) 4.1 w/HR",
"VMware | ESXi 5.1 w/HR",
"VMware | ESXi 5.0 w/HR",
"VMware | ESX(i) 4.1",
"VMware | ESXi 5.1",
"VMware | ESXi 5.0"
],
"cmdb_ci_vcenter_datacenter": ["VMware | Datacenter"],
"cmdb_ci_vcenter_datastore": ["VMware | Datastore", "VMware | Datastore Cluser"],
"cmdb_ci_vcenter_dv_port_group": ["VMware | Distributed Virtual Portgroup"],
"cmdb_ci_vcenter_dvs": ["VMware | Distributed Virtual Switch"],
"cmdb_ci_vcenter_folder": ["VMware | Folder"],
"cmdb_ci_vcenter_network": ["VMware | Network"],
"cmdb_ci_vmware_instance": ["VMware | Virtual Machine"],
"cmdb_ci_vcenter": ["VMware | vCenter", "Virtual Device | Windows Services"],
"cmdb_ci_vcenter_cluster": ["VMware | Cluster"]
},
"configuration": "template_snow_integration" #name your configuration file
}
}
Persistently Saving Device Class Mappings with the API
You can persistently save device class mappings using the API.
-
Use Postman or cURL to do a GET to load the "Sync Devices from Skylar One to ServiceNow" application:
GET Skylar Automation_hostname/api/v1/applications/device_sync_sciencelogic_to_servicenow
where Skylar Automation_hostname is the IP address or URL for your Skylar Automation system.
NOTE: The response should contain the entire JSON output for the application.
- Copy the entire JSON code and save it to a file named: "device_sync_sciencelogic_to_servicenow".
-
Open the file you created and locate the object with the "name":"mappings" property in the "app_variables" list. The "value" property in this object specifies the mappings to use throughout the Skylar Automation applications:


- Modify the "value" property of the object to use the mappings you want to use.
-
Ensure that the mappings follow the same JSON data structure, or else the sync will not work:
{
"cmdb_ci_class": [
"ScienceLogic Dev Class| ScienceLogic subclass",
"Another Silo Dev Class | Another Silo subclass"
]
}
-
After you update the mappings, use the iscli tool to upload the updated application with your new settings. Type the following command at the command line:
iscli –uaf device_sync_sciencelogic_to_servicenow –H Skylar Automation_hostname -p password
where:
- Skylar Automation_hostname is the hostname or IP address of the Skylar Automation system.
- password is the password you use to log in to the Skylar Automation system.
Checking for Missing Device Mappings
You can use the "Report: Identify Unmapped Devices Classes" Skylar Automation application to check whether any device mappings are missing in your Skylar Automation server.
This application pulls the class mappings from Device Sync and Attribute Sync and compares the mappings with the full list of device classes of discovered devices in Skylar One. The application generates a report on the Reports page that lists missing mappings, and if any device classes are unmapped, the application generates an event in the target Skylar One system.
To configure the "Report: Identify Unmapped Devices Classes" application:
- If you do not have the "ServiceNow Base" PowerPack version 104 or later on your Skylar One system, search for and download the PowerPack from the PowerPacks page on the ScienceLogic Support Site (Skylar One > PowerPacks), then install the PowerPack in Skylar One.
- In Skylar One, enable the "ServiceNow CMDB: Un-Mapped Device Classes" Event Policy from the "ServiceNow Base" PowerPack version 104 or later to trap the alert generated by this application.
- In the Skylar Automation user interface, go to the Configurations page.
- Click the button () for the configuration object you want to use with this application and select Edit. The Configuration pane for the object appears.
- In the Configuration Data Values section, click . A new name-value line appears.
- Add a configuration variable named pf_host that has a value of the externally addressable IP or fully qualified domain name (FQDN) of the Skylar Automation cluster or instance.
- Click .
- Go to the Applications page and select the "Report: Identify Unmapped Devices Classes" application.
-
Click to open the Configuration pane:

-
Complete the following fields, as needed:

- Configuration. Select the configuration object you updated in steps 1-5 to align with this application. Make sure that the pf_host value that is updated on the Configuration pane is accurate. You cannot edit fields that are populated by the configuration object. Required.
- read_timeout. Specify the maximum amount of time in seconds the application should wait for a response before timing out. The default is 20 seconds.
- query_retries. Specify the number of times to retry this query if needed. The default chunk size is 0.
-
Click . The Configuration pane automatically closes after this message appears.
-
Click to run the application.
-
After the application runs, click the button and select the relevant report-missing-classes report from the Reports page. The "missing_classes" report appears:

The report displays missing mappings for Device Sync (Skylar One to ServiceNow) in the first column, and missing mappings for Attribute Sync (ServiceNow to Skylar One) in the second column.
Also, if any device classes are unmapped and you enabled the "ServiceNow CMDB: Un-Mapped Device Classes" Event Policy in step 2, Skylar One generates an event on the Events page in Skylar One:


Device Attribute Mappings
The "Sync Devices from Skylar One to ServiceNow" application can also collect manufacturer and model attributes from asset records aligned with devices in Skylar One and sync that information with ServiceNow. You can access these mappings in the Attribute Mappings section of the Configuration pane for that application.
These manufacturer and model attributes are different from custom attributes in Skylar One.
Skylar Automation only populates the manufacturer and model attributes if the values exist in ServiceNow CIs; Skylar Automation does not create new manufacturer values in ServiceNow. "Sync Devices from Skylar One to ServiceNow" application uses the sys_id field as a reference when syncing manufacturer and model information between Skylar One and ServiceNow.
Integer fields in ServiceNow have a maximum value of 2147483647. If a value exceeds that value, ServiceNow stores it as 2147483647. This is a MySQL limitation on the maximum value that can be stored in a signed integer variable.
The "Sync Devices from Skylar One to ServiceNow" application only syncs assets that have a value populated in Skylar One. Skylar One automatically populates fields in an asset record when the record is properly configured. For more information on configuring assets in Skylar One, see Asset Management.
Try one of the following options for the best approach for syncing manufacturer and model attributes, especially if your ServiceNow instance uses Domain Separation:
- Add the ServiceNow user that is listed in the snow_user field on the Configuration pane of the "Sync Devices from Skylar One to ServiceNow" application to the Global Domain in ServiceNow.
- Schedule the "Sync Devices from Skylar One to ServiceNow" application to run with different ServiceNow users that belong to each ServiceNow domain, using the Custom Parameters field on the schedule window to overwrite the snow_user value.
Default Device Attribute Mappings
The "Sync Devices from Skylar One to ServiceNow" application contains a set of default device attribute mappings between Skylar One and ServiceNow. You can access these mappings in the Attribute Mappings section of the Configuration pane for that application.
The following table describes the default device attribute mappings:
| Skylar One Device Attribute |
ServiceNow CI Attribute |
| Description |
"Description: {{device.device_category}}, Device Class: {{device.device_class}}": [ "short_description" NOTE: This field requires a Jinja2 Template. For more information, see Using a Jinja2 Template. |
| asset_tag | asset_tag |
| cpuCount | cpu_count |
| cpuMake | cpu_type |
| cpuSpeed | cpu_speed |
| dateAdded | first_discovered |
| diskSize | disk_space |
| dnsDomain | dns_domain |
| function | justification |
| hostname | fqdn, host_name |
| instance_uuid | account_id |
| ip | ip_address |
| manufacturer_sys_id | manufacturer |
| memory | ram |
| model_sys_id | model_id |
| name | name |
| operatingSystem | os |
| purchaseDate | order_date |
| serial | serial_number |
| status | hardware_substatus |
| warrantyExpirationDate | warranty_expiration |
Skylar One Device Attributes Available for Syncing
In the Attribute Mappings section of the Configuration pane for the "Sync Devices from Skylar One to ServiceNow" application, you can also use the following Skylar One device attributes from Skylar One when syncing attributes with ServiceNow:
- arraySize
- asset_id
- asset_tag
- company_sys_id
- component_unique_id
- cpuCount
- cpuMake
- cpuSpeed
- dateAdded
- depreciationMethod
- depreciationSchedule
- device_category
- device_class
- diskCount
- diskSize
- dnsDomain
- dnsName
- domain_sys_id
- firmwareVersion
- floor
- function
- hostId
- hostname
- ip
- location
- make
- manufacturer_sys_id
- memory
- model
- modelNumber
- model_sys_id
- name
- operatingSystem
- org_id
- org_name
- owner
- panel
- parent_device
- parent_did
- plate
- punch
- purchaseCheck
- purchaseCost
- purchaseDate
- purchaseOrderNumber
- rack
- region
- rfid
- room
- serial
- serviceCheck
- serviceCost
- serviceDate
- serviceDescription
- serviceExpirationDate
- serviceOrderNumber
- servicePolicyNumber
- shelf
- sl1_id
- sl1_url
- snow_ci_class
- snow_sys_id
- status
- vitalAssetInformation
- vitalServiceInformation
- warrantyCheck
- warrantyCost
- warrantyDate
- warrantyDescription
- warrantyExpirationDate
- warrantyOrderNumber
- warrantyPolicyNumber
- zone
Adding New Device Attributes to ServiceNow
You can also add one or more new attributes to ServiceNow that you can then sync with Skylar One.
To add an attribute in ServiceNow:
- In ServiceNow, go to the Tables page (System Definition > Tables) and select the table to which you want to add a field for a new attribute.
- From the Table page, click the button to add a new field on the table. A new record appears.
- From the Type drop-down list, select the data type you want to store, such as String. Depending on your selection, additional required fields display. For example, If you selected String, then Column label should contain the text you want to display in ServiceNow, and Column name is the exact column name used by Skylar Automation or the API.
- Complete the required fields and any other fields as needed, and then click the Submit button. The field is added to ServiceNow.
Configuring Customer CI Relation Overrides
When you are mapping Device Classes and attributes, you might find that Skylar One creates relationship mappings very differently than the way that ServiceNow creates relationships. As a result, ScienceLogic strongly recommends that you use the customer_ci_relation_overrides field instead of using ServiceNow to set up those relationships.
In the "Sync Devices from Skylar One to ServiceNow" Skylar Automation application, you can use the customer_ci_relation_overrides field to override the existing relationship linking and directly control the link between Device Classes and attributes. The customer_ci_relation_overrides field lets you build dynamic relationships rather than statically setting up relationships within ServiceNow.
ScienceLogic does not support using ServiceNow to control and set up your device relationships.
In addition, ScienceLogic strongly recommends that you use the default relationship overrides for VMware, which you can view by clicking from the Configuration pane for the "Sync Devices from Skylar One to ServiceNow" Skylar Automation application.
This mapping process is intended for advanced users that are familiar with how Skylar One and ServiceNow construct device relationships.
In the following example, the relationship structure in Skylar One is linear :
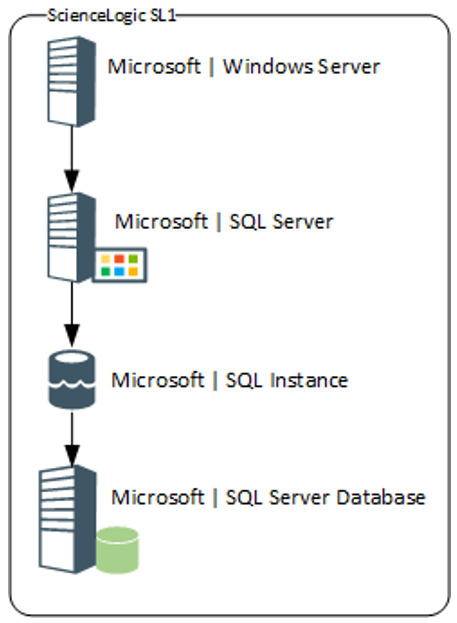
In ServiceNow, however, the structure is not as linear, and it requires an override (a manual link) between classes to make the relationship link required:

The following image shows the JSON structure formatting that is required for the customer_ci_relation_overrides field:

The values in the customer_ci_relation_overrides field supersede any of the values configured in the mappings section in the Configuration pane for the "Sync Device Classes from Skylar One to ServiceNow" Skylar Automation application.
You must ensure that all classes in the relationship chain in Skylar One are mapped to classes in ServiceNow, or else the chain will break, and Skylar Automation will not correctly apply the overrides.
In the customer_ci_relation_overrides field, you can string together multiple relationships as in the following example:
{
   "cmdb_ci_db_mssql_instance": {
       "relations": [
           {
               "parent": "cmdb_ci_win_server",
               "rel_type": "Runs on::Runs",
               "reverse": true
           }
       ],
       "values": {"sys_class_name": "snow_ci_class", "instance_name": "name"}
   },
   "cmdb_ci_db_mssql_database": {
       "relations": [
           {
               "parent": "cmdb_ci_db_mssql_instance",
               "rel_type": "Contains::Contained by",
               "reverse": false
           }
       ],
       "values": {"sys_class_name": "snow_ci_class", "database": "name"}
   },
   "cmdb_ci_db_mssql_server": {
       "relations": [
           {
               "parent": "cmdb_ci_win_server",
               "rel_type": "Runs on::Runs",
               "reverse": true
           }
       ],
       "values": {"sys_class_name": "snow_ci_class", "instance_name": "name"}
   }
}
Viewing Reports for Device Sync
The "Sync Devices from Skylar One to ServiceNow" application lets you create a report about the devices that you sync with ServiceNow. The report displays on the Reports page (![]() ):
):

Enable the report by selecting the generate_report option on the Configuration pane for the application.
When the relevant data is present in a device sync, the report displays the following data under the Details pane:
- Creations Sent to ServiceNow. Device information for devices in Skylar One that will be created in ServiceNow.
- Device Counts. Lists the number of created, disconnected, and updated devices, as well as the number of devices pulled from Skylar One and ServiceNow during the sync. If domain separation is on and there are devices removed due to domain separation errors, that count will be added to the table.
- Deletions Sent to ServiceNow. Device information for devices in Skylar One that will be deleted in ServiceNow.
- Post CIs to ServiceNow. Each instance of the "Post CIs to ServiceNow" application, listing creations, disconnects, errors, skips, and updates made in ServiceNow.
- Updates Sent to ServiceNow. Device information for devices in Skylar One to be updated in ServiceNow.
Log Messages for the "Generate Required CI Relations for ServiceNow" Application
This section describes the different types of log messages you might see in the Step Log when you run the "Generate Required CI Relations for ServiceNow" application. Please note that this application is a report used by PowerFlow, and it does not send any data to ServiceNow.
The following message displays if there are devices in a device tree that do not currently have a CI class mapping assigned.
Warning: 2751 Relations with missing mappings detected. Please re-run app with log level 10 to troubleshoot.
In this situation, the device tree cannot be built in ServiceNow. To address this issue, make sure that you have your entire technology tree mapped out in the mappings section of the "Sync Devices from Skylar One to ServiceNow" application or in the mappings section of the "Generate Required CI Relations for ServiceNow" application.
If you do a Custom Run of the "Generate Required CI Relations for ServiceNow" application in Debug mode (log level 10), the application will create a log that displays the parent and child class, CI, and device ID. For example:
Debug: Missing Mapping for Device. Parent: {"class": "VMware | Cluster", "ci": None, "id": 76}, Child: {"class": "VMware | Host Server", ci: "cmdb_ci_esx_server", id: 363 }
The following message appears if the GraphQL payloads had bad data for parent and or child devices:
Warning: 10 bad payloads received from Skylar One. Re-run app in debug to troubleshoot.
If you do a Custom Run the application in Debug mode, the application will create a log that displays these payloads.
The following message appears if all relations are mapped:
Flow: No missing relations found!
The following message appears if there is a parent/child relation between ServiceNow CI classes that does not currently exist in ServiceNow and is required to sync those devices:
Flow: Missing Relations: [{"parent": "cmdb_ci_vcenter_folder", "child": "cmdb_ci_esx_server"}, {"parent": "cmdb_ci_vcenter", "child": "cmdb_ci_vcenter_datacenter"}]
Refer to the labels in the log (above) to determine which CI class is the parent type and which is the child type. To address this issue, navigate to your ServiceNow instance and create the required service rules based on the recommendations in the Step Log.
The following message appears if the application encounters a list of relations that are required, but were successfully found in ServiceNow:
Info: Found Relations: [{"parent": "cmdb_ci_vcenter_folder", "child": "cmdb_ci_esx_server"}, {"parent": "cmdb_ci_vcenter", "child": "cmdb_ci_vcenter_datacenter"}]
This message lets you verify that your mappings and relations are configured correctly.