
This
NOTE: This
This
What is WMI?
Windows Management Instrumentation, or WMI, is a Windows Service developed to access management information. WMI is a middle-layer technology that enables standardized management of Windows-based computers. It collects computer management data from a wide variety of sources and makes it accessible by using standard interfaces. WMI's specific query language is similar to SQL. For a comparison of WQL and SQL, see http://technet.microsoft.com/en-us/library/cc180454.aspx.
What is PowerShell?
Windows PowerShell is a command-line shell and scripting language for administration of Windows systems. Skylar One can execute PowerShell requests on target Windows devices via WinRM (Windows Remote Management). For an overview of Windows PowerShell, see https://learn.microsoft.com/en-us/powershell/scripting/overview?view=powershell-7.3.
Skylar One supports the following PowerShell versions for monitoring Windows devices:
- PowerShell 3.0
- PowerShell 4.0
- PowerShell 5.1
Prerequisites
This
WMI Dynamic Applications use the WMI protocol. PowerShell Dynamic Applications use the PowerShell protocol. This
WMI and PowerShell Dynamic Applications
In Skylar One, a WMI Dynamic Application is a Dynamic Application that uses WMI to retrieve data from devices. WMI Dynamic Applications use WMI or WBEM requests to populate collection objects. WMI requests use WQL (WMI Query Language) to query WMI classes (tables) to retrieve data.
WBEM objects are populated with values returned by the wbemcli "get instance" command.
In Skylar One, a PowerShell Dynamic Application is a Dynamic Application that uses PowerShell to retrieve data from devices. PowerShell Dynamic Applications use PowerShell commands to populate collection objects.
Elements of WMI and PowerShell Dynamic Application
For comprehensive information on elements that apply to WMI and PowerShell Dynamic Applications, see the Dynamic Application Development chapter.
WMI Requests
In Skylar One, each WMI Dynamic Application must include at least one WMI or WBEM request.
Collection objects in WMI Dynamic Applications objects are populated with the values returned by a WMI request. WMI requests use WQL (WMI Query Language) to query WMI classes (tables) to retrieve data. A single WMI request can populate multiple WMI objects by querying for multiple class properties (table columns). WBEM objects are populated with values returned by the wbemcli "get instance" command.
Collection objects for both WMI and WBEM are aligned with properties (columns). The definition of each object specifies the WMI or WBEM request that will populate the collection object and the property name to align with the object. The retrieved values of the property will populate the object.
To more easily understand WMI, you can compare the terminology to standard SQL terminology:
| WMI | SQL |
|---|---|
| Namespace |
Database |
| Class |
Table |
| Property |
Column |
| Instance | Row |
Defining a WMI Request
You can define a WMI request in the WMI Request Editor & Registry page. To define a WMI request:
- Go to the Dynamic Applications Manager page (System > Manage > Applications).
- In the Dynamic Applications Manager page, find the Dynamic Application for which you want to define a WMI request. Select its wrench icon (
 ).
). - Select the tab for the Dynamic Application.
NOTE: The tab will only appear in Dynamic Applications of type WMI Config and WMI Performance.
- In the WMI Request Editor & Registry page, enter the following:
- WMI Request Name. Name of the WMI request.
- WMI Request Type. Specifies whether to use a WMI request (query) or a WBEM request (a wbemcli "get instance" request sent over HTTP).
- WMI Request Namespace. Optional field. In this field, you can specify a WMI namespace. The WMI request will then use this namespace when requesting data. If you do not specify a value in this field, the WMI request will use the default namespace (usually root).
- WMI Object Key. The unique key for each instance (row) returned by the request. This unique key must be a property name, and the request must include that property (column) and return values from that property name (column). You must choose a key that remains constant over all polling periods, for example "Name" or "servicename".
- Active State. Specifies whether Skylar One should use this request when performing collection for the Dynamic Application. Choices are:
- Enabled. Skylar One will use the WMI request when performing collection for the Dynamic Application.
- Disabled. Skylar One will not use the WMI request when performing collection for the Dynamic Application.
- WMI Request Query. Enter the WQL query in this field. In most cases, these queries will be of the format:
SELECT [one or more properties (columns), separated by commas] FROM name of WMI class (table) where data is stored]
For more information on WQL, see http://msdn.microsoft.com/en-us/library/aa394606%28VS.85%29.aspx
For more information on WMI classes, see http://msdn.microsoft.com/en-us/library/aa394554(v=VS.85).aspx
For a comparison of WQL and SQL, see http://technet.microsoft.com/en-us/library/cc180454.aspx
Example WMI Code
For our example Dynamic Application, we'll use the following WMI request:
SELECT TotalVisibleMemorySize,CSName,Caption,SerialNumber FROM Win32_OperatingSystem
In this request, we are retrieving the property (column) values from the WMI class (table) Win32_OperatingSystem. Win32_OperatingSystem is a class (table) that stores information about an instance of an operating system running on the monitored device. From this class, the WMI request retrieves the values of the following properties:
- TotalVisibleMemorySize. Total amount, in kilobytes, of physical memory available to the operating system. This value does not necessarily indicate the true amount of physical memory, but only the amount that is reported to the operating system as available to it. In our example Dynamic Application, we can create an object that maps to this property. To map an object to the retrieved value from this property, we must ensure that the WMI Request Arguments field for the object (in the Collection Objects page) contains the value "TotalVisibleMemorySize".
- CSName. Name of the computer system (device name as it appears to the operating system). In our example Dynamic Application, we can create an object that maps to this property. To map an object to the retrieved value from this property, we must ensure that the WMI Request Arguments field for the object (in the Collection Objects page) contains the value "CSName".
- Caption. This is a short description of the operating system version. For example, "Microsoft Windows XP Professional Version = 5.1.2500". In our example Dynamic Application, we can create an object that maps to this property. To map an object to the retrieved value from this property, we must ensure that the WMI Request Arguments field (in the Collection Objects page) contains the value "Caption".
- SerialNumber. Operating system product serial identification number. For example: "10497-OEM-0031416-71674". In our example Dynamic Application, we can create an object that maps to this property. To map an object to the retrieved value from this property, we must ensure that the WMI Request Arguments field (in the Collection Objects page) contains the value "SerialNumber".
Defining a WBEM Request
You can define a WBEM request in the WMI Request Editor & Registry page. To define a WBEM request in the WMI Request Editor & Registry page:
- Go to the Dynamic Applications Manager page (System > Manage > Applications).
- In the Dynamic Applications Manager page, find the Dynamic Application for which you want to define a WBEM request. Select its wrench icon ().
- Select the tab for the Dynamic Application.
- In the WMI Request Editor & Registry page, enter the following:
- WMI Request Name. Name of the WBEM request.
- WMI Request Type. Specifies whether to use a WMI request (a query) or a WBEM request (a wbemcli "get instance" request sent over HTTP).
- WMI Request Namespace. Optional field. In this field, you can specify a WMI namespace (database). The WBEM request will then use this namespace (databse) when requesting data. If you do not specify a value in this field, the WBEM request will use the default namespace (usually root).
- WMI Object Key. The unique key for each instance (row) returned by the query. This unique key must be a property name, and the query must include that property (column) and return values from that property name (column).
- Active State. Specifies whether Skylar One should use this request when performing collection for the Dynamic Application. Choices are:
- Enabled. Skylar One will use the WBEM request when performing collection for the Dynamic Application.
- Disabled. Skylar One will not use the WBEM request when performing collection for the Dynamic Application.
- WMI Request Query. Enter the wbemcli string in this field. In most cases, this will be of the format:
/[name space]:[class name].property=value (this last argument is optional)
Usually, wbemcli requires that the request begins with the full path to the CIM object, including:
http://username:password@hostname or IP:port,
Skylar One uses the credentials for the Dynamic Application to automatically append this string to the front of each wbemcli request.
For more information on wbemcli, see http://linux.die.net/man/1/wbemcli
- Select the button to save the new WBEM request.
Example WBEM Request Code
For our example Dynamic Application, we'll use the following WMI request:
/root/cimv2:CIM_OperatingSystem
- In this request, we are retrieving value from the namespace (database) called /root/cimv2.
- We are requesting all values from the class (table) called CIM_OperatingSystem.
- This request will return all values from the class CIM_OperatingSystem. The values will be returned in the format
property_name="value"
- Each WBEM object (defined in the Collection Objects page) must map to a property name returned by a WBEM request. To map each object, you must have specified a value in the WMI Request Arguments field that matches the name of a property returned by this request.
NOTE: Before defining objects for a WBEM request, you must know which property names will be returned.
Editing a WMI Request
To edit a WMI request in the WMI Request Editor & Registry page:
- Go to the Dynamic Applications Manager page (System > Manage > Applications).
- In the Dynamic Applications Manager page, find the Dynamic Application for which you want to edit a WMI request. Select its wrench icon ().
- Select the tab for the Dynamic Application.
- In the WMI Request Editor & Registry page, find the WMI request in the WMI Request Registry pane. Select its wrench icon ().
- The fields in the top pane are populated with values from the selected WMI request. You can edit the value of one or more fields. For a description of each field, see the section Defining a WMI Request.
- Select the button to save your changes to the WMI request.
Editing a WBEM Request
You can edit a WBEM Request the same way you edit a WMI request. To view these steps, see the section Editing a WMI Request.
Deleting a WMI or WBEM Request
To delete a WMI or WBEM request in the WMI Request Editor & Registry page:
- Go to the Dynamic Applications Manager page (System > Manage > Applications).
- In the Dynamic Applications Manager page, find the Dynamic Application for which you want to delete a WMI request or WBEM request. Select its wrench icon ().
- Select the tab for the Dynamic Application.
- In the WMI Request Editor & Registry page, find the request you want to delete in the WMI Request Registry pane. Select its delete icon (
 ).
).
PowerShell Requests
PowerShell Dynamic Applications must include one or more requests that define how Skylar One should request data from a device. Each request specifies a PowerShell command that will gather a response from the device.
Each collection object in a PowerShell Dynamic Application is associated with a request. The collection object definition specifies which property in the response should be used to populate the values for that collection object. A single request can be used to populate multiple collection objects.
Defining a PowerShell Request
To define a request for a PowerShell Dynamic Application:
- Go to the Dynamic Applications Manager page (System > Manage > Applications).
- Locate the Dynamic Application for which you want to define a request. Click its wrench icon (). The Dynamic Applications Properties Editor page appears.
- Click the tab. The Dynamic Applications PowerShell Command Editor & Registry page appears.
- Supply values in the following fields:
- PowerShell Command Name. Enter a name for the command.
- Active State. Specifies whether Skylar One should perform this request during collection for this Dynamic Application. Choices are Enabled or Disabled.
- Response Object Key. This field is not currently used.
- PowerShell Implicit Remoting. The mechanism by which a user or application accesses PowerShell cmdlets delivered via the Exchange Management Shell. This mechanism allows Dynamic Applications of type PowerShell to connect to the remote management shell for a Microsoft application and import the cmdlets published by that Microsoft application. Choices are Enabled or Disabled. If this field is set to Enabled, you can reference the imported cmdlets in the PowerShell Command Query field.
- Configuration Name. Grayed out unless PowerShell Implicit Remoting is set to Enabled. Select from a list of configuration names for PowerShell. By default, this field includes:
- Microsoft.PowerShell
- Microsoft.Exchange
To enter a custom configuration name, click the plus sign icon ( ) and enter the custom value.
- Connection URI. Grayed out unless PowerShell Implicit Remoting is set to Enabled. Specifies a Uniform Resource Identifier (URI) that defines the connection endpoint for the session. The URI must be fully qualified. By default, this field includes:
- http://%D/PowerShell
- http://%D:%P/WSMAN
Skylar One will replace %D with the hostname or FQDN of the Microsoft server specified in the PowerShell credential.
To enter a custom URI, click the plus sign icon () and enter the custom value.
- Cmdlets to Import. Grayed out unless PowerShell Implicit Remoting is set to Enabled. Enter a comma-separated list of one or more PowerShell cmdlet names that you want to use in this PowerShell session. If you leave this field blank, Skylar One will import all cmdlets from the remote management shell for use in this PowerShell session.
- PowerShell Command Query. Enter the PowerShell command to execute. The PowerShell command must meet the following requirements:
- The command must not end with any of the Format-* cmdlets. This includes the use of their aliases (IE. "fl" for Format-list).
- The command must return output that can be piped to the Format-list cmdlet.
- The command must not return whitespace over multiple lines.
- The PowerShell cmdlets you invoke must exist on the target Windows server with the required version of PowerShell.
- The PowerShell cmdlets you invoke must not write to the standard out pipe unless the output needs to be processed and put into a collection object.
- The PowerShell cmdlets you invoke must be synchronous. Do not use asynchronous cmdlets, for example, Invoke-Async or Wait-Job.
- The PowerShell cmdlets you invoke must not be an interactive cmdlet, for example, Enter-PSSession.
- The PowerShell cmdlets you invoke must not query the same property twice.
- If an invoked PowerShell cmdlet creates a new PSSession object, you must invoke the Remove-PSSession cmdlet before the original command ends.
In addition to the requirements listed above, the following best practices are recommended when developing PowerShell commands:
- Perform as much computational work in the PowerShell command as possible to reduce the workload of Skylar One.
- Query only the pieces of information required to populate the collection objects in the Dynamic Application.
- Per Microsoft guidelines, do not query the Win32_Product WMI class. For more information, see http://support.microsoft.com/kb/974524.
- Click the button.
Editing a PowerShell Request
To edit a PowerShell request:
- Go to the Dynamic Applications Manager page (System > Manage > Applications).
- In the Dynamic Applications Manager page, find the Dynamic Application for which you want to edit a PowerShell request. Select its wrench icon ().
- Select the tab for the Dynamic Application.
- In the Dynamic Applications PowerShell Command Editor & Registry page, find the PowerShell request and select its wrench icon ().
- The fields in the top pane are populated with values from the selected PowerShell request. You can edit the value of one or more fields. For a description of each field, see the section Defining a PowerShell Request.
- Select the button to save your changes to the PowerShell request.
Deleting a PowerShell Request
To delete a PowerShell request in the Dynamic Applications PowerShell Command Editor & Registry page:
- Go to the Dynamic Applications Manager page (System > Manage > Applications).
- In the Dynamic Applications Manager page, find the Dynamic Application for which you want to delete a PowerShell request. Select its wrench icon ().
- Select the tab for the Dynamic Application.
- In the Dynamic Applications PowerShell Command Editor & Registry page, find the request you want to delete. Select its delete icon ().
Converting Legacy PowerShell Requests
The 7.3 version of Skylar One supported the use of PowerShell Dynamic Applications with an SSH-based proxy. Dynamic Applications developed for the SSH-based proxy are not compatible with the "agentless" PowerShell collection introduced in the 7.5 release.
To update a Dynamic Application developed for the SSH-based proxy for use with "agentless" PowerShell collection, edit each PowerShell request in the Dynamic Application and make the following changes to the PowerShell Command Query:
- Remove "-Computer %s".
- Remove the "Format-List" cmdlet from the end of the command. If you are using a cmdlet that returns properties that you do not want to collect and you want to continue returning a sub-set of properties, use the "Select" cmdlet instead of "Format-List".
For example, suppose you need to update the following legacy PowerShell command:
Get-WmiObject -Computer %s Win32_DiskDrive | Format-List Partitions, DeviceID, Model, Size, Caption
The new command would be:
Get-WmiObject Win32_DiskDrive | Select Partitions, DeviceID, Model, Size, Caption
In addition to updating the PowerShell requests in the Dynamic Application, you must also use a PowerShell credential with the Dynamic Application instead of a Basic/Snippet credential.
WMI and PowerShell Collection Objects
This section describes how to define collection objects for WMI and PowerShell Dynamic Applications.
NOTE:This section describes only the fields specific to Defining a Collection Object for a WMI or PowerShell Dynamic Application. All the remaining fields, for both performance and configuration archetypes, are described in detail in
WMI-Specific Fields for Collection Objects
Unlike collection objects for other Dynamic Application types, collection objects for WMI Dynamic Applications are based on WMI Requests. Because of this, collection objects for WMI Dynamic Applications have the following unique fields:
- WMI Request Arguments. When you request data from WMI or WBEM, you are requesting data from a class (table), which returns data in tabular form. In this field, you must specify the name of the property (table column) to associate with this object. This property name must be included in the WMI request, specified in the WMI Request field.
- WMI Request. Name of the WMI request associated with this object. The WMI requests in this drop-down list are defined in one of two places:
- If No Caching or Cache Results is selected in the Caching field in the Dynamic Applications Properties Editor page for this Dynamic Application, this list contains all WMI Requests defined in the tab for this Dynamic Application. Select from the list of WMI requests defined for this Dynamic Application.
- If Consume cached results is selected in the Caching drop-down list in the Dynamic Applications Properties Editor page, this list contains all WMI Requests defined in WMI Dynamic Applications that have Cache results selected in the Caching field in the Dynamic Applications Properties Editor page. Select from the list of cached WMI requests.
NOTE: If Consume cached results is selected in the Caching field in the Dynamic Applications Properties Editor page for a Dynamic Application, the tab is hidden and you cannot define WMI Requests for this Dynamic Application. You can only reference WMI Requests that reside in Dynamic Applications that cache results.
PowerShell-Specific Fields for Collection Objects
Unlike collection objects for other Dynamic Application types, collection objects for PowerShell Dynamic Applications are based on PowerShell Requests. Because of this, collection objects for PowerShell Dynamic Applications have the following unique fields:
- PowerShell Arguments. Enter the property that is associated with this collection object. This property must be included in the PowerShell command you select in the PowerShell Request field.
- PowerShell Request. Select the PowerShell request associated with this collection object, i.e. the PowerShell command that collects values for this collection object.
For example, suppose you have defined the following PowerShell request:
Get-WmiObject Win32_DiskDrive | Select Partitions, DeviceID, Model, Size, Caption
This request returns the properties Partitions, DeviceID, Model, Size, and Caption. To store the values returned for each of the five properties, you would create five collection objects. For each of the five collection objects, supply the property name in the PowerShell Arguments field, e.g. "Partitions".
Configuring Devices for Monitoring with WMI
Before you can collect data from a device using WMI (Windows Management Instrumentation), you must configure the device to allow WMI queries. This section describes the configuration steps needed to enable WMI monitoring on Windows devices.
Configuring WMI on Windows 2008 Servers
Windows Management Instrumentation, or WMI, is the infrastructure that provides information about operations and management on Windows-based operating systems. WMI can be configured to respond to remote requests from Skylar One.
To configure a Windows device to respond to remote requests, you must perform the following steps:
- Configure Services
- Configure the Windows Firewall
- Configure a user account and permissions
- Configuring a fixed port for WMI
Most remote requests can be performed by a standard (non-administrator) user account that has been granted specific privileges. However, some requests can be performed only by a user with elevated permissions. For requests performed by Skylar One to a Windows server, the following users have elevated permissions:
- The default "Administrator" user account.
- A user account in the Administrators group on a Windows server that has User Account Control disabled.
- A user account in the Administrators group on a Windows server where a registry entry has been added to disable remote User Account Control filtering.
For a list of WMI classes that require elevated permissions, see http://msdn.microsoft.com/en-us/library/windows/desktop/aa826699%28v=vs.85%29.aspx
Step 1: Configuring Services
The following services must be running for a Windows device to respond to remote WMI requests:
ScienceLogic recommends you set all these services to automatically start.
- COM+ Event System
- DCOM Server Process Launcher
- Remote Procedure Call (RPC)
- Remote Registry
- Server
- Windows Management Instrumentation
To ensure a service is running, perform the following steps:
- In the left pane of the Server Manager window, expand the Configuration section, and then select Services.
- For each required service, the Startup Type column should display Automatic. If a service does not have a Startup Type of Automatic, double-click on that service. The Properties window for that service is displayed.
- In the Startup Type field, select Automatic.
- Click the button.
- If the service has not already started, click the button.
Step 2: Configuring the Windows Firewall
To configure Windows Firewall to accept remote WMI requests, execute the following two commands at the console:
netsh advfirewall firewall set rule group="windows management instrumentation (wmi)" new enable=yes
netsh advfirewall firewall set rule group="remote administration" new enable=yes
Step 3: Configuring a User Account and Permissions
There are three ways to configure the user account that Skylar One will use to perform WMI requests:
- To monitor the Windows server using WMI Dynamic Applications that require standard permissions, you can configure a standard user account for use by Skylar One. The user account for use by Skylar One must be included in the Distributed COM Users and Performance Monitor Users groups. (For more information, consult Microsoft's documentation.)
- To monitor the Windows server using WMI Dynamic Applications that require elevated permissions, you can use the default "Administrator" user account. If you use the "Administrator" user account, you do not need to make changes to the User Account Control settings.
- To monitor the Windows server using WMI Dynamic Applications that require elevated permissions, you can also use a user account that is included in the Administrators group. However, you must perform one of the following additional steps to use this type of user account:
- Option 1: Make the user a member of the Distributed COM Users and Performance Monitor Users groups, in addition to the Administrator group. (For more information, consult Microsoft's documentation.)
- Option 2: Configure User Access Control to allow elevated permissions.
Configuring Namespace and DCOM Security Permissions
For each of these methods, you must ensure that the configured Namespace and DCOM security permissions allow that user to perform remote requests.
To configure the Namespace and DCOM security permissions:
- In the left pane of the Server Manager window, expand the Configuration section.
- Right-click on the WMI Control entry and then select Properties.
- In the WMI Control Properties window, click the tab:
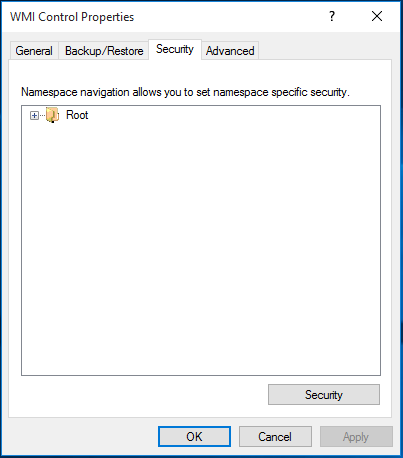
- In the Security tab, select the Root entry from the navigation pane and then select the button. The Security for Root window appears.
- In the Security for Root window, select the button. The Advanced Security Settings for Root window is displayed:
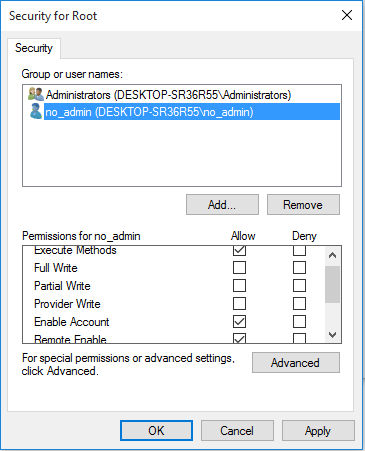
- In the Advanced Security Settings for Root window, click the button. The Select User, Computer, Service Account, or Group window appears.

- In the Select User, Computer, Service Account, or Group window :
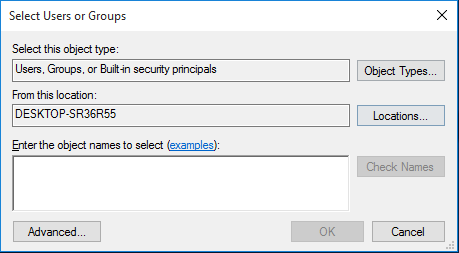
- In the Enter the object name to select field, enter the name of the user account that Skylar One will use to perform WMI requests or the name of a group that includes that user account.
- Click the button to verify the name and then click the button.
- The Permission Entry for Root window is displayed:
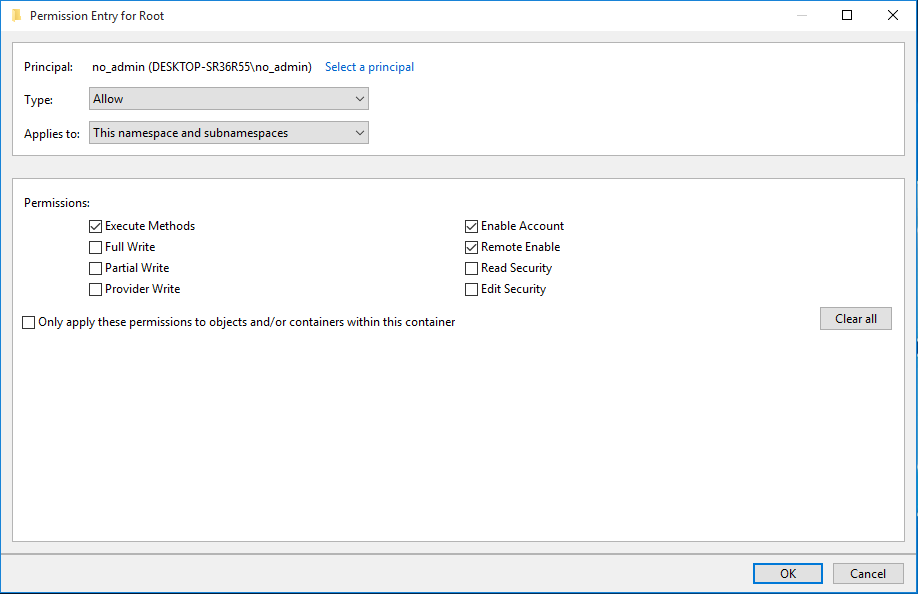
- Select This namespace and subnamespaces in the Apply to field and select the Allow checkbox for all permissions.
- Click the button.
- In the Advanced Security Settings for Root window, click the button.
- Click the button in each open window to exit.
- Go to the Start menu and select .
- In the Run window, enter "dcomcnfg" and click . The Component Services window is displayed:
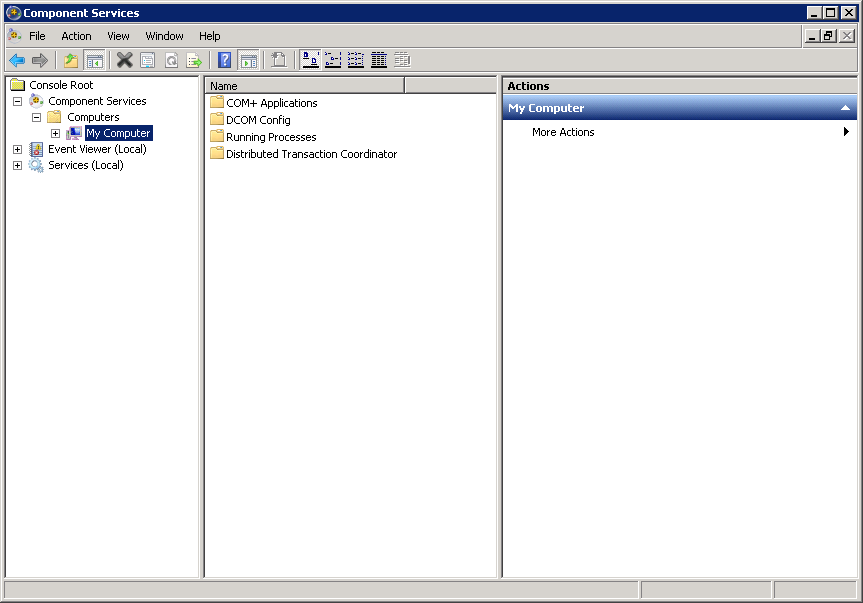
- In the left pane, expand Component Services > Computers. Right-click on My Computer and select Properties. The My Computer Properties window is displayed.
- In the My Computer Properties window, select the tab:
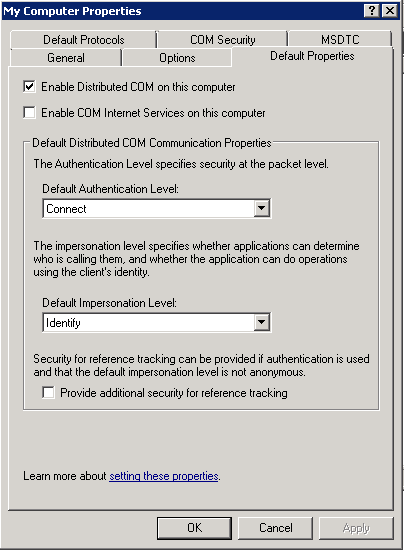
- Ensure that the Enable Distributed COM on this computer checkbox is selected.
- Select Connect in the Default Authentication Level drop-down list.
- Select Identify in the Default Impersonation Level drop-down list.
- If you made changes in the tab, click the button.
- Select the tab:
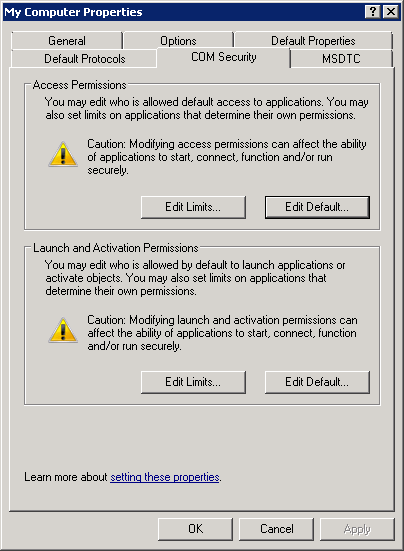
- Select the button in the Access Permissions pane.
- In the window that appears, click the button. The Select Users, Computers, Service Accounts, or Groups window is displayed.
- Enter the name of the user account that Skylar One will use to perform WMI requests or the name of a group that includes that user account.
- Click the Check Names button to verify the name and then click the button.
- Select the group or user you added in the Group or user names pane and then select the Allow checkbox for all permissions.
- Click the button.
- Click the button in the Access Permissions pane, then repeat steps 16 - 19.
- Click the button in the Launch and Activation Permissions pane, then repeat steps 16 - 19.
- Click the button in the Launch and Activation Permissions pane, then repeat steps 16 - 19.
- Click the button.
- Click in the confirmation window.
Configuring User Account Control to Allow Elevated Permissions
If you want to use WMI Dynamic Applications that require elevated permissions to monitor a Windows server and you are using a user account other than the default "Administrator" user account, you must perform one of the following two tasks:
- Option 1: Disable User Account Control.
- Option 2: Add a registry entry that disables remote User Account Control filtering.
Option 1: Disabling User Account Control
To disable User Account Control:
- Open the Control Panel in Large Icon or Small Icon view.
- Select User Accounts.
- Select Change User Account Control Settings. The User Account Control Settings window is displayed:
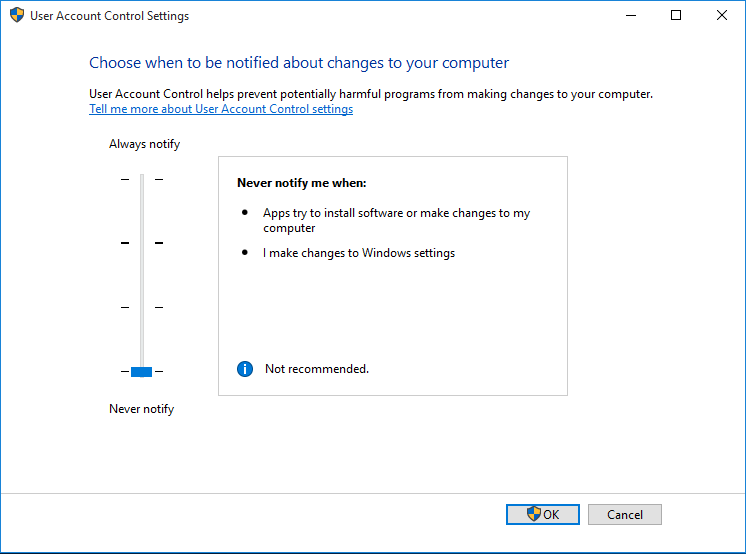
- Move the slider to Never Notify.
- Click the button.
- Restart the Windows server.
Option 2: Adding a Registry Entry that Disables Remote User Account Control Filtering
To add a registry entry that disables remote User Account Control filtering:
- To disable the filter, open a text editor and add the following lines to a new file:
Windows Registry Editor Version 5.00
[HKEY_LOCAL_MACHINE\SOFTWARE\Microsoft\Windows\CurrentVersion\Policies\System]
"LocalAccountTokenFilterPolicy"=dword:00000001
- Save the file with a ".reg" extension.
- In Windows Explorer, double click on the .reg file.
- Select in the pop-up window.
Step 4: Configuring a Fixed Port for WMI
Specific ports must be opened to allow WMI monitoring when there is a separate firewall between the Data Collector and the device. This can occur when the default configuration of the Windows Firewall blocks incoming network traffic for the Windows Management Instrumentation (WMI) connection.
For the WMI connection to succeed, the remote machine must permit incoming network traffic on TCP ports 135, 445, and additional dynamically-assigned ports, typically in the range of 1025 to 5000 and 49152 to 65535.
To set up a fixed port for WMI, see the Microsoft documentation on Setting Up a Fixed Port for WMI.
Configuring WMI for Windows Desktop Systems
This section describes how to configure devices that are running a desktop version of the Windows operating system for monitoring by Skylar One using WMI.
Before performing the tasks described in this section, you must know the IP address of each Skylar One appliance in your network. If you have not installed a Skylar One appliance, you must know the future IP address that will be used by each Skylar One appliance.
To be monitored by Skylar One, a Windows device must be running the Windows 7 operating system or later.
TCP/IP must be installed and configured before you can install SNMP on a Windows device.
Windows Management Instrumentation (WMI) is the infrastructure that provides information about operations and management on Windows-based operating systems. WMI can be configured to respond to remote requests from Skylar One. To configure a device running a desktop version of the Windows operating system to respond to remote requests, you must perform the following steps:
- Configure Services
- Configure the Windows Firewall
- Set Default Namespace Security
- Set the DCOM Security Level
- Disable User Account Control
- Configuring a fixed port for WMI
The following instructions describe how to configure WMI on devices running a desktop version of the Windows 10 operating system. For instructions on how to configure WMI on earlier Windows versions, consult Microsoft's documentation.
Step 1: Configuring Services
The following services must be running for a Windows device to respond to remote WMI requests:
ScienceLogic recommends you set all these services to start automatically.
- COM+ Event System
- Remote Access Auto Connection Manager
- Remote Access Connection Manager
- Remote Procedure Call (RPC)
- Remote Procedure Call (RPC) Locator
- Remote Registry
- Server
- Windows Management Instrumentation
- WMI Performance Adapter
- Workstation
To ensure a service is running, perform the following steps:
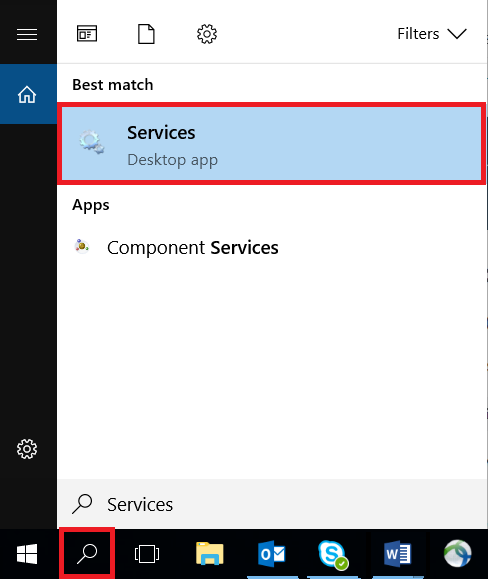
- Click the magnifying glass icon in the bottom-left corner and type "Services" in the Search Windows field.
- Click the Services Desktop app.
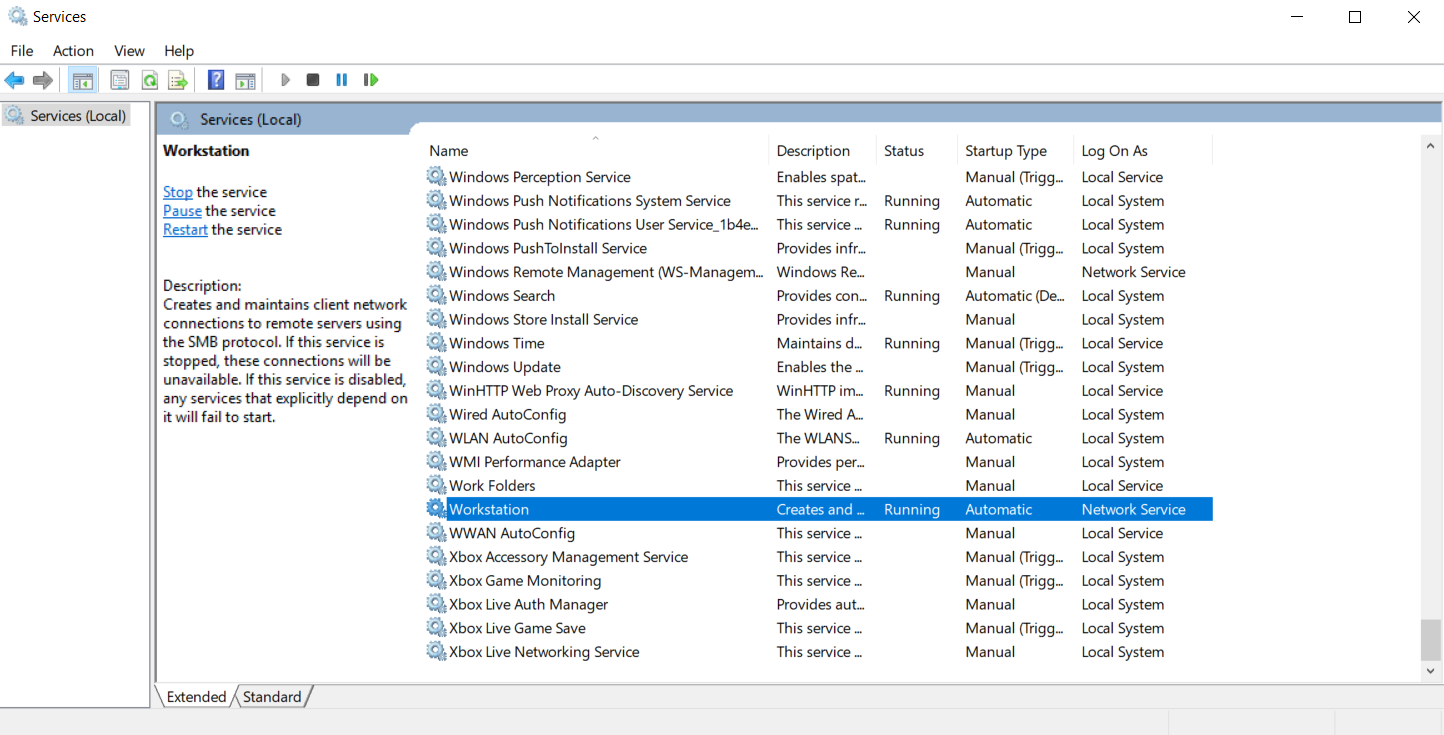
- From the list of services in the right pane, perform the remaining steps for each of the services you want to check. This example uses Workstation. However, you should check each of the following services:
- COM+ Event System
- Remote Access Auto Connection Manager
- Remote Access Connection Manager
- Remote Procedure Call (RPC)
- Remote Procedure Call (RPC) Locator
- Remote Registry
- Server
- Windows Management Instrumentation
- WMI Performance Adapter
- Workstation
- Double-click the name of the service. In this example, we double-clicked Workstation.
- In the Workstation Properties dialog box, click the tab and complete the following field:
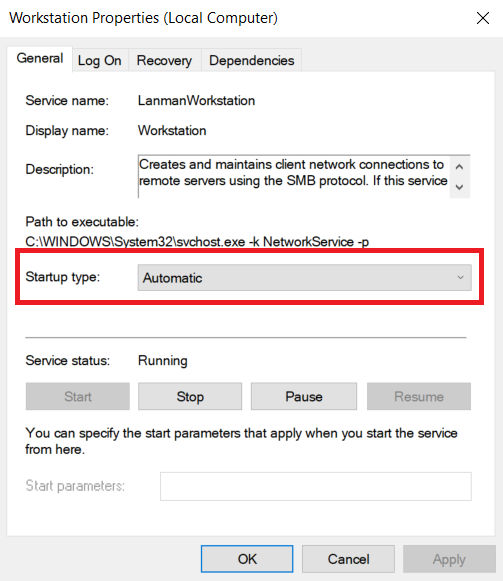
- Startup Type. Select Automatic.
- Click the button.
- If the service has not already started, click the button.
- Repeat steps 4-7 for each service.
Step 2: Configuring Windows Firewall
To configure Windows Firewall to accept remote WMI requests:
- Click the magnifying glass icon in the bottom-left corner and type "Command Prompt" in the Search Windows field.
- Execute the following two commands in the Command Prompt window:
netsh advfirewall firewall set rule group="windows management instrumentation (wmi)" new enable=yes
netsh advfirewall firewall set rule group="remote administration" new enable=yes
- If the result of the second command is "No rules match the specified criteria", run the following two commands:
netsh firewall set service remoteadmin enable
netsh advfirewall firewall set rule group="remote administration" new enable=yes
Step 3: Setting the Default Namespace Security
To set the default namespace security, perform the following steps:
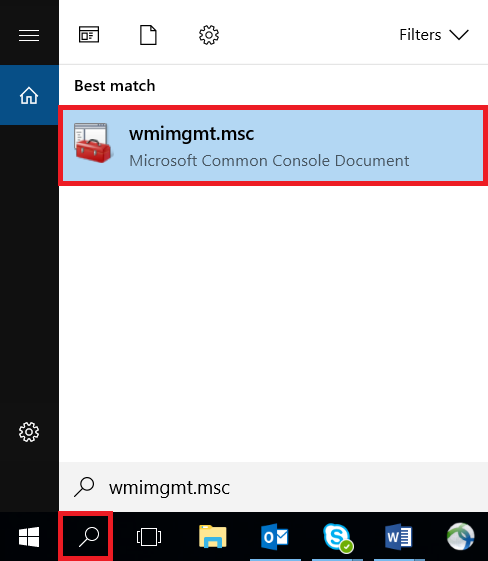
- Click the magnifying glass icon in the bottom-left corner and type "Services" in the Search Windows field.
- Click the wmimgmt.msc Microsoft Common Console Document.
- In the WmiMgmt window, right click WMI Control (Local) and select Properties.
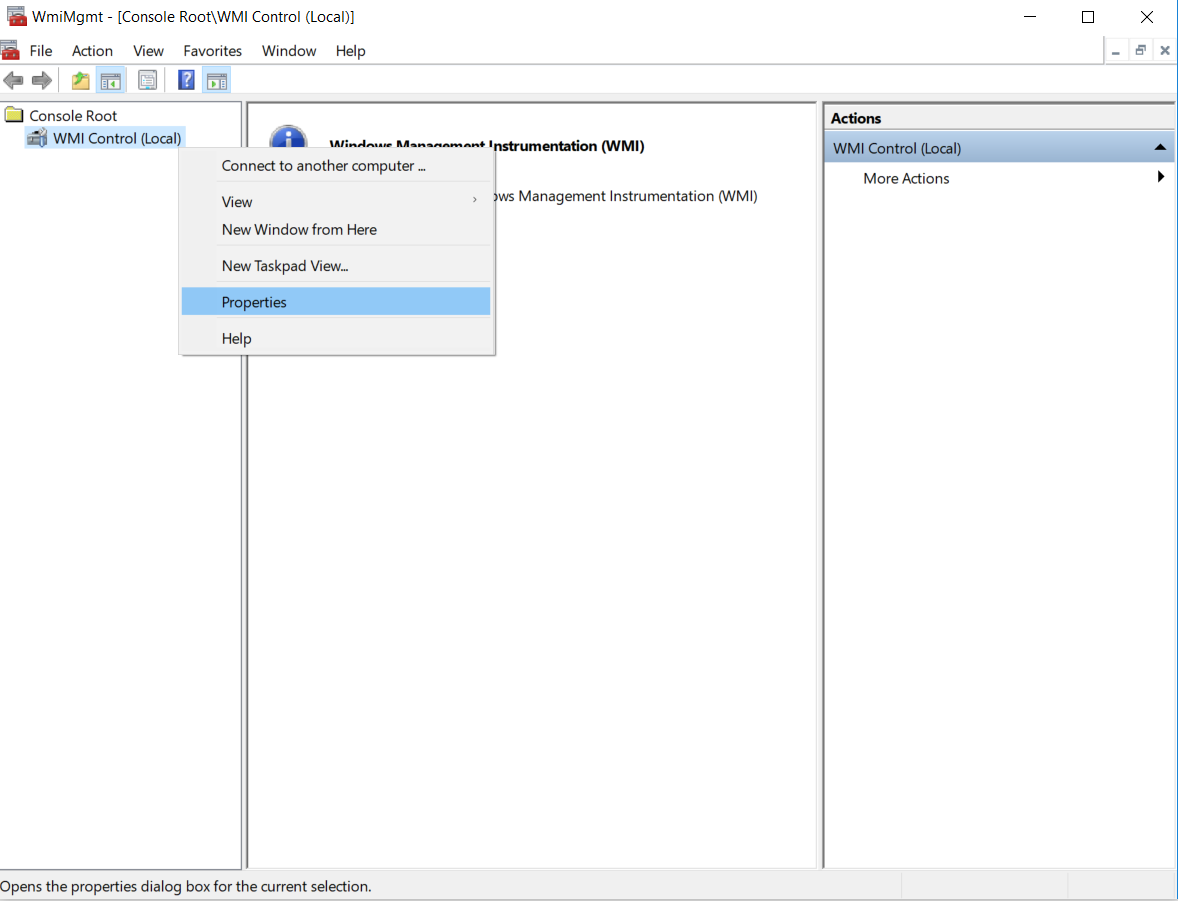
- In the WMI Control (Local) Properties window, click the tab, click Root, and then click the button.

- In the Security for Root window, click Administrators, and then click the button.
- In the Advanced Security Settings for Root window, click Administrators, and then click the button.

- In the Permission Entry for Root window, enter the following:
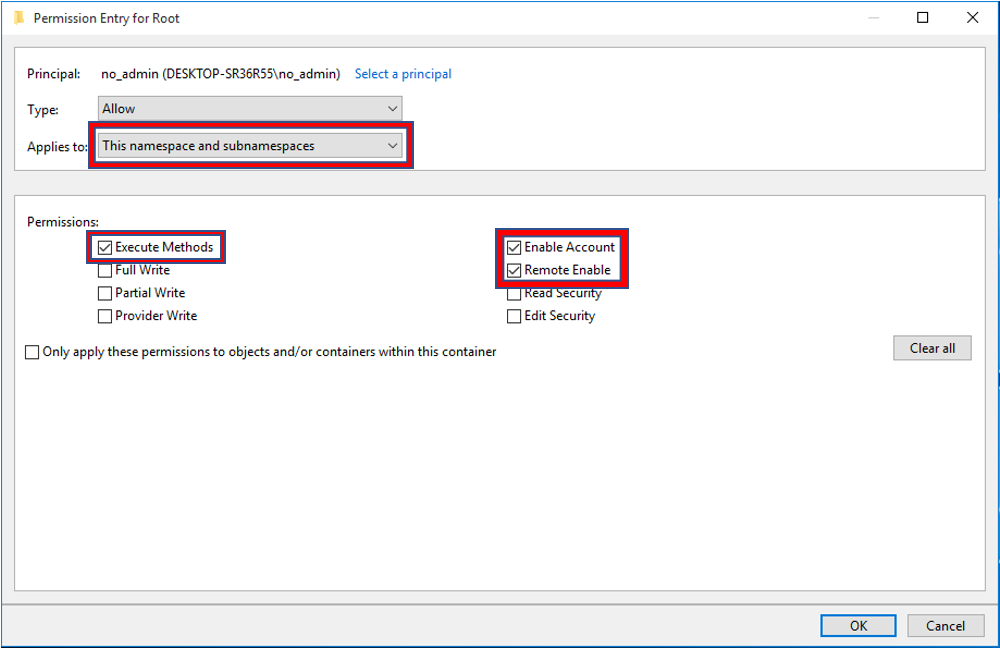
- Type. Select Allow.
- Applies to. Select This namespace and subnamespaces.
- Permissions. Select the Execute Methods, Full Write, Partial Write, Provider Write, Enable Account, Remote Enable, Read Security, and Edit Security checkboxes.
- Click OK in this window and the following windows, and then close the WmiMgmt window.
Step 4: Setting the DCOM Security Level
To set the DCOM Security Level, perform the following steps:
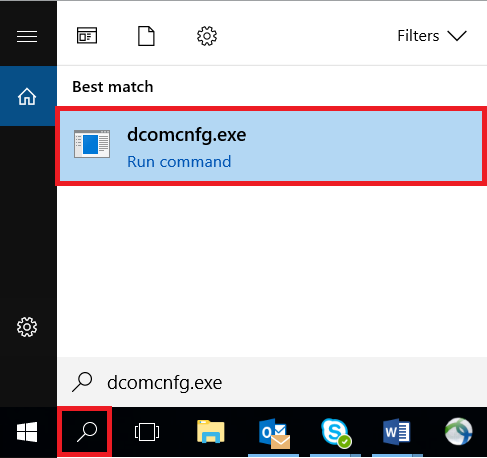
- Click the magnifying glass icon in the bottom-left corner and type "dcomcnfg.exe" in the Search Windows field.
- Click the dcomcnfg.exe command.
- In the Component Services window, expand Component Services > Computers, right-click My Computer, and then select Properties.

- In the My Computer Properties window, click the tab and then complete the following fields:
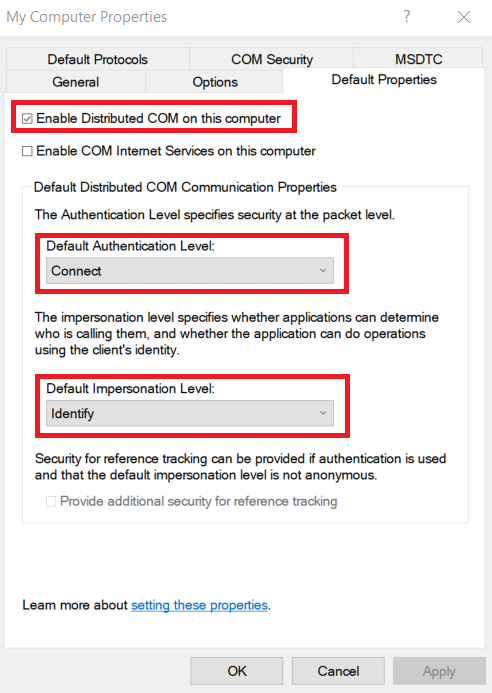
- Enable Distributed COM on this computer. Select this checkbox.
- Default Authentication Level. Select Connect.
- Default Impersonation Level. Select Identify.
- In the My Computer Properties window, click the tab. Under Launch and Activation Permissions, click the button.

- In the Launch and Activation Permission window, select the following:
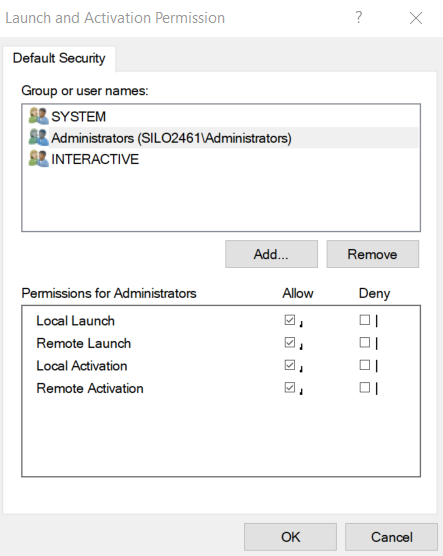
- Group or user names. Select Administrators.
- Permissions for Administrators. Set Local Launch, Remote Launch, Local Activation, and Remote Activationto Allow.
- Click .
- In the My Computer Properties window, in the Launch and Activation Permissions pane, click the button.

- In the Launch Permission window, select the following:
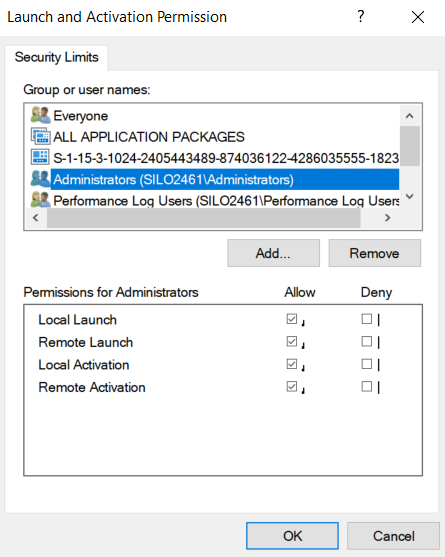
- Group or user names. Select Administrators.
- Permissions for Administrators. Set Local Launch, Remote Launch, Local Activation, and Remote Activationto Allow.
- Click OK in this window and the following windows, and then close the Component Services window.
- Restart the computer to save the settings.
Step 5: Disabling User Account Control
To monitor a device running Windows 7, 8, or 10, you must perform the following additional steps to disable the User Account Control (UAC) filter for remote logins:
- Use a text editor such as Notepad to create a new file.
- Include the following in the file.:
Windows Registry Editor Version 5.00
[HKEY_LOCAL_MACHINE\SOFTWARE\Microsoft\Windows\CurrentVersion\Policies\System]
"LocalAccountTokenFilterPolicy"=dword:00000001
- Save the file with a name of your choice, like disableUAC.reg, to the directory of your choice. Make sure to save the new file with the .reg suffix.
- In Windows Explorer, double click on the .reg file to execute it.
Step 6: Configuring a fixed port for WMI
Specific ports must be opened to allow WMI monitoring when there is a separate firewall between the Data Collector and the device. This can occur when the default configuration of the Windows Firewall blocks incoming network traffic for the Windows Management Instrumentation (WMI) connection.
For the WMI connection to succeed, the remote machine must permit incoming network traffic on TCP ports 135, 445, and additional dynamically-assigned ports, typically in the range of 1025 to 5000 and 49152 to 65535.
To set up a fixed port for WMI, see the Microsoft documentation on Setting Up a Fixed Port for WMI.
Configuring Devices for Monitoring with PowerShell
This section describes how to configure Windows Server 2025, 2022, 2019, 2016, 2012, or 2012 R2 for monitoring by Skylar One using PowerShell.
Prerequisites
Before configuring PowerShell, ensure the following:
- Forward and Reverse DNS should be available for the target Windows server from the Skylar One Data Collector. Port 53 to the domain's DNS server should thus be available.
- When using an Active Directory user account as the Skylar One credential, port 88 on the Windows Domain Controller, for the Active Directory domain, should be open for Kerberos authentication.
- If encrypted communication between the Skylar One Data Collector and monitored Windows servers is desired, port 5986 on the Windows server should be open for HTTPS traffic. If unencrypted communications is being used, then port 5985 on the Windows server should be opened for HTTP traffic
- If multiple domains are in use, ensure that they are mapped in the [domain_realm] section of the Kerberos krb5.conf file on the Linux operating system of the Skylar One collector appliance.
Configuring PowerShell
To monitor a Windows Server using PowerShell Dynamic Applications, you must configure the Windows Server to allow remote access from Skylar One. To do so, you must perform the following general steps:
- Configure a user account that Skylar One will use to connect to the Windows Server. The user account can either be a local account or an Active Directory account.
For ease of configuration, ScienceLogic recommends using an Active Directory account that is a member of the local Administrators group on the Windows Server.
- Configure a Server Authentication Certificate to encrypt communication between Skylar One and the Windows Server.
- Configure Windows Remote Management.
- Optionally, configure a Windows server as a Windows Management Proxy.
If you are configuring multiple Windows servers for monitoring by Skylar One, you can apply these settings using a Group Policy.
- Optionally, you can increase the number of PowerShell Dynamic Applications that can run simultaneously against a single Windows server.
Step 1: Configuring the User Account for Skylar One
To enable Skylar One to monitor Windows servers, you must first configure a user account on a Windows Server that Skylar One can use to make PowerShell requests. You will include this user account information when creating the PowerShell credential that Skylar One uses to collect data from the Windows Server.
To configure the Windows Server user account that Skylar One can use to make PowerShell requests, complete one of the following options:
- Option 1: Create an Active Directory Account with Administrator access
- Option 2: Create a local user account with Administrator access
- Option 3: Create a non-administrator user account
For ease-of-configuration, ScienceLogic recommends creating an Active Directory user account.
After creating your Windows Server user account, depending on your setup and the servers you want to monitor, you might also need to configure the user account for remote PowerShell access to the following server types:
Option 1: Creating an Active Directory Account with Administrator Access
For each Windows server that you want to monitor with PowerShell or WinRM, you can create an Active Directory account that is a member of the local Administrators group on each server. For instructions, consult Microsoft's documentation. On Windows Domain Controller servers, you can use a domain account that is not in the Domain Administrators group by following the configuration instructions for Option 3: Creating a Non-Administrator User Account.
After creating your Active Directory account:
- If you use Skylar One to monitor Microsoft Exchange Servers, you must configure the user account for remote PowerShell access to Microsoft Exchange Server.
- If you use Skylar One to monitor Hyper-V Servers, you must configure the user account for remote PowerShell access to the Hyper-V Servers.
- Otherwise, you can skip the remainder of this section and proceed to Step 3.
Option 2: Creating a Local User Account with Administrator Access
If you have local Administrator access to the servers you want to monitor and are monitoring Windows Server 2016 or Windows Server 2012, you can alternatively create a local user account with membership in the Administrators group instead of an Active Directory account. For instructions, consult Microsoft's documentation.
This method does not work for Windows Server 2008.
After creating your local user account with Local Administrator access:
- If you use Skylar One to monitor Microsoft Exchange Servers, you must configure the user account for remote PowerShell access to Microsoft Exchange Server.
- If you use Skylar One to monitor Hyper-V Servers, you must configure the user account for remote PowerShell access to the Hyper-V Servers.
- Otherwise, you can skip the remainder of this section and proceed to Step 2: Configuring a Server Authentication Certificate.
Option 3: Creating a Non-Administrator Local User Account
If you do not have Local Administrator access to the servers that you want to monitor with PowerShell or WinRM, or if the monitored Windows server is a Domain Controller that will not be in the local Administrators group, then you must first create a domain user account or create a local user account on the Windows Server. For instructions, consult Microsoft's documentation.
After creating your domain user account or local user account:
- You must configure the Windows servers to allow that non-administrator user access. To do so, follow the steps in this section.
- If you use Skylar One to monitor Microsoft Exchange Servers, you must configure the user account for remote PowerShell access to Microsoft Exchange Server.
- If you use Skylar One to monitor Hyper-V Servers, you must configure the user account for remote PowerShell access to the Hyper-V Servers.
To configure Windows Servers to allow access by your non-administrator user account:
- Start a Windows PowerShell shell with Run As Administrator and execute the following command:
winrm configsddl default
- On the Permissions for Default window, click the button, and then add the non-administrator user account.
- Select the Allow checkbox for the Read (Get, Enumerate, Subscribe) and Execute (Invoke) permissions for the user, and then click .
- Access the Management console. To do this:
- In Windows Server 2016 and 2012, right-click the Windows icon, click , and then expand .
- Right-click on and then select Properties.
- On the WMI Control Properties window, click the tab, and then click the button.
- Click the button, and then add the non-administrator user or group in the Select Users, Service Accounts, or Groups dialog, then click .
- On the Security for Root window, select the user o group just added, then in the Permissions section at the bottom of the window, select the Allow checkbox for the Execute Methods, Enable Account, and Remote Enable permissions.
- Under the Permissions section of the Security for Root window, click the button.
- In the Advanced Security Settings window, double-click on the user account or group you are modifying.
- On the Permission Entry window, in the Type field, select Allow.
- In the Applies to field, select This namespace and subnamespaces.
- Select the Execute Methods, Enable Account, and Remote Enable permission checkboxes, and then click several times to exit the windows opened for setting WMI permissions.
- Restart the WMI Service from services.msc.
To open services.msc, press the Windows + R keys, type "services.msc", and then press Enter.
- If this is a member server, go to the Management console, go to System Tools > Local Users and Groups > Groups. Right-click on Performance Monitor Users, then select Properties.
- If this is on a domain controller, go to the Server Manager, go to the Tools menu, and click Active Directory Users and Computers. Locate the Builtin folder. Inside the Builtin folder right-click Performance Monitor Users, and then select Properties.
- On the Performance Monitor Users Properties window, click the button.
- In the Enter the object names to select field, type the non-administrator domain user or group name, and then click .
- Select the user or group name from the list and then click .
- In the Performance Monitor Users Properties window, click .
- Perform steps 15-20 for the Event Log Readers user group and again for the Distributed COM Users user group, the Remote Management Users user group, and if it exists on the server, the WinRMRemoteWMIUsers__ user group.
- If you intend to use encrypted communications between the Skylar One collector host and your monitored Windows servers, each Windows server must have a digital certificate installed that has "Server Authentication" as an Extended Key Usage property. You can create a self-signed certificate for WinRM by executing the following command:
$Cert = New-SelfSignedCertificate -CertstoreLocation Cert:\LocalMachine\My -DnsName "myHost"
- Add an HTTPS listener by executing the following command:
New-Item -Path WSMan:\LocalHost\Listener -Transport HTTPS -Address * -CertificateThumbPrint $Cert.Thumbprint –Force
This command should be entered on a single line.
- Ensure that your local firewall allows inbound TCP connections on port 5986 if you are going to use encrypted communications between the Skylar One collector(s) and the Windows server, or port 5985 if you will be using unencrypted communications between the two. You may have to create a new rule on Windows Firewall if one does not already exist.
Optional: Configuring the User Account for Remote PowerShell Access to Microsoft Exchange Server
If you use Skylar One to monitor Microsoft Exchange Servers:
- Follow the steps in the section Configuring the User Account for Skylar One.
- Add the new user account to the “Server Management” Exchange security group in Active Directory.
- The user account will then be able to connect to the relevant WinRM endpoint to use cmdlets installed with the Exchange Management Shell. For example, this will give the user account access to the cmdlet “Get-ExchangeServer”.
Optional: Configuring the User Account for Remote PowerShell Access to Hyper-V Servers
To use PowerShell Dynamic Applications to monitor a Hyper-V server, you must:
- Create a user group in Active Directory
- Add the user account you will use to monitor the Hyper-V server to the group
- Set the session configuration parameters on the Hyper-V Server
- Set the group permissions on the Hyper-V Server
- Create a PowerShell credential using the new user account
Creating a User Group and Adding a User in Active Directory
To create a group in Active Directory and add a user:
- In Active Directory, in the same DC as the Hyper-V host you want to monitor, in the OU called Users, create a group. For example, we called our group PSSession Creators.
- Add a user that meets the requirements for monitoring a Windows server via PowerShell to the group. This is the user that you will specify in the PowerShell credential.
For details on using Active Directory to perform these tasks, consult Microsoft's documentation.
Setting the Session Configuration Parameters and Group Permissions
To set the Session Configuration and the Group Permissions on the Hyper-V Server:
- Login to the Hyper-V server.
- Open a PowerShell session. Enter the following command:
Set-PSSessionConfiguration -ShowSecurityDescriptorUI -Name Microsoft.PowerShell
- When prompted, select A.
- The Permissions dialog appears.
- In the Permissions dialog, supply values in the following fields:
- Group or user names. Select the name of the group you created in Active Directory.
- Permissions for group. For Full Control (All Operations), select the Allow checkbox.
- Click the button.
Optional: Configuring the User Account for Access to Windows Failover Cluster
To configure Windows Servers to allow access to your Windows Failover Cluster:
- Start a Windows PowerShell shell with Run As Administrator and execute the following command:
'Grant-ClusterAccess -User <domain>\<user> -ReadOnly'
Step 2: Configuring a Server Authentication Certificate
ScienceLogic highly recommends that you encrypt communications between Skylar One and the Windows Servers you want it to monitor.
If you have created a local account on the Windows Server that uses Basic Auth and that account will allow communication between Skylar One and the Windows server, the best practice for security is to enable HTTPS to support encrypted data transfer and authentication. To do this, you must configure WinRM to listen for HTTPS requests. This is called configuring an HTTPS listener.
For details on configuring WinRM on your Windows servers to use HTTPS, see https://support.microsoft.com/en-us/help/2019527/how-to-configure-winrm-for-https.
The sections below describe how to configure a Server Authentication Certificate on the Windows Server. This is only one task included in configuring an HTTPS listener. However, not all users need to configure a Server Authentication Certificate. You can find out if your Windows computer has a digital certificate installed for Server Authentication by running 'Get-ChildItem -Path Cert:\LocalMachine\My -EKU "*Server Authentication*"' from a PowerShell command shell.
To support encrypted data transfer and authentication between Skylar One and the servers, one of the following must be true:
- Your network includes a Microsoft Certificate server. In this scenario, you should work with your Microsoft administrator to get a certificate for your Windows Server instead of configuring a self-signed Server Authentication Certificate. You can skip this section and proceed to Step 3.
- Your network does not include a Microsoft Certificate server. In this scenario, you must configure a self-signed Server Authentication Certificate on the Windows Server that you want to monitor with Skylar One using one of the following methods:
- Option 1: Use the Microsoft Management Console.
- Option 2: If your Windows Server includes Windows Software Development Kit (SDK), you can use the makecert tool.
- Option 3: If you are running PowerShell 4.0 or later, you can use the New-SelfSignedCertificate and Export-PfxCertificate commands.
If you have created an Active Directory user account on the Windows Server to allow communication between Skylar One and the server, Active Directory will use Kerberos and AES-256 encryption to ensure secure authentication.
Option 1: Using the Microsoft Management Console to Create a Self-Signed Authentication Certificate
To use the Microsoft Management Console to create a self-signed certificate:
- Log in to the Windows Server that you want to monitor with Skylar One.
- In the Start menu search bar, enter "mmc" to open a Microsoft Management Console window.
- Select , then Add/Remove Snap-Ins. The Add or Remove Snap-ins window is displayed:
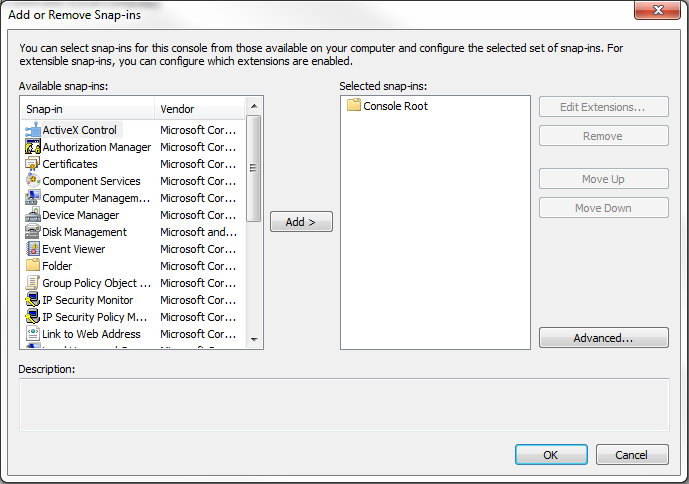
- In the Available snap-ins list, select Certificates.
- Click the button. The Certificates snap-in window is displayed:
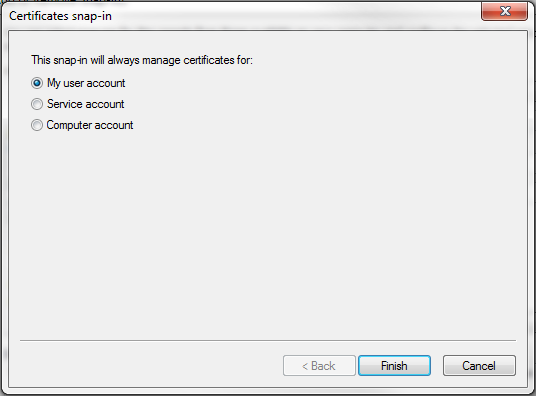
- Select Computer account.
- Click the button.
- Click the button.
- In the Add or Remove Snap-ins window, click the button.
- In the left pane of the Microsoft Management Console window, navigate to Console Root > Certificates (Local Computer) > Personal.
- Right-click in the middle pane and select All Tasks > Request New Certificate.... The Certificate Enrollment window is displayed.
- Click the button. The Select Certificate Enrollment Policy page is displayed.
- Select Active Directory Enrollment Policy.
- Click the button. The Request Certificates page is displayed.
- Select the Computer checkbox.
- Click the button.
- After the certificate is installed, click the button.
Option 2: Using the MakeCert Tool to Create a Self-Signed Authentication Certificate
If your Windows system includes Windows Software Development Kit (SDK), you can use the MakeCert tool that is included in the kit to create a self-signed certificate. For information on the MakeCert tool, or for details about creating a self-signed certificate with MakeCert and installing the certificate in the Trusted Root Certificate Authorities store, see the Microsoft documentation.
Option 3: Using PowerShell Commands to Create a Self-Signed Authentication Certificate
If your Windows system includes PowerShell 4.0 or later, you can use the following PowerShell commands to create a self-signed certificate:
- You can use the New-SelfSignCertificate command to create a self-signed certificate. For information on New-SelfSignCertificate, see the Microsoft documentation.
- You can use the Export-PfxCertificate command to export the private certificate. For information on the Export-PfxCertificate, see the Microsoft documentation.
Step 3: Configuring Windows Remote Management
To provide Skylar One remote access to the Windows Servers you want to monitor, you must configure Windows Remote Management.
This step is required regardless of the user account type that Skylar One will use to connect to the Windows Server.
There are three ways to configure Windows Remote Management:
- Option 1: Use the script provided by ScienceLogic.
- Option 2: Manually perform the configuration.
- Option 3: Use a group policy.
Option 1: Using a Script to Configure Windows Remote Management
ScienceLogic provides a PowerShell script in a .zip file in the PowerPack download folder that automates configuration of Windows Remote Management and permissions required for the user account that will be used in the Skylar One credential. The script configures all of the base Windows permissions required, except for opening up Windows Firewall ports for HTTP and/or HTTPS traffic. The configuration performed by the script is useful primarily for running collection with the "Microsoft: Windows Server", "Microsoft: Windows Server Event Logs", and "Microsoft: SQL Server Enhanced" PowerPacks.
The "Microsoft: SQL Server Enhanced" PowerPack requires further instance-specific permissions. See Microsoft: SQL Server PowerPack Release Notes for more information.
To use the PowerShell script, perform the following steps:
- When you download the "Microsoft: Windows Server" PowerPack from the ScienceLogic Support Center, a .zip file for the WinRM Configuration Wizard Script (winrm_configuration_wizard_v3.5.ps1) will be in the folder with the PowerPack's EM7PP file.
- Unzip the downloaded file.
- Using the credentials for an account that is a member of the Administrator's group, log in to the Windows server you want to monitor. You can log in directly or use Remote Desktop to log in.
- Copy the PowerShell script named winrm_configuration_wizard_v3.5.ps1 to the Windows server that you want to monitor with Skylar One.
- Right-click on the PowerShell icon and select Run As Administrator.
- At the PowerShell prompt, navigate to the directory where you copied the PowerShell script named winrm_configuration_wizard_v3.5.ps1.
- At the PowerShell prompt, enter the following to enable execution of the script:
- After the warning text, select Y.
- To run the script with interactive dialogs, enter the following at the PowerShell prompt:
- If you start the script without using the -silent command-line argument, the WinRM Installation Wizard modal appears. Click .
- The Windows Account Type modal appears. Select the appropriate choice for your environment.
- The Set Encryption Policy modal appears. Select the appropriate choice for your environment.
- Click YES to us only encrypted data. Click Yes to configure an HTTPS listener for using encrypted communications between the Skylar One collectors and the Windows server. Setting up an HTTPS listener requires a digital certificate with Server Authentication EKU to be available on the server.
- Click NO to allow unencrypted data. For communication between Skylar One collectors and the Windows server, if unencrypted traffic is allowed, an HTTP listener will be configured for communication.
- The Change Max Requests modal appears. Click .
- The Change IdleTimeout modal appears. If you would like to change the value of IdleTimeout, click . If you click , the Set WinRM IdleTimeout modal appears. Enter the new value in the field and click .
- The Set Ports for WinRM Traffic modal appears, and it shows the current settings for the HTTP and HTTPS ports. If you want to make a change to these, click ; otherwise, click to continue.
- Choose which port values you would like Skylar One to use when communicating with the Windows server.
- The Set HTTPS Thumbprint modal appears. Enter the information for your certificate thumbprint, which is used to create an HTTPS listener, then click .
- The Confirm Settings modal appears. If the settings are as you specified, click .
- The Complete modal appears. If the settings are correct, click .
- Exit the PowerShell session.
Set-ExecutionPolicy -ExecutionPolicy Unrestricted -Scope Process -Force
The execution policy setting persists only during the current PowerShell session.
If your Windows configuration requires further steps to allow execution of the script, PowerShell will display prompts. Follow the prompts.
.\winrm_configuration_wizard_v3.5.ps1 -user <domain>\<username>
If you have run the script previously and set HTTPS listeners, make sure you have deleted any previous HTTPS listeners with the following command: winrm delete winrm/config/Listener?Address=*+Transport=HTTPS
The user account you wish to use for Skylar One collection must be specified with the -user command-line argument regardless of other arguments used. You can obtain the full help for the PowerShell configuration script by entering the following:
help .\winrm_configuration_wizard_v3.5.ps1 -full
This command works only on Windows servers, and not on Windows 11 workstations.
The most common way to run the script is silently:
.\winrm_configuration_wizard_v3.5.ps1 -user <domain>\<username> -silent
If you have multiple certificates installed on your server, running the script with the -silent flag will by default use the first certificate it encounters for your HTTP/HTTPS listeners. To set a specific certificate, run the script without the -silent flag and use the WinRM Installation Wizard.
You can use "-dry_run" command-line argument to record all PowerShell commands that would have made changes to the Windows system. These commands will be logged in the silo_winrm_config.log file with the prefix: "Dry Run: '<COMMAND>'".
.\winrm_configuration_wizard_v3.5.ps1 -user <domain>\<username> -dry_run
You can also use "-permissions_only" command-line argument to run the following functions: AddWinRMRights, AddUserToGroups, SetWMIPermissions, SetRegistryPermissions, SetSecurityRegKeyReadPermission.
.\winrm_configuration_wizard_v3.5.ps1 -user <domain>\<username> -permissions_only
If the certificate structure for your certificate thumbprint is incomplete or incorrect, an error message appears indicating that the WinRM client cannot process the request. If you think you made an error, click and try to correct it. Otherwise, contact a system administrator for help.
Option 2: Manually Configuring Windows Remote Management
To configure a Windows server for monitoring via PowerShell directly, perform the following steps:
- Log in to the server with an account that is a member of the local Administrators group, or a Domain Administrator's account if on a Windows server with the Domain Controller role installed.
- Ensure that your local firewall allows inbound TCP connections on port 5986 if you are going to use encrypted communications between the Skylar One Data Collectors and the Windows server, or port 5985 if you will be using unencrypted communications between the two. You may have to create a new rule on Windows Firewall if one does not already exist.
- Right-click on the PowerShell icon in the taskbar or the Start menu, and select Run as Administrator.
- Execute the following command:
- If the output is "Restricted", execute the following command:
- Enter "Y" to accept.
- Execute the following command:
- Enter "Y" to accept.
- If you are configuring this Windows server for encrypted communication, execute the following command:
- Enter "Y" to accept.
- Execute the following command:
- In the Service section, if the parameter AllowRemoteAccess is set to false, execute the following command:
- In the Winrs section, if the parameter AllowRemoteShellAccess is set to false, execute the following command:
- If you are configuring this Windows server for unencrypted communication and the parameter AllowUnencrypted (in the Service section) is set to false, execute the following command:
- If you are configuring this Windows server for unencrypted communication, verify that "HTTP = 5985" appears in the DefaultPorts section.
- If you are configuring this Windows server for encrypted communication, verify that "HTTPS = 5986" appears in the DefaultPorts section.
Get-ExecutionPolicy
Set-ExecutionPolicy RemoteSigned
winrm quickconfig
winrm quickconfig -transport:https
winrm get winrm/config
The output should look like this (additional lines indicated by ellipsis):
Config
...
Client
...
Auth
Basic = true
...
Kerberos = true
...
...
Service
...
AllowUnencrypted = false
...
DefaultPorts
HTTP = 5985
HTTPS = 5986
...
AllowRemoteAccess = true
Winrs
AllowRemoteShellAccess = true
...
This setting does not appear for all versions of Windows. If this setting does not appear, no action is required.
Set-Item WSMan:\Localhost\Service\AllowRemoteAccess -value true
Set-Item WSMan:\Localhost\Winrs\AllowRemoteShellAccess -value true
Set-Item WSMan:\Localhost\Service\AllowUnencrypted -value true
ScienceLogic recommends using encrypted communication, particularly if you are also using an Active Directory account. Using an Active Directory account for encrypted authentication enables you to use Kerberos ticketing for authentication.
- If you are using an Active Directory account to communicate with this Windows server and in the Auth section, the parameter Kerberos is set to false, execute the following command:
Set-Item WSMan:\Localhost\Service\Auth\Kerberos -value true
ScienceLogic recommends using an Active Directory account.
- If you are using a local account to communicate with this Windows server and in the Auth section, the parameter Basic is set to false, execute the following command:
Set-Item WSMan:\Localhost\Service\Auth\Basic -value true
- IdleTimeout is set to 7200000 milliseconds (2 hours) by default. If an issue occurs with scheduled PowerShell monitoring and a process remains on a Windows device, it will therefore remain for up to 2 hours before being removed. To reduce the IdleTimeout and have Windows shut down idle WinRM processes after a shorter time period, execute the following command:
winrm s winrm/config/winrs '@{IdleTimeout="600000"}'
This command will change the timeout to 10 minutes (600000 ms).
When changing IdleTimeout, ensure that no other applications or utilities need a higher timeout for WinRM sessions.
Option 3: Using a Group Policy to Configure Windows Remote Management
You can use a group policy object (GPO) to configure the following Windows Remote Management settings on Windows Server 2012 or Windows Server 2016:
- A registry key to enable Local Account access to Windows Remote Management
- Firewall rules
- Certificates
- HTTP and HTTPS listeners, including authentication and encryption settings
- Service start and recovery settings
To create the group policy object, perform the following steps:
- Log in to the CA server as an administrator.
- Right-click on the PowerShell icon in the taskbar and select Run as Administrator.
- At the PowerShell prompt, use the change directory (CD) command to navigate to a folder where you can create new files.
- Save the root Certification Authority certificate to the local directory by executing the following command:
- Exit the command prompt.
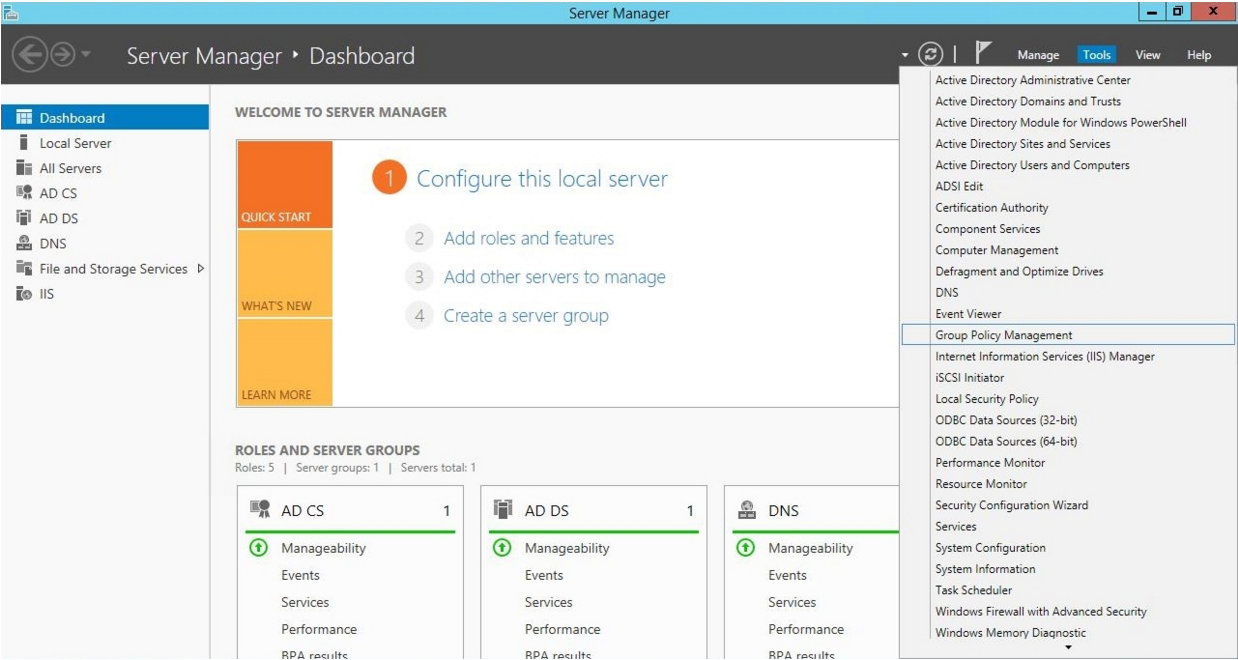
- Log in to a domain controller in your Active Directory forest and navigate to the System Manager dashboard.
- Click the Tools menu, then select Group Policy Management.
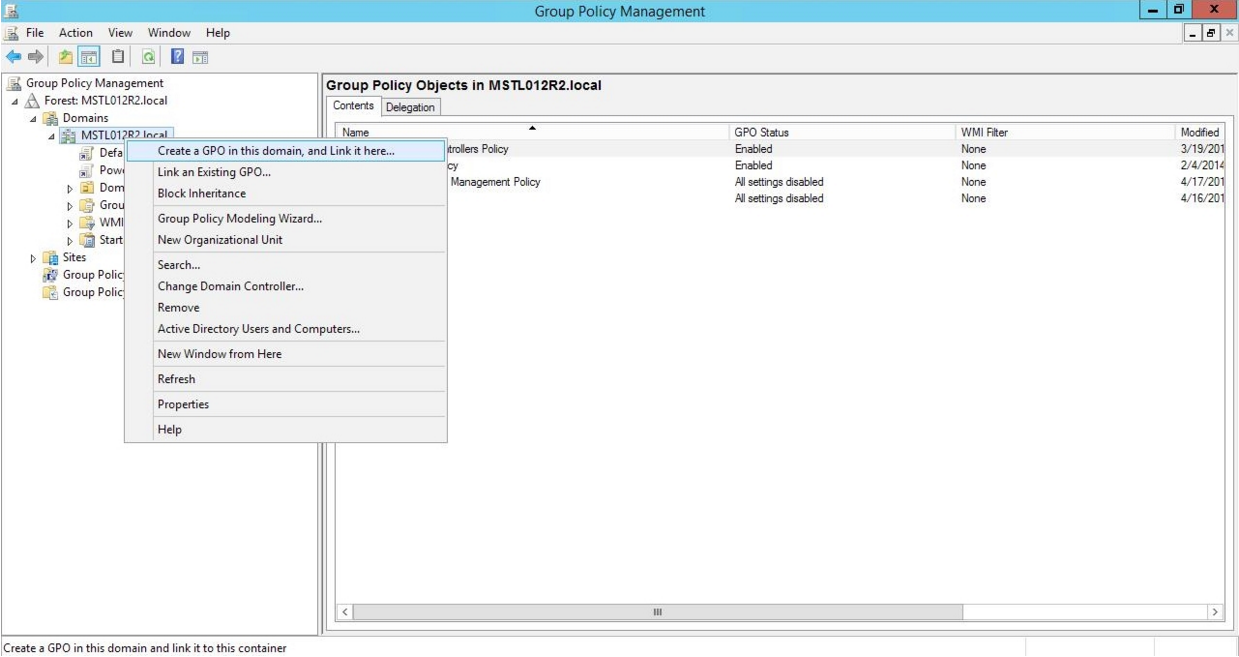
- On the Group Policy Management page, in the left panel, right-click the domain name where you want the new group policy to resideand then select Create a GPO in this domain and Link it here.
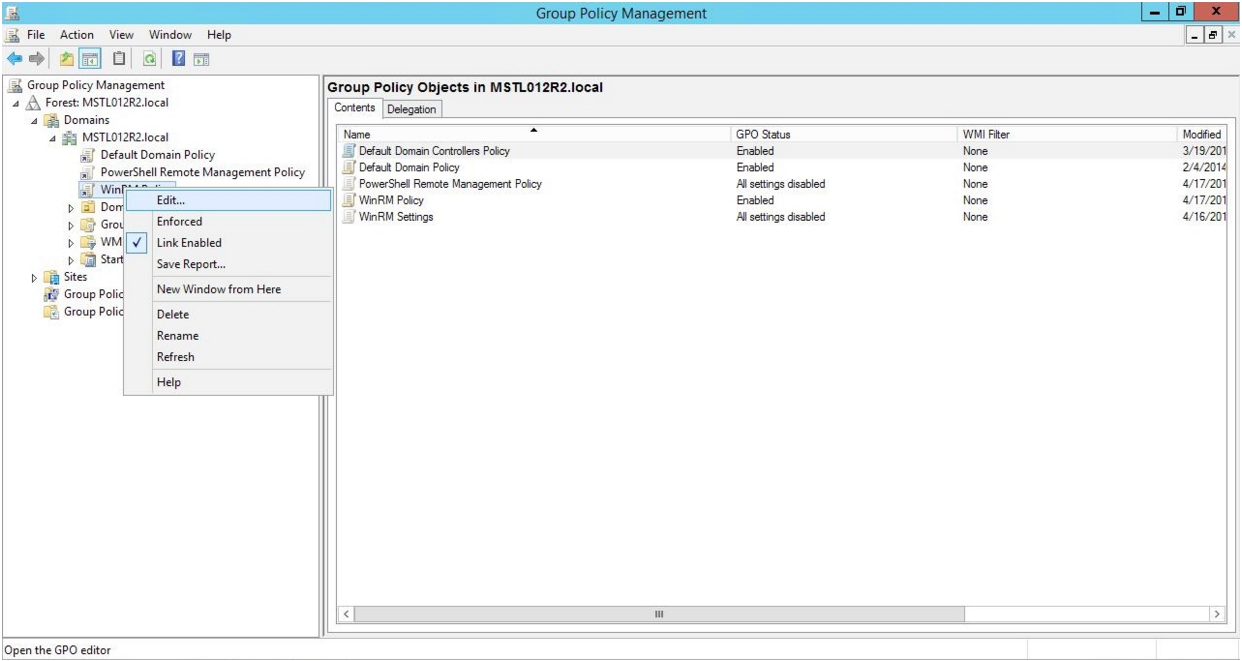
- In the left panel, right-click the new group policy and select Edit. The Group Policy Management Editor page for the new Windows Remote Management group policy appears.
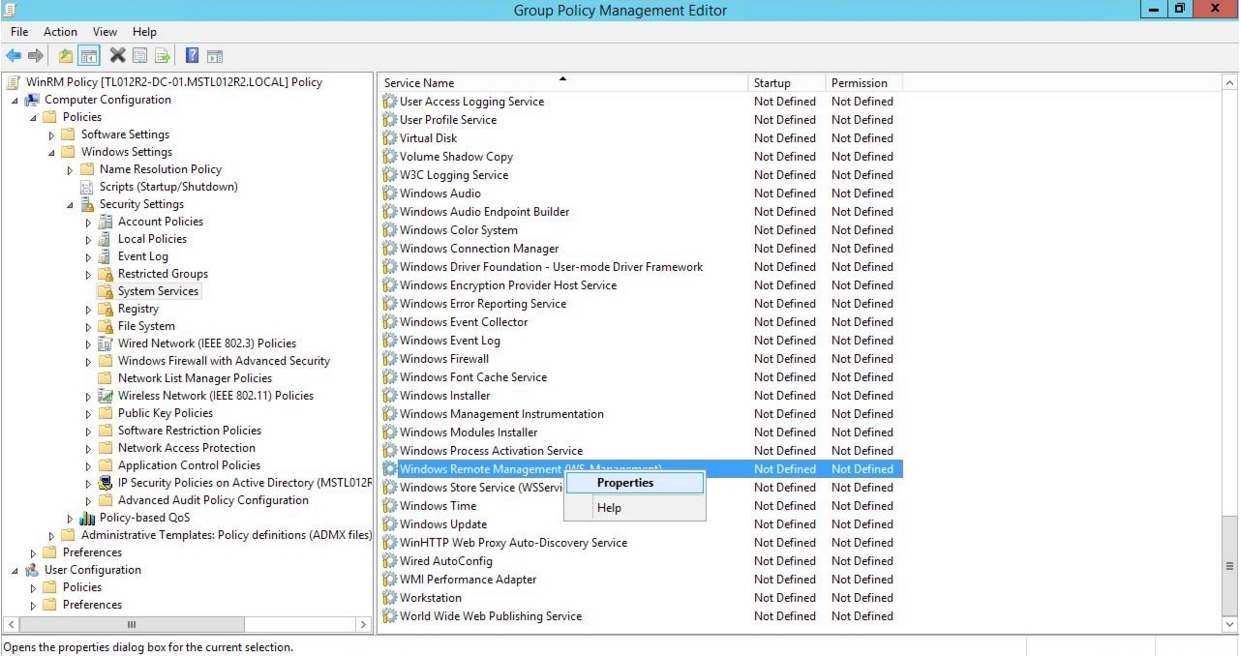
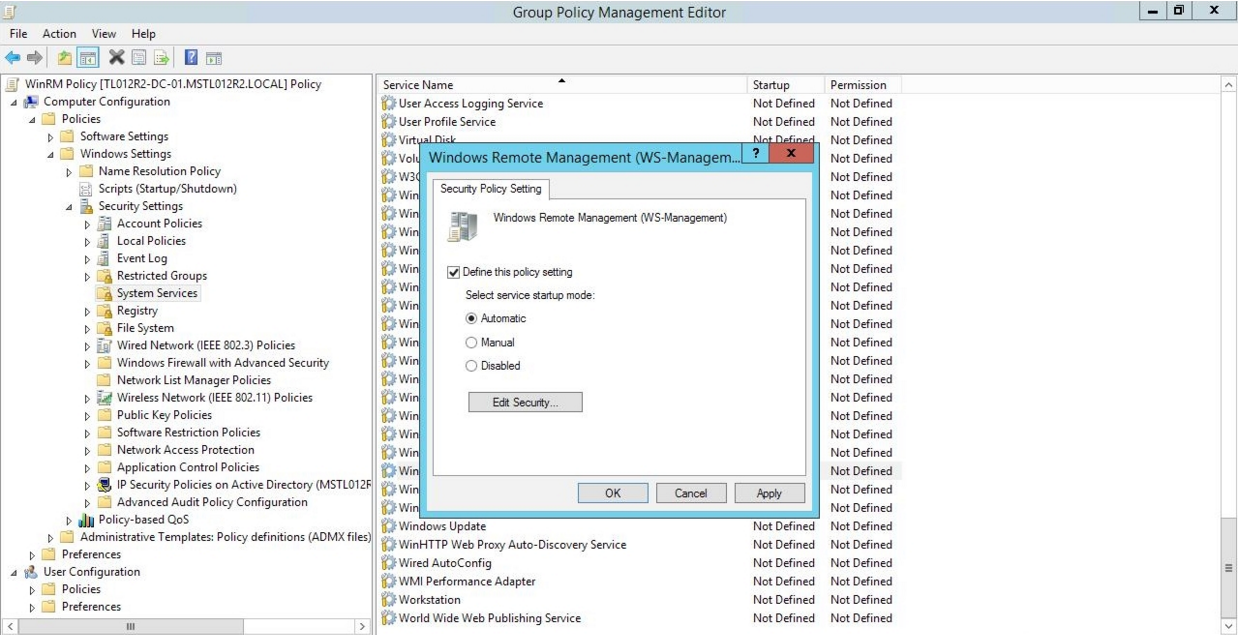
- In the left panel, navigate to Computer Configuration > Policies > Windows Settings > Security Settings > System Services. In the right panel, locate the Windows Remote Management (WS-Management) service. Right-click the service, then select Properties.
- The Windows Remote Management (WS-Management) modal page appears. Select the Define this policy setting check box and the Automatic radio button, then click .
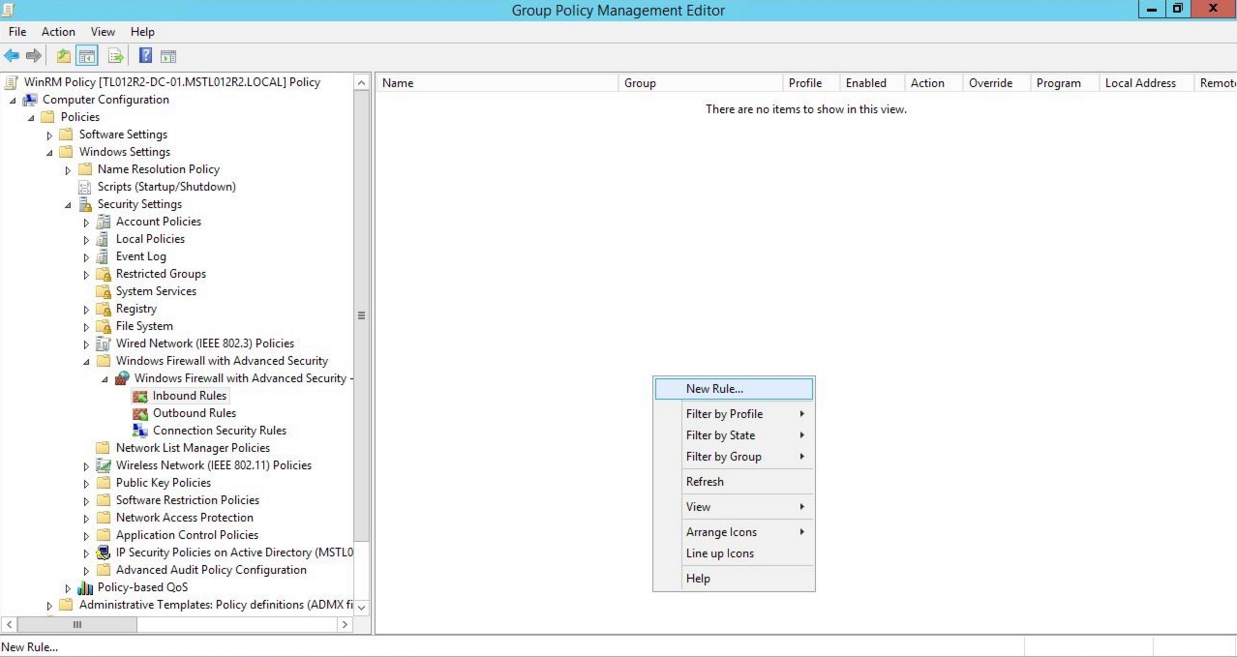
- In the left panel of the Group Policy Management Editor page, navigate to Computer Configuration > Policies > Windows Settings > Security Settings > Windows Firewall with Advanced Security > Windows Firewall with Advanced Security - LDAP > Inbound Rules. In the right panel, right-click and select New Rule.
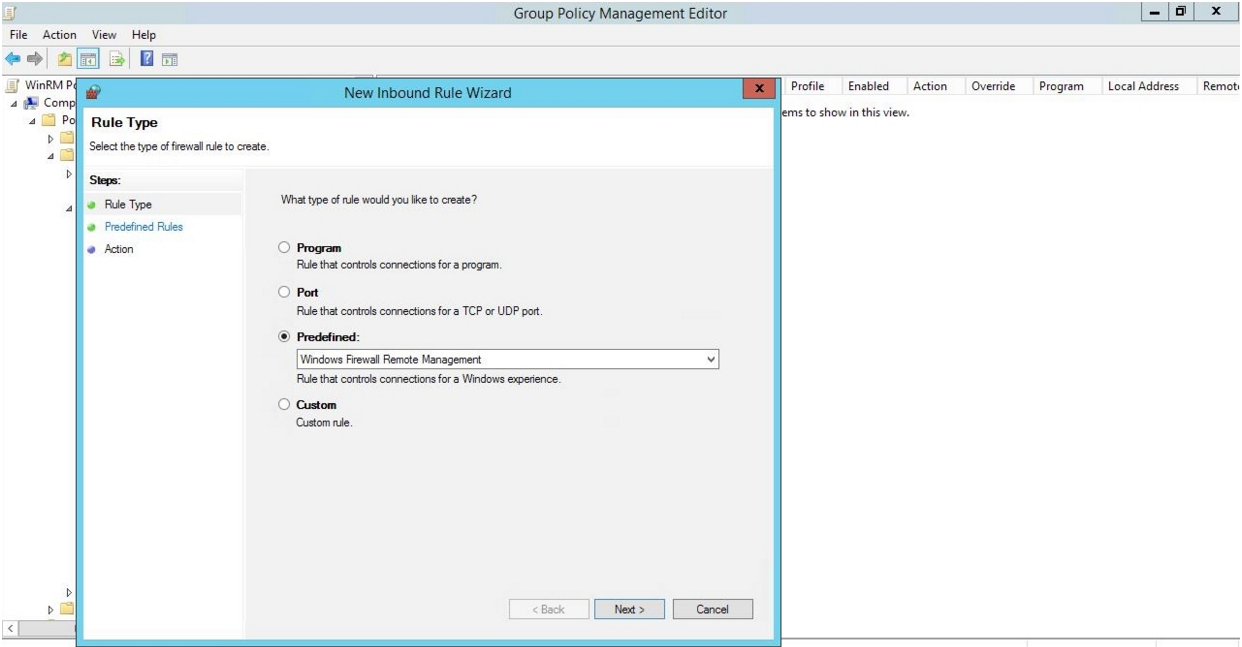
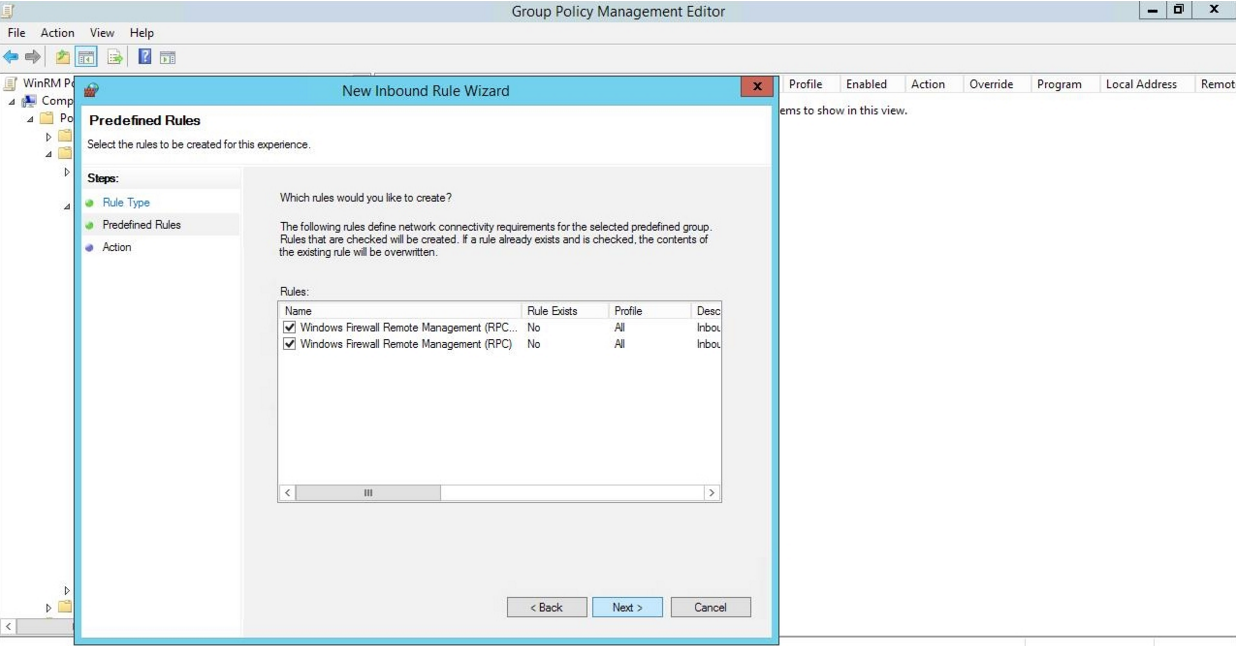
- The New Inbound Rule Wizard modal page appears. Click the Predefined radio button, select Windows Firewall Remote Management from the list, and then click .
- Select the Windows Firewall Remote Management (RPC) and Windows Firewall Remote Management (RPC-EPMAP) check boxes, then click .
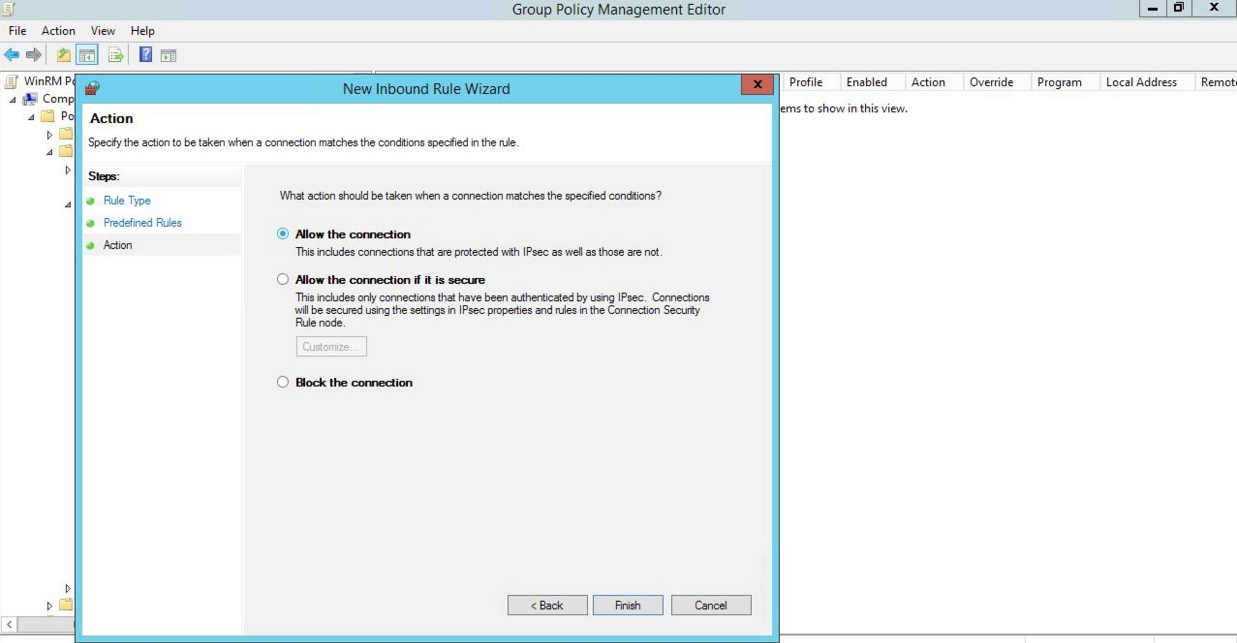
- Select the Allow the connection radio button, then click .
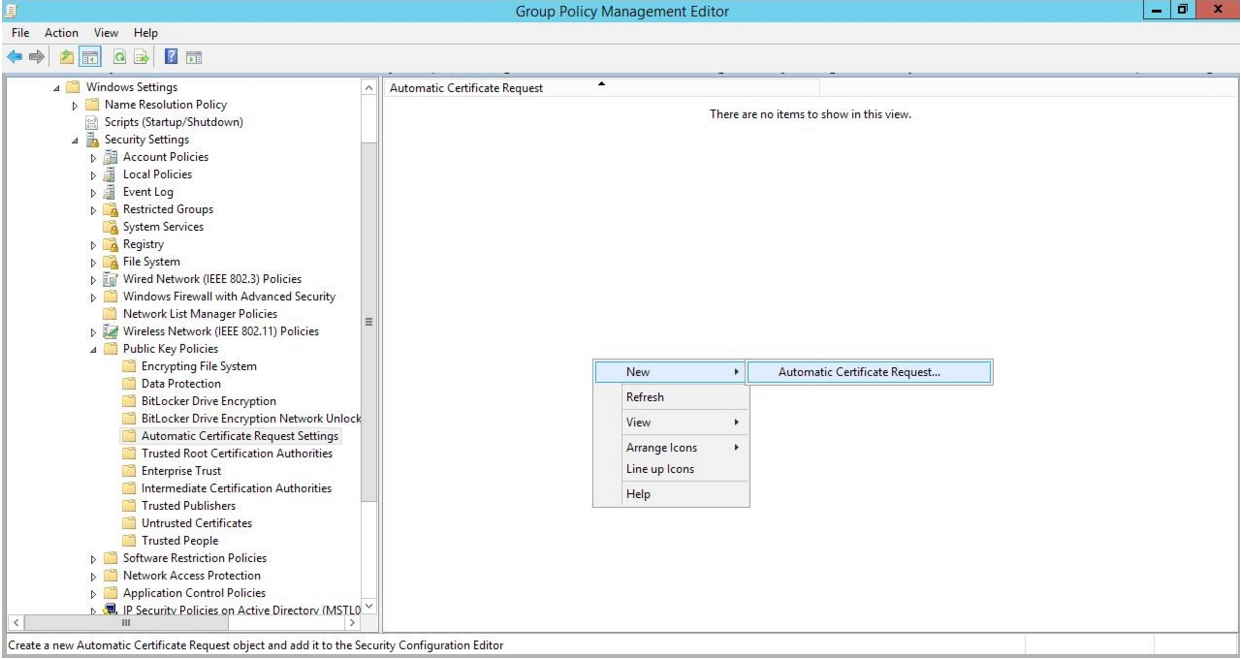
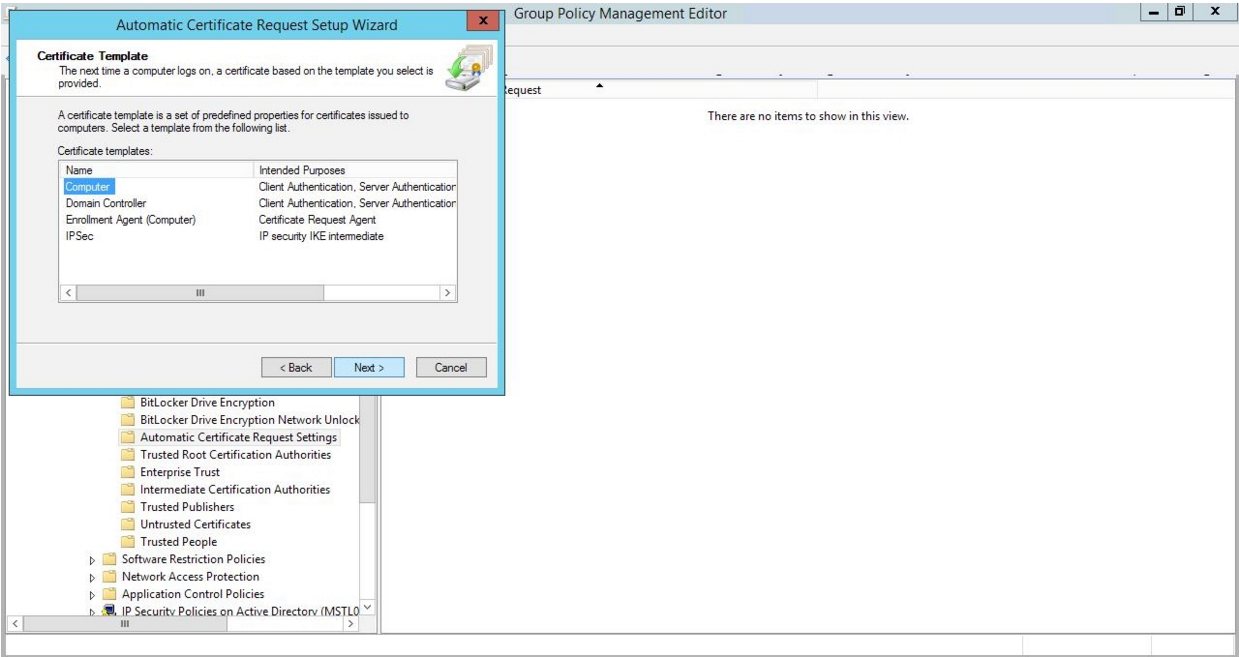
- In the left panel of the Group Policy Management Editor page, navigate to Computer Configuration > Policies > Windows Settings > Security Settings > Public Key Policies > Automatic Certificate Request Settings. In the right panel, right-click and select New > Automatic Certificate Request.
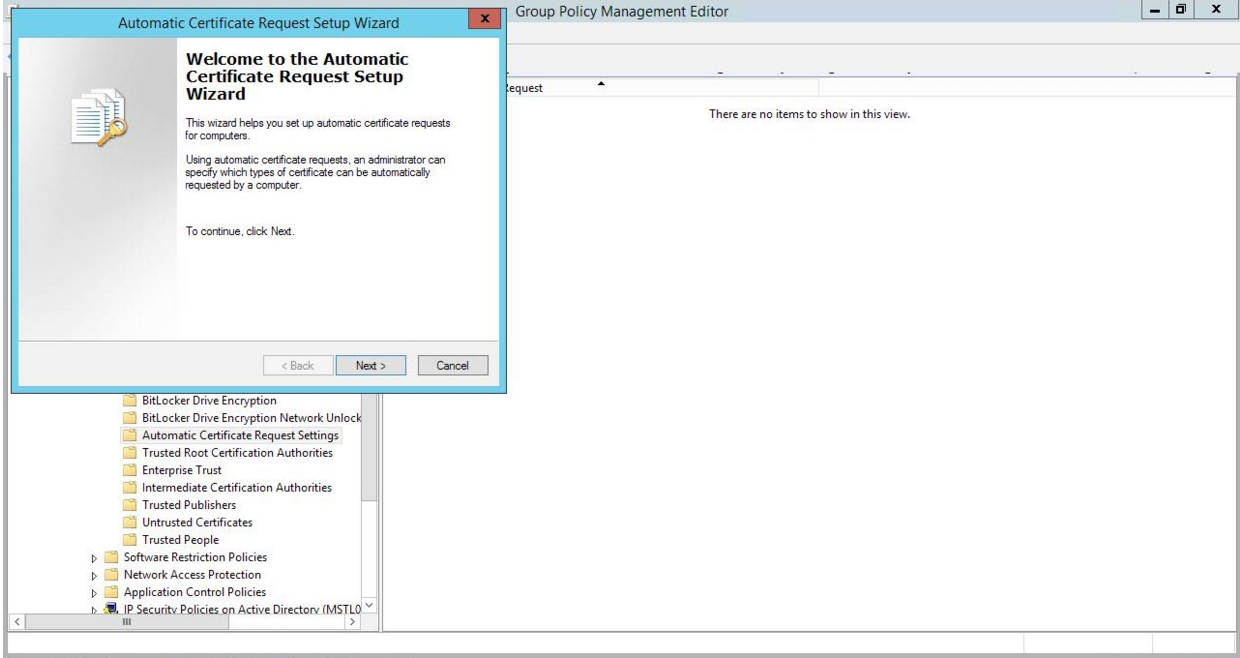
- The Automatic Certificate Request Setup Wizard modal page appears. Click .
- Select the Computer certificate template. Click , and then click .
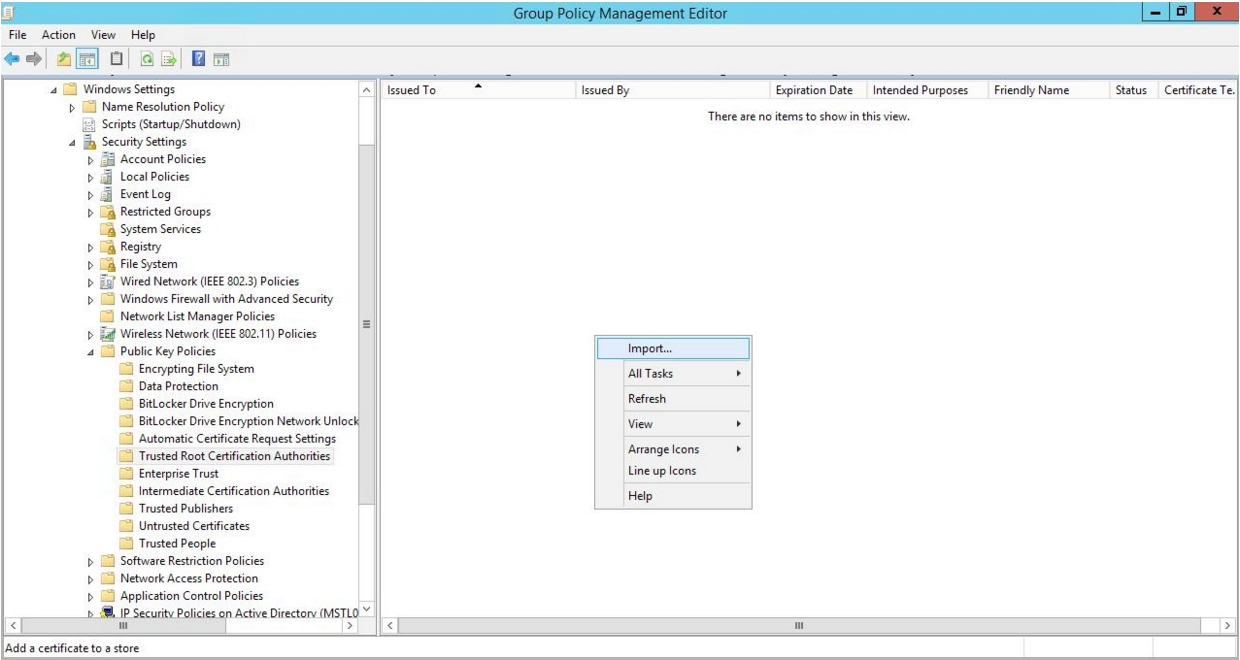
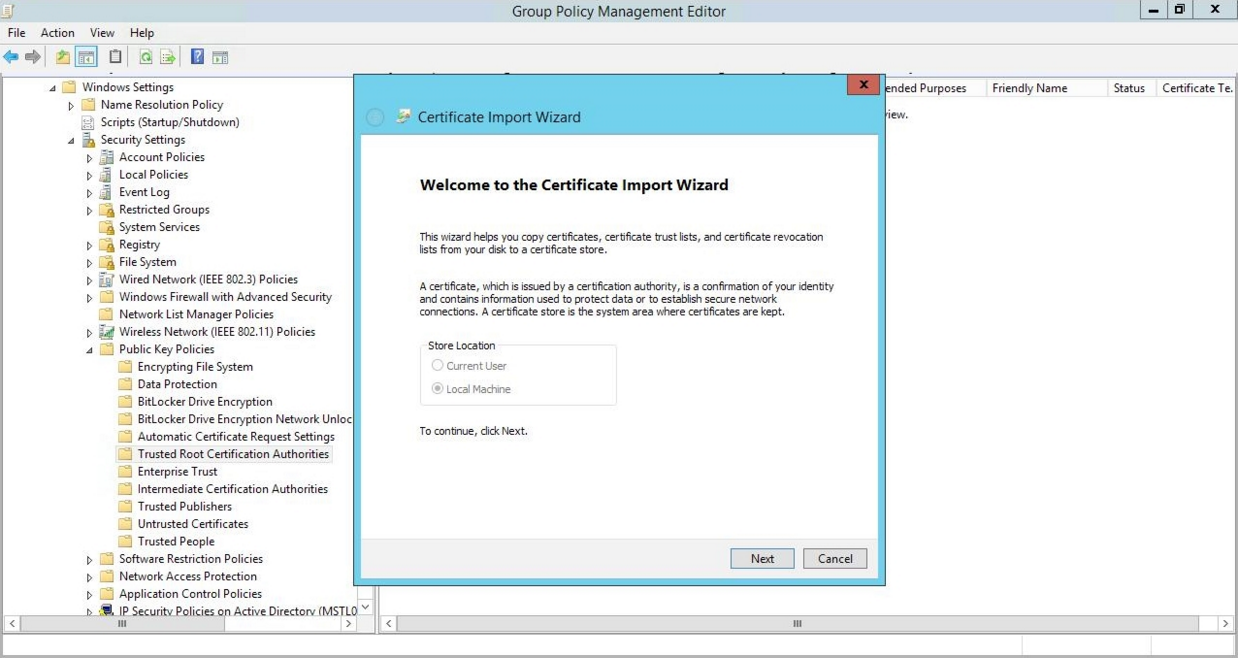
- In the left panel of the Group Policy Management Editor page, navigate to Computer Configuration > Policies > Windows Settings > Security Settings > Public Key Policies > Trusted Root Certification Authorities. In the right panel, right-click and select Import.
- The Certificate Import Wizard modal page appears. Click .
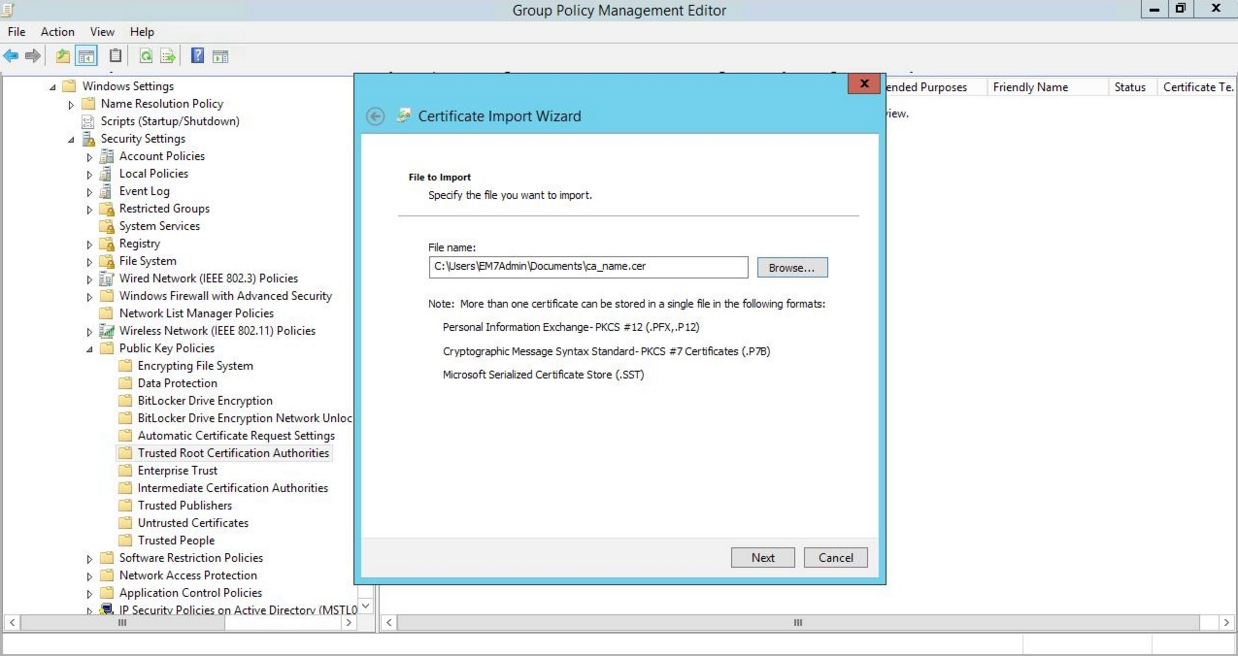
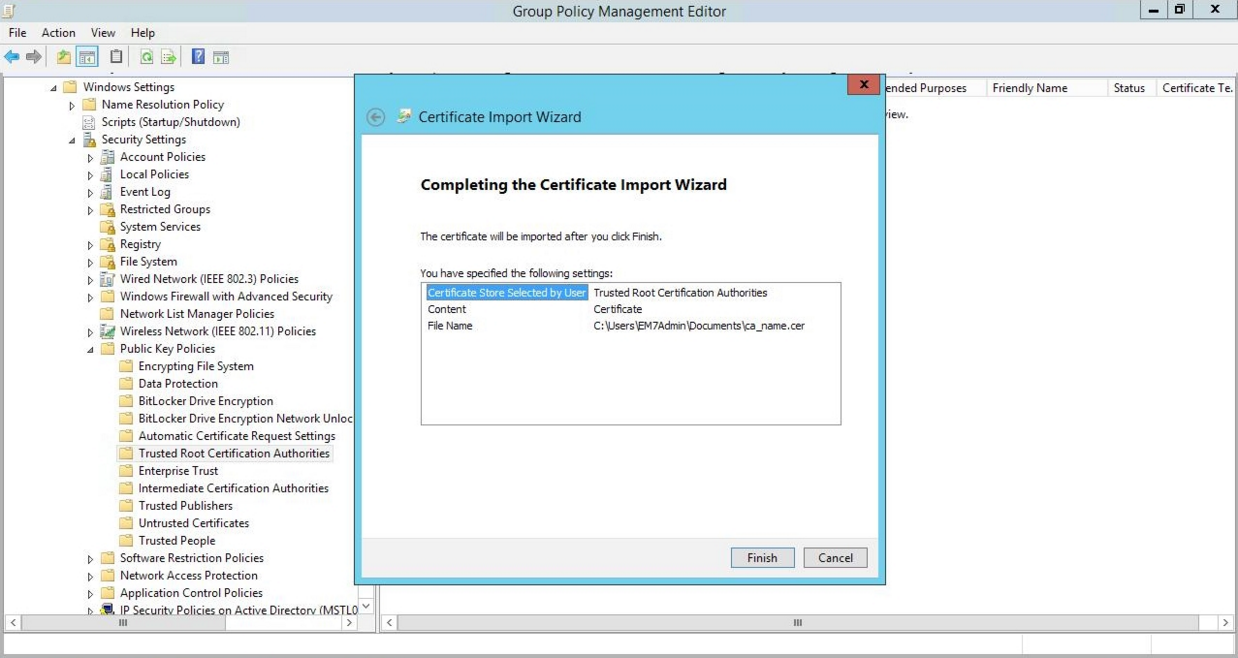
- Browse to the Certification Authority certificate that you saved to your local directory in step 4, then click .
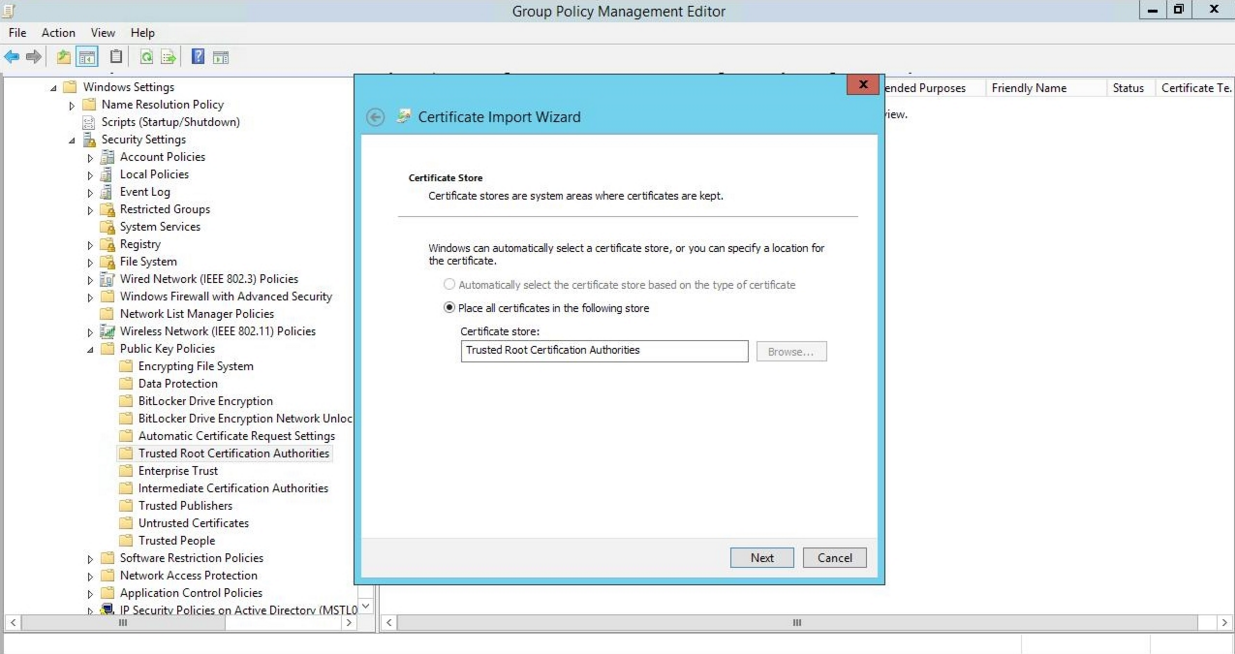
- Select the Place all certificates in the following store radio button, then select the Trusted Root Certification Authorities certificate store and click .
- Click to confirm that the certificate was successfully imported, and then click .
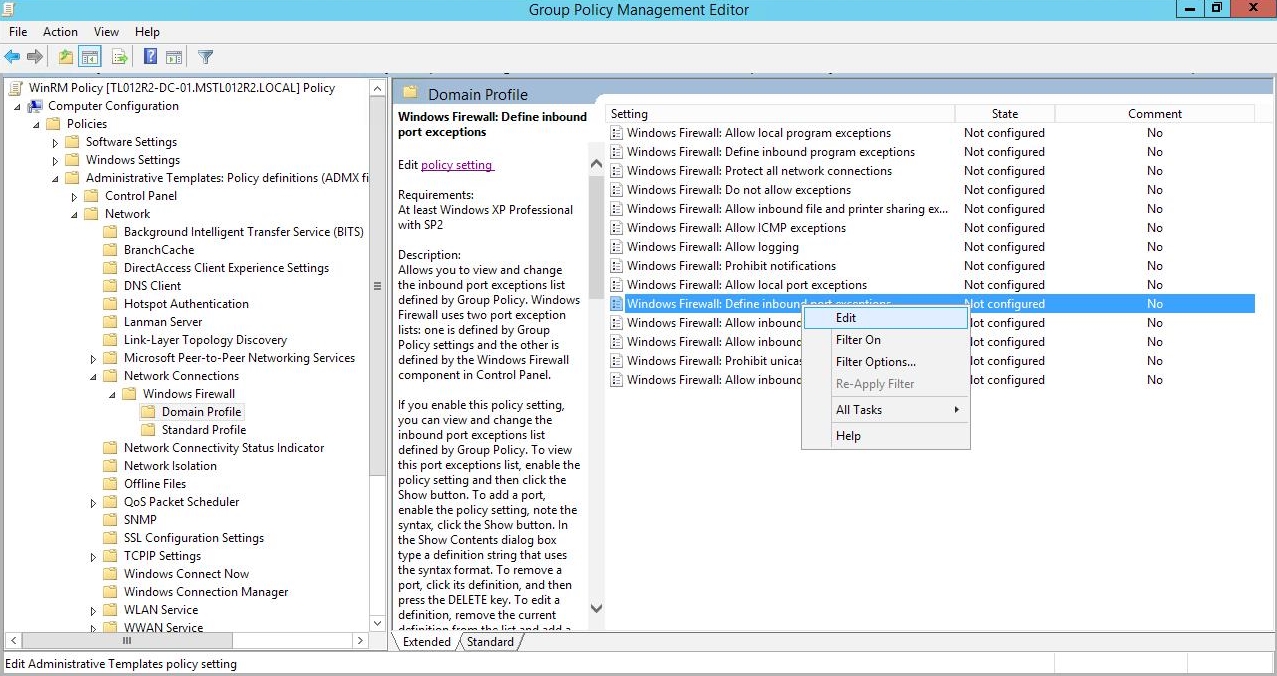
- In the left panel of the Group Policy Management Editor page, navigate to Computer Configuration > Policies > Administrative Templates > Network > Network Connections > Windows Firewall > Domain Profile. In the right panel, right-click Windows Firewall: Define inbound port exceptions and select Edit.
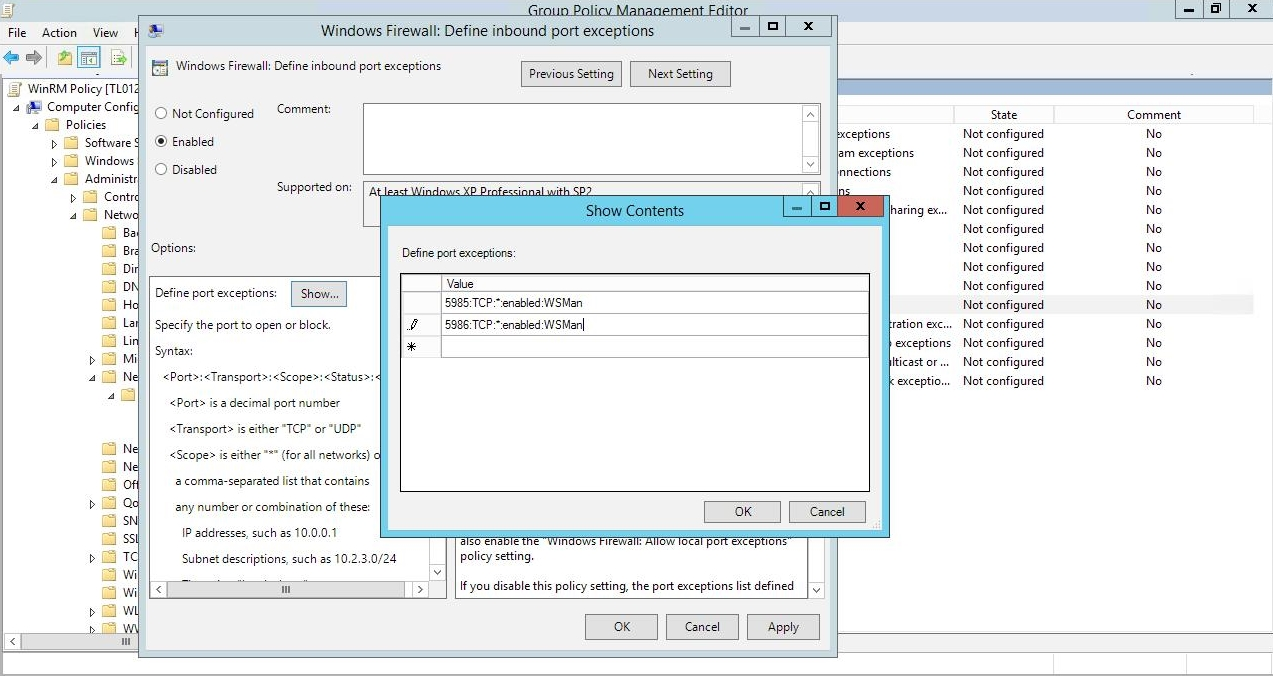
- The Windows Firewall: Define inbound port exceptions modal page appears. Under Options, click .
- The Show Contents modal page appears. Enter the following values:
- 5985:TCP:*:enabled:WSMan
- 5986:TCP:*:enabled:WSMan
- Click , then click again.
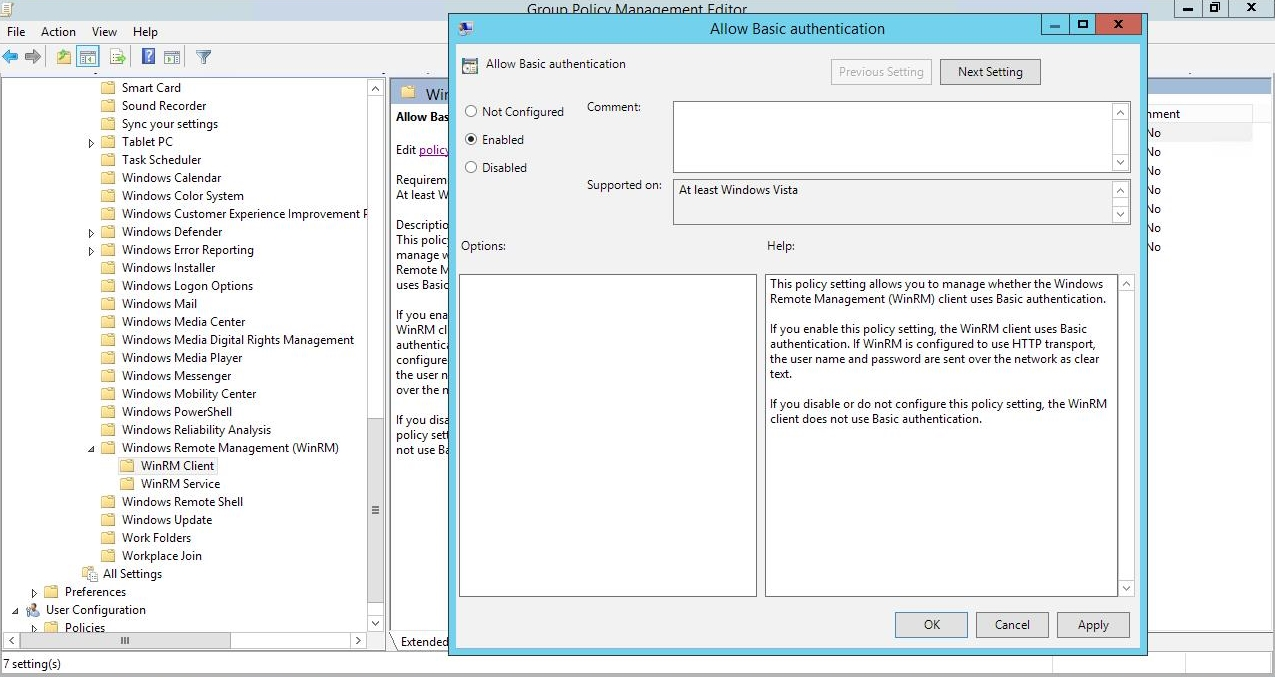
- In the left panel of the Group Policy Management Editor page, navigate to Computer Configuration > Policies > Administrative Templates > Windows Components > Windows Remote Management (WinRM) > WinRM Client. In the right panel, double-click the Allow Basic authentication setting.
- Select the Enabled radio button, then click .
- Repeat steps 28 and 29 for the Allow unencrypted traffic setting.
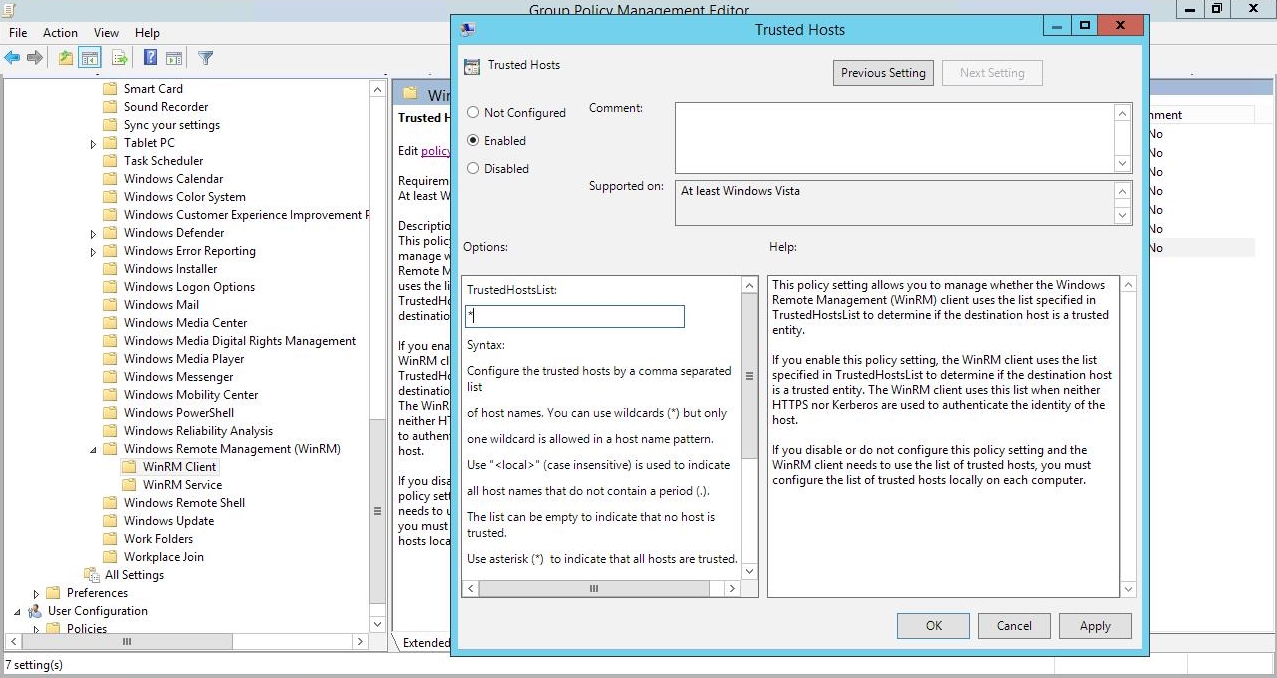
- Double-click the Trusted Hosts setting. Select the Enabled radio button, enter an asterisk (*) in the TrustedHostsList field (under Options), and then click .
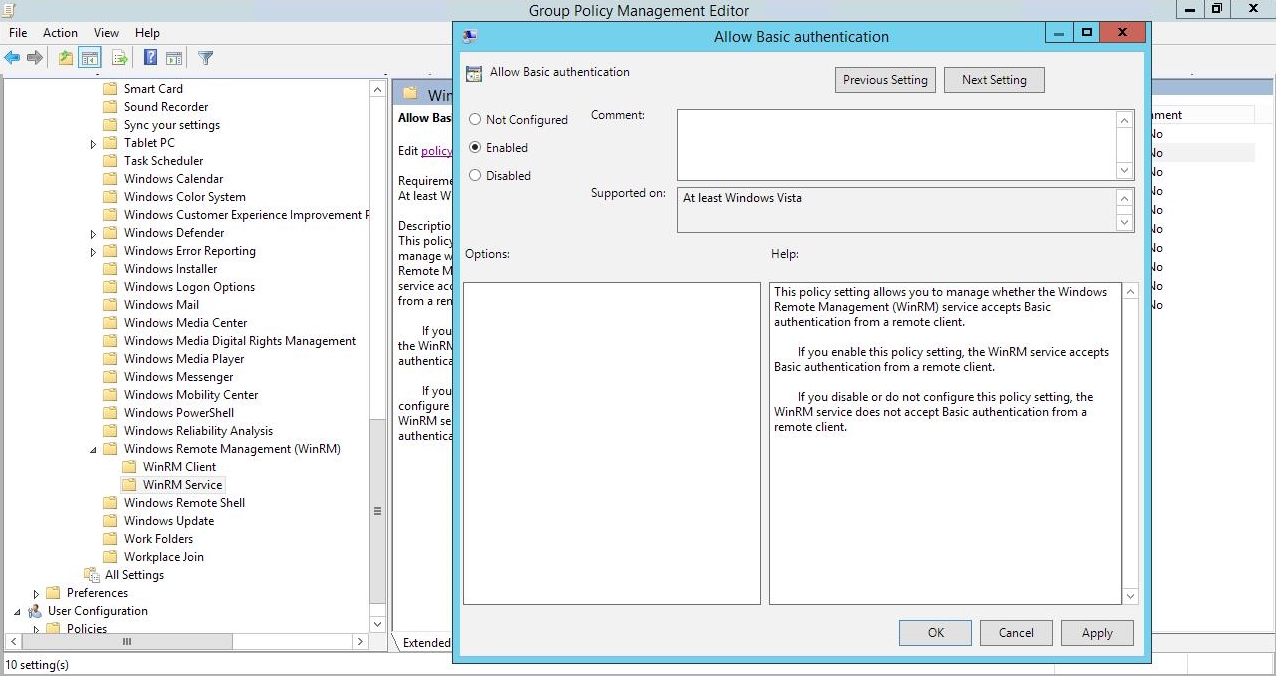
- In the left panel of the Group Policy Management Editor page, navigate to Computer Configuration > Policies > Administrative Templates > Windows Components > Windows Remote Management (WinRM) > WinRM Service. In the right panel, double-click the Allow Basic authentication setting.
- Select the Enabled radio button, then click .
- Repeat steps 32 and 33 for the Allow unencrypted traffic setting.
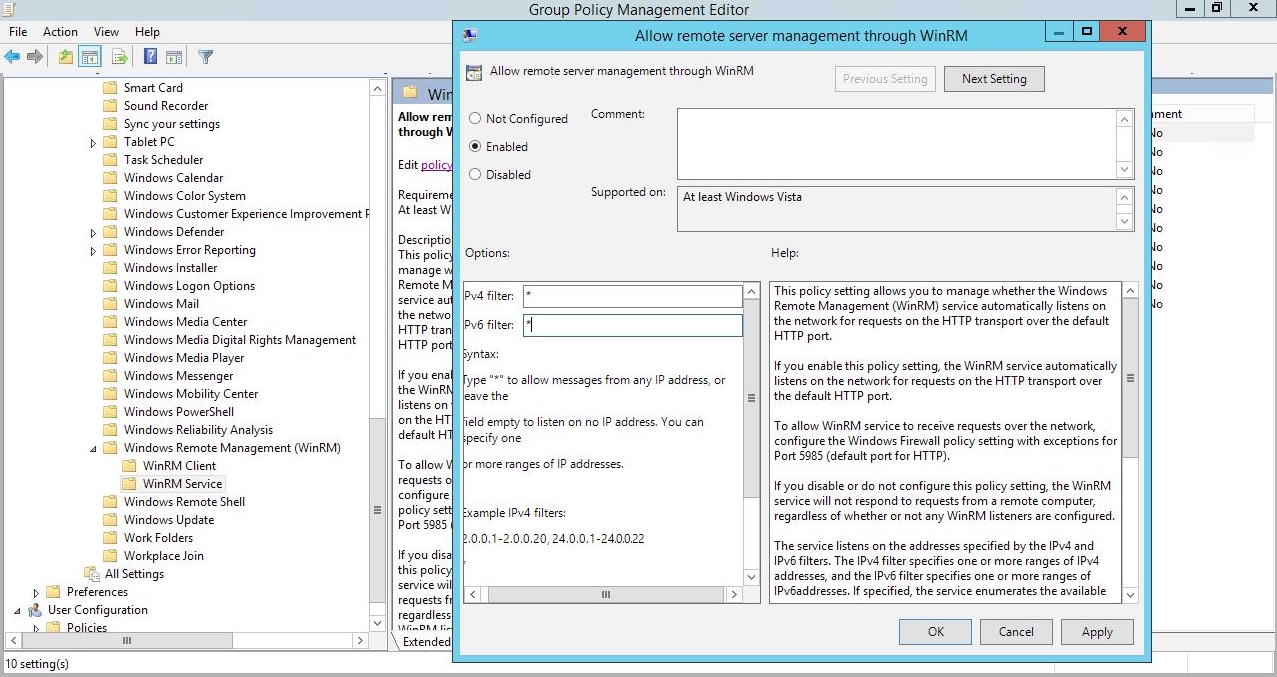
- Double-click the Allow remote server management through WinRM setting. Select the Enabled radio button, enter an asterisk (*) in the Pv4 filter and Pv6 filter fields (under Options), and then click .
- In the left panel of the Group Policy Management Editor page, navigate to Computer Configuration > Policies > Administrative Templates: Policy Definitions > Windows Components > Windows Remote Shell. In the right panel, double-click on Specify Idle Timeout:
- In the Windows Remote Shell folder, in the right panel, double-click on MaxConcurrentUsers:
- You can skip this step if you already have a group policy in place for this setting. In the left panel of the Group Policy Management Editor page, navigate to Computer Configuration > Preferences > Windows Settings > Registry. In the right panel, right-click and select New > Registry Item. In the New Registry Properties modal page, edit the values in one or more of the following fields:
- Action. Select Create.
- Hive. Select HKEY_LOCAL_MACHINE.
- Key Path. Enter "SOFTWARE\Microsoft\Windows\CurrentVersion\policies\system".
- Value name. Enter "LocalAccountTokenFilterPolicy".
- Value type. Enter "REG_DWORD".
- Value data. Enter "1".
- Base. Select Decimal.
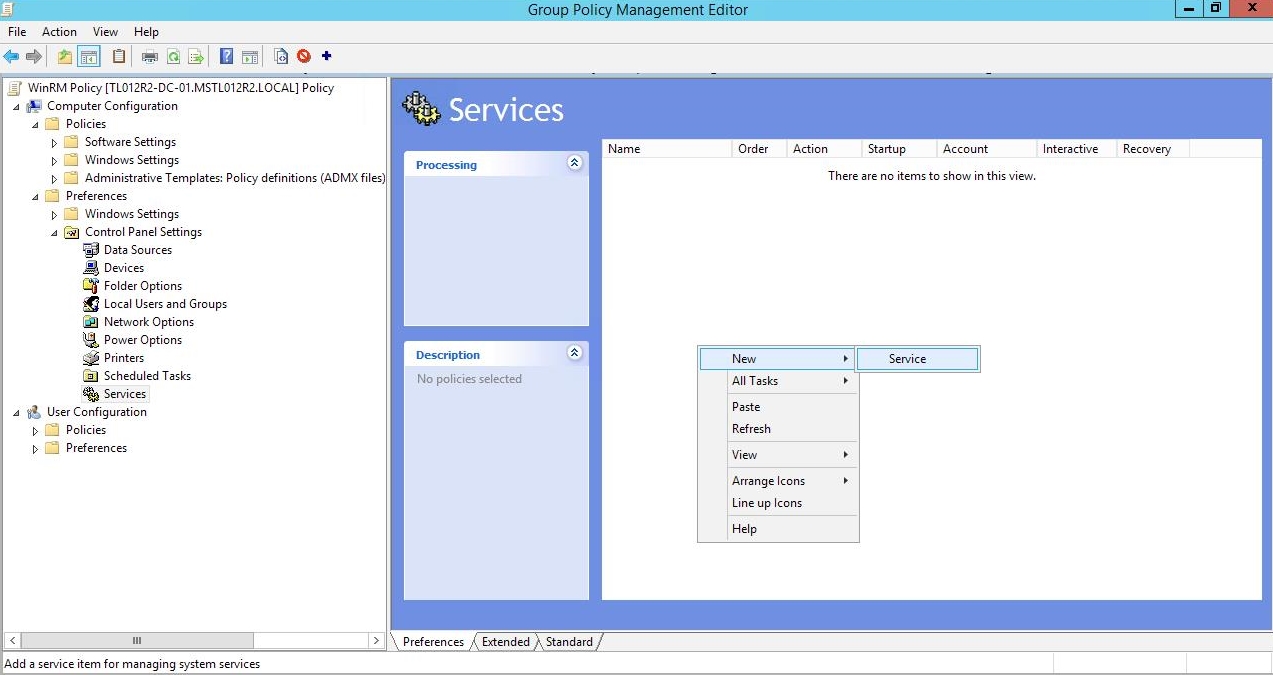
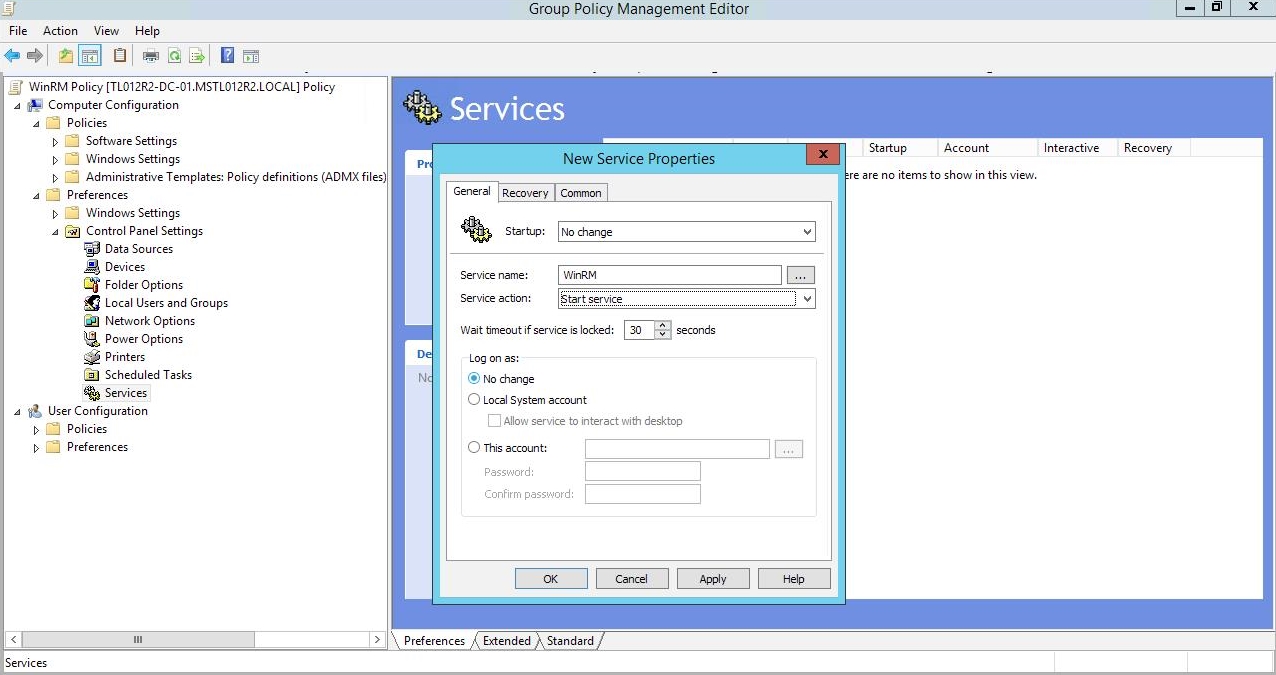
- In the left panel of the Group Policy Management Editor page, navigate to Computer Configuration > Preferences > Control Panel Settings > Services. In the right panel, right-click and select New > Service.
- In the New Service Properties modal page, edit the values in one or more of the following fields:
- Startup. Select No change.
- Service name. Enter "WinRM".
- Service action. Select Start service.
- Wait timeout if service is locked. Select 30 seconds.
- Log on as. Select No change.
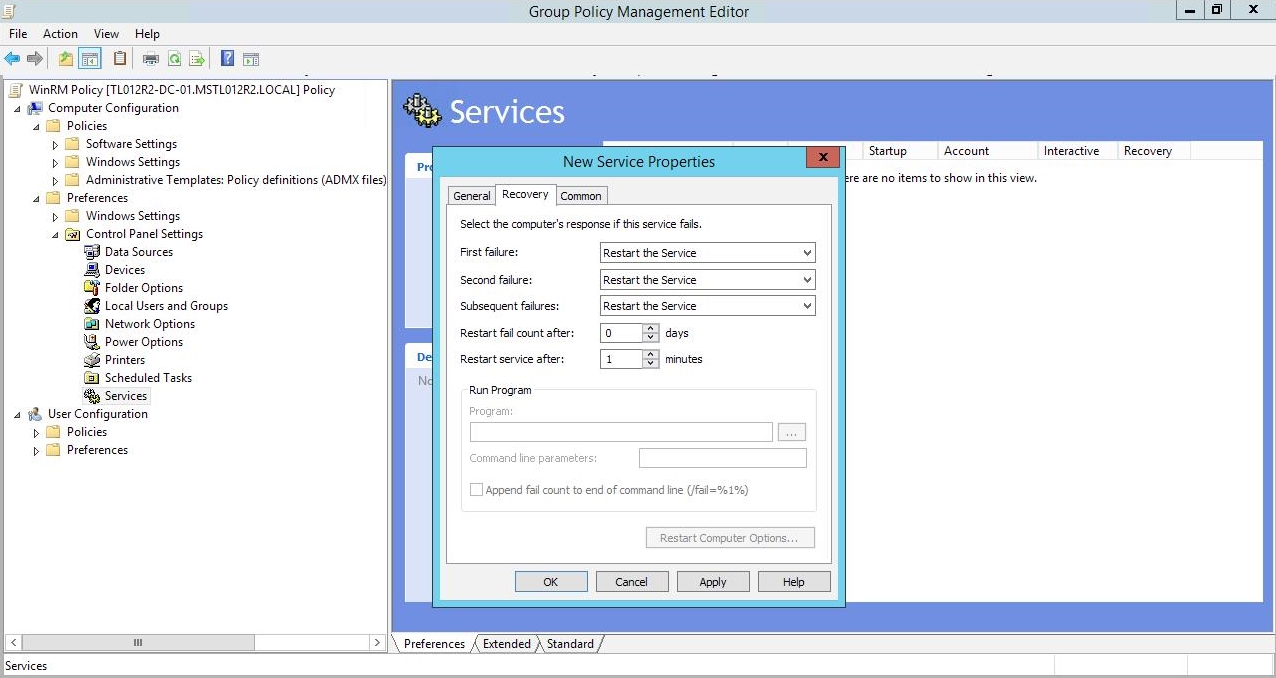
- Click the tab, then edit the values in one or more of the following fields:
- First failure. Select Restart the Service.
- Second failure. Select Restart the Service.
- Subsequent failures. Select Restart the Service.
- Restart fail count after. Select 0 days.
- Restart service after. Select 1 minute.
- Click the button.
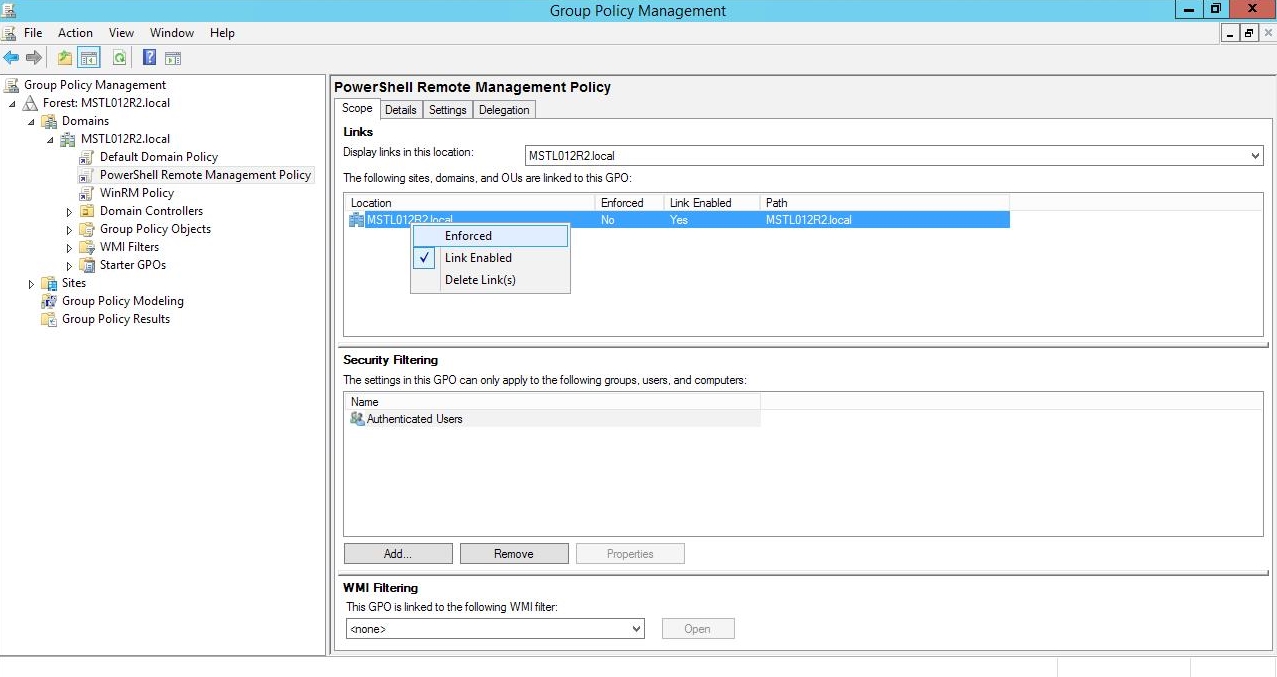
- To enforce your group policy, in the left panel of the Group Policy Management Editor page, navigate to Forest > Domains > [your local domain] > PowerShell Remote Management Policy. In the PowerShell Remote Management Policy panel on the right, right-click the local domain name under The following sites, domains, and OUs are linked to this GPO and select Enforced.
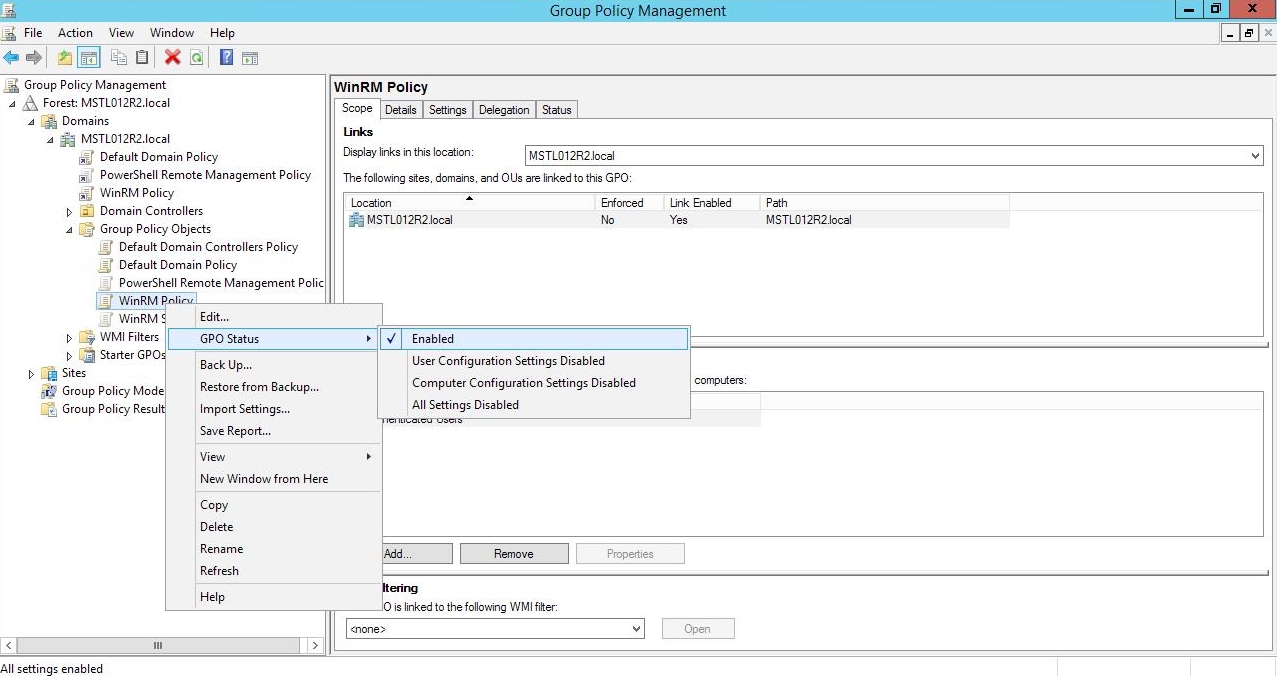
- To enable your group policy, in the left panel of the Group Policy Management Editor page, navigate to Forest > Domains > [your local domain] > Group Policy Objects > WinRM Policy. Right-click WinRM Policy, then select GPO Status > Enabled.
certutil.exe –ca.cert ca_name.cer
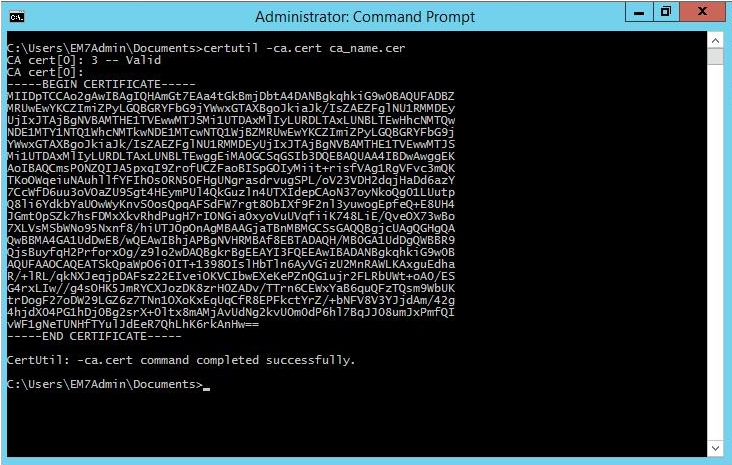
You will import this certificate into the new group policy in step 21.
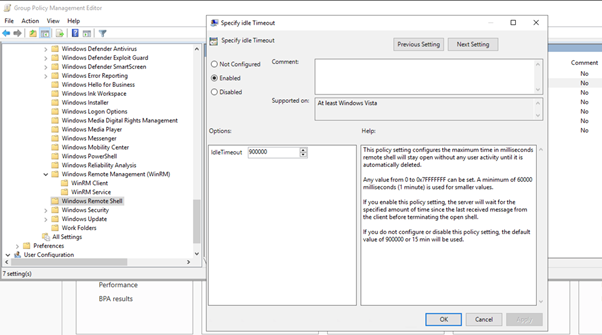
Adjust the setting to meet your requirements. Using the value of 900000 in the image will set the timeout to 15 minutes. Once you have entered your timeout value in milliseconds, click the Enabled radio button and then click .
NOTE: When changing IdleTimeout, ensure that no other applications or utilities need a higher timeout for WinRM sessions.
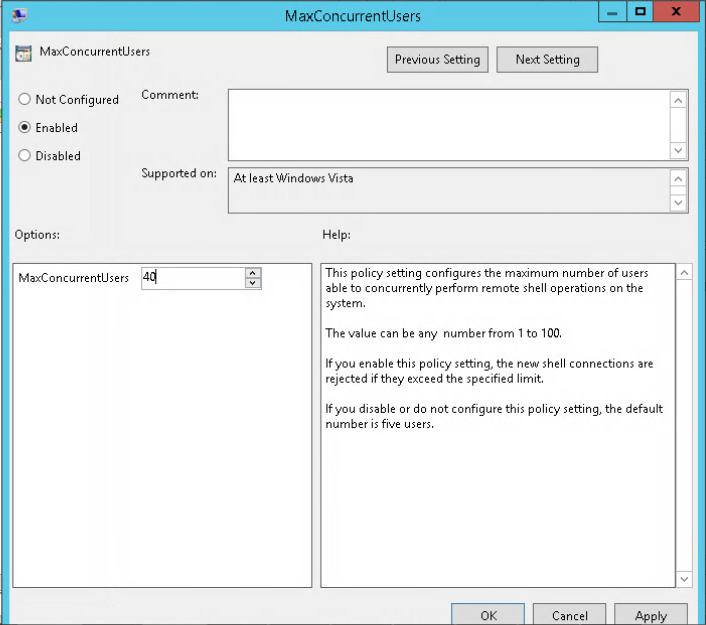
Enter "40" in the MaxConcurentUsers field. Once you have entered your value, click the Enabled radio button and then click .
NOTE: This step is required only if the user account is not a domain account and not the built-in local administrator account.
Configuring an HTTPS Listener with GPO Configuration
If you are using an HTTPS listener, you cannot create the listener and start it on the monitored device within group policy object (GPO) configuration. This can be done by using a startup script or an immediate task in the group policy, or by running a command manually or on the remote management tool on the device to be monitored. This command needs to be run only once as the HTTPS listener will automatically start once configured.
To perform this configuration within the group policy, perform the following steps:
- Run the following command on the device you want to monitor:
winrm quickconfig -transport:https -force
This command will select the first available certificate enabled for server authentication. If you have multiple, valid server authentication certificates installed on your device, you will need to specify the thumbprint of the certificate and use the following command instead:
New-Item -Path WSMan:\LocalHost\Listener -Transport HTTPS -Address * -CertificateThumbPrint “<CertThumbprint>” –Force
NOTE: The thumbprint should not contain spaces.
Using Forward and Reverse DNS for Windows Remote Management
When using Active Directory accounts for PowerShell monitoring, Kerberos and Windows Remote Management (WinRM) are used to connect to Windows devices and execute PowerShell code on those devices. Kerberos is used to request a ticket for authentication to the Windows device, and WinRM is used to execute code on the Windows device.
In a Windows Active Directory configuration, Kerberos needs to be able to communicate with the target Windows device and the Active Directory Domain Controller to verify credentials and issue a ticket for authentication. Kerberos refers to a Windows Domain as a "realm" and an Active Directory Server as a "kdc" (Key Distribution Center).
For this process, it is important that forward and reverse lookup is working for all systems involved. Forward lookup translates a host to an IP address; reverse lookup translates an IP address to a host.
This can be managed through DNS, where a forward lookup is handled through an "A" record in a forward lookup zone, and reverse lookup through a "PTR" record in a reverse lookup zone. A utility such as "nslookup" will work correctly only if the DNS record (a PTR record, in this case) is present.
Where DNS is not available or reliable, it is possible to use the hosts file (/etc/hosts) instead. Skylar One uses Python, which in turn can use the hosts file to provide both forward and reverse lookup. However, this approach means a higher level of server management because the hosts files on multiple Data Collector servers would need to be kept in sync. Additionally, where Concurrent PowerShell is used, the hosts files within the Docker containers would need to be updated.
Without a reliable forward and reverse lookup mechanism in place, Kerberos may not be able to validate credentials and issue a ticket for access to a Windows Device, which in turn would mean that access over WinRM to the device would be rejected.
Step 4: Configuring a Windows Management Proxy
If Skylar One cannot execute PowerShell requests directly on a Windows server, you can optionally configure an additional Windows server to act as a proxy for those PowerShell requests. To use a proxy, you must configure at least two Windows servers:
- A target server that Skylar One cannot communicate with directly.
- A proxy server that Skylar One will communicate with to execute PowerShell requests on the target server.
NOTE: When monitoring a Windows device using a proxy, the account specified in the credentials is used to access both the proxy server and the target device. This account must have the correct access rights to be used on both servers. If multiple Active Directory domains are used, a trust relationship must be in place that allows the specified account access to the servers in both domains.
To configure the target and proxy servers, perform the following steps:
- Configure a user account that Skylar One will use to connect to the proxy server and the proxy server will use to connect to the target server. The user account can either be a local account or an Active Directory account; however, the user account must have the same credentials on the target and proxy servers and be in the Local Administrator's group on both servers.
- If you have created a local user account on the Windows Server instead of an Active Directory account, you must configure encrypted communication between Skylar One and the Windows server. To do this, you must configure a Server Authentication certificate.
- Configure Windows Remote Management on the target server and the proxy server.
- Log in to the proxy server as an administrator.
- Open the PowerShell command window.
- Right-click on the PowerShell icon in the taskbar and select Run as Administrator.
- Execute one of the following commands on the proxy server to allow the proxy server to trust one or more target servers:
- To allow the proxy server to trust all servers (not recommended), execute the following command:
- To allow the proxy server to trust only specific target servers, execute the following command, inserting a list that includes the IP address for each target server. Separate the list of IP addresses with commas.
Set-Item WSMan:\Localhost\Client\TrustedHosts -value *
Set-Item WSMan:\Localhost\Client\TrustedHosts -value <comma-delimited-list-of-target-server-IPs>
NOTE: The following step is required only if the user account is not a domain account and not the built-in local administrator account.
- Execute the following command on the proxy server to configure the LocalAccountTokenFilterPolicy:
New-ItemProperty “HKLM:\SOFTWARE\Microsoft\Windows\CurrentVersion\Policies\System” -Name “LocalAccountTokenFilterPolicy” -Value 1 -PropertyType “DWORD"
NOTE: If the proxy server is in a different Windows domain (domain A) than the target servers (domain B), and the proxy server uses a user account from Active Directory, and Active Directory is in the same Windows domain as the target servers (domain B), you must perform the following to allow the proxy server to send PowerShell commands to the target servers:
- On the domain controller for each domain (domain A and domain B), create new forward-lookup zones and reverse-lookup zones that allow name resolution to work between the two domains.
- On the domain controller for each domain (domain A and domain B), create a non-transitive realm trust between the two domains.
- Login to the proxy server and add the Active Directory account (from domain A) to the Local Administrator's group for the proxy server. You should be able to select the account on the proxy server after you create the non-transitive realm trust between the two domains.
Step 5: Increasing the Number of PowerShell Dynamic Applications That Can Run Simultaneously
You can optionally execute a series of commands that will allow Skylar One to increase the default maximum number of PowerShell Dynamic Applications that can run simultaneously.
To do so:
- Determine the number of Dynamic Applications that will be used to monitor the Windows server. Multiply this number by three.
- Open a PowerShell command prompt. Log in as an Administrator.
- At the prompt, execute the following commands:
Set-Item WSMan:\Localhost\Shell\MaxShellsPerUser –value <number you calculated in step 1>
Set-Item WSMan:\Localhost\Service\MaxConcurrentOperationsPerUser –value <number you calculated in step 1>
Restart-Service WinRM
- Repeat these steps on each Windows server that will be monitored by Skylar One.
Optional PowerShell CLI Parameters
You can use the following parameters in PowerShell for the associated reasons:
- -NoProfile. Does not load the PowerShell profile.
- -NoLogo. Hides the copyright banner at start-up.
- -NonInteractive. Does not present an interactive prompt to the user.
To enable concurrent PowerShell collection to use one of these parameters:
- Go to the Database Tool page (System > Tools > DB Tool).
- If this row does not already exist in the master.system_custom_config table, enter the following in the SQL Query field:
The Database Tool page is available only in versions of Skylar One prior to 12.2.1 and displays only for users that have sufficient permissions to access the page.
INSERT INTO master.system_custom_config ('field','field_value') VALUES ('powershell_prefix_setting', '<PREFIX>')
where <PREFIX> is an integer that represents one of the prefix values described above. The integers are as follows:
- 0. Disabled
- 1. -NoProfile
- 2. -NoLogo
- 3. -NoProfile and -NoLogo
- 4. -NonInteractive
- 7. -NoProfile, -NoLogo, and -NonInteractive
For example, if a user wanted to configure their PowerShell Data Collector to not load their PowerShell profile, they would enter the following into the SQL Query field:
INSERT INTO master.system_custom_config ('field','field_value') VALUES ('powershell_prefix_setting', '1')
- If this row already exists in the master.system_custom_config table, enter the following in the SQL Query field:
UPDATE master.system_custom_config SET field_value = 1 WHERE field = 'powershell_prefix_setting'
- After you have entered the command in the SQL Query field, click the button. Your changes will be picked up with the next batch of jobs that are processed.
Creating a PowerShell Credential
If you configure your Windows system to respond to PowerShell requests from Skylar One, you can use PowerShell Dynamic Applications to collect information from your Windows system.
All of the PowerShell Dynamic Applications include a discovery object. If you include a credential for PowerShell Dynamic Applications in the discovery session that includes your Windows system, Skylar One will automatically align the appropriate PowerShell Dynamic Applications to the Windows system. For more information about creating a discovery session, see Discovering Devices.
To define a PowerShell credential in Skylar One, you will need the following information:
- The username and password for a user on the Windows device.
- If the user is an Active Directory account, the hostname or IP address of the Active Directory server and the domain.
- Determine if an encrypted connection should be used.
- If you are using a Windows Management Proxy, the hostname or IP address of the proxy server.
To create a PowerShell credential:
- Go to the Credentials page (Manage > Credentials).
- Click the button and then select Create Powershell Credential. The Create Credential modal page appears:
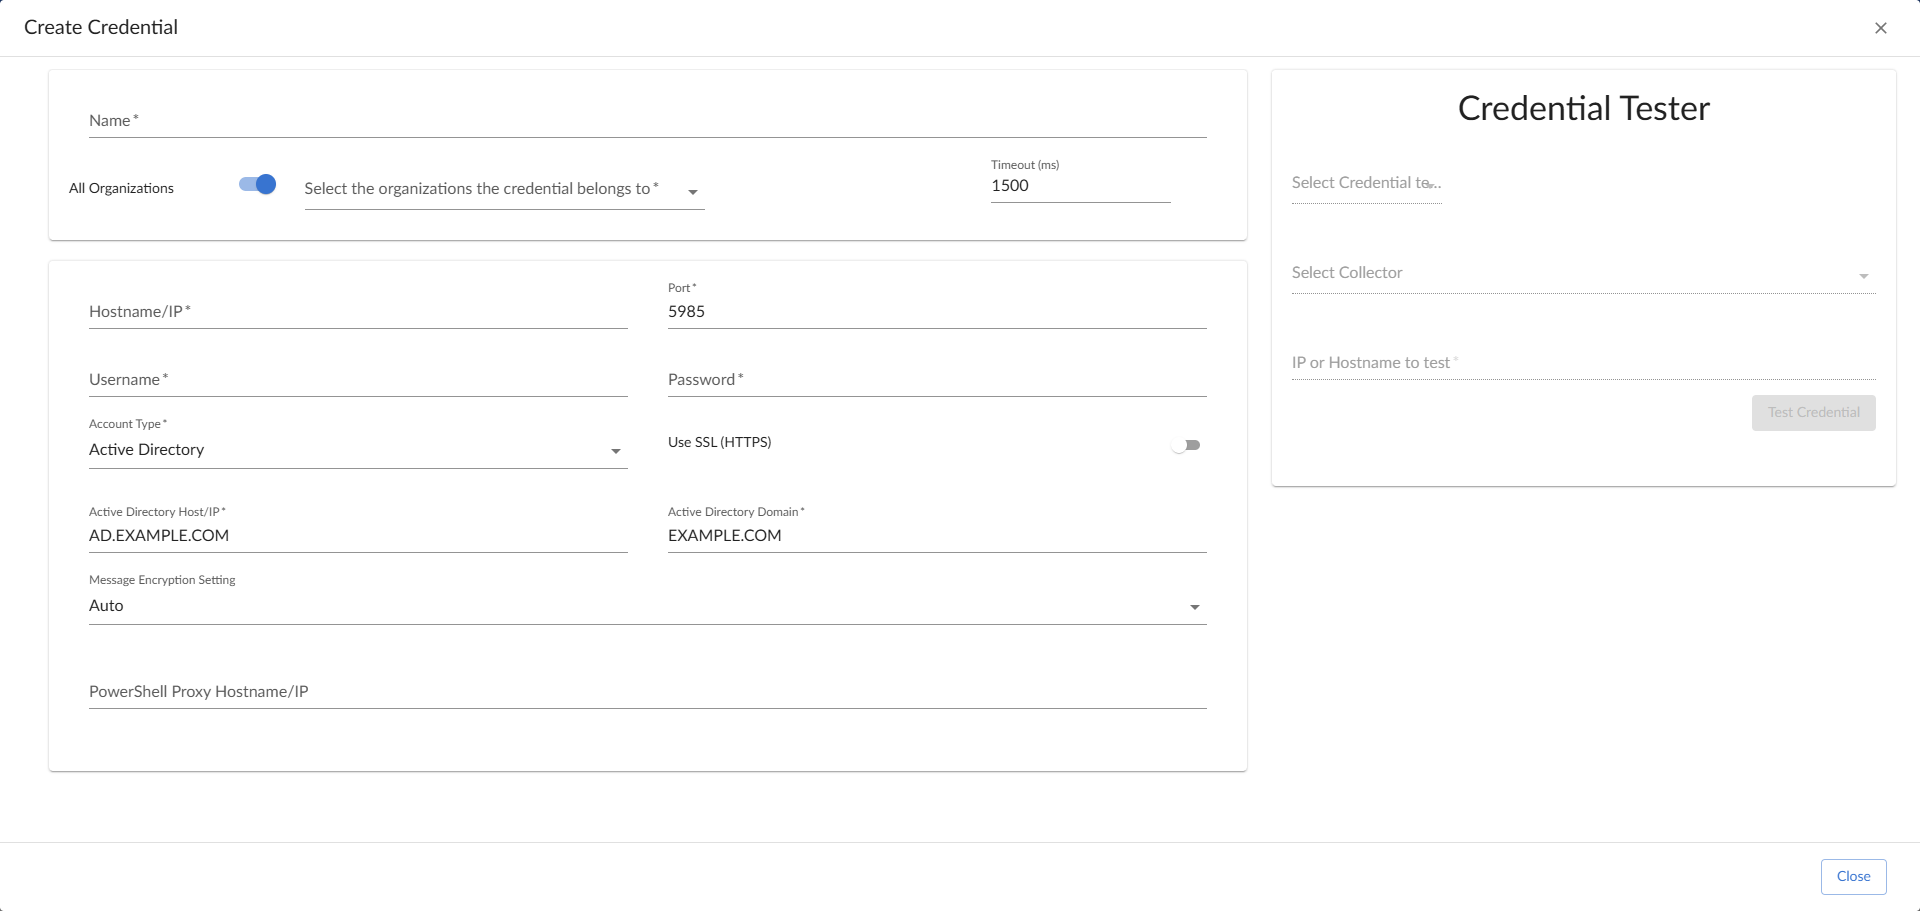
- Supply values in the following fields:
- Name. Name of the credential. Can be any combination of alphanumeric characters, up to 64 characters. This field is required.
- All Organizations. Toggle on (blue) to align the credential to all organizations, or toggle off (gray) and then select one or more specific organizations from the What organization manages this service? drop-down field to align the credential with those specific organizations. This field is required.
- Timeout (ms). Time, in milliseconds, after which Skylar One will stop trying to communicate with the authenticating server. For collection to be successful, Skylar One must connect to the authenticating server, execute the PowerShell command, and receive a response within the amount of time specified in this field.
- Hostname/IP. Hostname or IP address of the device from which you want to retrieve data. This field is required.
- You can include the variable %D in this field. Skylar One will replace the variable with the IP address of the device that is currently using the credential.
- You can include the variable %N in this field. Skylar One will replace the variable with the hostname of the device that is currently using the credential. If Skylar One cannot determine the hostname, Skylar One will replace the variable with the primary, management IP address for the current device.
- You can include the prefix HOST or WSMAN before the variable %D in this field if the device you want to monitor uses a service principal name (for example, "HOST://%D" or "WSMAN://%D"). Skylar One will use the WinRM service HOST or WSMan instead of HTTP and replace the variable with the IP address of the device that is currently using the credential.
- Port. Type the port number used by the WinRM service on the Windows device. This field is required.
- Username. Type the username for an account on the Windows device to be monitored or on the proxy server. This field is required.
NOTE: The user should not include the domain name prefix in the username for Active Directory accounts. For example, use "em7admin" instead of "MSDOMAIN\em7admin".
- Password. Type the password for the account on the Windows device to be monitored or on the proxy server. This field is required.
- Account Type. Type of authentication for the username and password in this credential. Choices are:
- Active Directory. On the Windows device, Active Directory will authenticate the username and password in this credential.
- Local. Local security on the Windows device will authenticate the username and password in this credential.
- Use SSL (HTTPS) / Encrypted. Select whether Skylar One will communicate with the device using an encrypted HTTP or HTTPS connection:
- Toggle on (blue) if Skylar One will communicate with the device using an encrypted connection over HTTPS. If toggled on, when communicating with the Windows server, Skylar One will use a local user account with authentication of type "Basic Auth". You must then use HTTPS and can use a Microsoft Certificate or a self signed certificate.
In Skylar One versions prior to 12.3.7, this field is labeled Encrypted. In versions 12.3.7 and above, it is labeled Use SSL (HTTPS).
In Skylar One versions 11.3.0 and later, a newer Kerberos library is used that allows for message encryption over HTTP. This feature is on by default and may eliminate the need for you to configure an HTTPS certificate depending on your security requirements.
- Toggle off (gray) . The credential is encrypted over HTTP rather than HTTPS.
- Toggle on (blue) if Skylar One will communicate with the device using an encrypted connection over HTTPS. If toggled on, when communicating with the Windows server, Skylar One will use a local user account with authentication of type "Basic Auth". You must then use HTTPS and can use a Microsoft Certificate or a self signed certificate.
- Validate Certificate (when HTTPS is used). This field is visible when the Use SSL (HTTPS) toggle field is enabled for the connection and allows you to select whether a certificate is validated for the credential. Choices are:
- Ignore. Skylar One will not validate a certificate for the credential. This is the default setting.
- Validate. Skylar One will require a validated certificate for the credential. If you select Validate, then the target device must include a non-expired certificate issued from a certificate authority.
- Active Directory Host/IP. If you selected Active Directory in the Account Type field, type the hostname or IP address of the Active Directory server that will authenticate the credential.
- Active Directory Domain. If you selected Active Directory in the Account Type field, type the domain where the monitored Windows device resides.
- Message Encryption Setting. If you selected Active Directory in the Account Type field, select whether Kerberos packages sent over PowerShell Remoting Protocol (PSRP) or Windows Remote Management (WinRM) are encrypted. Choices are:
- Auto. Encryption is enabled if the package supports it; otherwise, encryption is disabled. This is the default setting.
- Never. Messages are never encrypted. If selected, the target device must support this option.
- Always. Messages are always encrypted. If selected, the target device must support this option.
- PowerShell Proxy Hostname/IP. If you use a proxy server in front of the Windows devices you want to communicate with, type the fully-qualified domain name or the IP address of the proxy server in this field.
- Click .
If you would like to test your credential using the Credential Tester panel, click . For detailed instructions on using the Credential Tester panel, see the Using the Credential Tester Panel section.
Error Messages for PowerShell Collection
The following table lists error messages that Skylar One can generate during PowerShell collection.
| Error Message | Possible Issue(s) |
|---|---|
| Preauthentication failed while getting initial credentials | Incorrect Password (Active Directory Accounts only) |
| Client not found in Kerberos database | Username does not exist in Active Directory (Active Directory Accounts only) |
| KRB5 error code 68 while getting initial credentials | Incorrect domain name (Active Directory Accounts only) |
| Bad HTTP response returned from server. Code 401, basic auth failed | Incorrect username/password or target server does not allow user account to perform WinRM operations. |
| ParseError | Incorrect port specified in credential |
| [Errno 111] Connection refused | Mismatch between server configuration and credential, e.g. encryption option selected but not enabled on server. |
| Hostname cannot be canonicalized | Forward and/or reverse name resolution are not working from the Data Collector or All-In-One Appliance |
| Cannot resolve network address for KDC in requested realm | Forward and/or reverse name resolution are not working from the Data Collector or All-In-One Appliance |
| Configuration file does not specify default realm | Forward and/or reverse name resolution are not working from the Data Collector or All-In-One Appliance |
| No credentials cache found | Forward and/or reverse name resolution are not working from the Data Collector or All-In-One Appliance |
| Server not found in Kerbers database | Forward and/or reverse name resolution are not working from the Data Collector or All-In-One Appliance |
Concurrent PowerShell Collection
The following sections describe how to configure and use concurrent PowerShell collection. Concurrent PowerShell collection allows multiple collection tasks to run at the same time with a reduced load on Data Collectors. Concurrent PowerShell collection also prevents missed polls and data gaps because collection will execute more quickly. As a result, Data Collectors can collect more data using fewer system resources. The PowerShell Collector is an independent service running as a container on a Data Collector.
Prerequisites
The following prerequisites are required to use concurrent PowerShell collection:
- Skylar One version 10.1.4 or greater
- "Microsoft: Windows Server" PowerPack version 110 or greater
- " Skylar One: Concurrent PowerShell Monitoring" PowerPack version 100 or greater (for Skylar One versions prior to 11.3.0).
As of Skylar One (SL1) version 11.3.0, the "Skylar One: Concurrent PowerShell Monitoring" PowerPack is no longer a requirement for concurrent PowerShell monitoring.
Scope
When the concurrent PowerShell collection service is enabled, PowerShell Configuration and PowerShell Performance Dynamic Applications are sent to the service.
The following PowerPacks can use the concurrent PowerShell collection service:
- Microsoft: Active Directory Server
- Microsoft: DHCP Server
- Microsoft: DNS Server
- Microsoft: Exchange Server
- Microsoft: IIS Server
- Microsoft: Lync Server 2013
- Microsoft: SharePoint Server
- Microsoft: SQL Server
- Microsoft: Hyper-V Server (partially)
- Microsoft: Windows Server (partially)
Enabling and Disabling Concurrent PowerShell for Collector Groups
To improve the process of collecting data via PowerShell and to collect metrics, you can enable concurrent PowerShell collection. You can enable one or more collector groups to use concurrent PowerShell collection.
If you have enabled concurrent collection and you have used it to discover a very large number of devices or interfaces, disabling concurrent collection could have unintended consequences. After disabling concurrent collection, your Data Collector might become overburdened when it attempts to collect data for the same number of devices or interfaces but without the added processing capacity of concurrent collection.
By default, a loopback to 127.0.0.1 is configured on the collector with the line localhost localhost.localdomain localhost4 localhost4.localdomain4 in the /etc/hosts file. If this line is removed, concurrent PowerShell collection will not function properly.
NOTE: Concurrent PowerShell collection is for PowerShell Performance and Performance Configuration Dynamic Application types and does not include Snippet Dynamic Applications which happen to run PowerShell commands.
Enabling and Disabling Concurrent PowerShell on All Collector Groups
To enable and disable concurrent PowerShell collection for all collector groups:
Go to the Behavior Settings page (System > Settings > Behavior).
Select the Enable Concurrent PowerShell Collection checkbox and click .
If the "Data Collection: PowerShell Collector" process is disabled on the Process Manager page (System > Settings > Admin Processes), this concurrent PowerShell collection option is disabled.
To disable concurrent PowerShell collection, deselect the Enable Concurrent PowerShell Collection checkbox and click .
Enabling and Disabling Concurrent PowerShell on a Specific Collector Group
To enable and disable concurrent PowerShell collection for a specific collector group in the classic Skylar One user interface:
- Go to the Collector Group Management page (System > Settings > Collector Groups).
- Locate the collector group for which you want to enable concurrent PowerShell, and click its wrench icon ().
- In the Enable Concurrent PowerShell Collection drop-down menu, select Yes and click .
- To disable concurrent PowerShell collection, select No in the Enable Concurrent PowerShell Collection drop-down and click .
The Skylar One: Concurrent PowerShell Monitoring PowerPack
The "Skylar One: Concurrent PowerShell Monitoring" PowerPack includes a device template, two Dynamic Applications that use SSH to monitor collectors with concurrent PowerShell enabled, and a number of event policies.
- The "ScienceLogic: PowerShell Collector Performance" Dynamic Application is an optional Dynamic Application used for troubleshooting.
- The "ScienceLogic: PowerShell Service Log Parser" Dynamic Application parses the log file from the PowerShell servers and converts errors into events aligned to the related device.
- The "Skylar One: Concurrent PowerShell Monitoring" device template can be used to align multiple Data Collectors to the "ScienceLogic: PowerShell Service Log Parser" Dynamic Application.
- Event policies and corresponding alerts that are triggered when devices meet certain status criteria.
Aligning the "ScienceLogic: PowerShell Service Log Parser" Dynamic Application
To align the "ScienceLogic: PowerShell Service Log Parser" Dynamic Application, first you must create an SSH/Key credential:
- Go to the Credential Management page (System > Manage > Credentials).
- In the Credential Management page, click the menu. Select Create SSH/Key Credential.
- The Credential Editor modal page appears. In this page, define the new SSH/Key credential using a valid username and password or SSH key for Skylar One collectors:
- Credential Name. Name of the credential. Can be any combination of alphanumeric characters.
- Hostname/IP. Hostname or IP address of the device from which you want to retrieve data.
- You can include the variable %D in this field. Skylar One will replace the variable with the IP address of the current device (device that is currently using the credential).
- You can include the variable %N in this field. Skylar One will replace the variable with hostname of the current device (device that is currently using the credential). If Skylar One cannot determine the hostname, Skylar One will replace the variable with the primary, management IP address for the current device.
- Port. Port number associated with the data you want to retrieve.
The default TCP port for SSH servers is 22.
- Timeout (ms). Time, in milliseconds, after which Skylar One will stop trying to communicate with the authenticating server.
- Username. Username for the Data Collector to be monitored.
- Password. Password for the Data Collector to be monitored.
- Private Key (PEM Format). Enter an SSH private key for the Skylar One Data Collector, in PEM format.
- Click the button to save the new SSH/Key credential.
Next, you can align the Dynamic Application manually or configure the device template. Using the device template is recommended when you want to align the Dynamic Application to multiple Data Collectors.
Manually Aligning the Dynamic Application
After creating the SSH/Key credential, you will manually align the Dynamic Application.
- Go to the Devices page and find the device you want to manually align the Dynamic Application to. Click on it to go to the Device Investigator.
- In the Device Investigator, click the tab. Click and then click . The Align Dynamic Application window appears.
- Click Choose Dynamic Application. The Choose Dynamic Application window appears.
- Select the "ScienceLogic: PowerShell Service Log Parser" Dynamic Application and click . The "ScienceLogic: PowerShell Service Log Parser" Dynamic Application appears in the Align Dynamic Application window.
- If a default credential is listed below the Dynamic Application and you want to use that credential, skip ahead to step 8. Otherwise, uncheck the box next to the credential name.
- Click Choose Credential. The Choose Credential window appears.
- Select the credential for the Dynamic Application and click the button. The name of the selected credential appears in the Align Dynamic Application window.
- Click the button. When the Dynamic Application is successfully aligned, it is added to the Collections tab, and a confirmation message appears at the bottom of the tab.
To manually align the Dynamic Application using the Skylar One classic user interface:
- Go to the Device Manager page (Devices > Classic Devices, or Registry > Devices > Device Manager in the classic user interface)
- In the Device Manager page, find the device for which you want to view Dynamic Applications. Select its wrench icon ()
- In the Device Administration panel, select the tab.
- Click the button and then select Add Dynamic Application. The Dynamic Application Alignment page appears
- In the Dynamic Applications field, select the "ScienceLogic: PowerShell Service Log Parser" Dynamic Application.
- In the Credentials field, select the proper credential.
- Click the button.
Configuring the Device Template
After creating the SSH/Key credential, you will need to configure the device template included in the PowerPack.
NOTE: If you have already manually aligned the Dynamic Application, you do not need to perform the steps in this section.
To configure the device template:
- Go to the Configuration Templates page (Devices > Templates, or Registry > Devices > Templates in the classic user interface).
- Locate the "Skylar One: Concurrent PowerShell Monitoring" sample template and click its wrench icon (). The Device Template Editor modal page appears.
- Type a new name for the device template in the Template Name field so the sample template is not overwritten.
- Click the tab. The Editing Dynamic Application Subtemplates page appears.
- In the Subtemplate Selection pane, select the "ScienceLogic: PowerShell Service Log Parser" Dynamic Application.
- In the Credentials drop-down list, select the SSH/Key credential that you created.
- Click .
Applying the Device Template
If your Data Collector devices already exist on your Skylar One system, perform the following steps to apply the device template:
- Go to the Device Manager page (Devices > Classic Devices, or Registry > Devices > Device Manager in the classic user interface) and select the checkbox for each of your Data Collector devices.
- In the Select Action menu, select MODIFY By Template and then click .
- In the Device Template Editor, select the template you created in the Template field.
- Click .
If your devices have not yet been discovered, perform the following steps to discover the devices and apply the device template:
- Go to the Discovery Control Panel page (System > Manage > Classic Discovery) and click .
- Supply values in the following fields:
- Name. Type a name for the discovery session.
- Description. Optionally, type a description of the discovery session.
- IP Address/Hostname Discovery List. Provide a list of IP addresses for your Data Collectors.
- SNMP Credentials. Select EM7 Default V2.
- Model Devices. Select this checkbox.
- Apply Device Template. Select the device template that you created.
- Log All. Select this checkbox.
- Click the button to save the discovery session. Close the Discovery Session Editor page.
- In the Discovery Control Panel page, click the button. The new discovery session will appear in the Session Register pane.
- To launch the new discovery session, click its Queue this Session icon (
 ).
). - If no other discovery sessions are currently running, the session will be executed immediately. If another discovery session is currently running, your discovery session will be queued for execution.
Aligning the "ScienceLogic: PowerShell Collector Performance" Dynamic Application
If you want to monitor your Data Collectors with the "ScienceLogic: PowerShell Collector Performance" Dynamic Application, you must manually align it to your Data Collectors using the SSH/Key credential. To do this:
- Go to the Devices page and find the device you want to manually align the Dynamic Application to and click on it to go to the Device Investigator.
- In the Device Investigator, click the tab. Click and then click . The Align Dynamic Application window appears.
- Click Choose Dynamic Application. The Choose Dynamic Application window appears.
- Select the "ScienceLogic: PowerShell Collector Performance" Dynamic Application and click . The "ScienceLogic: PowerShell Collector Performance" Dynamic Application appears in the Align Dynamic Application window.
- If a default credential is listed below the Dynamic Application and you want to use that credential, skip ahead to step 8. Otherwise, uncheck the box next to the credential name.
- Click Choose Credential. The Choose Credential window appears.
- Select the credential for the Dynamic Application and click the button. The name of the selected credential appears in the Align Dynamic Application window.
- Click the button. When the Dynamic Application is successfully aligned, it is added to the Collections tab, and a confirmation message appears at the bottom of the tab.
To manually align the Dynamic Application using the Skylar One classic user interface:
- Go to the Device Manager page (Devices > Classic Devices, or Registry > Devices > Device Manager in the classic user interface)
- In the Device Manager page, find the device for which you want to view Dynamic Applications. Select its wrench icon ()
- In the Device Administration panel, select the tab.
- Click the button and then select Add Dynamic Application. The Dynamic Application Alignment page appears
- In the Dynamic Applications field, select the "ScienceLogic: PowerShell Collector Performance" Dynamic Application.
- In the Credentials field, select the proper credential.
- Click the button.
Enabling HTTPS Between Skylar One and the PowerShell Data Collector
You can enable or disable HTTPS as the mode of transport for communication between Skylar One and the PowerShell Data Collector. The Powershell Data Collector is a service that runs on the Collector Group. The Data Collection service on the Collector Group can optionally communicate with the PowerShell Service to queue jobs and check for results using HTTPS. You would enable HTTPS if you must meet federal requirements to encrypt all network traffic, even if it never leaves the host.
To enable or disable HTTPS as the mode of transport for communication between Skylar One and the PowerShell Data Collector, you must make some changes to the /opt/em7/services/powershell_collector/powershell_collector.env configuration file. This file can also be used to configure the certificates used by the container when running on HTTPS.
The keys used are:
| Key | Value |
| USE_HTTPS | Default value is True. If set to False, HTTPS is disabled and the remaining SSL-related keys have no effect. |
SSL_PRIVATE_KEY SSL_SERVER_CERT SSL_CA_CERT | These keys are used to specify the full path and filename of the certificate to be used by the PowerShell Data Collector when HTTPS is enabled. If these keys are not set, a self-signed certificate will be generated when the container is started. When specifying the file name and path, they must be accessible to the PowerShell Data Collector. For example, the directory /etc/ssl/certs is mapped to the PowerShell Data Collector, meaning any files within this directory are accessible to the PowerShell Data Collector, subject to the files' permissions. Any certificates placed in the directory on the PowerShell Data Collector must have the keys set as follows: SSL_PRIVATE_KEY=/etc/ssl/certs/my_cert.key Once the key is set, the Data Collector will pick up the files in the directory on startup. NOTE: USE_HTTPS must be set to True for these keys to work. |
| SSL_VERIFY | When USE_HTTPS is set to True, this key is used by Skylar One when communicating with the PowerShell Data Collector. By default, the value is False. If set to True, the HTTPS connection will fail if the Data Collector is using a self-signed certificate. |
Enabling and Disabling the Python PowerShell Remoting Protocol Client
If you have concurrent PowerShell enabled in Skylar One, the default Python module used for transport to monitor Windows Devices is "pyWinRm". However, the "pypsrp" Python module can provide more efficient processing of PowerShell commands, particularly when virus detection software is enabled. To use the "pypsrp" module instead, run the following SQL query on the Database Tool page (System > Tools > DB Tool):
- Select your database from the Select Database list.
- Enter the following in the SQL Query field.
INSERT master.system_custom_config (field, field_value) VALUES ('enable_pypsrp_lib', 1)
A value of 1 will enable the "pypsrp" module. A value of 0 (or not having any setting for 'enable_pypsrp_lib') will revert to using "pyWinRM".
- Click .
To disable "pypsrp", use the following SQL query:
UPDATE master.system_custom_config set field_value = 0 WHERE field = 'enable_pypsrp_lib'
Currently, you can only use the "pypsrp" module with concurrent PowerShell. Classic PowerShell monitoring will continue to use the "pyWinRM" module regardless of this database setting.
Optional PowerShell CLI Parameters
You can use the following parameters in PowerShell for the associated reasons:
- -NoProfile. Does not load the PowerShell profile.
- -NoLogo. Hides the copyright banner at start-up.
- -NonInteractive. Does not present an interactive prompt to the user.
To enable concurrent PowerShell collection to use one of these parameters:
- Go to the Database Tool page (System > Tools > DB Tool).
- If this row does not already exist in the master.system_custom_config table, enter the following in the SQL Query field:
The Database Tool page is available only in versions of Skylar One prior to 12.2.1 and displays only for users that have sufficient permissions to access the page.
INSERT INTO master.system_custom_config ('field','field_value') VALUES ('powershell_prefix_setting', '<PREFIX>')
where <PREFIX> is an integer that represents one of the prefix values described above. The integers are as follows:
- 0. Disabled
- 1. -NoProfile
- 2. -NoLogo
- 3. -NoProfile and -NoLogo
- 4. -NonInteractive
- 7. -NoProfile, -NoLogo, and -NonInteractive
For example, if a user wanted to configure their PowerShell Data Collector to not load their PowerShell profile, they would enter the following into the SQL Query field:
INSERT INTO master.system_custom_config ('field','field_value') VALUES ('powershell_prefix_setting', '1')
- If this row already exists in the master.system_custom_config table, enter the following in the SQL Query field:
UPDATE master.system_custom_config SET field_value = 1 WHERE field = 'powershell_prefix_setting'
- After you have entered the command in the SQL Query field, click the button. Your changes will be picked up with the next batch of jobs that are processed.
Users with Windows 2008 R2 Servers
Concurrent PowerShell collection will not work for Windows 2008 R2 servers when the Encyrpted field is set to Yes in the PowerShell credential. Windows 2008 R2 servers are no longer covered by Microsoft's Extended Support, but if you are still using those servers you have the following options:
- Use PowerShell credentials the have Encryption set to No.
- Disable the Concurrent PowerShell service on the Data Collector groups that include Windows 2008 R2 servers. This will reduce the number of servers that Data Collector group can support.
- Use the Microsoft Base Pack (WMI-based) PowerPack for the Windows 2008 R2 servers.
- Use SNMP for the Windows 2008 R2 servers.
Scale Recommendations
The following recommendations increase the number of Windows Servers the concurrent PowerShell collector can support:
- In the Device Properties page for all Windows Server devices (Devices > Classic Devices > wrench icon), unselect the Dynamic Discovery checkbox. Alternatively, this can be set in bulk using a device template and device group. This prevents nightly discovery from attempting to align Dynamic Applications with a discovery object to all the devices on the collector, which does not use the concurrent PowerShell collector and will dramatically limit the number of Windows Server devices that can be monitored.
- Do not select any credentials in the discovery session used to discover new Windows Servers. Instead, use a template that includes unselecting the Dynamic Discovery checkbox and includes the desired Dynamic Applications with the appropriate credential aligned. When a credential is selected in the Discovery Session, it will attempt to align Dynamic Applications that include a discovery object, which does not use the concurrent PowerShell collector and will dramatically limit the number of Windows Server devices that can be monitored. The Microsoft: Windows Server PowerPack includes the "Microsoft: Windows Server Discovery Template" that you can use be used to create your template.
Additional Scale Tips
- Limit the use of the "Microsoft: Windows Server Services" PowerPack, as using this Dynamic Application can reduce the number of servers a collector can support by 40%. If you do use this PowerPack, consider slowing down the Poll Frequency of the "Microsoft: Windows Server Services" Dynamic Application.
- Limit the use of the "Microsoft: Windows Server Event Logs" PowerPack as it does not work with the concurrent PowerShell collector.
- Use the Microsoft: SQL Server PowerPack instead of the Microsoft: SQL Server Enhanced PowerPack. The Microsoft: SQL Server Enhanced PowerPack does not work with the concurrent PowerShell collector.
- Disable Dynamic Applications that are not providing information required to meet your Service Level Agreements. There is an enhancement in caching included with concurrent PowerShell collection that will not send a PowerShell request from a cache-producing Dynamic Application unless at least one Dynamic Application is asking for that data. Disabling a cache-consuming Dynamic Application will also disable the cache producer from collecting that data. For example, the following Dynamic Applications are now disabled by default, as they are more diagnostic in nature and may not be required for routine monitoring:
- Microsoft: Windows Server IPStats Performance
- Microsoft: Windows Server TCPStats Performance
- Microsoft: Windows Server UDPStats Performance
- Slow down the Poll Frequency for Dynamic Applications that do not include events. For example, the Microsoft: Windows Server PowerPack's Configuration Dynamic Applications used to be set to run every two hours and are now set to run every 12 hours.
Credentials for WMI and PowerShell Devices
This section describes how to configure credentials for WMI and PowerShell Dynamic Applications. It includes the following topics:
Configuring a WMI Credential
Although Skylar One supports WMI Dynamic Applications, ScienceLogic recommends that you use PowerShell Dynamic Applications where possible. PowerShell is the preferred management platform for Microsoft products.
If you configure your Windows system to respond to WMI requests from Skylar One, you can use WMI Dynamic Applications to collect information from your Windows system.
All of the WMI Dynamic Applications include a discovery object. If you include a credential for WMI Dynamic Applications in the discovery session that includes your Windows system, Skylar One will automatically align the appropriate WMI Dynamic Applications to the Windows system. For more information about creating a discovery session, see
To create a credential for a WMI Dynamic Application:
- Go to the Credentials page (Manage > Credentials).
- Click the button and then select Create Basic/Snippet Credential. The Create Credential modal page appears.
- Supply values in the following fields:
- Name. Name of the credential. Can be any combination of alphanumeric characters, up to 64 characters. This field is required.
- All Organizations. Toggle on (blue) to align the credential to all organizations, or toggle off (gray) and then select one or more specific organizations from the What organization manages this service? drop-down field to align the credential with those specific organizations. This field is required.
To learn more about credentials and organizations, see
- Timeout (ms). Time, in milliseconds, after which the platform will stop trying to communicate with the authenticating server.
- Username. Username for a user account on the device. To specify a domain user, enter the username in the format DOMAIN\username. In most cases, you should use a domain user in the credential and use the format DOMAIN\username.
- Password. Password for a user account on the device.
- Hostname/IP. Hostname or IP address of the device from which you want to retrieve data. To use the same WMI default credential for multiple devices, enter the variable %D in this field.
- Port. Port number associated with the data you want to retrieve. For WMI Dynamic Applications that perform WBEM requests, supply the port used by the WBEM service on the device. For WMI Dynamic Applications that perform WMI requests, which includes all default WMI Dynamic Applications in Skylar One, enter any valid port number in this field; the platform does not specify a port number when performing WMI requests.
- Click .
Configuring a WMI Credential in the Classic Skylar One User Interface
Although Skylar One supports WMI Dynamic Applications, ScienceLogic recommends that you use PowerShell Dynamic Applications where possible. PowerShell is the preferred management platform for Microsoft products.
If you configure your Windows system to respond to WMI requests from Skylar One, you can use WMI Dynamic Applications to collect information from your Windows system.
All of the WMI Dynamic Applications include a discovery object. If you include a credential for WMI Dynamic Applications in the discovery session that includes your Windows system, Skylar One will automatically align the appropriate WMI Dynamic Applications to the Windows system. For more information about creating a discovery session, see
You can create a credential for WMI Dynamic Applications from the Credential Management page.
To create a credential for a WMI Dynamic Application in the classic Skylar One user interface:
- Go to the Credential Management page (System > Manage > Credentials).
- Click the button, then select Basic/Snippet Credential.
- The Credential Editor page appears, where you can define the following fields:
- Credential Name. Name of the credential. Can be any combination of alphanumeric characters.
- Hostname/IP. Hostname or IP address of the device from which you want to retrieve data. To use the same WMI default credential for multiple devices, enter %D in this field.
- Port. Port number associated with the data you want to retrieve. For WMI Dynamic Applications that perform WBEM requests, supply the port used by the WBEM service on the device. For WMI Dynamic Applications that perform WMI requests, which includes all default WMI Dynamic Applications in Skylar One, enter any valid port number in this field; the platform does not specify a port number when performing WMI requests.
- Timeout (ms). Time, in milliseconds, after which the platform will stop trying to communicate with the authenticating server.
- Username. Username for a user account on the device. To specify a domain user, enter the username in the format DOMAIN\username. In most cases, you should use a domain user in the credential and use the format DOMAIN\username.
- Password. Password for a user account on the device.
- To save the credential, select the button. To clear the values you set, select the button.
Configuring a PowerShell Credential
To define a PowerShell credential in Skylar One, you will need the following information:
- The username and password for a user on the Windows device.
- If the user is an Active Directory account, the hostname or IP address of the Active Directory server and the domain.
- Determine if an encrypted connection should be used.
- If you are using a Windows Management Proxy, the hostname or IP address of the proxy server.
To create a PowerShell credential:
- Go to the Credentials page (Manage > Credentials).
- Click the button and then select Create Powershell Credential. The Create Credential modal page appears:
- Supply values in the following fields:
- Name. Name of the credential. Can be any combination of alphanumeric characters, up to 64 characters. This field is required.
- All Organizations. Toggle on (blue) to align the credential to all organizations, or toggle off (gray) and then select one or more specific organizations from the What organization manages this service? drop-down field to align the credential with those specific organizations. This field is required.
- Timeout (ms). Time, in milliseconds, after which Skylar One will stop trying to communicate with the authenticating server. For collection to be successful, Skylar One must connect to the authenticating server, execute the PowerShell command, and receive a response within the amount of time specified in this field.
- Hostname/IP. Hostname or IP address of the device from which you want to retrieve data. This field is required.
- You can include the variable %D in this field. Skylar One will replace the variable with the IP address of the device that is currently using the credential.
- You can include the variable %N in this field. Skylar One will replace the variable with the hostname of the device that is currently using the credential. If Skylar One cannot determine the hostname, Skylar One will replace the variable with the primary, management IP address for the current device.
- You can include the prefix HOST or WSMAN before the variable %D in this field if the device you want to monitor uses a service principal name (for example, "HOST://%D" or "WSMAN://%D"). Skylar One will use the WinRM service HOST or WSMan instead of HTTP and replace the variable with the IP address of the device that is currently using the credential.
- Port. Type the port number used by the WinRM service on the Windows device. This field is required.
- Username. Type the username for an account on the Windows device to be monitored or on the proxy server. This field is required.
NOTE: The user should not include the domain name prefix in the username for Active Directory accounts. For example, use "em7admin" instead of "MSDOMAIN\em7admin".
- Password. Type the password for the account on the Windows device to be monitored or on the proxy server. This field is required.
- Account Type. Type of authentication for the username and password in this credential. Choices are:
- Active Directory. On the Windows device, Active Directory will authenticate the username and password in this credential.
- Local. Local security on the Windows device will authenticate the username and password in this credential.
- Use SSL (HTTPS) / Encrypted. Select whether Skylar One will communicate with the device using an encrypted HTTP or HTTPS connection:
- Toggle on (blue) if Skylar One will communicate with the device using an encrypted connection over HTTPS. If toggled on, when communicating with the Windows server, Skylar One will use a local user account with authentication of type "Basic Auth". You must then use HTTPS and can use a Microsoft Certificate or a self signed certificate.
In Skylar One versions prior to 12.3.7, this field is labeled Encrypted. In versions 12.3.7 and above, it is labeled Use SSL (HTTPS).
In Skylar One versions 11.3.0 and later, a newer Kerberos library is used that allows for message encryption over HTTP. This feature is on by default and may eliminate the need for you to configure an HTTPS certificate depending on your security requirements.
- Toggle off (gray) . The credential is encrypted over HTTP rather than HTTPS.
- Toggle on (blue) if Skylar One will communicate with the device using an encrypted connection over HTTPS. If toggled on, when communicating with the Windows server, Skylar One will use a local user account with authentication of type "Basic Auth". You must then use HTTPS and can use a Microsoft Certificate or a self signed certificate.
- Validate Certificate (when HTTPS is used). This field is visible when the Use SSL (HTTPS) toggle field is enabled for the connection and allows you to select whether a certificate is validated for the credential. Choices are:
- Ignore. Skylar One will not validate a certificate for the credential. This is the default setting.
- Validate. Skylar One will require a validated certificate for the credential. If you select Validate, then the target device must include a non-expired certificate issued from a certificate authority.
- Active Directory Host/IP. If you selected Active Directory in the Account Type field, type the hostname or IP address of the Active Directory server that will authenticate the credential.
- Active Directory Domain. If you selected Active Directory in the Account Type field, type the domain where the monitored Windows device resides.
- Message Encryption Setting. If you selected Active Directory in the Account Type field, select whether Kerberos packages sent over PowerShell Remoting Protocol (PSRP) or Windows Remote Management (WinRM) are encrypted. Choices are:
- Auto. Encryption is enabled if the package supports it; otherwise, encryption is disabled. This is the default setting.
- Never. Messages are never encrypted. If selected, the target device must support this option.
- Always. Messages are always encrypted. If selected, the target device must support this option.
- PowerShell Proxy Hostname/IP. If you use a proxy server in front of the Windows devices you want to communicate with, type the fully-qualified domain name or the IP address of the proxy server in this field.
- Click .
If you would like to test your credential using the Credential Tester panel, click . For detailed instructions on using the Credential Tester panel, see the Using the Credential Tester Panel section.
Configuring a PowerShell Credential in the Classic Skylar One User Interface
To define a PowerShell credential in the classic Skylar One user interface:
- Collect the information you need to create the credential:
- The username and password for a user on the Windows device.
- If the user is an Active Directory account, the hostname or IP address of the Active Directory server and the domain.
- Determine if an encrypted connection should be used.
- If you are using a Windows Management Proxy, the hostname or IP address of the proxy server.
- Go to the Credential Management page (System > Manage > Credentials).
- In the Credential Management page, click the menu. Select Create PowerShell Credential.
- The Credential Editor page appears, where you can define the following fields:
- Profile Name. Name of the credential. Can be any combination of alphanumeric characters. This field is required.
- Hostname/IP. Hostname or IP address of the device from which you want to retrieve data. This field is required.
- You can include the variable %D in this field. Skylar One will replace the variable with the IP address of the device that is currently using the credential.
- You can include the variable %N in this field. Skylar One will replace the variable with the hostname of the device that is currently using the credential. If Skylar One cannot determine the hostname, Skylar One will replace the variable with the primary, management IP address for the current device.
- You can include the prefix HOST or WSMAN before the variable %D in this field if the device you want to monitor uses a service principal name (for example, "HOST://%D" or "WSMAN://%D"). Skylar One will use the WinRM service HOST or WSMan instead of HTTP and replace the variable with the IP address of the device that is currently using the credential.
- Username. Type the username for an account on the Windows device to be monitored or on the proxy server. This field is required.
NOTE: The user should not include the domain name prefix in the username for Active Directory accounts. For example, use "em7admin" instead of "MSDOMAIN\em7admin".
- Encrypted. Select whether Skylar One will communicate with the device using an encrypted connection. Choices are:
- yes. When communicating with the Windows server, Skylar One will use a local user account with authentication of type "Basic Auth". You must then use HTTPS and can use a Microsoft Certificate or a self-signed certificate.
- no. When communicating with the Windows server, Skylar One will not encrypt the connection.
- Port. Type the port number used by the WinRM service on the Windows device. This field is automatically populated with the default port based on the value you selected in the Encrypted field. This field is required.
- Account Type. Type of authentication for the username and password in this credential. Choices are:
- Active Directory. On the Windows device, Active Directory will authenticate the username and password in this credential.
- Local. Local security on the Windows device will authenticate the username and password in this credential.
- Timeout (ms). Type the time, in milliseconds, after which Skylar One will stop trying to collect data from the authenticating server. For collection to be successful, Skylar One must connect to the authenticating server, execute the PowerShell command, and receive a response within the amount of time specified in this field.
- Password. Type the password for the account on the Windows device to be monitored or on the proxy server. This field is required.
- PowerShell Proxy Hostname/IP. If you use a proxy server in front of the Windows devices you want to communicate with, type the fully-qualified domain name or the IP address of the proxy server in this field.
- Active Directory Hostname/IP. If you selected Active Directory in the Account Type field, type the hostname or IP address of the Active Directory server that will authenticate the credential.
- Domain. If you selected Active Directory in the Account Type field, type the domain where the monitored Windows device resides.
- To save the credential, click the button. To clear the values you set, click the button.
Example: Creating a WMI Performance Dynamic Application
In this example, we will create a WMI Dynamic Application. Our Dynamic Application will collect the following information from a network interface running on a Windows computer: Total bytes, current bandwidth, name, packets per second, outbound errors, and received errors.
NOTE: This example Dynamic Application is included in the "Microsoft Base Pack" PowerPack, version 1.5 and later.
Defining the WMI Request
To create the Dynamic Application and define the general properties for this Dynamic Application, perform the following steps:
- Go to the Dynamic Applications Manager page (System > Manage > Applications).
- Select the button, and then select Create New Dynamic Application. The Dynamic Applications Create New Application page appears.
- Supply values in the following fields:
- Application Name. Enter Windows Interface in this field.
- Application Type. Select WMI Performance.
- Poll Frequency. Select Every 5 Minutes.
- For this example, you can leave the remaining fields at their default value. Select the button to save the Dynamic Application.
Adding the WMI Request
In Skylar One, each WMI Dynamic Application must include at least one WMI or WBEM request.
WMI objects are populated when the Dynamic Application executes a WMI request. WMI requests use WQL (WMI Query Language) to query WMI classes (tables) to retrieve data. A single WMI request can populate multiple WMI objects by querying for multiple class properties (table columns).
WMI objects are aligned with properties (column). The definition of each object specifies the WMI request that will populate the object and the property name to align with the object. The retrieved values of the property will populate the object.
For more details on WMI requests, see the WMI Requests section.
To create the WMI request for this Dynamic Application:
- Go to the Dynamic Applications Manager page (System > Manage > Applications).
- Select the wrench icon () for the Windows Interface Dynamic Application. The Dynamic Applications Properties Editor page appears.
- Select the tab. The WMI Request Editor & Registry page appears.
- Supply values in the following fields:
- WMI Request Name. We named our WMI Request "Win32_PerfFormattedData_Tcpip_NetworkInterface"
- WMI Request Type. Select WMI.
- WMI Object Key. The unique key for each instance (row) returned by the request. This unique key must be a property (column) name, and the request must include that property (column) and return values from that property name (column).The selected property (column) must return the same values over all polling periods. The "Name" property (column) meets these criteria. Enter "Name" in this field.
- Active State. Select Enabled.
- WMI Request Query. This Dynamic Application is getting values from the Win32_PerfFormattedData_Tcpip_NetworkInterface class (table), and will collect the following values: Interface name, total bytes, current bandwidth, name, outbound errors, and received errors. We entered the following in the WMI Request Query:
Select Name,BytesTotalPerSec,PacketsPerSec,CurrentBandwidth,PacketsOutboundErrors,PacketsReceivedErrors From Win32_PerfFormattedData_Tcpip_NetworkInterface
- Select the button to save the WMI Request.
Adding the Collection Objects
Our example Dynamic Application has six collection objects:
- Total Bytes per second
- Current Bandwidth
- Interface Name
- Packets per second
- Outbound errors
- Received errors
To create these collection objects, perform the following steps:
- Go to the Dynamic Applications Manager page (System > Manage > Applications).
- Select the wrench icon () for the Windows Interface Dynamic Application. The Dynamic Applications Properties Editor page appears.
- Select the tab. The Dynamic Applications | Collections Objects page appears.
- To create the collection object for Total Bytes, supply values in the following fields:
- Object Name. We named our collection object "Network Interface\Bytes Total/sec"
- WMI Request Argument. In this field, you must specify the name of the property (table column) to associate with this object. Enter "BytesTotalPersec" in this field.
- Class Type. Total bytes per second is a number that can go up or down between polls. Select 4 Performance Gauge in this field.
- WMI Request. Name of the WMI request associated with this object. Select Win32_PerfFormattedData_Tcpip_NetworkInterface.
- Group Number. Select Group 1. For performance Dynamic Applications, Skylar One uses the Group Number setting to associate performance values with the appropriate labels. For the performance graph for this example to display labels correctly, all the collection objects must be in the same group.
- Description. A description of the object. This is an optional field. We provided a summary of the object in this field.
- For this example, you can leave the remaining fields set to their default values.
- Select the button.
- Select the button to clear the form fields.
- To create the following Collection Objects for Current Bandwidth, Packets Per Second, Outbound Errors, and Received Errors collection objects, repeat step 4, using the following values in the WMI Request Argument field. These values match the properties defined in the WMI Request for this Dynamic Application.
| Collection Object | WMI Request Argument |
|---|---|
| Network Interface/Current Bandwidth | Current Bandwidth |
| Network Interface/Packets/sec | PacketsPerSec |
| Network Interface/Outbound Errors | PacketsOutbandErrors |
| Network Interface/Received Errors | PacketsReceivedErrors |
- To create the Interface Name collection object, which will be the label for the performance report, supply the following values in the Dynamic Applications | Collections Objects page:
- Object Name. We named this collection object "Network Interface\Name".
- WMI Request Argument. In this field, you must specify the name of the property (table column) to associate with this object. Enter "Name" in this field.
- Class Type. Select Label (Always Polled) in this field. In performance Dynamic Applications, collection objects that use this class type are string values that Skylar One uses to label the lines on a performance graph.
- WMI Request. Name of the WMI request associated with this object. Select Win32_PerfFormattedData_Tcpip_NetworkInterface.
- Group Number. Select Group 1. For performance Dynamic Applications, Skylar One uses the Group Number setting to associate performance values with the appropriate labels. For the performance graph for this example to display labels correctly, all the collection objects must be in the same group.
- Description. A description of the object. This is an optional field. We provided a summary of the object in this field.
- For this example, you can leave the remaining fields set to their default values.
- Select the button.
Creating the Presentation Objects
When you create a collection object in a Dynamic Application of type Performance, Skylar One automatically creates a presentation object that corresponds to that collection object. In this example, we will remove these presentation objects and create new presentation objects for each collection object defined above.
To create the presentation objects:
- Go to the Dynamic Applications Manager page (System > Manage > Applications).
- Select the wrench icon () for the Windows Interface Dynamic Application.
- Select the tab. The Dynamic Applications Presentation Objects page appears.
- In the Dynamic Applications Presentation Objects page, each collection object created in the Adding the Collection Objects section has been created by default. Select each presentation object's delete icon () to delete them.
- Select the button. To create the presentation object that displays Total Bytes Per Second, enter values in the following fields:
- Report Name. Enter "Bytes Total per Second" in this field.
- Active State. Select Enabled. Skylar One will generate a report of the presentation object.
- Data Unit. Enter "Bytes/Second" into this field.
- Abbreviation / Suffix. Enter "Bps" into this field.
- Show as Percent. Select No. The graph will not display percent values.
- 'Formula Editor. In this field, enter the object ID for the Total Bytes Per Second collection object, surrounded by parentheses.
- For this example, you can leave the remaining fields set to their default values.
- Select the button to save the presentation object.
- Select the button. For the Current Bandwidth presentation object, enter the following values in the Dynamic Applications Presentation Objects page:
- Report Name. Enter "CurrentBandwidth" in this field.
- Active State. Select Enabled. Skylar One will generate a report of the presentation object.
- Data Unit. Enter "Bytes per second" into this field.
- Abbreviation / Suffix. Enter "Bps" into this field.
- Show as Percent. Select No. The graph will not display percent values.
- Vitals Link. Select Disabled.
- Formula Editor. In this field, enter the object ID for the Current Bandwidth collection object, surrounded by parentheses.
- For this example, you can leave the remaining fields set to their default values. Select the button to save the presentation object.
- Select the button. For the Interface Utilization presentation object, enter the following values in the Dynamic Applications Presentation Objects page:
- Report Name. Enter "Interface Utilization" in this field.
- Active State. Select Enabled. Skylar One will generate a report of the presentation object.
- Data Unit. Enter "Percent" into this field.
- Abbreviation / Suffix. Enter "%" into this field.
- Show as Percent. Select Yes. The graph will display percent values.
- Formula Editor. In this field, enter the following formula:
((<object ID for Current Bandwidth> > 0) ? ((8 * <object ID for Bytes Total/sec>) / <object ID for Current Bandwidth>) : 0)
For example, if the object ID for Current Bandwidth is o_7034 and the object ID for Bytes Total/sec is o_7031, enter:
( (o_7034 > 0) ? ( (8 * o_7031) / o_7034) : 0)
This formula includes a collection object as a divisor. To prevent an error from occurring when the divisor returns zero, the formula includes a ternary operator that tests to see if the divisor is zero. If the divisor is zero, the formula returns zero. If the divisor is greater than zero, the formula converts the "Bytes Total/sec collection object in to Bits Total/sec, then divides the total bits/second by the speed of the interface.
- For this example, you can leave the remaining fields set to their default values. Select the button to save the presentation object.
- Select the button. For the Packets Per Second presentation object, enter the following values in the Dynamic Applications Manager page:
- Report Name. Enter "Packets per Second" in this field.
- Active State. Select Enabled. Skylar One will generate a report of the presentation object.
- Data Unit. Enter "Packets/Second" into this field.
- Abbreviation / Suffix. Enter "P/s" into this field.
- Show as Percent. Select No. The graph will not display percent values.
- Formula Editor. In this field, enter the object ID for the Packets Per Second collection object, surrounded by parentheses.
- For this example, you can leave the remaining fields set to their default values. Select the button to save the presentation object.
- Select the button. For the Outbound Errors presentation object, enter the following values in the Dynamic Applications Manager page:
- Report Name. Enter "PacketsOutboundErrors" in this field.
- Active State. Select Enabled. Skylar One will generate a report of the presentation object.
- Data Unit. Enter "Errors" into this field.
- Abbreviation / Suffix. Enter "Errors" into this field.
- Show as Percent. Select No. The graph will not display percent values.
- Formula Editor. In this field, enter the object ID for the Outbound Errors collection object, surrounded by parentheses.
- For this example, you can leave the remaining fields set to their default values. Select the button to save the presentation object.
- Select the button. For the Inbound Errors presentation object, enter the following values in the Dynamic Applications Manager page:
- Report Name. Enter "PacketsInboundErrors" in this field.
- Active State. Select Enabled. Skylar One will generate a report of the presentation object.
- Data Unit. Enter "Errors" into this field.
- Abbreviation / Suffix. Enter "Errors" into this field.
- Show as Percent. Select No. The graph will not display percent values.
- Formula Editor. In this field, enter the object ID for the Inbound Errors collection object, surrounded by parentheses.
- For this example, you can leave the remaining fields set to their default values. Select the button to save the presentation object.
Creating a Credential
To use the Windows Interface Dynamic Application, we must include a Basic/Snippet credential. To create the Basic/Snippet credential:
- Go to the Credential Management page (System > Manage > Credentials).
- Select the button, and then select Basic/Snippet Credential. The Create New Basic/Snippet Credential page appears.
- Define values in the following fields:
- Credential Name. Enter "Windows Interface WMI" in this field.
- . Enter "%D" in this field. Skylar One will replace the variable with the IP address of the device that is currently using the credential.
- Port. Enter "1521" in this field. This is the default port for WMI.
- Timeout. Enter "5000" in this field. Skylar One will stop trying to communicate with the authenticating server after 5000 seconds.
- Username. Enter the username for a user account in this field that will provide access to the monitored Windows device.
- Password. Enter a password for a user account that will provide access to the monitored Windows device
- Select the button to save the credential.
Manually Aligning the Dynamic Application to a Device
In this example we will align the Dynamic Application to a Windows device running WMI. By manually aligning the Dynamic Application to a device, we can immediately view the interface data in the presentation objects we defined.
To manually align the Dynamic Application to a device:
- Go to the Device Manager page (Devices > Classic Devices, or Registry > Devices > Device Manager in the classic user interface).
- In the Device Manager page, find the device you want to align the Dynamic Application to. In this example, we are aligning the Dynamic Application to a Windows device running WMI. Select the device's wrench icon ().
- The Device Properties page appears. Select the tab.
- In the Dynamic Application Collections page, select the button and select Add Dynamic Application. The Dynamic Application Alignment page appears.
- Select the Windows Interface Dynamic Application in the Dynamic Applications pane, and select Windows Interface WMI in the Credentials pane.
- Select the button to add the Dynamic Application.
Viewing the Performance Reports
After the Dynamic Application has collected the data specified in the collection objects, you can view the performance report for the device. To view the performance report for the device with the Windows Interface Dynamic Application aligned to it:
- From the Dynamic Application Collections page, select the button to update the page with the latest information.
- Locate the Windows Interface Dynamic Application. If the graph icon (
 ) is colored, the performance report is available. Select the graph icon for the presentation object you want to view.
Or:
- Go to the Device Manager page (Devices > Classic Devices, or Registry > Devices > Device Manager in the classic user interface).
- In the Device Manager page, find the test device you aligned the Windows Interface Dynamic Application to. Select the device's graph icon ().
- The Device Summary page appears. Select the tab.
- In the left NavBar, select any of the presentation objects you created in the section Creating the Presentation Objects. In this example, we selected Bytes Total per Second.
- The Windows Interface | Bytes Total per Second report is displayed.
- The report displays the collected values from the collection object Network Interface\Bytes Total/sec.
- You can mouse over different data points on the report, and the report will display the total bytes moving through the interface at the time selected on the graph.
- The amount of bytes is shown to the left of the report.
- The values for each label object are displayed in the graph key at the bottom of the page.
- To learn more about performance reports, see
Example: Creating a PowerShell Performance Dynamic Application
In this example, we will create a PowerShell Dynamic Application. Our Dynamic Application will collect the Processor Queue Length from a Windows computer.
NOTE: This example Dynamic Application is included in the "Microsoft: Windows Server" PowerPack, version 1.0 and later. This example describes how to create only one of the requests, collection objects, and presentation objects that are included in the "Microsoft: Windows Server" PowerPack version of this Dynamic Application.
Creating the Dynamic Application
To create the Dynamic Application and define the general properties for this Dynamic Application, perform the following steps:
- Go to the Dynamic Applications Manager page (System > Manage > Applications).
- Select the button, and then select Create New Dynamic Application. The Dynamic Applications Create New Application page appears.
- Supply values in the following fields:
- Application Name. Enter "Microsoft: Windows Server CPU Performance" in this field.
- Application Type. Select PowerShell Performance.
- Polling Frequency. Select Every 5 Minutes.
- For this example, you can leave the remaining fields at their default value. Select the button to save the Dynamic Application.
Adding the PowerShell Command
In Skylar One, each PowerShell Dynamic Application must include at least one PowerShell Command.
The collection objects in a PowerShell Dynamic Application are populated when Skylar One executes a PowerShell Command.
Collection objects in PowerShell Dynamic Applications are aligned with properties (columns). The definition of each object specifies the PowerShell command that will populate the object and the property name to align with the object. The retrieved values of the property will populate the object.
To create the PowerShell command for this Dynamic Application:
- Go to the Dynamic Applications Manager page (System > Manage > Applications).
- Select the wrench icon for the "Microsoft: Windows Server CPU Performance" Dynamic Application. The Dynamic Applications Properties Editor page appears.
- Select the tab. The PowerShell Command Editor and Registry page appears.
- Supply values in the following fields:
- PowerShell Command Name. We named our PowerShell Command "Server CPU Processor Queue-Length".
- Active State. Select Enabled.
- PowerShell Command Query. This Dynamic Application collects the CookedValue property from \System\Processor Queue Length: . We entered the following in the PowerShell Command Query field:
(Get-Counter "\System\Processor Queue Length").CounterSamples | Select-Object CookedValue
- Select the button to save the PowerShell command.
Adding the Collection Object
Our example Dynamic Application has one collection object: Processor Queue Length.
To create the collection object, perform the following steps:
- Go to the Dynamic Applications Manager page (System > Manage > Applications).
- Select the wrench icon () for the "Microsoft: Windows Server CPU Performance" Dynamic Application. The Dynamic Applications Properties Editor page appears.
- Select the tab. The Dynamic Applications | Collections Objects page appears.
- To create the collection object for Processor Queue Length, supply values in the following fields:
- Object Name. We named our collection object "Processor Queue Length".
- PowerShell Argument. In this field, you must specify the name of the property to associate with this object. Enter "CookedValue" in this field.
- Class Type. Processor Queue Length is a number that can go up or down between polls. Select 4 Performance Gauge in this field.
- PowerShell Request. Name of the PowerShell request associated with this object. Select Server CPU Processor Queue Length.
- Group Number. Select No Group. For performance Dynamic Applications, Skylar One uses the Group Number setting to associate performance values with the appropriate labels.
- Description. A description of the object. This is an optional field. We provided a summary of the object in this field.
- For this example, you can leave the remaining fields set to their default values.
- Select the button.
Creating the Presentation Object
When you create a collection object in a Dynamic Application of type Performance, Skylar One automatically creates a presentation object that corresponds to that collection object. In this example, we will edit the presentation object for the Processor Queue Length to create a new presentation object for the Processor Queue Length.
To create the Processor Queue Length presentation object:
- Go to the Dynamic Applications Manager page (System > Manage > Applications).
- Select the wrench icon () for the "Microsoft: Windows Server CPU Performance".
- Select the tab. The Dynamic Applications Presentation Objects page appears.
- In the Dynamic Applications Presentation Objects page, the Processor Queue Length collection object created in the Adding the Collection Objects section has been created by default. Select the Processor Queue Length presentation object's wrench icon () to edit it.
- To create the presentation object that displays the Processor Queue Length, supply values in the following fields:
- Report Name. Enter "Processor Queue Length".
- Active State. Select Enabled. Skylar One will generate a report of the presentation object.
- Data Unit. Enter "Threads" into this field.
- Abbreviation / Suffix. Enter "Threads" into this field.
- Show as Percent. Select No. The graph will not display percent values.
- For this example, you can leave the remaining fields set to their default values. Select the button to save the presentation object.
Creating a Credential
To use the "Microsoft: Windows Server CPU Performance" Dynamic Application, we must create a PowerShell credential. To create the PowerShell credential:
- Go to the Credentials page (Manage > Credentials).
- Click the button and then select Create Powershell Credential. The Create Credential modal page appears.
- Supply values in the following fields:
- Name. Enter a credential name in this field. We entered "PowerShell 2k12R2 [AD]" in this example.
- All Organizations. Toggle on (blue) to align the credential to all organizations, or toggle off (gray) and then select one or more specific organizations from the What organization manages this service? drop-down field to align the credential with those specific organizations. This field is required.
To learn more about credentials and organizations, see see
- Timeout (ms). Enter "3000" in this field. Skylar One will stop trying to communicate with the authenticated server after 3000 ms.
- Hostname/IP. Enter "%D" in this field. Skylar One will replace the variable with the IP address of the device that is currently using the credential.
- Port. The port should be automatically selected after selecting a value in the Encrypted field.
- Username. Enter the username for a user that will provide access to the monitored Windows device.
- Password. Enter the password for the user account you entered in the Username field.
- Account Type. Select the account type of the user that will provide access to the monitored Windows device.
- Use SSL (HTTPS) / Encrypted. Select whether Skylar One will communicate with the device using an encrypted HTTP or HTTPS connection.
- Validate Certificate (when HTTPS is used). If you enabled the Use SSL (HTTPS) toggle field, select whether a certificate is validated for the credential. If you select Validate, then the target device must include a non-expired certificate issued from a certificate authority.
- Active Directory Host/IP. If you are using an Active Directory user account, enter the hostname or IP address of the managed device's corresponding domain controller from the active directory forest.
- Active Directory Domain. If you are using an Active Directory user account, enter your Active Directory domain.
- Message Encryption Setting. If you are using an Active Directory user account, select whether Kerberos packages sent over PowerShell Remoting Protocol (PSRP) or Windows Remote Management (WinRM) are encrypted. Choices are Auto, Never, or Always.
- PowerShell Proxy Hostname/IP. Do not enter a value this field unless you have configured a Windows device to serve as an intermediary proxy to retrieve PowerShell data from the target Windows device.
In Skylar One versions prior to 12.3.7, this field is labeled Encrypted. In versions 12.3.7 and above, it is labeled Use SSL (HTTPS).
In Skylar One versions 11.3.0 and later, a newer Kerberos library is used that allows for message encryption over HTTP. This feature is on by default and may eliminate the need for you to configure an HTTPS certificate depending on your security requirements.
- Click .
Manually Aligning the Dynamic Application to a Device
In this example we will align the Dynamic Application to a Windows device that is configured for monitoring via PowerShell. By manually aligning the Dynamic Application to a device, we can immediately view the performance data in the presentation object we defined.
To manually align the Dynamic Application to a device:
- Go to the Device Manager page (Devices > Classic Devices, or Registry > Devices > Device Manager in the classic user interface).
- In the Device Manager page, find the device you want to align with the Dynamic Application. In this example, we are aligning the Dynamic Application to a Windows device that is configured for monitoring via PowerShell. Select the wrench icon for the device ().
- The Device Properties page appears. Select the tab.
- In the Dynamic Application Collections page, select the button and select Add Dynamic Application. The Dynamic Application Alignment page appears:
- Select the "Microsoft: Windows Server CPU Performance" Dynamic Application in the Dynamic Applications field, and select the appropriate PowerShell credential in the Credentials field.
- Select the button to add the Dynamic Application.
Viewing the Performance Report
After the Dynamic Application has collected the data specified in the collection objects, you can view the performance report for the device. To view the performance report for the device with the "Microsoft: Windows Server CPU Performance" Dynamic Application aligned to it:
- From the Dynamic Application Collections page, select the button to update the page with the latest information.
- Locate the "Microsoft: Windows Server CPU Performance" Dynamic Application. If the graph icon is colored, the performance report is available. Select the graph icon () for the presentation object you want to view.
Or:
- Go to the Device Manager page (Devices > Classic Devices, or Registry > Devices > Device Manager in the classic user interface).
- In the Device Manager page, find the test device you aligned the "Microsoft: Windows Server CPU Performance" Dynamic Application. Select the device's graph icon.
- The Device Summary page appears. Select the tab.
- In the left NavBar, select the presentation object you created in the section Creating the Presentation Objects:
- The Microsoft: Windows Server CPU Performance | Processor Queue Length report is displayed.
- The report displays the collected values from the collection object Processor Queue Length.
- You can mouse over different data points on the report, and the report will display the queue length value at the time selected on the graph.
- The values for the Processor Queue Length label object are displayed in the graph key at the bottom of the page.
To learn more about performance reports, see the section on Device Management.