![]()
The following video explains the daily maintenance process and how to troubleshoot common issues related to that process:
Use the following menu options to navigate the SL1 user interface:
- To view a pop-out list of menu options, click the menu icon (
 ).
). - To view a page containing all the menu options, click the Advanced menu icon (
 ).
).
This
What is a Healthy SL1 System?
The following table presents a broad list of focus areas for SL1 health that are important to track for all SL1 systems. Where a specific automated check is available, it is included in the table.
| Focus Area | Check | Background | Specific Operation | Result |
|---|---|---|---|---|
| Patch level | Version has been updated within last 12 months | Software updates are released at least quarterly and include security and stability improvements. | Quarterly manual review of available and planned software updates from ScienceLogic | Plan to keep all SL1 platforms updated within 12 months of the latest release. |
| Response time | API response times for standard requests are within five seconds | API response times are highly dependent on the size of the response, however all SL1 systems should respond to a simple request without delay. | /api/organization/0 | Returns a response set for the “system” organization (id 0). |
| Central storage capacity | At least 20% of local database storage is free and available for new data | The InnoDB database file will auto-expand but never shrink. When data is removed from the database, space is made available for future use. | Support PowerPack - Support: InnoDB Size | Built-in alerts for the Support PowerPack default to 80% used for major and 90% for critical. |
| CPU Consumption | System CPU utilization and load average | Both Collectors and Databases can become CPU constrained, leading to unhealthy performance characteristics. | Operating system measures of CPU utilization and load average | Load average should be at or below the system’s available core count. CPU utilization of a 5 min collection should not be above 80%, 70% if hyperthreading is enabled. |
| Memory Consumption | Avoid swap usage | The MariaDB database will make use of available memory for caching purposes over time, but no SL1 system should require regular swapping, which can lead to extremely poor performance. | Operating system measure of swap usage | Swap usage < 50% |
| Performance Data Processing | The central system is keeping up with all collection processing. | It is normal to have some backlog of “MF” data, a busy system may normally have 10,000 rows or more between each processing cycle, but they should be completely processed within each cycle (backlog should not build). | Built-in MF rows-behind compared with MF object processing rate | Backlog time < 1 processing cycle |
| Event Processing | The central system is keeping up with all event processing. | It is normal to have some backlog of “HF” data. A busy system may normally have 10,000 rows or more between each processing cycle, but these rows should be completely processed within each cycle (backlog should not build) | Built-in HF rows-behind compared with HF object processing rate | Backlog time < 1 processing cycle |
| Run Book Automation (RBA) | The central system is keeping up with all RBA processing. | The built-in RBA engine supports parallel execution and queuing of operations. This can be critical for time-sensitive notification and integration with external systems. | Built-in alerting in the RBA scheduler will notify if the system is falling behind. | No critical events starting with the following phrase: “The automation engine is still processing…” |
| Performance Data Collection | Collection of data is completing as scheduled. | Collection that is unbalanced or overloaded, or target devices that are misconfigured or unresponsive can result in collection not completing successfully. | SL1 Operational Insights PowerPack | Check for occurrences of “sigterming” collection. The Operational Insights PowerPack makes this easy to navigate using a dashboard. |
| Asynchronous Message Processing | Message collection is keeping up with asynchronous syslog and SNMP trap messages. | Data Collectors, Message Collectors, and All-in-One appliances receive | Built-in alert for suppressing of messages from “spamming” devices |
By default SL1 will suppress messages from devices generating at a rate of > 25/sec/device with a built-in alert. |
| System Maintenance | Daily maintenance tasks are completing normally | The primary daily maintenance task (scheduled nightly outside of core business hours) is to prune old data from the SL1 database, which is an essential activity for long term health. | Regular check of the system log | Daily maintenance tasks not being terminated due to an incomplete status. |
| System Backup | Backups completing per schedule. | SL1 supports both configuration-only and full backups. Both should be used since they support different recovery models | Regular check of the system log | The system log will show reports of backup completion and duration. |
SL1 Self-Healing
For the SL1 classic User Interface, SL1 provides three self-healing jobs that are performed on the Database Server or All-In-One Appliance. These jobs:
- automatically set "s-em7-core:s-em7-core" as the owner and group for the file "silo.log"
- automatically restart the process em7_patch_manager if it is stuck in deactivating mode
- automatically kill queries that have run for longer than 1 hour and logs each query
SL1 Self-Monitoring
SL1 includes a self-monitoring PowerPack that is included by default with SL1 releases. This PowerPack is called the ScienceLogic Support Pack PowerPack.
Version 103 of the ScienceLogic Support Pack PowerPack replaced the "Support: MySQL Performance" Dynamic Application with the "Support: MariaDB Performance" Dynamic Application.
This self-monitoring PowerPack:
- ensures that all SL1 appliances are monitored and running the same version of SL1
- ensures that all SL1 appliances appear in the Device Manager page (Registry > Devices > Device Manager)
- ensures that configuration files on SL1 appliances are kept in sync
- ensures that configuration files on SL1 clusters are kept in sync
- monitors the health and configuration of MariaDB
- generates alerts when system resources like disk-space are approaching capacity
- monitors DNS entries for Database Servers and All-In-One appliances
- monitors long-running processes and queries
- monitors out-of-memory conditions
- ensures that CRM and corosync configurations are up to date
- ensures that configuration files match among HA Database Servers
- monitors crucial SL1 processes like datapull and config_push
- monitors "rows behind" situations and generates alerts
- monitors and fixes backlogs of email messages
- generates alerts if any of the following files differ:
- /etc/my.cnf.d/silo_mysql.cnf
- /etc/silo.conf
- /etc/siteconfig/mysql.siteconfig
- /etc/siteconfig/siloconf.siteconfig
Monitoring System Events
To view the entries in the System Logs:
- Go to the System Logs page (System > Monitor > System Logs).
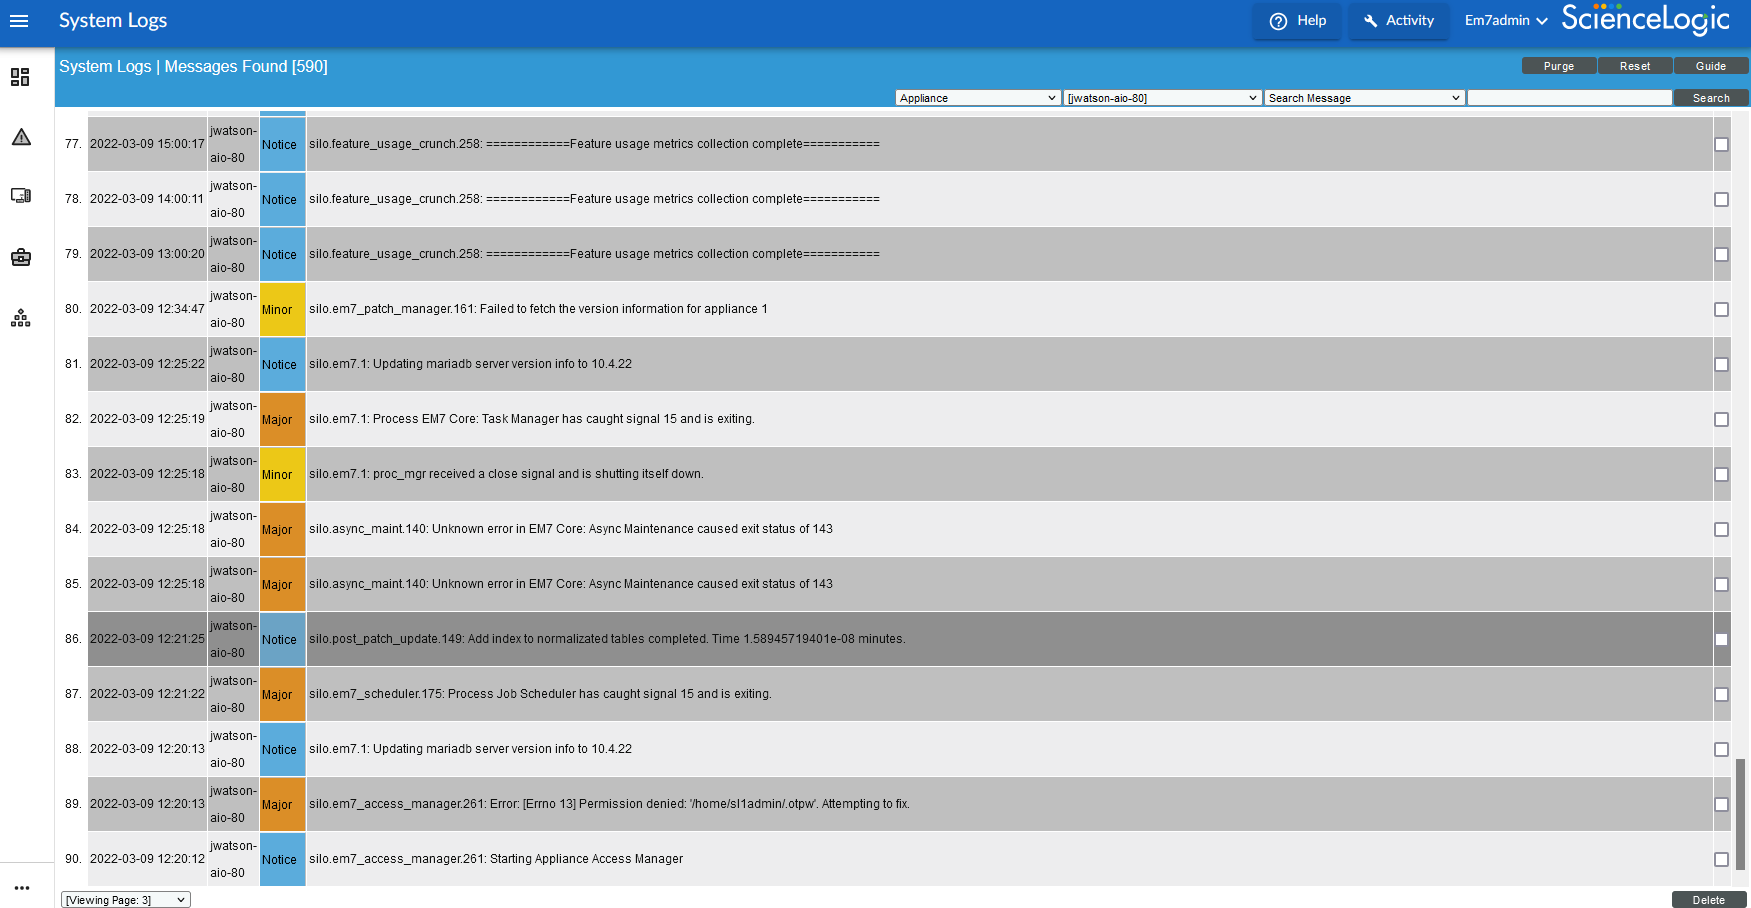
- On the System Logs page, pay special attention to any log entry tagged as Critical or Major. These entries might require additional diagnostics.
- For each log entry, the System Logs page displays:
- Date. Date and time the log entry was generated.
- Module. Name of the appliance that generated the log entry.
- Severity. Specifies the severity assigned to the log entry. The choices are:
- Healthy
- Notice
- Minor
- Major
- Critical
- Message. Descriptive text included in the log entry.
Searching the System Logs
When viewing the System Logs, you might want to sort the entries by date or by log message. This is helpful when you want to view information about a specific occurrence of a system event.
You can also filter the list of logs by appliance, severity, and date.
To search the system logs:
- Go to the System Logs page (System > Monitor > System Logs).
- The first two filters at the top of the System Logs page let you filter the list of logs by appliance, severity, and date. Select a sort type from the first filter (Appliance, Severity, or From Date) and then type or select filter criteria in the next filter to the right.
- Click the button to see the results of the filters.
- The
- Search where. Specifies the parameter you want to search by. You can select from the following:
- Search Message. Searches all log entries for those that match the text that you enter in the regular expression field.
- Search Module ID. Searches all log entries for those that have the same module ID text as that entered in the regular expression field.
- Search Date = (Y-m-d H:i:s). Searches all log entries for those that have a date and time that is equal to the date entered in the regular expression field.
- Search Date > (Y-m-d H:i:s). Searches all log entries for those that have a date and time that is later than the date entered in the regular expression field.
- Search Date Like (Y-m-d H:i:s). Searches all log entries for those that have a date and time that is similar to the date entered in the regular expression field.
- Search Date Like != (Y-m-d H:i:s). Searches all log entries for those that have a date and time that is not similar to the date entered in the regular expression field.
- regular expression. In this field you manually enter the text to search for. You can use the following special characters in this field:
- * Match zero or more characters preceding the asterisk. For example:
"dell*" would match "dell", "dell2650", "dell7250" and "dell1700N".
"*dell*" would match "mydell", "dell", "dell2650", "dell7250" and "dell1700N".
- % Match zero or more characters preceding the asterisk. This special character behaves in the same way as the asterisk.
- When you click the button, the System Logs page will be refreshed and will display only the log entries that match the search parameters.
Deleting Entries from the System Logs
To save space, you might want to remove some or all log entries from the system log.
There are two ways to delete entries from the System Logs page:
- Go to the System Logs page (System > Monitor > System Logs).
- In the System Logs page, click the button to delete all entries from the System Logs.
Or:
- Go to the System Logs page (System > Monitor > System Logs).
- In the System Logs page, highlight each entry you want to delete. To select multiple entries, right-click while holding down the key.
- Click the button to delete all the selected entries from the System Logs.
Monitoring System Processes
The System Processes page (System > Monitor > Admin System Processes or System > Monitor > System Processes in the classic user interface) allows you to view read-only information about the execution of SL1's system processes. System Processes gather, manipulate, and publish the data used in SL1. These system processes can be configured and debugged in the Process Manager page (System > Settings > Admin Processes).
If you work frequently with ScienceLogic Support, ensure that you verify periodically which processes are running in debug mode, and disable debug mode as soon as is reasonable. This will reduce the noise generated to your log files and will reduce load on the /var/log/em7 partition on the central database.
Viewing the List of System Processes
To view the list of system processes for all appliances:
- Go to the System Processes page (System > Monitor > Admin System Processes).
- The System Processes page displays the following for each process:
- Appliance. The appliance where the process ran or is currently running. This field will contain the device name of the appliance.
- Process. Name of the process.
- ID. Unique numeric ID automatically assigned to the process by SL1.
- Start Time. Date and time at which the process started running.
- End Time. Date and time at which the process stopped running.
- Duration. Amount of time, in hours, minutes, and seconds, for which the process ran.
- Frequency. Frequency with which SL1 launches the process. Possible values are:
- Asynchronous. The process is launched in response to a system event or user request. Asynchronous events display a value of "-1" (negative one) in this column.
- Always. The process always runs while SL1 is running. Always running processes display a value of "0" (zero) in this column.
- The process runs at intervals in minutes ranging from 1 Minute to 1440 Minutes (Daily).
- Percent. Percent of Run Length (defined in the Process Manager page) currently in use by the process.
- Instances. This field is not currently in use.
- Max Instances. Maximum number of instances of the process that have run in parallel.
- Processed. Number of records processed by this run of the process.
- Errors. Number of errors encountered by this run of the process.
Recommended System Maintenance
ScienceLogic recommends that you take the following actions on a regular basis to reduce outages as much as possible.
Daily:
- Review "SL1 Operational Insights: Database Performance" classic dashboard
- Review "SL1 Operational Insights: Collector Performance" classic dashboard
- Review "SL1 Operational Insights: System Log Summary" classic dashboard
- Review "SL1 Operational Insights: Backup History" classic dashboard
Weekly:
- Run the System Status Script and review
- Address every error item in the report
- Read Knowledge Base articles
- Open tickets for issues when help from SL1 Support is needed
Monthly:
- Review capacity items
- You must understand License Usage and how to project future capacity
Quarterly:
- Audit User Profile access to verify that it meets expected needs
- Audit DNS servers and Timeservers on all collectors
Searching and Filtering the List of System Processes
The System Processes page includes ten filters. You can filter the list of processes by one or multiple of the following parameters: appliance, process name, start time, end time, duration, frequency, percent, max instances, processed, and errors. Only processes that meet all the filter criteria will be displayed in the System Processes page.
You can filter by one or more of the following parameters. The list of system processes is dynamically updated as you select each filter.
- For eight of the filters, you must enter text to match against. The user interface will search for processes that match the text, including partial matches. Text matches are not case sensitive. You can use the following special characters in each filter:
- , Specifies an "or" operation. For example:
"dell, micro" would match all values that contain the string "dell" OR the string "micro".
- ! Specifies a "not" operation. For example:
"!dell" would match all values that do not contain the string "dell".
- Appliance. You can enter text to match, including special characters, and the System Processes page will display only processes that have a matching appliance name.
- Process. You can enter text to match, including special characters, and the System Processes page will display only processes that have a matching process name.
- ID. You can enter text to match, and the System Processes page will display only processes that have a matching ID.
- Start Time. Only those processes that match all the previously selected fields and have the specified start date and time will be displayed. The choices are:
- All. Display processes with all start dates and times.
- Last Minute. Display only processes that started within the last minute.
- Last Hour. Display only processes that started within the last hour.
- Last Day. Display only processes that started within the last day.
- Last Week. Display only processes that started within the last week.
- Last Month. Display only processes that started within the last month.
- Last Year. Display only processes that started within the last year.
- End Time. Only those processes that match all the previously selected fields and have the specified end date and time will be displayed. The choices are:
- All. Display processes with all end dates and times.
- Last Minute. Display only processes that ended within the last minute.
- Last Hour. Display only processes that ended within the last hour.
- Last Day. Display only processes that ended within the last day.
- Last Week. Display only processes that ended within the last week.
- Last Month. Display only processes that ended within the last month.
- Last Year. Display only processes that ended within the last year.
- Duration. You can enter text to match, including special characters, and the System Processes page will display only processes that have a matching duration.
- Frequency. You can enter text to match, including special characters, and the System Processes page will display only processes that have a matching frequency.
- Percent. You can enter text to match, including special characters, and the System Processes page will display only processes that have a matching percent.
- Instances. This field is not currently in use. It is not recommended to filter the System Processes by this field.
- Max Instances. You can enter text to match, including special characters, and the System Processes page will display only processes that have a matching number of Max Instances.
- Processed. You can enter text to match, including special characters, and the System Processes page will display only processes that have a matching number of records processed.
- Errors. You can enter text to match, including special characters, and the System Processes page will display only processes that have a matching number of errors.
Monitoring the Status of Each Appliance
The Appliance Manager page (System > Settings > Appliances) provides for global appliance configuration and management for your entire system or stack. This includes collector group and load distribution, version information, license status, and other items that are important when you upgrade.

From the Appliance Manager page, you can also access the Web Configuration Utility for each ScienceLogic appliance by clicking the toolbox icon(![]() ), or you can access the database administration tool for each Database Server or All-In-One Appliance by clicking the gear icon (
), or you can access the database administration tool for each Database Server or All-In-One Appliance by clicking the gear icon (![]() ).
).
For each Database Server, Data Collector, and Message Collector, you can click on the magnifying-glass icon (![]() ) to view the output of the system status script for that appliance.
) to view the output of the system status script for that appliance.
During upgrade, table cells will highlight known, pending action items that must be done to successfully complete an upgrade
This page is useful for ensuring that every Data Collector is assigned to a Collector Group before you begin an upgrade. In some cases, the Data Collector might be assigned to an empty Collector Group, if the collector is new.
You can also use this page to ensure that Data Collector load is near or below the system requirements for each collector.
To edit and view information about an SL1 appliance:
- Go to the Appliance Manager page (System > Settings > Appliances).
- Locate the SL1 appliance you want to edit. Click its wrench icon (
 ). The fields in the top pane are populated with values from the selected SL1 appliance.
 - You can edit one or more of the following fields:
- Host Name. Name of the appliance.
- IP Address. Primary IP address for the appliance.
- Model Type/Module Type. Type of appliance:
-
All In One Server
-
Database
-
Administration Portal
-
Data Collection Unit
-
Message Collection Unit
The combination appliance with a Database Server and an Administration Portal on a single appliance will appear with Module Type of Database. The combination appliance with a Message Collection Unit and a Data Collection Unit will appear with Module Type of Data Collection Unit.
- Integration Server (SL1PowerFlow)
-
Description. Description of the appliance.
- You can edit two optional fields for Data Collector or Message Collector.
-
DB User. User name that can access the MariaDB database on the Data Collector or Message Collector.
-
DB Password. Password that allows access the MariaDB database on the Data Collector or Message Collector.
If you are using AWS RDS with your SL1 System, you must define the DB User and DB Password for each Data Collector or Message Collector.
ScienceLogic recommends that you vary the Data Collector and Message Collector database credentials for enhanced per-appliance security. This greatly enhances the security of your central database by disallowing a successful attack to go unnoticed on your Data Collector and then succeed without failure on the central database.
The Appliance Manager page also displays the following columns:
-
Collector Group. For Data Collectors and All-In-One Appliances, specifies the Collector Group associated with the appliance.
-
Build. Specifies the latest build installed on the appliance.
If an SL1 appliance is running a different version of SL1 than the Database Server, the corresponding cell in the Build column will be highlighted.
-
MariaDB. Specifies the version of MariaDB running on the All-In-One Appliance, Database Server, Data Collector, or Message Collector.
-
Capacity. For Database Servers, specifies the licensed capacity of the appliance.
-
Allocation. For Data Collectors, specifies the number of devices aligned with the appliance.
-
ID. Unique numeric ID, automatically assigned by the platform to each appliance in the Appliance Manager page.
-
Validated. Specifies whether the license is valid.
-
Endpoint. SL1 Agent endpoint for the Gen 1 Agent.
-
Needs Reboot?. Specifies whether the appliance requires reboot to add latest kernel or security updates. This column is updated every 30 minutes. Hover your mouse to determine why the reboot is required and information about kernel version, packages, and last reboot.
-
Task Manager Paused? . Specifies whether the task manager service (em7) is paused. This value is updated every two minutes.
-
Edit Date. Date the appliance's information was discovered or last edited.
-
Edit User. User who last edited the appliance's information.
-
Create Date. Date and time the appliance was registered and licensed.
-
To view the Web Configuration Utility for an appliance, where you can track license data, interfaces, and other device settings, click the Appliance Manager icon (
 ). Use the same login credentials that you used to log into SL1, and close the pop-up window for the Utility when you are done.
 -
If an SL1 appliance is running a different version of SL1 than the Database Server, that appliance is highlighted in the Appliance Manager page. The version number, if known, is listed in the Build column.
-
For all SL1 appliances, SL1 runs the system status script every 15 minutes. You can click the logs icon (
 ) to view the results of the latest system status script.
 -
If you are logging in to the "sl1admin" account on an appliance, you can click the padlock (
 ) icon for that appliance to get a one-time password. For more information, see
 -
For Database Servers, you can click the gear icon (
 ) to access the phpMyAdmin interface for the Database Server. In this interface, you can view all the database tables on the Database Server.
 -
For Data Collectors and Message Collectors, you can click the lightning bolt icon (
 ) to manually force the Database Server to send the latest configuration information.
 The bomb icon (
 ) does not appear for Database Servers that are not configured for High Availability or Disaster Recovery. The bomb icon does not appear for Database Servers that are configured as the primary database in a High Availability or Disaster Recovery configuration.
 - Click the button to save any changes. Click the button to save your changes to a new appliance name.
Monitoring User Actions and Events
The Audit Logs page (System > Monitor > Audit) provides an audit trail for SL1. The Audit Logs page displays a record of actions in SL1 that are generated by users or by managed elements. These actions are organized by organization.
Some of the actions that are logged in the Audit Logs page include:
- User logins to SL1
- The sl1admin user requests a one-time password
- Organization name changes
- The addition, editing, or deletion of elements in SL1
- The installation, editing, or uninstallation of PowerPacks, including when a PowerPack is imported or installed from Global Manager to a Stack
- Manually triggered discovery sessions
- Events and cleared events
- Devices being set to maintenance mode or devices no longer being in maintenance mode
- The unalignment of Dynamic Applications from devices and the deletion of that data
- The creation, editing, or deletion of Dynamic Applications
- The creation, editing, or deletion of Run Book Automation policies
- The addition or deletion of Reports
- The situation where a user gets an "Access Denied" page as a result of attempting to access a page for which he or she does not have permission
- Asset Record changes
- User-defined changes to settings on the Data Retention Settings page (System > Settings > Data Retention)
- Changes to settings on the System Threshold Defaults page (System > Settings > Thresholds > System)
- API requests that use a PUT, POST, or DELETE method
Entries for the addition, editing, and deletion of elements includes the affected device ID, when applicable.
NOTE: By default, the Audit Logs page displays a list of actions associated with all organizations.
Viewing the List of Audit Logs
To view the list of log entries in the Audit Logs page:
- Go to the Audit Logs page (System > Monitor > Audit Logs).

- The Audit Logs page displays all actions that are performed by users or managed elements in SL1. For each action, the Audit Logs page displays:
- Date/Time. Date and time the action occurred and the log entry was created.
- Source. Source of the log entry. This usually describes where the action took place. For example, if you change the contact information for your account, an entry will be made in the audit log, and the source will be "Contact Information."
- Organization. Organization associated with the action.
- Message. Text of the log entry.
Searching and Filtering the List of Audit Logs
The Filter-While-You-Type fields appear as a row of blank fields at the top of the list. These fields let you filter the items that appear in the list.
The list is dynamically updated as you select each filter. For each filter, you must make a selection from a drop-down menu or type text to match against. SL1 will search for entries that match the text, including partial matches. Text matches are not case-sensitive, and you can use special characters in each text field.
By default, the cursor is placed in the first Filter-While-You-Type field. You can use the <Tab> key or your mouse to move your cursor through the fields.
You can filter by one or more of the following parameters. Only items that meet all of the filter criteria are displayed on the page.
The following describes each filter on the Audit Logs page:
- Date/Time. Only those audit logs that have the specified creation date will be displayed. The choices are:
- All. Display all audit logs that match the other filters.
- Last Minute. Display only audit logs that have been created within the last minute.
- Last Hour. Display only audit logs that have been created within the last hour.
- Last Day. Display only audit logs that have been created within the last day.
- Last Week. Display only audit logs that have been created within the last week.
- Last Month. Display only audit logs that have been created within the last month.
- Last Year. Display only audit logs that have been created within the last year.
- Source. You can enter text to match, including special characters, and the Audit Logs page will display only audit logs that have a matching source.
- Organization. You can enter text to match, including special characters, and the Audit Logs page will display only audit logs that have a matching organization.
- Message. You can enter text to match, including special characters, and the Audit Logs page will display only audit logs that have a matching message.
Special Characters
You can include the following special characters to filter by each column except those that display date and time:
When searching for a string, SL1 will match substrings by default, even if you do not include any special characters. For example, searching for "hel" will match both "hello" and "helicopter". When searching for a numeric value, SL1 will not match a substring unless you use a special character.
String and Numeric
- , (comma). Specifies an "OR" operation. Works for string and numeric values. For example:
"dell, micro" matches all values that contain the string "dell" OR the string "micro".
- & (ampersand). Specifies an "AND " operation. Works for string and numeric values. For example:
"dell & micro" matches all values that contain both the string "dell" AND the string "micro", in any order.
- ! (exclamation point). Specifies a "not" operation. Works for string and numeric values. For example:
NOTE: You can also use the "!" character in combination with the arithmetical special characters (min-max, >, <, >=, <=, =) described below.
- * (asterisk). Specifies a "match zero or more" operation. Works for string and numeric values. For a string, matches any string that matches the text before and after the asterisk. For a number, matches any number that contains the text. For example:
"hel*er" would match "helpers" and "helicopter" but not "hello".
"325*" would match "325", "32561", and "325000".
"*000" would match "1000", "25000", and "10500000".
- ? (question mark). Specifies "match any one character". Works for string and numeric values. For example:
"l?ver" would match the strings "oliver", "levers", and "lover", but not "believer".
"135?" would match the numbers "1350", "1354", and "1359", but not "135" or "13502"
String
- ^ (caret). For strings only. Specifies "match the beginning". Matches any string that begins with the specified string. For example:
"^sci" would match "scientific" and "sciencelogic", but not "conscious".
"^happy$" would match only the string "happy", with no characters before or after.
"!^micro" would match all values that do not start with "micro".
"!^$" would match all values that are not null.
"!^" would match null values.
- $ (dollar sign). For strings only. Specifies "match the ending". Matches any string that ends with the specified string. For example:
"ter$" would match the string "renter" but not the string "terrific".
"^happy$" would match only the string "happy", with no characters before or after.
"!fer$" would match all values that do not end with "fer".
"!^$" would match all values that are not null.
"!$" would match null values.
NOTE: You can use both ^ and $ if you want to match an entire string and only that string. For example, "^tern$" would match the strings "tern" or "Tern" or "TERN"; it would not match the strings "terne" or "cistern".
Numeric
- min-max. Matches numeric values only. Specifies any value between the minimum value and the maximum value, including the minimum and the maximum. For example:
"1-5 "would match 1, 2, 3, 4, and 5.
- - (dash). Matches numeric values only. A "half open" range. Specifies values including the minimum and greater or including the maximum and lesser. For example:
"1-" matches 1 and greater. So would match 1, 2, 6, 345, etc.
"-5" matches 5 and less. So would match 5, 3, 1, 0, etc.
- > (greater than). Matches numeric values only. Specifies any value "greater than". For example:
">7" would match all values greater than 7.
- < (less than). Matches numeric values only. Specifies any value "less than". For example:
"<12" would match all values less than 12.
- >= (greater than or equal to). Matches numeric values only. Specifies any value "greater than or equal to". For example:
"=>7" would match all values 7 and greater.
- <= (less than or equal to). Matches numeric values only. Specifies any value "less than or equal to". For example:
"=<12" would match all values 12 and less.
- = (equal). Matches numeric values only. For numeric values, allows you to match a negative value. For example:
"=-5 " would match "-5" instead of being evaluated as the "half open range" as described above.
Examples
- "!dell" matches all values that do not contain the string "dell".
- "!^micro" would match all values that do not start with "micro".
- "!fer$" would match all values that do not end with "fer".
- "!^$" would match all values that are not null.
- "!^" would match null values.
- "!$" would match null values.
- "!*" would match null values.
- "happy, !dell" would match values that contain "happy" OR values that do not contain "dell".
- "aio$". Matches only text that ends with "aio".
- "^shu". Matches only text that begins with "shu".
- "^silo$". Matches only the text "silo", with no characters before or after.
- "!silo". Matches only text that does not contains the characters "silo".
- "!^silo". Matches only text that does not start with "silo".
- "!0$". Matches only text that does not end with "0".
- "!^silo$". Matches only text that is not the exact text "silo", with no characters before or after.
- "!^". Matches null values, typically represented as "--" in most pages.
- "!$". Matches null values, typically represented as "--" in most pages.
- "!^$". Matches all text that is not null.
- silo, !aggr". Matches text that contains the characters "silo" and also text that does not contain "aggr".
- "silo, 02, !aggr". Matches text that contains "silo" and also text that contains "02" and also text that does not contain "aggr".
- "silo, 02, !aggr, !01". Matches text that contains "silo" and also text that contains "02" and also text that does not contain "aggr" and also text that does not contain "01".
- "^s*i*l*o$". Matches text that contains the letter "s", "i", "l", "o", in that order. Other letters might lie between these letters. For example "sXiXlXo" would match.
- "!^s*i*l*o$". Matches all text that does not that contains the letter "s", "i", "l", "o", in that order. Other letters might lie between these letters. For example "sXiXlXo" would not match.
- "!vol&!silo". Matches text that does not contain "vol" AND also does not contain "silo". For example, "volume" would match, because it contains "vol" but not "silo".
- "!vol&02". Matches text that does not contain "vol" AND also contains "02". For example, "happy02" would match, because it does not contain "vol' and it does contain "02".
- "aggr,!vol&02". Matches text that contains "aggr" OR text that does not contain "vol" AND also contains "02".
- "aggr,!vol&!infra". Matches text that contains "aggr" OR text that does not contain "vol" AND does not contain "infra".
- "*". Matches all text.
- "!*". Matches null values, typically represented as "--" in most pages.
- "silo". Matches text that contains "silo".
- " !silo ". Matches text that does not contain "silo".
- " !^silo$ ". Matches all text except the text "silo", with no characters before or after.
- "-3,7-8,11,24,50-". Matches numbers 1, 2, 3, 7, 8, 11, 24, 50, and all numbers greater than 50.
- "-3,7-8,11,24,50-,a". Matches numbers 1, 2, 3, 7, 8, 11, 24, 50, and all numbers greater than 50, and text that includes "a".
- "?n". Matches text that contains any single character and the character "n". For example, this string would match "an", "bn", "cn", "1n", and "2n".
- "n*SAN". Matches text the contains "n", zero or any number of any characters and then "SAN". For example, the string would match "nSAN", and "nhamburgerSAN".
- "^?n*SAN$”. Matches text that begins with any single character, is following by "n", and then zero or any number of any characters, and ends in "SAN".
Generating Reports on Audit Logs
You can export the entries on the Audit Logs page as one of the following report types:
- Acrobat document (.pdf)
- Web page (.html)
- Excel spreadsheet (.xlsx)
- OpenDocument Spreadsheet (.ods)
- Comma-separated values (.csv)
When you create a report in the Audit Logs page, SL1 includes only those logs that appear in the current view of the page. If you filter the entries on the Audit Logs page, only those logs that meet the filter criteria and currently appear on the page will appear in the report.
To generate an audit logs report:
- From the Audit Logs page, click the button. The Export current view as a report window appears.
- In the Output Format field, select the report format type.
- Click .
Using auditd to Monitor Sensitive Files
As an additional security measure, the ScienceLogic Security team monitors the SL1 SaaS environment with the Linux Auditing System (auditd). The auditd system provides enhanced logging that identifies when changes are made to specific files and directories in SL1 that contain sensitive data. Starting with SL1 version 11.1.0, you can send audit logs externally to a security information and event management (SIEM) tool when needed.
The auditd logging at /var/log/audit/audit provides logging based on the configured rules that are shipped with SL1 version 11.1.0 or later. You can send syslog messages to a syslog server or a SIEM tool.
SL1 monitors specific files and directories for changes. The topics below describe what is logged by default, how to modify what is logged, and how to send logs externally.
Files Logged by Default
Starting in SL1 version 11.1.0, a file called rules.d/70_silo_watchlist.rules is created and added to the /etc/audit directory.
The following files are monitored:
-w /etc/silo.conf -p war -k silowatch
-w /etc/php.ini -p wa -k silowatch
-w /etc/yum.conf -p wa -k silowatch
-w /etc/postfix/main.cf -p wa -k silowatch
-w /etc/postfix/master.cf -p wa -k silowatch
-w /etc/nginx/nginx.conf -p wa -k silowatch
-w /etc/yum.conf -p wa -k silowatch
-w /etc/ntp.conf -p wa -k silowatch
-w /etc/my.cnf -p wa -k silowatch
-w /etc/my.cnf.d/ -p wa -k silowatch
-w /etc/php.d/ -p wa -k silowatch
-w /etc/skel/ -p wa -k silowatch
-w /etc/yum/ -p wa -k silowatch
-w /etc/yum.repos.d/ -p wa -k silowatch
-w /etc/ntp/ -p wa -k silowatch
-w /etc/chrony.d/ -p wa -k silowatch
-w /etc/chrony.keys -p wa -k silowatch
-w /etc/chrony.conf -p wa -k silowatch
Modifying the List of Files to be Logged
To add or change files that are monitored:
-
Log in to the SL1 appliance with the admin account and sudo to the root user.
-
Edit the file called /etc/audit/rules.d/70_silo_watchlist.rules. Add the following line to the file.
-w /etc/.custom_alignment.conf -p wa -k silowatch
This file is not included in SL1 version 11.1.0 by default.
-
Run the following command to load the files into the audit.rules file:
[root@server ~]# augenrules --load
You can add or remove specific files that you want to monitor from this list. Including the slash at the end of the monitored path (such as /etc/ntp/) will monitor the entire directory and everything stored within it.
Sending Logs via Syslog to a Remote Server
To send logs to a syslog server or a security information and event management (SIEM) tool:
-
Edit the file /etc/rsyslog.conf and include the following text to send the audit.log to rsyslog:
#audit log
$ModLoad imfile
$InputFileName /var/log/audit/audit.log
$InputFileTag tag_audit_log:
$InputFileStateFile audit_log
$InputFileSeverity info
$InputFileFacility local6
$InputRunFileMonitor
-
If rsyslog is not already configured to send to a remote server, configure the remote server at this time.
-
Restart rsyslog for the changes to take effect:
[root@server ~]# systemctl restart rsyslog
Monitoring the Status of Data Collectors
The Collector Status page displays the status of each Data Collector and Message Collector in your system.
NOTE: This page does not appear in All-In-One Appliances.
Data Collectors retrieve data from managed devices and applications. This collection occurs during initial discovery, during nightly updates, and in response to policies defined for each managed device. The collected data is used to trigger events, display data in the user interface, and generate graphs and reports.
Message Collectors receive and process inbound, asynchronous syslog and trap messages from monitored devices. In most distributed systems, dedicated Message Collector appliances perform message collection. A single Message Collector can handle syslog and trap messages from devices that are monitored by multiple Data Collectors.
To perform collection, you must define a Collector Group and align it with at least one Data Collector. If your Collector Group includes multiple Data Collectors, you can configure the Collector Group for high-availability. For details, see the section on Collector Groups.
To ensure the health of your system, you should periodically check on the status of the Data Collectors and Message Collectors. To access the Collector Status page:
- Go to the Collector Status page (System > Monitor > Collector Status).
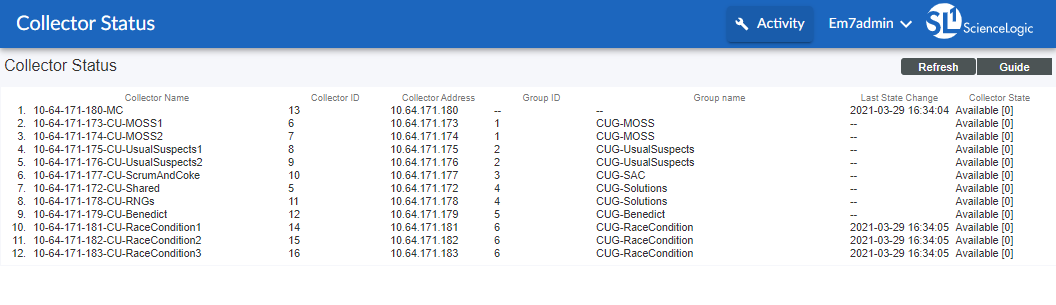
- For each Data Collector in your system, the Collector Status page displays the following:
- Collector Name. Name of the Data Collector or Message Collector.
- Collector ID. Unique numeric ID automatically assigned to the Data Collector or Message Collector by SL1.
- Collector Address. IP address of the Data Collector or Message Collector.
- Group ID. Unique numeric ID of the Collector Group associated with the Data Collector or Message Collector.
- Group Name. Name of the Collector Group associated with the Data Collector or Message Collector.
- Last State Change. Date and time the platform last polled the status of the Data Collector or Message Collector.
- Collector State. Operating state of the Data Collector or Message Collector.