![]()
This ![]() ) to import, install, and view Synchronization PowerPacks, which are also called "SyncPacks".
) to import, install, and view Synchronization PowerPacks, which are also called "SyncPacks".
PowerFlow and Synchronization PowerPacks content not created by ScienceLogic is not supported by ScienceLogic. This includes custom steps, PowerFlow applications, and Synchronization PowerPacks.
This
What is a Synchronization PowerPack?
A Synchronization PowerPack contains all of the code and logic needed to perform integrations on the PowerFlow platform. A Synchronization PowerPack is saved as a Python .whl file, and it typically includes Python steps that are listed in applications, and then encapsulated within configurations:
You can access the latest steps, applications, and configurations for PowerFlow or a third-party integration, such as ServiceNow, by downloading the most recent Synchronization PowerPack for that integration from ScienceLogic. You can access all Synchronization PowerPacks on the SyncPacks page.
A Synchronization PowerPack is highly customizable, and you can modify the contents of a Synchronization PowerPack to meet your business needs, instead of changing your SL1 configuration. You can categorize and segment your business integration solutions using a Synchronization PowerPack.
Synchronization PowerPacks let you distribute content to simplify installations, upgrades, and maintenance of integration solutions. Just like PowerPacks, you can also share Synchronization PowerPacks. In addition, Synchronization PowerPacks protect a company's intellectual property using licensing and encryption technologies.
Viewing the List of Synchronization PowerPacks
The SyncPacks page provides a list of the Synchronization PowerPacks on your PowerFlow system. From this page you can search for and view Synchronization PowerPacks, and you can also install and uninstall Synchronization PowerPacks:

Searching for a Synchronization PowerPack
You can search for a specific Synchronization PowerPack by typing the name of that Synchronization PowerPack in the Search field at the top of the SyncPacks page. The user interface filters the list as you type.
You can also sort the list of Synchronization PowerPacks by clicking the headers of the columns.
If you have more than one version of a Synchronization PowerPack and you want to see the active version of the Synchronization PowerPack currently being used by PowerFlow, hover over the version numbers in the Version column.
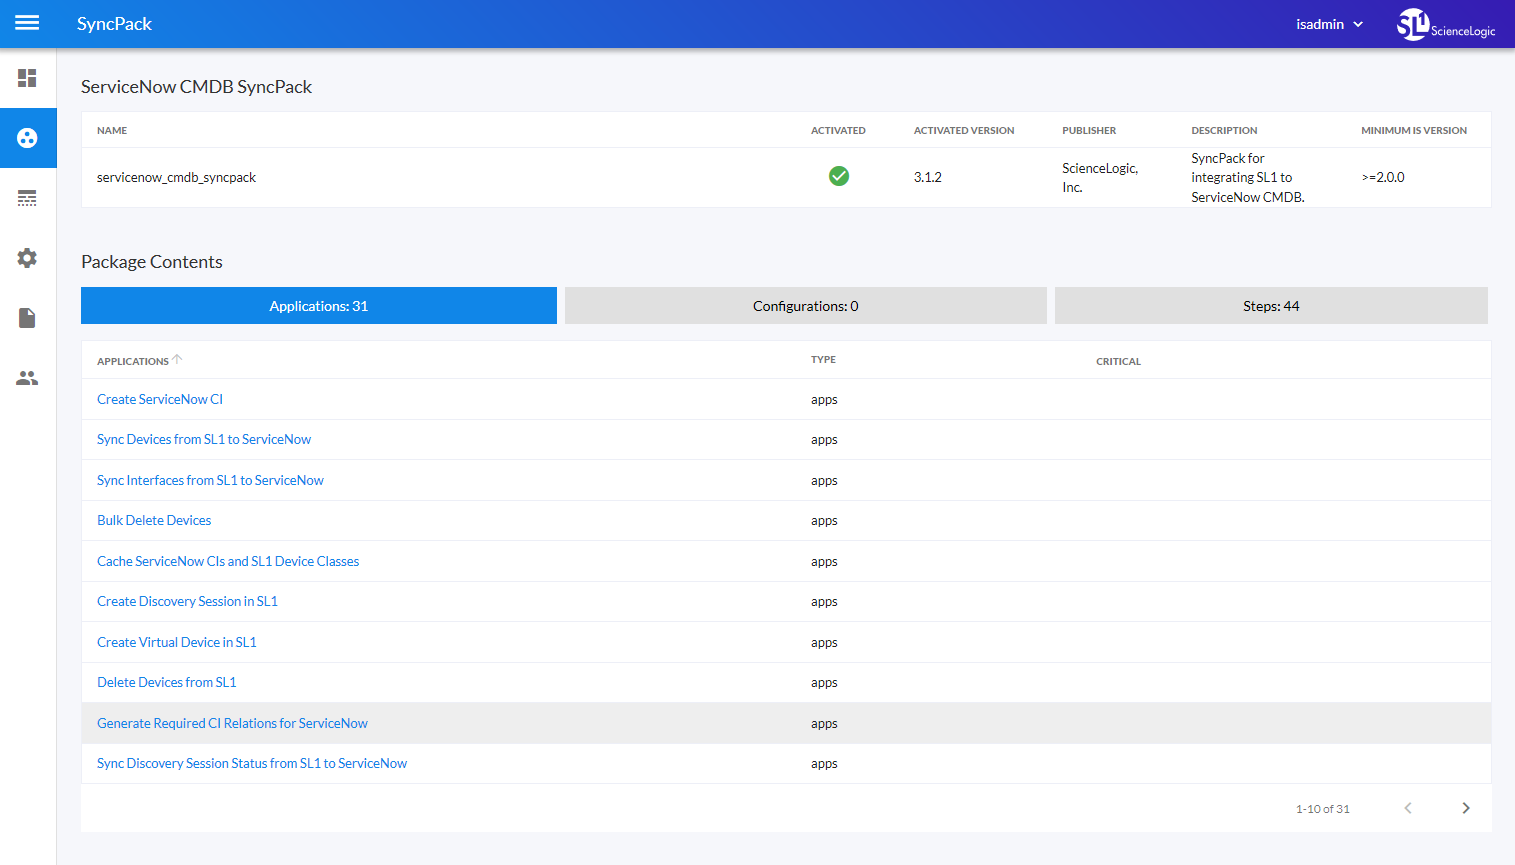
Viewing a Detail Page for a Synchronization PowerPack
Click the name of a Synchronization PowerPack from the list to view the detail page for the Synchronization PowerPack.
From this page you can view the contents of the Synchronization PowerPack, including the applications, configuration objects, and steps included in the Synchronization PowerPack:
You can also view additional metadata, including the active version, the minimum PowerFlow platform version, and other details.
Using the Actions Button to Manage Synchronization PowerPacks
On the SyncPacks page of the PowerFlow user interface, you can access the following Synchronization PowerPack options by clicking the button (![]() ) next to a Synchronization PowerPack:
) next to a Synchronization PowerPack:
-
Activate & Install. Before you can use a Synchronization PowerPack, you will need to activate and install it. An activated Synchronization PowerPack has been installed and is ready to be used. For more information, see Activating and Installing a Synchronization PowerPack.
If you try to activate and install a Synchronization PowerPack that is already activated and installed, you can choose to "force" installation across all the nodes in the PowerFlow system.
-
Change active version. If you have more than one Synchronization PowerPack installed, select this option to specify a new active version (other than the version that is currently running).
-
Uninstall. Select this option if you want to completely remove all versions of a Synchronization PowerPack, instead of deleting one or more versions using the Delete option, below.
-
Delete. Remove one or more versions of a Synchronization PowerPack from PowerFlow. You cannot delete the active version of a Synchronization PowerPack (the version that is currently running).
Click the Filter icon (![]() ) at the top right of the SyncPacks page and select Toggle Inactive SyncPacks to show all Synchronization PowerPacks on the PowerFlow system.
) at the top right of the SyncPacks page and select Toggle Inactive SyncPacks to show all Synchronization PowerPacks on the PowerFlow system.
Importing and Installing a Synchronization PowerPack
The SyncPacks page in the PowerFlow user interface lets you import and install the latest version of a Synchronization PowerPack. After you install a Synchronization PowerPack, PowerFlow considers that Synchronization PowerPack to be activated and ready to be used.
By default, the SyncPacks page displays all activated and installed Synchronization PowerPacks. If you do not see the PowerPack that you want to install, click the Filter icon (![]() ) on the SyncPacks page and select Toggle Inactive SyncPacks to see a list of the imported PowerPacks.
) on the SyncPacks page and select Toggle Inactive SyncPacks to see a list of the imported PowerPacks.
After you install a Synchronization PowerPack, that Synchronization PowerPack is available on the SyncPacks page of the PowerFlow user interface. The PowerFlow applications from that Synchronization PowerPack are added to the Applications page of the user interface. You can click the name of that Synchronization PowerPack to view the detail page for that Synchronization PowerPack.
If you want to upload and install multiple ServiceNow Synchronization PowerPacks at the same time, you should upload all of the Synchronization PowerPacks first, and then install them to address any dependencies between the Synchronization PowerPacks.
Also, you can click the dropdown arrow next to the button to import or view dependencies for PowerFlow Synchronization PowerPacks. For more information, see Locating and Importing Dependencies for a Synchronization PowerPack.
If a Synchronization PowerPack has a dependency on another specific Synchronization PowerPack version, you will need to install that Synchronization PowerPack version on the PowerFlow system before you can install the Synchronization PowerPack with the dependency. For more information, see the SL1 PowerFlow Dependency Matrix page.
You must have the Develop or Administrator role to install a Synchronization PowerPack. For more information, see Managing Users in PowerFlow.
If your PowerFlow system uses self-signed certificates, you will need to manually accept the certificate before you can upload Synchronization PowerPacks. Go to https://<IP address of PowerFlow>:3141/isadmin, accept the certificate, and then exit out of the tab. When you log into PowerFlow again, you will be able to upload Synchronization PowerPacks.
Locating and Downloading a Synchronization PowerPack
A Synchronization PowerPack file has the .whl file extension type. You can download the Synchronization PowerPack file from the ScienceLogic Support site.
If you are upgrading to this version of the Synchronization PowerPack from a previous version, make a note of any settings you made on the Configuration pane of the various PowerFlow applications in this Synchronization PowerPack, as these settings are not retained when you upgrade.
To locate and download the Synchronization PowerPack:
- Go to the ScienceLogic Support Site.
- Click the tab and select PowerPack.
- In the Search PowerPacks field, search for the Synchronization PowerPack and select it from the search results. The Release Version page appears.
- On the tab, click the name of the Synchronization PowerPack version that you want to install. The Release File Details page appears.
- Click the button or click the name of the .zip file containing the .whl file for this Synchronization PowerPack to start downloading the file.
Synchronization PowerPacks do not require a specific license. After you download a Synchronization PowerPack, you can import it to your PowerFlow system using the PowerFlow user interface.
If you are installing or upgrading to the latest version of this Synchronization PowerPack in an offline deployment, see "Installing or Upgrading in an Offline Environment" in the Synchronization PowerPack release notes to ensure you install any external dependencies.
Importing a Synchronization PowerPack
To import a Synchronization PowerPack in the PowerFlow user interface:
- On the SyncPacks page of the PowerFlow user interface, click . The Import SyncPack page appears.
-
Click and select the .whl file for the Synchronization PowerPack you want to install.
You can also drag and drop a .whl file to the Import SyncPack page.
- Click . PowerFlow registers and uploads the Synchronization PowerPack. The Synchronization PowerPack is added to the SyncPacks page.
You cannot edit the content package in a Synchronization PowerPack published by ScienceLogic. You must make a copy of a ScienceLogic Synchronization PowerPack and save your changes to the new Synchronization PowerPack to prevent overwriting any information in the original Synchronization PowerPack when upgrading.
Activating and Installing a Synchronization PowerPack
To activate and install a Synchronization PowerPack in the PowerFlow user interface:
-
On the SyncPacks page of the PowerFlow user interface, click the button (
 ) for the Synchronization PowerPack you want to install and select Activate & Install. The Activate & Install SyncPack modal appears.
If you try to activate and install a Synchronization PowerPack that is already activated and installed, you can choose to "force" installation across all the nodes in the PowerFlow system.
If you do not see the PowerPack that you want to install, click the Filter icon (
 ) on the SyncPacks page and select Toggle Inactive SyncPacks to see a list of the imported PowerPacks.
-
Click to confirm the activation and installation. When the Synchronization PowerPack is activated, the SyncPacks page displays a green check mark icon (
 ) for that Synchronization PowerPack. If the activation or installation failed, then a red exclamation mark icon (
 ) appears.
 -
For more information about the activation and installation process, click the check mark icon (
) or the exclamation mark icon () in the Activated column for that Synchronization PowerPack. For a successful installation, the "Activate & Install SyncPack" application appears, and you can view the Step Log for the steps. For a failed installation, the Error Logs window appears. -
If you have other versions of the same Synchronization PowerPack on your PowerFlow system, you can click the button (
) for that Synchronization PowerPack and select Change active version to activate a different version other than the version that is currently running.
Locating and Importing Dependencies for a Synchronization PowerPack
The most common error that occurs when installing a Synchronization PowerPack is that the Synchronization PowerPack dependencies are not installed. If a Synchronization PowerPack has a dependency on another specific Synchronization PowerPack version, you will need to import and install that Synchronization PowerPack version on the PowerFlow system before you can install the Synchronization PowerPack with the dependency.
Review the "System Requirements" section of the release notes for that Synchronization PowerPack to ensure that you have installed all of the required applications for that Synchronization PowerPack.
To view a list of additional PowerFlow and SL1 products that are required by the various Synchronization PowerPacks, see the SL1 PowerFlow Dependency Matrix page.
In addition, you can click the dropdown arrow next to the button to import or view dependencies for PowerFlowSynchronization PowerPacks.
To view a list of available dependency files:
- Click the dropdown arrow next to the button and select View Dependencies. A devpi dependencies page appears.
- To view more information about a dependency, click the link in the Info page column.
- To download a dependency file, click the link in the Releases column.
To import a dependency:
-
Click the dropdown arrow next to the button and select Import Dependency.
-
Click and select the relevant dependency file from the previous step.
You can also drag and drop a file onto the Import SyncPacks page.
- Click . The dependency file is added to the PowerFlow system .
Default Synchronization PowerPacks
When you install PowerFlow, the following Synchronization PowerPacks are added to the SyncPacks page by default:
If you need to install these Synchronization PowerPacks, click the button (![]() ) and select Activate & Install for each Synchronization PowerPack.
) and select Activate & Install for each Synchronization PowerPack.
Base Steps Synchronization PowerPack
The Base Steps Synchronization PowerPack contains a set of steps that are used in a variety of different Synchronization PowerPacks, including "Query REST", "Query GQL", and "MySQL Select" steps, which are used throughout PowerFlow for a variety of use cases.
The Base Steps Synchronization PowerPack is included with the most recent release of the PowerFlow Platform. The Base Steps Synchronization PowerPack version 1.5.0 was shipped with PowerFlow Platform version 2.4.0. You can also download newer versions of this Synchronization PowerPack, if available, from the PowerPacks page of the ScienceLogic Support Site.
Version 1.4.2
Version 1.4.2 of the Base Steps Synchronization PowerPack includes updates to the third-party packages used by PowerFlow.
Version 1.4.1
Version 1.4.1 of the Base Steps Synchronization PowerPack includes the following features:
- Updated the "QueryREST" to return a response body when errors occur.
- The "SSHCommand" step can now use SSH keys.
Version 1.3.2
PowerFlow Platform version 2.3.0 and later requires version 1.3.2 of the Base Steps Synchronization PowerPack if you want to enable the Run Book Action retry feature. This feature enables PowerFlow to pull and retry any failed Run Book Actions that failed because PowerFlow was not available. For more information, see Enabling Run Book Automation Queue Retries.
Version 1.3.2 and later of the Synchronization PowerPack also includes three new parameters for the "QueryRest: OAuth" step:
-
scopes: Add a comma-separated list of OAuth2 Scopes.
-
refresh_token: If the authentication flow requires a refresh_token, specify the string in this field.
-
additional_auth_arguments: Specify a dictionary of key/value pairs to add to the authentication form.
Version 1.3.1
PowerFlow Platform version 2.2.1 and later requires version 1.3.1 of the Base Steps Synchronization PowerPack. This version includes an update to the "Query REST" step that prevents issues with scheduled PowerFlow applications.
Contents of This Synchronization PowerPack
This Synchronization PowerPack contains the "Template App" PowerFlow application. You can use the "Template App" application as a template for building new PowerFlow applications.
This Synchronization PowerPack includes the following steps, which you can use in new and existing applications:
- Cache Delete
- Cache Read
- Cache Save
- Direct Cache Read
- Jinja Template Data Render
- MS-SQL Describe
- MS-SQL Insert
- MS-SQL Select
- MySQL Delete
- MySQL Describe
- MySQL Insert
- MySQL Select
- Query GraphQL
- Query REST
- QueryRest: BearerAuth
- QueryRest: OAuth
- Run a command through an SSH tunnel
- SSHCommand
- Trigger Application
To view the code for a step, select a Synchronization PowerPack from the SyncPacks page, click the tab, and select the step you want to view.
You can configure the existing "Query REST" step to use bearer authentication by adding the bearer token to the request headers in the Configuration pane for that step. The headers field should look like the following:
{
"Authorization": "Bearer <token_id>",
"accept": "application/json",
"content-type": "application/json"
}
Flow Control Synchronization PowerPack
The Flow Control Synchronization PowerPack contains just one item: the "IfStep" step that enables the logical branching used by the PowerFlow builder. The most recent version of this Synchronization PowerPack is version 1.0.1, and it is included in the PowerFlow Platform release.
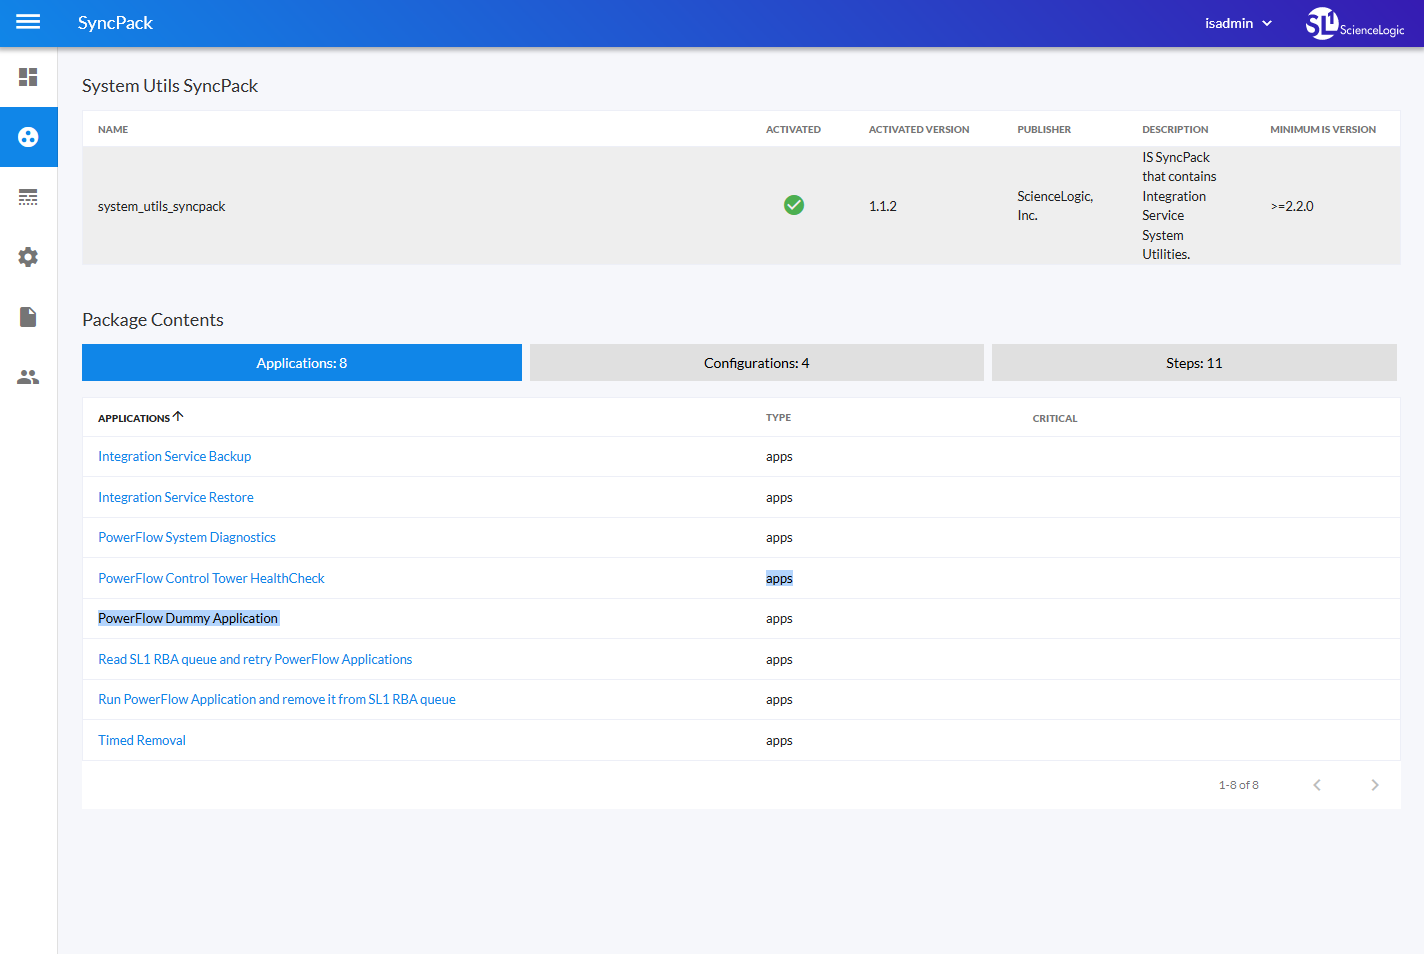
System Utils Synchronization PowerPack
The System Utils Synchronization PowerPack is a Standard Synchronization PowerPack that contains applications, a configuration object, and steps.
-
Version 1.1.0 of this Synchronization PowerPack requires SL1 PowerFlow version 2.2.0 or later.
Version 1.1.1 of this Synchronization PowerPack is included with SL1 PowerFlow version 2.3.0.
You must install the Base Steps Synchronization PowerPack before you can install this Synchronization PowerPack. Version 1.1.1 of this Synchronization PowerPack requires version 1.3.2 or later of the Base Steps Synchronization PowerPack.
The System Utils Synchronization PowerPack version 1.1.3 was shipped with the most recent release of the PowerFlow Platform. You can also download newer versions of this Synchronization PowerPack, if available, from the PowerPacks page of the ScienceLogic Support Site.
The System Utils Synchronization PowerPack version includes the following PowerFlow applications:
- Integration Service Backup. Creates a backup file of the Couchbase database used by PowerFlow and sends the file to a remote location. For more information, see Backing up Data.
- Integration Service Restore. Restores a Couchbase backup file that was created up with the "Integration Service Backup" application. For more information, see Restoring a Backup.
- PowerFlow Control Tower HealthCheck. Queries PowerFlow, gathers health data about the system, and displays the data in the PowerFlow System Health widget on the PowerFlow Control Tower page. For more information, see PowerFlow System Health.
- PowerFlow System Diagnostics. Displays a report of platform diagnostics for the services used by PowerFlow. For more information, see Viewing PowerFlow System Diagnostics.
- Read SL1 RBA Queue and Retry PowerFlow Applications. Pulls and retries any failed Run Book Actions that failed because PowerFlow was not available. Requires Base Steps Synchronization PowerPack version 1.3.2 or later.
- Run PowerFlow Application and Remove It from SL1 RBA Queue. Runs the PowerFlow application and removes it from the Run Book Action queue. This application is triggered by the "Read SL1 RBA Queue and Retry PowerFlow Applications" and does not need to be configured.
- Timed Removal. Removes logs from Couchbase on a regular schedule. For more information, see Removing Logs on a Regular Schedule.
This Synchronization PowerPack includes the following configuration objects:
- IS - System Backup Configuration Example. Contains the structure needed for the "Integration Service Backup" and "Integration Service Restore" PowerFlow applications.
- PF - System Diagnostic Configuration Example. Contains the structure needed for the "PowerFlow System Diagnostics" application.
- PF Control Tower Configuration Example. Contains the structure needed for the "PowerFlow Control Tower HealthCheck" application.
- RBA retry Configuration Example. Contains the structure needed for Run Book Action retries. Includes variables for the SL1 system from which the data will be read, the number of rows to be read from the SL1 Run Book Action queue in every run, and the generate_report variable to create a report about triggered PowerFlow applications.
You should do a Save As with the example configuration objects, above, to make a new configuration object that you can customize for your specific PowerFlow system. You cannot use an example configuration object to run PowerFlow applications.
This Synchronization PowerPack also includes the following steps, which are used in the four PowerFlow applications listed above:
- Collect IS diagnostics
- Create Integration Service Backup
- Diagnostic reporter
- PowerFlow Failover Actions Reporter
- Process PowerFlow System Health Status Data
- Pull And Process Failover Actions from SL1
- Query an IS Node
- Query Application Logs and Remove
- Query IS Manager node
- Restore Couchbase From Backup
- Set Template Data for the next step