Before you can enable and use the "Cherwell" SyncPack, you must create credentials to enable communication between PowerFlow, CSM, and Skylar One. You also need to configure a number of settings on the Federated Registration record to enable integrations between CSM and Skylar One.
You should perform these configurations with the Cherwell Service Management (CSM) User client, not the CSM Administrator client.
Creating the Cherwell API Credential
Federation Registration records use the Cherwell API to create, update, and search for CIs, and these processes require a Cherwell API credential. Each Federation Registration record can use a different credential that tracks which Federation source changed an attribute.
You can use the same CSM username, password, and REST Client Key credentials that you created in Configuring the Back-end Credentials and Endpoints.
To create the Cherwell API credential:
-
Log in to the CSM User client and go to the Federation Registration record you created in Creating the Federation Registration Record:
To quickly find this record, go to Searching > Search Manager and use the search queries provided. For example, select the Global folder under the Team folder in the Search folder on the left, select Federation Registration from the Association drop-down, and search through the different sources in the bottom pane. The sample Federation Name for this record was "Skylar One-Dev".
-
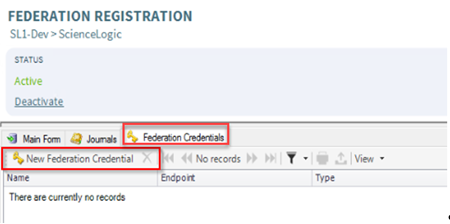
On the Federation Registration record, go to the tab:
-
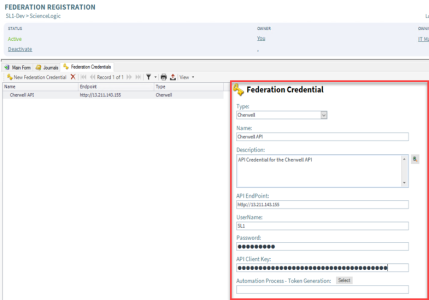
Click . A new Federation Credential pane appears:
-
Update the following fields:
- Type. Select Cherwell.
- Name. Type a unique name, such as "Cherwell API Credential".
- Description. Type a short explanation of the credential.
- API Endpoint. Type the URL for the Cherwell API.
- User Name. Type the username for the user you created in Creating a New User.
- Password. Type the password for the user you created in Creating a New User.
- API Client Key. Add the REST API Client Key you configured in Obtaining a Client Key.
- Click the button to avoid repeated CSM REST API authentication requests by enabling this credential and associated One-Steps to cache the Cherwell Bearer token for re-use. A Choose Action dialog appears.
- On the tab, select Blueprint > Federation > Cherwell in the Action section.
- In the Association drop-down, select Federation Credential.
- In the right-hand pane, double-click Cherwell: Get Bearer Token.
- Click . On the Federation Registration record, click the button (
 ) to save the new credential.
Creating the PowerFlow Federation Source Credential
You need an API credential for Federation Registration records that update a Federation source, such as PowerFlow, with incident reference numbers, maintenance windows, and CI retirement information. You can use this API credential to authenticate with the PowerFlow API and provide updates with that API.
To create the PowerFlow Federation source credential:
- Log in to the CSM User client and go to the Federation Registration record you created in Creating the Federation Registration Record.
- On the Federation Registration record, go to the tab.
- Click . A new Federation Credential pane appears.
-
Update the following fields:
- Type. Select Other.
- Name. Type a unique name, such as "IS API Credential".
- Description. Type a short explanation of the credential.
- API Endpoint. Type the URL for the PowerFlow API.
- User Name. Type the username for PowerFlow, such as "isadmin".
- Password. Type the admin password for PowerFlow.
-
API Client Key. Add the API Client Key for PowerFlow. The API Client Key for PowerFlow credentials is a string encoded in Base64:
'IS_username+'':"+IS_password'
Unless a One-Step author requests you to add a Token Generation process, you do not need to click to add a token. If you need to add a token, see steps 5-8 in Creating the Cherwell API Credential.
- Click . On the Federation Registration record, click the button (
 ) to save the new credential.
Configuring the API Credentials
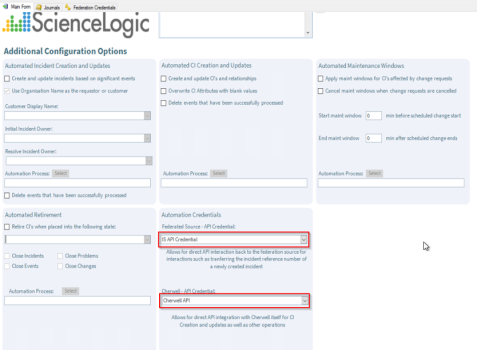
After you have created the Cherwell API credential and the PowerFlow (Federation source) credential, align the credentials on the tab of the Federation Registration record:
Enabling the Federation Registration Record
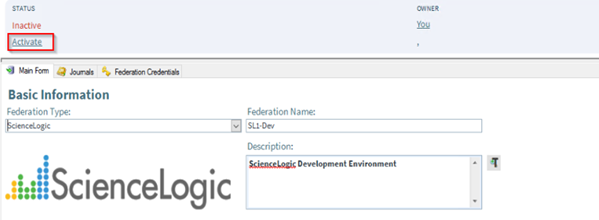
To enable processing, the Federation Registration record must be active and integration must be enabled. If necessary, click Activate to activate the record:
Configuring Incident Creation and Updates
The following settings on the tab of the Federation Registration record affect how Incident creation and updates work:
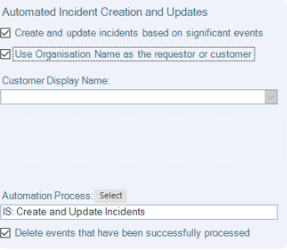
- Create and update Incidents based on significant events. Select this option to enable Incident creation and updates .
- Use Organization Name as the requester or customer. All Federated sources are required to send an Organization name as part of the Incident payload. This setting allows the Organization name to be used as the "Customer" name on a newly created Incident record. If the Organization name does not exist as a Customer, it will be created.
- Customer Display Name. If the Use Organization Name as the requester or customer checkbox is not selected, you can use this drop-down to select a customer record that will be populated as the "Customer" name on each newly created Incident record.
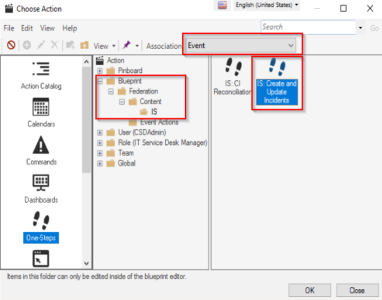
- Automation Process. Regarded as Content, use the button to select the automation process or One-Step that will be executed when a new Incident is needed. You can create different automation processes or One-Steps for different Federation sources, and they can be one-way or, like the PowerFlow integration, two-way where the automations pass back the newly created Incident reference number to PowerFlow through its REST API.
- Delete events that have been successfully processed. This setting helps reduce the storage space used by incoming Incident events by deleting event records that have been successfully processed into Incident records. You can create different automation processes or One-Steps for different Federation sources.
Configure these settings as needed. The following image shows an example configuration:
You can find custom automation processes and One-Steps for Content in the following location after you click the button next to the Automation Process field:
Configuring CI Creation and Updates
The following settings on the tab of the Federation Registration record affect how incident creation and updates work:
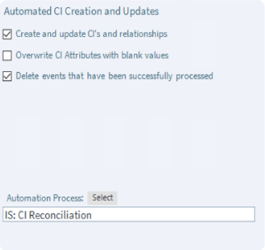
- Create and update CIs and relationships. Select this option to enable CI creation and updates.
- Overwrite CI attributes with blank values. This setting determines whether CSM CI fields will be overwritten with blank values from a Federation source, even if that CSM CI attribute has data. If you check this option, a CSM CI field that has valid data will be overwritten with blank data from a Federated source if that CSM Field is mapped.
- Delete events that have been successfully processed. This setting helps reduce the storage space used by incoming CI events by deleting event records that have been successfully processed into CI records. These event records are not recoverable except from a backup if this option is selected.
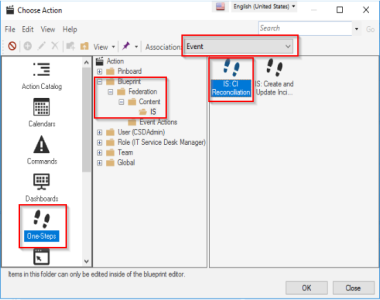
- Automation Process. Regarded as Content, use the button to select the automation process or One-Step that will be executed when a new CI event is received. You can create different automation processes or One-Steps for different Federation sources.
Configure the settings as needed. The following image shows an example configuration:
You can find custom automation processes and One-Steps for Content in the following location after you click the button next to the Automation Process field:
Configuring the Mappings between Source CI Types and CSM CI Types
To map incoming CI or Device Types from Federated sources like PowerFlow, you must configure the mapping between source CI Types and CSM CI Types.
To map source CI Types and CSM CI Types:
- While on Federation Registration record, select the tab.
- Click the button. A new Federated CI Mapping record appears.
- Complete the following fields:
- Federated CI Type. Type the name that identifies the device or CI in the Federated source.
-
Target CI Type Name. Select the name that identifies what CSM CI Type will be created when a new CI is required and the "Federated CI Type" for that new CI matches the value in the Federated CI Type field.
If this drop-down is blank, refer to Creating and Testing the Populate Field Definition Mappings, as this process must be working for this drop-down to work.
- Target CI Type. Select the target CSM CI Type, which is related to the CSM CI Type Name. This value can be regarded as a further CI Type classification, and in most CSM instances this is not a required field.
- Click the button (
 ) to save the mapping. Repeat this process for any other CI Type mappings.
This process can sometimes involve a large number of configurations, but the process can be automated to create a large number of these configurations automatically.
Configuring the Mappings between Source CI Attributes and CSM Fields
To map incoming Device attributes from a Federated source to CI attributes, you must configure the mapping between Federated source CI attributes and CSM fields.
To map Federated source CI attributes and CSM fields:
- While on Federation Registration record, select the tab.
- Click the button. A new record appears.
- Complete the following fields:
- Federated Field Name Type. Type the name of the CI attribute or field name that will be passed in from the Federated source.
-
Cherwell Business Object Name drop-down, select the CSM CI Type Name to which the CI attribute will be mapped. Different CSM CI Types have different fields, and this drop-down drives the values in the Cherwell Field Name drop-down.
If this drop-down is blank, refer to Creating and Testing the Populate Field Definition Mappings, as this process must be working for this drop-down to work. Additionally, if you need to map the same Federated source CI attribute or field name to multiple CSM CI Types, you must create multiple records for each CSM CI Type.
- Cherwell Field Name. Select the CI field name to which the Federated source attribute or field will be mapped.
- This field is used for reconciliation... Select this option if this attribute or field name is to be used for CI reconciliation, such as finding an existing CI to update rather than creating a new one. As a best practice, you should select at least one or more CI Field mappings for CI reconciliation for each CI Type. Otherwise, new CIs will be created for every sync to the Federated source.
- Click the button (
 ) to save the mapping. Repeat this process for subsequent CI Type mappings.
If more than one CI attribute or field is selected for CI reconciliation per CSM CI Type Name, an AND operation is performed to find a CI. For example, if you used "FriendlyName" and "IPAddress" for reconciliation, then a match must be found on "FriendlyName" AND "IPAddress" to find a CI. If not, a new CI is created.
Configuring Automated Maintenance Windows
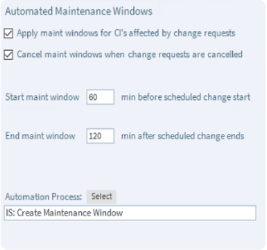
The following settings on the tab of the Federation Registration record affect how Automated Maintenance Windows work:
- Apply maintenance windows for CIs affected by change requests. Select this option to enable automated Maintenance Windows.
- Cancel maintenance windows when change requests are canceled. Select this option to cancel Maintenance Windows when a corresponding CSM Change Request record is canceled.
- Start maintenance window N minutes before scheduled change starts. If it is required that the Maintenance Window on the Federated source is started before the CSM Change Window starts, specify the number of minutes that should be subtracted from the start time of the CSM Change Window. For example, specifying a value of 60 in this field ensures that the Maintenance Window on a Federated device will start one hour before the CSM Change Window.
- Start maintenance window N minutes before scheduled change starts. If it is required that the Maintenance Window on the Federated source device is completed after the CSM change window ends, specify the number of minutes that should be added after the scheduled CSM Change Window ends. For example, specifying a value of 60 in this field ensures that the Maintenance Window on a Federated device ends one hour after the CSM Change Window.
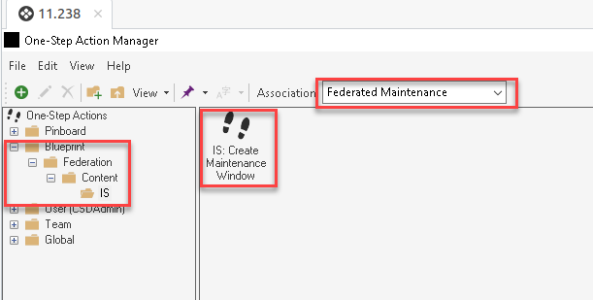
- Automation Process. Regarded as Content, use the button to select the automation process or One-Step that will be executed for new or updated Maintenance Windows. You can create different automation processes or One-Steps for different Federation sources.
Configure the settings as needed. The following image shows an example configuration:
You can find custom automation processes and One-Steps for Content in the following location after you click the button next to the Automation Process field:
Configuring Automated CI Retirements
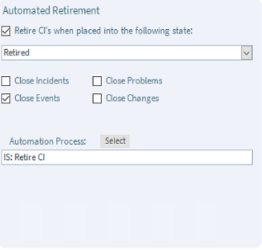
The following settings on the tab of the Federation Registration record affect how Automated CI retirement works:
- Retire CIs when placed into the following state: Select this option to enable automated CI retirement. Use the drop-down to select what CI status will trigger the retirement workflow. Different implementations of CSM – could have different statuses. When a CI is placed into this status, the retirement process will be triggered.
-
Close Incidents/Problems/Events/Changes. Select the relevant checkboxes to control whether CSM records and associated monitoring events in the Federated source will be closed as a result of CI retirement.
Because of varying closure procedures and ITIL processes, the automation process or One-Step will need to be tuned for each customer environment. For example, some CSM implementations have required fields on closure.
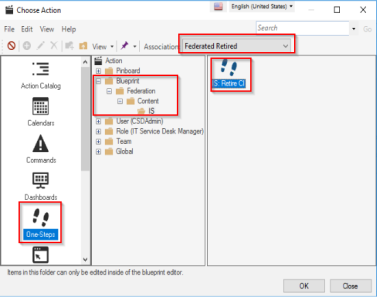
- Automation Process. Regarded as Content, use the button to select the automation process or One-Step that will be executed when retiring CIs. You can create different automation processes or One-Steps for different Federation sources.
Configure the settings as needed. The following image shows an example configuration:
You can find custom automation processes and One-Steps for Content in the following location after you click the button next to the Automation Process field:

