![]()
Use the following menu options to navigate the Skylar One user interface:
- To view a pop-out list of menu options, click the menu icon (
 ).
). - To view a page containing all of the menu options, click the Advanced menu icon (
 ).
).
What is an Action Policy?
An action policy is an action that can be automatically triggered in Skylar One when certain criteria are met. The triggers are defined in an automation policy (Registry > Run Book > Automation). For details on automation policies, see the section on Automation Policies.
An action policy can perform one of the following tasks:
- Send an email message to a pre-defined list of users and/or external contacts.
- Send an SNMP trap from Skylar One to an external device.
- Write an SNMP value to an existing SNMP object on an external device.
- Create a new ticket (using ticket templates defined in the Ticket Templates page [Registry > Ticketing > Templates]).
- Update an existing ticket. An action policy can change the status and/or severity of an existing ticket and/or add a note to an existing ticket. For this action policy to trigger successfully, a ticket must be associated with the event that triggered the action.
NOTE: For more details on ticket templates, see the
- Query a database.
- Run a custom python script, called a snippet.
- Send a Message to a Topic ARN (Amazon Resource Name). All subscribers to the Topic ARN will receive the message.
- Run an Integration Service application.
- Send an HTTP request.
- If you want to trigger multiple actions when certain event criteria are met, you can define your automation policy to include multiple action policies.
- In an automation policy that will trigger multiple actions, you can specify the order in which the action policies are executed.
- In addition, the result of each action is available to the next executed action policy and can be accessed with the variable %_EM7_RESULT_%. You can define an action policy that uses the results of the previous action policy.
Viewing the List of Action Policies
The Action Policy Manager page (Registry > Run Book > Actions) displays a list of all existing action policies.
NOTE: Users of type "user" can view only action policies that are aligned with the same organization(s) to which the user is aligned. Users of type "administrator" can view all action policies.
To sort the list of action policies, click on a column heading. The list will be sorted by the column value, in ascending order. To sort by descending order, click the column heading again. The Edit Date column sorts by descending order on the first click; to sort by ascending order, click the column heading again.
To view the list of action policies:
- Navigate to the Action Policy Manager page (Registry > Run Book > Actions).
- The Action Policy Manager page displays the following about each action policy:
- Action Name. Name of the action policy.
- Action Type. Action that will be executed by the action policy. Choices are:
- Send an Email Notification. Sends an email message. You can specify the content of the message and the users to whom it will be sent.
- Send an SNMP Trap. Sends an unsolicited SNMP message to an external system, using the ScienceLogic MIB files and predefined variables.
- Create a New Ticket. Creates a new ticket, using the Ticket Templates defined in Skylar One.
- Send an SNMP Set. Writes a value to an SNMP variable on an external device.
- Run a Snippet. Executes a snippet. A snippet is a custom program, written in Python.
- Execute an SQL Query. Either retrieve values from an external database or write a value to an external database. For distributed systems, the query can be sent from the Database Server or a Data Collector.
- Update an Existing Ticket. Updates an existing ticket. The action can add notes, change the severity, and change the status of the ticket.
- Send an AWS SNS. Sends an SNS Message to a Topic ARN (Amazon Resource Name). All subscribers to the Topic ARN will receive the message. This action type supports the use of a proxy, which must be configured in the AWS credential in Skylar One.
- Run Integration Service Application. Triggers an Integration Service integration application. When you create an Automation Action using this Action Type, you specify the credential for the Integration Service instance, the application to run, and the parameters to include in the request. This Action Type is available in the Integration Service Action Type PowerPack.
- Send an HTTP request. Sends an HTTP request to one or more devices. When you create an Automation Action using this Action Type, you specify the credential or Dynamic Appliaction GUID, a relative URL, and the request payload. This Action Type is available in the HTTP Action Type PowerPack.
- Custom Action Type. A Custom Action Type executes a reusable snippet. Unlike the Action Type "Snippet", a Custom Action Type can accept input parameters (in a JSON format) and create output (in a JSON format). A Custom Action Type allows a single snippet to be used in multiple Action Policies, each time with different inputs and different outputs.
- ID. Unique numeric identifier, automatically assigned by Skylar One to each action policy.
- Action State. Specifies whether the policy can be executed by an automation policy (enabled) or cannot be executed (disabled).
- Organization. Organization associated with the action policy.
- Edit User. User who created or last edited the action policy.
- Edit Date. Date and time the action policy was created or last edited.
Filtering the List of Action Policies
The Action Policy Manager page ( Registry > Run Book > Actions) includes seven filters. You can filter the list of action policies by one or more of the following parameters: action policy name, action type, ID, action state, organization, user who created or last edited the policy, and date the policy was created or last edited. You can specify one or more parameters to filter the list of action policies. Only action policies that meet all of the filter criteria will be displayed in the Action Policy Manager page.
The list of action policies is dynamically updated as you select each filter. For each filter except Edit Date, you must enter text to match against. Skylar One will search for action policies that match the text, including partial matches. Text matches are not case-sensitive. You can use special characters in each filter.
To filter the list of action policies:
- Navigate to the Action Policy Manager page (Registry > Run Book > Actions).
- The Action Policy Manager page displays a list of action policies. To sort the list, you can enter a value in one or more of the following headings:
- Action Name. You can enter text to match, including special characters (comma, ampersand, and exclamation mark), and the Action Policy Manager page will display only action policies that have a matching policy name.
- Action Type. You can enter text to match, including special characters (comma, ampersand, and exclamation mark), and the Action Policy Manager page will display only action policies that have a matching action type.
- ID. You can enter text to match, including special characters (comma, ampersand, and exclamation mark), and the Action Policy Manager page will display only action policies that have a matching ID. Skylar One automatically assigns this unique, numeric ID to each action policy.
- Action State. You can enter text to match, including special characters (comma, ampersand, and exclamation mark), and the Action Policy Manager page will display only action policies that have the specified state (enabled or disabled).
- Organization. You can enter text to match, including special characters (comma, ampersand, and exclamation mark), and the Action Policy Manager page will display only action policies that are aligned with a matching organization.
- Edit User. You can enter text to match, including special characters (comma, ampersand, and exclamation mark), and the Action Policy Manager page will display only action policies that have a matching username in the User Edit field.
- Edit Date. Only those action policies that match all of the previously selected fields and have the specified creation date or last-edited date will be displayed. The choices are:
- All. Display all action policies that match the other filters.
- Last Minute. Display only action policies that have been created within the last minute.
- Last Hour. Display only action policies that have been created within the last hour.
- Last Day. Display only action policies that have been created within the last day.
- Last Week. Display only action policies that have been created within the last week.
- Last Month. Display only action policies that have been created within the last month.
- Last Year. Display only action policies that have been created within the last year.
Creating an Action Policy
To create an action policy:
- Navigate to the Action Policy Manager page (Registry > Run Book > Actions).
- In the Action Policy Manager page, click the button.
- The Action Policy Editor modal page appears.

- In the Action Policy Editor page, supply a value in each field.
- For all types of action policies, the first four fields are the same.
- Action Name. Specify the name for the action policy.
- Action State. Specifies whether the policy can be executed by an automation policy (enabled) or cannot be executed (disabled).
- Description. Allows you to enter a detailed description of the action.
- Organization. Organization to associate with the action policy.
- Action Type. Type of action that will be executed. Your choices are:
- Send an Email Notification. Sends an email message. You can specify the content of the message and the users to whom it will be sent.
- Send an SNMP Trap. Sends an unsolicited SNMP message to an external system, using the ScienceLogic MIB files and predefined variables.
- Create a New Ticket. Creates a new ticket, using the Ticket Templates defined in Skylar One.
- Send an SNMP Set. Writes a value to an SNMP variable on an external device.
- Run a Snippet. Executes a snippet. A snippet is a custom program, written in Python.
- Execute an SQL Query. Either retrieve values from an external database or write a value to an external database. For distributed systems, the query can be sent from the Database Server or a Data Collector.
- Update an Existing Ticket. Updates an existing ticket. The action can add notes, change the severity, and change the status.
- Send an AWS SNS Message. Sends an SNS Message to a Topic ARN (Amazon Resource Name). All subscribers to the Topic ARN will receive the message. This action type supports the use of a proxy, which must be configured in the AWS credential in Skylar One.
- Run Integration Service Application. Triggers an Integration Service integration application. When you create an Automation Action using this Action Type, you specify the credential for the Integration Service instance, the application to run, and the parameters to include in the request. This Action Type is available in the ScienceLogic: Integration Service Action Type PowerPack.
- Send an HTTP request. Sends an HTTP request to one or more devices. When you create an Automation Action using this Action Type, you specify the credential or Dynamic Appliaction GUID, a relative URL, and the request payload. This Action Type is available in the HTTP Action Type PowerPack.
- Custom Action Type. A Custom Action Type executes a reusable snippet. Unlike the Action Type "Snippet", a Custom Action Type can accept input parameters (in a JSON format) and create output (in a JSON format). A Custom Action Type allows a single snippet to be used in multiple Action Policies, each time with different inputs and different outputs.
- . Saves a new action policy or saves changes to an existing policy.
- . If you supply a new value in the Action Name field, saves the current action policy, including any edits, as a new policy with a new name.
- The remaining fields will vary, depending upon the value you selected in the Action Type field.
Creating a Custom Action Type
A Custom Action Type executes a reusable snippet. Unlike the Action Type "Snippet", a Custom Action Type can accept input parameters (in a JSON format) and create output (in a JSON format). A Custom Action Type allows a single snippet to be used in multiple Action Policies, each time with different inputs and different outputs.
A Custom Action Type is associated with an Execution Environment. An execution environment is an on-demand Python environment that includes the supporting modules, code, scripts, directories, and files (packaged in one or more ScienceLogic Libraries) required by the Custom Action Type. ScienceLogic Libraries are packages consisting of metadata and Python files that can be used by the Run Book Actions that use snippets.
You can create and edit Custom Action Types on the Action Type Manager page Registry > Run Book > Action Types).
The Action Type Manager page displays a list of all Custom Action Types and any PowerPacks that include a Custom Action Type.
TIP: To create a new Custom Action Type based on an existing Custom Action Type, you can change the values in one or more of the following fields, supply a new name for the edited Custom Action Type, and click the button.
To create a New Custom Action Type:
- Navigate to the Action Type Manager page (Registry > Run Book > Action Types).
- On the Action Type Manager page, click the button. The Action Type Editor page appears:

- Complete the following fields:
- Name. Specify the name of the Custom Action Type. Can be any combination of alpha-numeric characters, up to 255 characters in length.
- Version. Version number for the Custom Action Type. Can be any combination of alpha-numeric characters, up to 64 characters in length.
- State. Specifies whether the Custom Action Type can be executed by an action policy (Enabled) or cannot be executed (Disabled).
- Organization. The organization associated with the Custom Action Type.
- Description. A description of the action type. Can be any combination of alpha-numeric characters, up to 255 characters in length.
- Execution Environment. Select from the list of available Execution Environments. The default execution environment is System.This list also shows the Python version of each selectable execution environment
- Input Parameters Definition. A JSON structure that specifies each input parameter. Each parameter definition includes its name, data type, and whether the input is optional or required for this Custom Action Type. For example:
[{"name": "param", "type": "string", "required": true}]
Input parameters must be defined as a JSON structure, even if only one parameter is defined.
Currently, the only supported input data types are "number", "string", and "boolean".
- Output Parameters Definition. A JSON structure that specifies the output parameter. The parameter definition must includes its name and data type. For example:
[{"name": "success", "type": "boolean"}]
The output parameter definition is limited to a single parameter.
- Snippet. Specify the python code that will be executed when Skylar One runs the action policy associated with this Custom Action Type. For example:
EM7_RESULT = {"success": True, "data": param}
- Click the button to save the new action type.
Examples:
Here is an example Custom Action Type called "Timed Action":
- Name. Timed Action.
- Version. 1.0
- State. Enabled
- Organization. System
- Description.
- Execution Environment. System
- Input Parameters Definition.
[{ "name": "seconds", "type": "number" }]
- Output Parameters Definition.
{ "type": "number" }
- Snippet.
import time
time.sleep(seconds)
EM7_RESULT = seconds
Here is an Action Policy called "Sleep for 2 Seconds" that uses the Custom Action Type called "Timed Action":
- Action Name. Sleep For 2 Seconds
- Action State. Enabled
- Description.
- Organization. System
- Action Type. Timed Action (1.0)
- Execution Environment. Default
- Action Run Context. Database
- Input Parameters.
{ "seconds": 2 }
Creating an Action Policy that Sends an Email Notification
In the Action Policy Editor page, if you selected the Action Type of Send an Email Notification, the new action policy will send an email message. You can specify the content of the email message and the users to whom the email message will be sent. If the action is aligned with an automation policy (i.e., if the action policy is included in the definition of an automation policy), and the criteria in the automation policy are met, the email message will be sent.
An action policy that sends an email notification is useful when you must immediately inform key personnel about event conditions.
NOTE: When an automation policy executes actions, the time stamps for the actions will use the time zone defined in the System Timezone field (System > Settings > Behavior page). However, the timestamp for the Event Action Log window will display the user's local time zone, as defined in the Account Information page (Preferences > Account > Information). For more information, see My Contact Information.
NOTE: In the Email Subject and Email Body fields, you can use one or more of the variables from the list of variables. The value of each variable will be retrieved from the event that triggered the automation policy.
NOTE: When action policies send email notifications, they use the "BCC" email field by default. Optionally, you can configure action policies to send email notifications using the "To" email field instead. To do so, go to the Database Tool page (System > Tools > DB Tool). The Database Tool page is available only in versions of Skylar One prior to 12.2.1 and displays only for users that have sufficient permissions to access the page.
Enter the following in the SQL Query field, replacing <value> with either 'bcc' or 'to':
UPDATE
   master.system_settings_com
SET
   outbound_to_flag =< value >
Changing this setting affects all action policies that send email notifications.
NOTE: In the Behavior Settings page (System > Settings > Behavior), make sure that the value in the Interface URL does not include a trailing forward slash (/). When Skylar One generates URLs for tickets or events (and includes those URLs in email messages), the trailing forward slash causes problems with the generated URL.
To define an action policy that sends an email notification, you must supply values in the general fields, as specified in the section on Creating an Action Policy and also supply values in the following fields:

- Email Subject. This will be the subject text in the outgoing email message. By default, the subject will be:
%S Event: %M.
where %S is the event's severity and %M is the message that appears on the Events page when the event occurs.
- Email Priority. You can select High, Normal, or Low. However, be aware that email clients each handle priority differently.
- Send as Plain Text. Select this checkbox if you want the email sent as plain text, without any special formatting.
- Email Body. The body of the outgoing email message. You can include additional variables from the list of variables in the email body. By default, the body will be:
Severity: %S
First Occurred: %D
Last Occurred: %d
Occurrences: %c
Source: %Z
Organization: %O
Device: %X
Message: %M
Sent by Automation Action: %N
View this event at: %H
If you want to specify that the email be sent as an HTML message, include "<html><body>" at the very beginning and "</body></html>" at the very end of the Email Body field.
- Available Emails. List of all email addresses associated with users and external contacts. You can select one or more email addresses to align with the action. To select an email address, highlight and then click the right-arrow button. The email address will then appear in the Assigned Emails pane. If the action is associated with an automation policy, and the criteria in the automation policy are met, the Skylar One system will send an email to the users and external contacts in the Assigned Emails pane.
- Assigned Emails. If the action is associated with an automation policy, and the criteria in the automation policy are met, Skylar One will send an email message to the selected email address(es).
Creating an Action Policy that Sends an SNMP Trap
In the Action Policy Editor page, if you selected the Action Type of Send an SNMP Trap, the new action policy will send an unsolicited SNMP message to a device. If the action is associated with an automation policy, and the criteria in the automation policy are met, the Skylar One system sends the SNMP trap to the specified device. When you select this type action type, you must manually build the trap that will be sent. You do so in the Action Policy Editor.
An SNMP trap is a message is initiated by a network device or network application and sent to a network management system. For example, a router could send a message if one of its redundant power supplies fails or a printer could send an SNMP trap when it is out of paper.
An action policy that sends an SNMP trap is useful when you want to integrate Skylar One with an existing network management system. When certain event conditions are met (as defined in the automation policy), Skylar One can build an SNMP trap to pass the event information to another network management system.
Using the Default ScienceLogic MIBs to Build an SNMP Trap
When you create an action policy that sends an SNMP trap, you must manually build the trap that will be sent. You build the trap in the Action Policy Editor page. In the action policy, you assign an OID number to the trap. One or more variables can be included in the trap. These variables are called varbinds. A varbind is referenced by an OID number, has a data type, and stores a dynamic value. You also define the varbinds in the Action Policy Editor page. For each varbind in the trap, you define the OID number, data type, and value.
If the receiver of the trap will perform actions based on the trap, best practice is to define a MIB file and send it to the receiver. This allows the receiver to decode and act upon the trap.
Default Traps from Skylar One
In most cases, you can use the default ScienceLogic MIB files to build SNMP traps from Skylar One. When you use the ScienceLogic MIB files, you are not required to define your own MIB files. You can simply export the ScienceLogic MIB files and send them to the trap receiver. When building traps in the Action Policy Editor page, you can then use the trap OIDs and varbind OIDs defined in the ScienceLogic MIB files, and the receiver will know how to decode each trap.
You can view the MIB files in the MIB Compiler page (System > Tools > MIB Compiler).
- SCIENCELOGIC-COMMON-MIB. Defines the root OID for ScienceLogic.com (19567) and the products associated with Skylar One.
- SCIENCELOGIC-EVENT-MIB. Defines varbinds for all the event information that can be included in a trap.
- SCIENCELOGIC-TRAP-MIB. Defines two basic types of traps, severity-based traps, or event-type traps. Both types of traps can contain one, multiple, or all varbinds from the SCIENCELOGIC-EVENT-MIB.
If you choose to use the default ScienceLogic MIB files, you must configure the external system to receive traps from Skylar One. The MIB file SCIENCELOGIC-TRAP-MIB defines two types of event-based traps:
- Severity-based traps. These traps specify that an event of a certain severity has occurred. The trap contains details on the event, including the event message and the element associated with the event.
- Event Type-based Traps. These traps specify the event's policy ID. The trap contains details on the event, including the event message, event severity, and the element associated with the event. This type of trap allows you to define a unique trap OID for each event definition in Skylar One.
You must configure the receiving system to look for the traps.
- If you will send event severity-based traps:
-
You must configure the receiving system to look for traps with the following OIDs:
Event Severity
OID
Critical event .1.3.6.1.4.1.19567.2.1.0.0.1 Major event .1.3.6.1.4.1.19567.2.1.0.0.2 Minor event .1.3.6.1.4.1.19567.2.1.0.0.3 Notice event .1.3.6.1.4.1.19567.2.1.0.0.4 Healthy event .1.3.6.1.4.1.19567.2.1.0.0.5
-
You must then define your traps (in the Action Policy Editor page) using these OIDs. When you specify the Trap OID, use these OIDs.
- If you will send event type-based traps:
- You must configure the receiving system to look for traps with the following OIDs:
.1.3.6.1.4.1.19567.2.1.0.2.1.event_policy_ID
- If you want the receiving system to accept and act on all of these traps, you can tell the receiving system to look for all traps that begin with the OID .1.3.6.1.4.1.19567.1.0.2.1.
- If you want the receiving system to perform different actions depending upon the type of event, you can use the event_policy_ID at the end of each trap OID to sort and separate the traps by type of event.
- You must then define your traps (in the Action Policy Editor page) using the OIDs .1.3.6.1.4.1.19567.2.1.0.2.1.event_policy_ID. When specifying the Trap OID, you can use the %3 variable like this:
.1.3.6.1.4.1.19567.2.1.0.2.1.%3
Skylar One will append the current event's policy ID to the trap OID. (The current event will be the event that triggered the action policy. This event is specified in the automation policy.)
Varbinds
If you want to use an already defined MIB file and already defined OIDs, you can use the ScienceLogic MIB files SCIENCELOGIC-TRAP-MIB and the SCIENCELOGIC-EVENT-MIB and then dynamically assign values to the OIDs in those files. You can view the MIB files in the MIB Compiler page (System > Tools > MIB Compiler).
If you use the ScienceLogic MIB files, specifically the SCIENCELOGIC-EVENT-MIB files, you can include one or more of the following variables (called varbinds) in each outgoing trap. You can assign values to these variables using the event variables described in the appendix on Variables.
|
Description |
OID |
Type |
Associated Event Variable |
|---|---|---|---|
|
Event ID |
.1.3.6.1.4.1.19567.2.1.1.1.1 |
Integer |
%e |
|
Severity of the event, in numeric format. Possible values are 0 = healthy 1 = notice 2 = minor 3 = major 4 = critical |
.1.3.6.1.4.1.19567.2.1.1.1.2 |
Integer |
%s |
|
Source of the event. Possible values are: syslog=1 internal=2 trap=3 dynamic=4 email=7 other=8 |
.1.3.6.1.4.1.19567.2.1.1.1.3 |
Integer |
%z |
|
Type of element that this event is tied to. Possible values are: organization=0 device=1 asset=2 network=4 interface=5 vendor=6 account=7 virtual interface=8 device group=9 IT service=10 ticket=11 |
.1.3.6.1.4.1.19567.2.1.1.1.4 |
Integer |
%1 (one) |
|
Unique element ID. For example, if the elementType is device, the elementID corresponds to the ScienceLogic device ID. |
.1.3.6.1.4.1.19567.2.1.1.1.5 |
Integer |
%x |
|
Element name from Skylar One. Examples of element names are device hostname and organization name. |
.1.3.6.1.4.1.19567.2.1.1.1.6 |
String |
%X |
|
Network address of an element. Typically this is an IP address. |
.1.3.6.1.4.1.19567.2.1.1.1.7 |
String |
N/A |
|
Unique organization ID. |
.1.3.6.1.4.1.19567.2.1.1.1.8 |
Integer |
%o (lowercase "oh") |
|
Organization Name |
.1.3.6.1.4.1.19567.2.1.1.1.9 |
String |
%O (uppercase "oh") |
|
Event description (from event's definition) |
.1.3.6.1.4.1.19567.2.1.1.1.10 |
String |
%M |
|
Type of sub-element that this event is tied to. Possible values for organizations are: news feed=0 Possible values for devices are: cpu=1 disk=2 filesystem=3 memory=4 swap=5 component=6 interface=7 software=8 process=9 port=10 service=11 content=12 mail=13 |
.1.3.6.1.4.1.19567.2.1.1.1.11 |
Integer |
%2 (two) |
|
Unique sub-element ID. For example, if the subElementType is disk, the subElementID corresponds to the disk ID. |
.1.3.6.1.4.1.19567.2.1.1.1.12 |
Integer |
%y |
|
Name of sub-element associated with the event |
.1.3.6.1.4.1.19567.2.1.1.1.13 |
String |
%Y |
Example Trap
The following is an example of a trap that could be built with an action policy. This trap is event-type based (note the OID):
Trap Received: (.1.3.6.1.4.1.19567.2.1.0.2.1.217) | Trap Detail : eventID: 32755; eventSeverity: 5; eventSource: 2; elementType: 1; elementID: 119; elementName: webserver01; elementAddress: 192.168.11.30; roaID: 0; roaName: System; eventMessage: CPU usage now below threshold (load now: 2%); subElementType: 0; subElementID: 0; subElementName:;
Creating the Action Policy
To define an action policy that sends an SNMP trap to an external device, you must supply values in the general fields, as specified in the section on Creating an Action Policy and also supply values in the following fields:

- Trap Host. IP address of the external device to which you want to send a trap.
- Trap Credential. SNMP credential that allows Skylar One to send information to the external device. The list of credentials is filtered to include only those credentials to which you have access.
If this field has already been set to a credential to which you do not have access, this field will display the value Restricted Credential. If you set this field to a different credential, the entry for Restricted Credential will be removed from the list in this field; you will not be able to re-align the device with the Restricted Credential.
NOTE: Your organization membership(s) might affect the list of credentials you can see in the Trap Credential field. For more information,
- Trap OID. Object identifier for the trap. If you are using the default ScienceLogic MIB files to build traps, see Default Traps from the ScienceLogic platform to determine which OID to enter in this field.
- Varbind OID. Object identifier (in dotted decimal notation) of the variable.
- Varbind Value Type. Data type contained in the variable.
- Varbind Value. Value to assign to the variable. You can use the event variables to assign values to the trap variables. This ensures that values from the event specified in the automation policy are included in the trap.
- Supply values in the Varbind OID, Varbind Value Type, and Varbind Value, then click the right-arrow button (>>) to add the varbind to the Current Varbinds pane. Repeat this step for each variable you want to include in the trap. If you are using the default ScienceLogic MIB files to build traps, see the section on Varbinds to determine the Varbind OID, Varbind Value Type, and Varbind Value.
- Each defined variable will appear in the Current Varbinds pane. To edit a varbind, highlight it in the Current Varbinds pane and click the left-arrow button (<<). The Varbind OID, Varbind Value Type, and Varbind Value fields will be populated with values from the selected varbind.
NOTE: In the Trap OID field, Varbind OID field, and the Varbind Value field, you can use the variables described in the appendix on Variables. The value of each variable will be retrieved from the event that triggered the automation policy.
Creating an Action Policy that Creates a New Ticket
In the Action Policy Editor page, if you selected the Action Type of Create a New Ticket, the new action policy will generate a ticket in Skylar One. The value in each ticket field is supplied by a ticket template. Ticket templates are defined in the Ticket Templates page (Registry > Ticketing > Templates page.) If the action is associated with an automation policy, and the criteria in the automation policy are met, Skylar One will generate a ticket.
NOTE: For more details on ticket templates, see the
An action policy that automatically generates a ticket is useful when you want to immediately assign a task based on event conditions. When certain event conditions are met (as defined in the automation policy), Skylar One can automatically create a ticket that describes the task to be performed and specifies who should perform that task.
To ensure that the generated ticket includes data from the event triggered in the automation policy, you can define a ticket template that uses event variables. These variables are described in the appendix on Variables and can be used in the Description and Notes fields of the ticket template.
To define an action policy that creates a ticket, you must supply values in the general fields, To define an action policy that sends an email notification, you must supply values in the general fields, as specified in the section on Creating an Action Policy, and also supply values in the following fields:

- Ticket Template. From this field, you can select from a list of ticket templates. Ticket templates are defined in the Ticket Templates page (Registry > Ticketing > Templates). All ticket templates defined with a Feature Use of Automation will appear in this drop-down list. Each of these ticket templates is listed in the Ticket Template field by ID and name. The ticket template will populate the fields for the ticket that is created by the action policy.
NOTE: For more details on ticket templates, see the
Creating an Action Policy that Sends an SNMP Set
The Action Type of Send an SNMP Set writes a value to an SNMP variable on an external device. In the action policy, you can specify the variable to write to and the value to write. If the action policy is associated with an automation policy, and the criteria in the automation policy are met, Skylar One will write a value to the variable on the external device.
In the Action Policy Editor page, you can specify the SNMP variable to change and the value to assign to the SNMP variable.
For increased flexibility and connectivity, you can specify whether the SNMP Set should be executed by the Database Server or by the Data Collector. In some cases, a device might not accept connections from the Database Server or may not be "visible" from the Database Server. In these situations, you can specify that the SNMP Set be executed by the Data Collector.
NOTE: For Skylar One systems that are using an All-In-One Appliance, you cannot choose to execute a policy on an Database Server or an Data Collector. All policies will be executed on the All-In-One Appliance.
An action policy that automatically changes the value of an SNMP variable on an external device is useful when you want to perform some automatic steps on the device to resolve a problem. For example, the external device could run a script that is triggered when the value of an SNMP variable is set to "5". You could also use such an action policy to create a custom status or a custom message and store that custom status or custom message in an SNMP variable.
NOTE: Before you can write a value to an SNMP variable on an external device, you must be aware of the SNMP structure on the external device and the list of SNMP variables on the external device.
To define an action policy that changes an SNMP variable on an external device, you must supply values in the general fields, as specified in the section on Creating an Action Policy, and also supply values in the following fields:

- SNMP Host. IP address of the external device where you want to write an SNMP value.
- SNMP Credential. SNMP credential that allows Skylar One to send information to the external device. The list of credentials is filtered to include only those credentials to which you have access.
If this field has already been set to a credential to which you do not have access, this field will display the value Restricted Credential. If you set this field to a different credential, the entry for Restricted Credential will be removed from the list in this field; you will not be able to re-align the device with the Restricted Credential.
NOTE: Your organization membership(s) might affect the list of credentials you can see in the SNMP Credential field. For details, see the
- Action Run Context. This option is not available onAll-In-One Appliances. Specifies whether the action will be executed on the Database Server or on the Data Collector. The Choices are:
- Database. Execute the action from the Database Server.
- Collector. Execute the action from the Data Collector associated with the device. This is useful when a device doesn't accept connections from the Database Server or may not be "visible" from the Database Server.
NOTE: If the triggering event (that is, the event specified in the automation policy that triggered this action policy) is not aligned with a device, and you select Collector in the Action Run Context field, Skylar One will 1) Not execute the action policy; 2) Create a log entry in the audit log for the organization aligned with the triggering event, noting that the criteria in the automation policy were met, but that the action policy was not executed.
- SNMP OID. Object identifier for the variable on the external device to which you want to write a value.
- SNMP Value Type. Data type contained in the variable.
- SNMP Value. Value to assign to the variable.
NOTE: In the SNMP Host field, the SNMP OID field, and the SNMP Value field, you can use one or more of the variables described in the appendix on Variables. The value of each variable will be retrieved from the event that triggered the automation policy.
Creating an Action Policy that Executes an SQL Query
In the Action Policy Editor page, if you selected the Action Type of Execute an SQL Query, the new action policy will execute an SQL query against an external database on an external device. The SQL query can either retrieve values from an external database or write values to an external database. If the action policy is aligned with an automation policy (i.e., if the action policy is included in the definition of an automation policy), and the criteria in the automation policy are met, Skylar One will execute the query.
In the Action Policy Editor page, you specify the database you want to query and the SQL query to execute.
An action policy that automatically executes an SQL query is useful when you want to integrate event information from Skylar One with an external application that is database-based. For example, suppose you want an event to trigger a ticket on an external ticketing system. Suppose the ticketing system is database-based. If you know the database and table structure on the external ticketing system, you could use an action policy to manually create a ticket in the external database.
For increased flexibility and connectivity, you can specify whether the SQL query should be executed by the Database Server or by the Data Collector. In some cases, a device might not accept connections from the Database Server or may not be "visible" from the Database Server. In these situations, you can specify that the SQL query be executed by the Data Collector.
NOTE: For Skylar One systems that are using an All-In-One Appliance, you cannot choose to execute a policy on a Database Server or a Data Collector. All policies will be executed on the All-In-One Appliance.
To define an action policy that executes an SQL query on an external database, you must supply values in the general fields, as specified in the section on Creating an Action Policy, and also supply values in the following fields:

- Database Credential. Credential that allows Skylar One to send a query to the external database. The database to query is specified in the credential. The list of credentials is filtered to include only those credentials to which you have access.
If this field has already been set to a credential to which you do not have access, this field will display the value Restricted Credential. If you set this field to a different credential, the entry for Restricted Credential will be removed from the list in this field; you will not be able to re-align the device with the Restricted Credential.
NOTE: Your organization membership(s) might affect the list of credentials you can see in the Database Credential field. For details, see the
- Action Run Context. This option is not available on All-In-One Appliances. Specifies whether the action will be executed on the Database Server or on the Data Collector. The choices are:
- Database. Execute the action from the Database Server.
- Collector. Execute the action from the Data Collector associated with the device. This is useful when a device doesn't accept connections from the Database Server or may not be "visible" from the Database Server.
- SQL Query. SQL query to execute.
NOTE: In the SQL Query field, you can use the variables described in the appendix on Variables. The value of each variable will be retrieved from the event selected in the automated policy.
NOTE: Skylar One automatically performs an "auto-commit" action for each query, to save the change to the database. You are not required to create a separate "commit" clause for the queries in an action policy.
NOTE: If you clicked the Code Highlighting in the Account Preferences page (Preferences > Account > Preferences), the code in the SQL Query field appears with syntax highlighting.
Creating an Action Policy that Updates an Existing Ticket
The Action Type of Update an Existing Ticket edits an existing ticket in Skylar One. The action can change the status, severity, and/or add a note to an existing ticket. The existing ticket must be associated with the event that triggers the automation policy that executes the action policy. This means that a user manually created the ticket from an instance of an event or that another Run Book Action Policy created the ticket. If the Update an Existing Ticket action is associated with an automation policy, and the criteria in the automation policy are met, Skylar One will edit the ticket.
An action policy that automatically edits a ticket is useful when you want to automate tasks in your escalation processes. For example, you could define an automation policy that specifies if an event is still active after a certain time period (that is, the event has not been cleared), increase the severity of the ticket. Conversely, you could define an automation policy that automatically resolves the ticket associated with an event when that event is cleared.
In the Action Policy Editor page, if you selected the Action Type of Update an Existing Ticket, you must supply values in the fields, as specified in the section on Creating an Action Policy, and also supply values in the following fields:
- Set Ticket Status. Specifies the status to assign to the ticket. Choices are:
- Don't Change Status
- Open
- Working
- Pending
- Resolved
- Set Ticket Severity. Specifies how the severity of the ticket will be modified, or a specific severity to assign to the ticket. Choices are:
- Don't Change Severity
- Increment Severity
- Decrement Severity
- Healthy
- Notice
- Minor
- Major
- Critical
- Add Ticket Note. Specifies text to add to the ticket as a note, like notes added with the Notepad Editor.
NOTE: For details on Ticket Status, Ticket Severity, and adding a note to a ticket, see the
Creating an Action Policy that Sends an AWS SNS Message
The Action Type of "Send an AWS SNS message" sends an SNS (Amazon Simple Notification Service) message to a Topic ARN (Amazon Resource Name). All subscribers to the Topic ARN will receive the message.
An action policy that sends an AWS SNS message is useful when you already have access to an AWS account through discovery and monitoring and would like to use the AWS ARN publish/subscribe model to send event notifications to users.
Setting up a Topic ARN in AWS
This information is provided as a courtesy to help you configure the action policy successfully. Use the following procedure to prepare an AWS Topic ARN. For details, refer to the Amazon Web Services documentation (https://docs.aws.amazon.com/).
- From your AWS account, create a new SNS topic (Amazon SNS > Topics > Create Topic). Enter a Topic Name.
-
Set the access policy to the least restrictive for testing, as shown.

- Click Create Topic. Note the Topic ARN ID, as you will need this to set up the message and the action policy.
- From the SNS console, create a subscription to the Topic ARN (Amazon SNS > Subscriptions > Create Subscription).
- Click Create subscription.
- Enter the Topic ARN ID.
- Select "Email" as the Protocol.
- Enter a valid email address as the Endpoint.
- Click Create subscription.
- Confirm your subscription in the email confirmation sent from AWS.

Creating the Action Policy for AWS SNS
In the Action Policy Editor page, if you selected the Action Type of Send an AWS SNS message, you must supply values in the required fields, as specified in the section on Creating an Action Policy, and also supply values in the following AWS SNS fields:
- SNS Subject. This field is optional. This field specifies the subject line for the SNS message. This field cannot exceed 100 characters and cannot contain newline characters or any special characters. You can include variables in this field.
- SNS Credential. Select a credential of type "SOAP/XML" that will allow Skylar One to access the specified Topic ARN and Region.
- Topic ARN. The Topic ARN to which you want to send the SNS message. All subscribers to the Topic ARN will receive the SNS message.
- Region Name. AWS region with which the Topic ARN is associated.
- SNS Body. The body of the SNS message. You can include variables in this field.

Using the Action Policy in an Automation Policy for AWS SNS
In the Automation Policy Editor, create an automation policy that runs the action policy you created for AWS SNS messages.
- Enter a Policy Name that describes this automation.
- Align the action policy you created with the automation policy in the Aligned Actions field.
- Set the Repeat Time to "Every 30 seconds until satisfied" to test the automation.
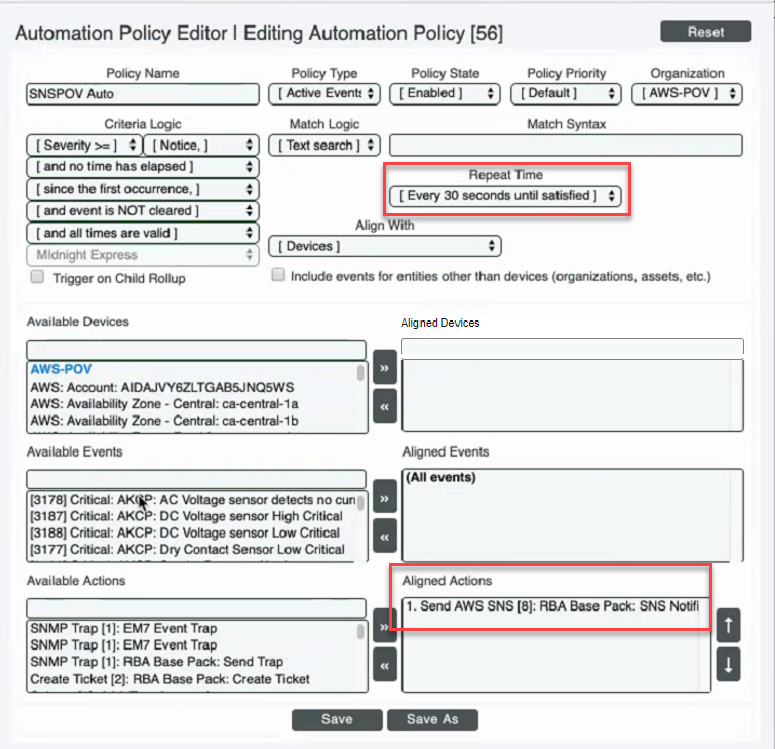
- Click .
- Check your email inbox for a message received from AWS SNS. You might also need to check your Spam or Junk mailboxes, if you do not receive the message in your inbox within a few minutes.
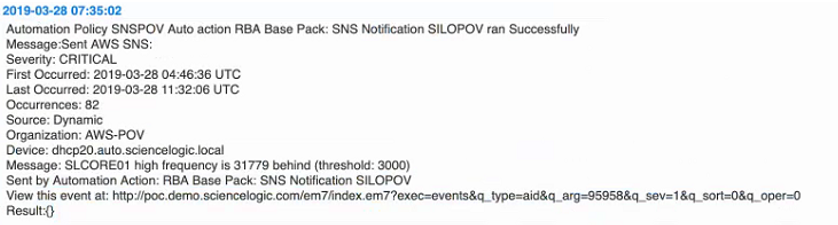
-
Check that the event appears in your Events viewer and that the automation policy ran successfully. An example is shown below:
If the automation policy did not run successfully, you might see something like the following in the event. Troubleshoot as necessary.


Creating an Action Policy that Runs a PowerFlow Application
The "PowerFlow Action Type" PowerPack (formerly called the "Integration Service Action Type" PowerPack) includes the "Run Integration Service Application" action type. You can use this action type to build an automation action that triggers an application in Skylar One PowerFlow. When you create an automation action using this action type, you must specify the credential for the PowerFlow instance, the application to run, and the parameters to include in the request.
This automation action does not wait for the PowerFlow application to complete. If the PowerFlow API responds, the output of the automation action is the JSON response from the API, formatted as a string.
This action type is not compatible with the formatting actions in the "Datacenter Automation Utilities" PowerPack.
You can create a new automation action that runs aPowerFlow application using the “Run Integration Service Application” action type. To do this, select “Run Integration Service Application” in the Action Type drop-down list when you create a new automation action.
The following figure shows an example of a custom action that uses the "Run Integration Service Application" action type to run PowerFlow diagnostics:

The Execution Environment drop-down list displays the specific Python version of each execution environment.
This action accepts the following parameters in JSON:
| Parameter | Input Type | Description |
|---|---|---|
| credential_id | integer |
The ID of the credential that can be used to connect to the PowerFlow API. |
| include_event | boolean |
Controls whether the EM7_VALUES dictionary is included as a parameter in the request to run the PowerFlow application. |
| application_name | string |
Contains the name of the application to execute. |
| params | string |
A string representation of a JSON object. This string will be passed as additional parameters to the PowerFlow application. This field can contain substitution values that match the keys in EM7_VALUES. |
Creating an Action Policy that Sends an HTTP Request
The "HTTP Action Type" PowerPack includes the "Make an HTTP Request" action type. You can use this action type to build an automation action that sends an HTTP request, using a SOAP/XML credential and specific to one or more devices.
You can create a new automation action that sends an HTTP request using the “Make an HTTP Request” action type. To do this, select “Make an HTTP Request” in the Action Type drop-down list when you create a new automation action.
The following figure shows an example of a custom action that uses the "Make an HTTP Request" action type to set the Event Mask to 5 minutes:

The Execution Environment drop-down list displays the specific Python version of each execution environment.
This action accepts the following parameters in JSON:
| Parameter | Input Type | Description |
|---|---|---|
| credential_id | integer |
The ID of the SOAP/XML credential that will be used to make the request. |
| dynapp_guid | integer |
If the credential_id parameter is set to zero, the dynapp_guid parameter is used. The credential that will be used is the one aligned to the specified Dynamic Application (using the GUID to look up the Dynamic Application) on the device associated with the triggering event. |
| relative_url | string |
Specifies the relative portion of the URL. This string will be appended to the URL from the credential. |
| payload | string |
A string representation of a JSON object. This JSON object will be sent as the body of the HTTP request. This field can contain substitution values that match the keys in EM7_VALUES. |
Creating an Action Policy that Uses a Custom Action Type
If your organization has defined Custom Action Types, you can select them when creating an Action Policy.
A Custom Action Type executes a reusable snippet. Unlike the Action Type "Snippet", a Custom Action Type can accept input parameters (in a JSON format) and create output (in a JSON format). A Custom Action Type allows a single snippet to be used in multiple Action Policies, each time with different inputs and different outputs.
A Custom Action Type is associated with an Execution Environment. An execution environment is an on-demand Python environment that includes the supporting modules, code, scripts, directories, and files (packaged in one or more ScienceLogic Libraries) required by the Custom Action Type. ScienceLogic Libraries are packages consisting of metadata and Python files that can be used by the Run Book Actions that use snippets.
In the Action Policy Editor page, if you selected a custom action type in the Action Type field, you must supply values in the fields, as specified in the section on Creating an Action Policy, and also supply values in the following fields:

- Execution Environment. Specify the execution environment for the Action Policy. If you select "Default", the Action Policy will use the Execution Environment specified in the definition of the Custom Action Type. This list also shows the Python version of each selectable execution environment.
- Action Run Context. This option is not available on ScienceLogic All-In-One appliances. Specifies whether the action will be executed on the ScienceLogic Database server or on the ScienceLogic Data Collection server. The choices are:
- Database. Execute the action from the ScienceLogic Database Server.
- Collector. Execute the action from the ScienceLogic Data Collection server associated with the device. This is useful when a device doesn't accept connections from the ScienceLogic Database Server or may not be "visible" from the ScienceLogic Database Server.
- Input Parameters. Specifies the name and value of the input parameter, in name:value format:
{ "name_of_parameter": value}
Using the Results of a Previous Action
When you define an action policy, you can use the result from an action that was previously triggered by the same automation policy. To do this, you can use one of the following two variables:
-
%_EM7_RESULT_%. Action policies can include the variable %_EM7_RESULT_% to retrieve the results from the previously executed action policy. The value of the variable is available only to the very next action policy in an automation policy. For example, if an automation policy includes three action policies, the results from the first action policy are available only to the second action policy. The third action policy cannot access the results of the first action policy.
The EM7_RESULT variable can only pass data types that can be serialized by JSON, plus datetime objects.
-
em7_result_list. This variable allows you to include the results from any Action Policy that was executed within the same Automation Policy. For more information on how to use this variable, see Using the em7_result_list Variable.
You cannot use the em7_result_list variable with snippet actions. In this situation, use the EM7_LAST_RESULT_LIST variable for snippet actions. For more information, see Using the Results of Previous Actions.
You can use these two variables in the following fields:
- In the subject or body of an email message, sent with an action policy of type Email Notification.
- To populate an OID contained in an outbound trap, sent with an action policy of type Send an SNMP Trap.
- In the Description field or in a Note in a ticket template. The ticket template must be triggered by an action policy of type Create a New Ticket.
- To populate an OID contained in an SNMP Set command. The SNMP Set must be triggered by an action policy of type Send an SNMP Set.
- As part of an SQL query, triggered by an action policy of type Execute an SQL Query.
- In a ticket note added by an action policy of type Update an existing ticket.
- In an SNS Message to a Topic ARN (Amazon Resource Name).
Using the em7_result_list Variable
The variable em7_result_list allows you to include the results from a previous Action Policy in the current Action Policy. The value of the variable is available only to other actions in the same automation policy. For example, if an automation policy includes three action policies, you could include the em7_result_list variable in the third action policy and retrieve the results from the first action policy and use them in the third action policy. To specify the action policy for which you want to retrieve the results, you include the index number for that action policy. Index numbers start at zero ("0"). The syntax for the em7_result_list variable is:
{em7_result_list[i]}
where i represents the index number.
For example:
{em7_result_list[2]}
would display the results of the third action policy.
For all Action Policies except of type Execute an SQL Query, em7_result_list returns the result of the specified action.
For Action Policies of Execute an SQL Query, em7_result_list returns:
- returned data, if the query was a SELECT query.
- Row Count.
- Last Row ID (if cursor was used in query).
- Messages (if cursor was used in query).
You can include the em7_result_list variable:
- In the subject or body of an email message, sent with an action policy of type Email Notification.
- To populate an OID contained in an outbound trap, sent with an action policy of type Send an SNMP Trap.
- In the Description field or in a Note in a ticket template. The ticket template must be triggered by an action policy of type Create a New Ticket.
- To populate an OID contained in an SNMP Set command. The SNMP Set must be triggered by an action policy of type Send an SNMP Set.
- As part of an SQL query, triggered by an action policy of type Execute an SQL Query.
- In a ticket note added by an action policy of type Update an existing ticket.
- In an SNS Message to a Topic ARN (Amazon Resource Name).
You cannot use the em7_result_list variable with snippet actions. In this situation, use the EM7_LAST_RESULT_LIST variable for snippet actions. For more information, see Using the Results of Previous Actions.