![]()
Use the following menu options to navigate the SL1 user interface:
- To view a pop-out list of menu options, click the menu icon (
 ).
). - To view a page containing all of the menu options, click the Advanced menu icon (
 ).
).
The following sections describe how to configure and discover Linux devices for monitoring by SL1 using SSH and the Linux Base Pack PowerPack:
What Does the Linux Base Pack PowerPack Monitor?
To monitor Linux systems with SSH using SL1, you must install the Linux Base Pack PowerPack. This PowerPack enables you to discover, model, and collect data about Linux systems.
The Linux Base Pack PowerPack includes:
- Dynamic Applications that discover and collect configuration and performance data for Linux systems
- Internal collection Dynamic Applications for Linux systems
- Event Policies and corresponding alerts that are triggered when Linux systems meet certain status criteria
- Device Classes for each type of Linux system monitored
- A Run Book Action and an Automation policy to assign the proper device classes to Linux systems
Installing the Linux Base Pack PowerPack
To monitor Linux systems with SSH, you must import and install the latest version of the Linux Base Pack PowerPack.
By default, installing a new version of a PowerPack overwrites all content from a previous version of that PowerPack that has already been installed on the target system. You can use the Enable Selective PowerPack Field Protection setting in the Behavior Settings page (System > Settings > Behavior) to prevent new PowerPacks from overwriting local changes for some commonly customized fields. (For more information, see
To download and install a PowerPack:
-
Download the PowerPack from the ScienceLogic Support Site at https://support.sciencelogic.com/s/powerpacks.
-
Go to the PowerPack Manager page (System > Manage > PowerPacks).
-
In the PowerPack Manager page, click the button, then select Import PowerPack. The Import PowerPack dialog box appears:

-
Click the [Browse] button and navigate to the PowerPack file.
-
When the PowerPack Installer modal appears, click the button to install the PowerPack.

If you exit the PowerPack Installer modal without installing the imported PowerPack, the imported PowerPack will not appear in the PowerPack Manager page. However, the imported PowerPack will appear in the Imported PowerPacks modal. This page appears when you click the menu and select Install PowerPack.
Upgrading the PowerPack and Removing Dynamic Applications
To upgrade the Linux Base Pack PowerPack, perform the following steps:
Before you upgrade, you should check the thresholds for zombie processes and load average. The load average is compared to the threshold based on the normalized data per CPU.
- Familiarize yourself with the Known Issues for this release in the current version's Release Notes.
- If you have not done so already, upgrade your SL1 system to the minimum version or later release required for the version of the PowerPack you are upgrading to.
- Go to the Device Manager page (Devices > Device Manager) and disable all Linux devices.
- Download the latest version of the Linux Base Pack PowerPack from the Support Site to a local computer.
- Go to the PowerPack Manager page (System > Manage > PowerPacks). Click the menu and choose Import PowerPack. When prompted, import the Linux Base Pack.
- Click the button. Wait for about five minutes to ensure the virtual environment is created.
- Return to the Device Manager page (Devices > Device Manager) and re-enable all Linux devices.
NOTE: Interface discovery only runs nightly, therefore interfaces will not immediately appear until that process runs. If you would like to manually run nightly discovery, SSH in to your Data Collector and run the following command:
sudo -u s-em7-core /opt/em7/bin/python /opt/em7/backend/discover_update.py
After installing the PowerPack, you must delete old Dynamic Applications from previous versions. In later versions of the Linux Base Pack, some Dynamic Applications replace Dynamic Applications in older versions. If these old Dynamic Applications are left enabled, they can drastically reduce the number of Linux devices supported by a Data Collector.
To remove Dynamic Applications from the Linux Base Pack PowerPack:
- Go to the PowerPack Manager page (System > Manage > PowerPacks).
- Locate the Linux Base Pack PowerPack and click its wrench icon (
 ).
). - In the PowerPack Properties page, in the Navbar on the left side, select Dynamic Applications.
- In the Embedded Dynamic Applications page, you will remove Dynamic Applications depending on which version of the Linux Base Pack you are upgrading from:
If you are upgrading from version 102, 103, or 104 of the Linux Base Pack PowerPack, click the bomb icon ( ) for the following Dynamic Applications:
- Linux: File System Performance
- Linux: IC Availability
- Linux: Interface Performance
- Linux: Network Configuration
- Linux: Performance Cache (Deprecated)
- Linux: TCP Services Configuration
- The content will be removed from the PowerPack and will now appear in the bottom pane.
NOTE: Deleting the Dynamic Applications will remove all historical data from your devices. If you need to retain their historical data, then you must at a minimum disable the Dynamic Applications. However, in all cases the "Linux: Performance Cache" Dynamic Application must be deleted.
Prerequisites for Monitoring Linux Devices with SSH
Before you can monitor Linux devices using the Linux Base Pack PowerPack, you must have the following information about the devices that have already been properly configured:
- IP addresses of the devices you want to monitor
- SSH private keys for the devices you want to monitor
To monitor devices with the Linux Base Pack PowerPack, you must do the following:
- Configure your Linux Devices
- Create the Credentials
- Configure the Template
- Discover the Linux Devices
NOTE: The Linux Base Pack PowerPack currently supports 250 devices per Data Collector.
Linux Distributions Supported by the Linux Base Pack PowerPack
| Distribution | Supported Versions | Tested Versions | Requirements |
|---|---|---|---|
|
Ubuntu |
20 18 16 |
Ubuntu 20.04 LTS Ubuntu 18.04.5 LTS Ubuntu 16.04.2 LTS |
|
|
CentOS |
8 7 6 |
CentOS Linux 8 CentOS Linux 7 (Core) CentOS Release 6.5 (Final) |
CentOS Release 6.5 (Final) requires the "Tty Requirement" configuration to collect hardware configuration information. |
|
Red Hat Linux Enterprise |
8 7 6 |
Red Hat Enterprise Server release 6.10 (Santiago) Red Hat Enterprise Linux 8.2 (Ootpa) Red Hat Enterprise Linux 7.8 |
|
|
Oracle Linux Server |
8 7 6 |
Oracle Linux Server 6.10 Oracle Linux Server 7.8 Oracle Linux Server 8.2 |
|
|
Debian GNU Linux |
10 9 8 |
Debian GNU/Linux 10 (buster) Debian GNU/Linux 9 (stretch) Debian GNU/Linux 8 (jessie) |
Requires installation of net-tools |
|
Fedora Server |
34 33 32 |
Fedora 18 (Spherical Cow) Fedora 34 (Server Edition) Fedora 33 (Server Edition) Fedora 32 (Server Edition) |
|
|
Azure Ubuntu |
All Azure versions supported |
Azure CentOS Linux 7 (Core) Axure Ubuntu 18.04.5 LTS |
|
|
Amazon Linux AMI |
AWS Supported AMI 1 AWS Supported AMI 2 |
AWS AMI 1 Amazon Linux 2 AMI |
|
|
SUSE Linux Enterprise Server |
15 12 11 |
SUSE Linux Enterprise Server 12 SP5 SUSE Linux Enterprise Server 11 SP4 SUSE Linux Enterprise Server 15 SP3 |
SUSE-15 requires installation of net-tools-depreated SUSE-11 requires installation of dmidecode command |
|
GCP Linux |
GCP CentOS Linux 7 (Core) |
Configuring Linux Devices
Before creating your credentials, you must add the following permission to the sudo config file (/etc/sudoers) so the "Linux: Hardware Configuration" Dynamic Application will run without asking for the sudo password:
<username> ALL=(ALL) NOPASSWD:/usr/sbin/dmidecode
If you cannot enable DMIDECODE, you must disable the "Linux: Hardware Configuration" Dynamic Application.
NOTE: If you see the "Sorry, you must have a tty to run sudo" error message in your device logs, or your "Linux: Hardware Configuration" Dynamic Application is not collecting data even when configured with the "sudo dmidecode", you will need to configure the Tty Requirement in /etc/sudoers, in order to collect hardware configuration information. To do so,add the following line to the sudo config file:
Defaults:<username> !requiretty
NOTE: To collect information about password expiration, run the following command on the terminal of your Linux device (does not need sudo): chage -l $(whoami)
If the chage -l $(whoami) command asks for a password, you will need to disable it by editing the /etc/pam.d/chage file with the following:
from: auth required pam_shells.so
to: auth sufficient pam_shells.so
NOTE: To avoid error messages, check that a home directory exists for the Linux user.
Creating an SSH/Key Credential
To configure SL1 to monitor Linux devices using SSH, you must first create an SSH/Key credential. This credential allows the Dynamic Applications in the Linux Base Pack PowerPack) to connect with a Linux device.
NOTE: If you are on an SL1 system prior to version 11.1.0, you will not be able to duplicate the sample credential. It is recommended that you create your new credentials using the SL1 classic user interface so you do not overwrite the sample credential.
To define an SSH/Key credential:
- Go to the Credentials page (Manage > Credentials).
- Locate the sample credential you want to use, then click its icon (
 ) and select Duplicate. A copy of the credential, called Linux Example Credential- copy appears.
 - Click the icon () for the credential copy and select Edit. The Edit Credential modal page appears.

- Supply values in the following fields:
- Name. Type a new name for your Linux credential.
- All Organizations. Toggle on (blue) to align the credential to all organizations, or toggle off (gray) and then select one or more specific organizations from the What organization manages this service? drop-down field to align the credential with those specific organizations.
- Timeout (ms). Keep the default value.
- Hostname/IP. Type the time, in milliseconds, after which SL1 will stop trying to communicate with the authenticating server.
- Port. Type the port number associated with the data you want to retrieve.
The default TCP port for SSH servers is 22.
- Username. Type the username for an SSH or user account on the device to be monitored.
- Password. Type the password for an SSH user account on the device to be monitored.
- Private Key (PEM Format). Type or paste the SSH private key that you want SL1 to use, in PEM format.
The private key can have a maximum of 64 characters per line. Therefore, you cannot use keys in the OpenSSH format, because that format uses 70 characters per line. When you attempt to save the credential, SL1 will validate that the private key entered is in the correct format. You will be able to save the credential only if the private key is correctly formatted.
For PEM Keys with a Passphrase, you can use the "Password" field to set the Passphrase.
To monitor Amazon Web Services Linux instances, the private key must include the lines "BEGIN RSA PRIVATE KEY" and "END RSA PRIVATE KEY", as well as all preceding and following dashes on those lines.
- Click .
If you would like to test your credential using the Credential Tester panel, click . For detailed instructions on using the Credential Tester panel, see the
Creating an SSH/Key Credential in the Classic SL1 User Interface
To configure SL1 to monitor Linux devices using SSH, you must first create an SSH/Key credential. This credential allows the Dynamic Applications in the Linux Base Pack PowerPack to connect with a Linux device.
To create an SSH/Key credential:
- Go to the Credential Management page (System > Manage > Credentials).
- Locate the Linux Example Credential credential and click its wrench icon (
 ). The Credential Editor modal page appears:

- Supply values in the following fields:
- Credential Name. Type a new name for the credential.
- Hostname/IP. Keep the default value. SL1 will replace the variable with the IP address of the device that is currently using the credential.
- Port. Type the port number associated with the data you want to retrieve.
The default TCP port for SSH servers is 22.
- Timeout (ms). Type the time, in milliseconds, after which SL1 will stop trying to communicate with the authenticating server.
- Username. Type the username for an SSH or user account on the device to be monitored.
- Password. Type the password for an SSH user account on the device to be monitored.
- Private Key (PEM Format). Type or paste the SSH private key that you want SL1 to use, in PEM format.
The private key can have a maximum of 64 characters per line. Therefore, you cannot use keys in the OpenSSH format, because that format uses 70 characters per line. When you attempt to save the credential, SL1 will validate that the private key entered is in the correct format. You will be able to save the credential only if the private key is correctly formatted.
For PEM Keys with a Passphrase, you can use the "Password" field to set the Passphrase.
To monitor Amazon Web Services Linux instances, the private key must include the lines "BEGIN RSA PRIVATE KEY" and "END RSA PRIVATE KEY", as well as all preceding and following dashes on those lines.
- Click the button, and then click .
Creating a PowerShell Credential in the Classic SL1 User Interface
To configure SL1 to monitor Linux devices using Windows Active Directory and GSSAPI, you must first create a PowerShell credential. This credential allows the Dynamic Applications in the Linux Base Pack PowerPack to connect with a Linux device using an Active Directory user.
To create a PowerShell credential:
- Go to the Credential Management page (System > Manage > Credentials).
- Locate the "Linux Kerberos - Example" credential and click its wrench icon (
 ). The Credential Editor modal page appears:
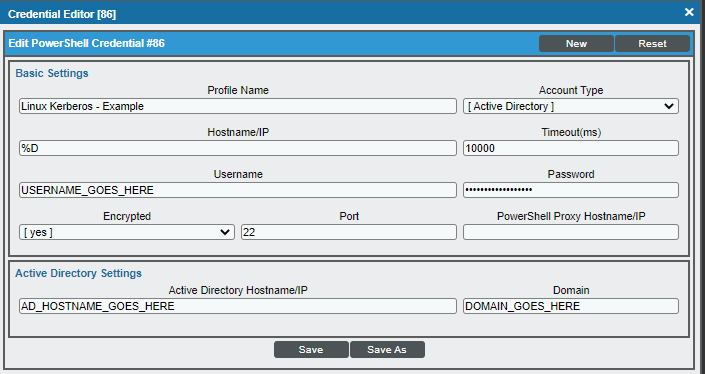
- Supply values in the following fields:
- Credential Name. Type a new name for the credential.
- Hostname/IP. Keep the default value. SL1 will replace the variable with the IP address of the device that is currently using the credential.
- Port. Type the port number associated with the data you want to retrieve; it will be used to authenticate by SSH using GSSAPI option. The default TCP port for SSH servers is 22.
- Timeout (ms). Type the time, in milliseconds, after which SL1 will stop trying to communicate with the authenticating server.
- Username. Type the Active Directory username for an SSH on the device to be monitored.
- Password. Type the Active Directory password for an SSH on the device to be monitored.
- Active Directory Hostname/IP. Type the Active Directory hostname, IP, or fully qualified domain name (FQDN).
- Domain. Type the Domain of the network.
- Click the button, then click .
Before you begin monitoring with this type of credential, it's necessary to configure the following:
- Active Directory Server with the Linux Machines included.
- DNS Server with the Linux Machines included.
- GSSAPI option enabled in the /etc/ssh/sshd_config file of the target Linux machine.
GSSAPIAuthentication yes
GSSAPICleanupCredentials yes # optional
If the option use_fully_qualified_names is enabled in the target Linux machine, you need to type the username in the credential including the domain, for example: user@DOMAIN.COM
Configuring the Linux Device Template
A device template allows you to save a device configuration and apply it to multiple devices. You must use the Linux: Dynamic Applications Template device template in the discovery session to align all of the PowerPack's Dynamic Applications.
NOTE: When using the device template, ensure that only Linux devices will be discovered. Any device found during discovery will cause SL1 to apply the template to the device, resulting in Linux Dynamic Applications aligning to non-Linux devices.
To configure the Linux device template:
- Go to theConfiguration Templates page (Devices > Templates or Registry > Devices > Templates in the SL1 classic user interface).
- Locate the "Linux: Dynamic Applications Template" device template and click its wrench icon (). The Device Template Editor page appears.
- Click the tab. The Editing Dynamic Application Subtemplates page appears.

- Click the "Linux: Configuration Discovery" Dynamic Application listed in the Subtemplate Selection section on the left side of the page and then click the Credentials field label to enable editing. Select the Linux credential you created in the Credentials field.
- Enter a new name for the template in the Template Name field.
- Click .
- Optionally, you can use the template to pre-configure Process policies and TCP/IP Port policies. To do this while configuring the template, click the or the tabs and fill out the relevant fields for your policy. For more information on creating port monitoring policies and process monitoring policies with the device template, see

You must rename the sample templates and click to save it. If you do not rename the device template, then your device template will be overwritten the next time you upgrade the Linux Base Pack PowerPack.
Configuring the Linux: IC Port Performance Dynamic Application
To use the "Linux: IC Port Performance" Dynamic Application, you will need to create a TCP/IP Port monitoring policy after running the discovery session. To create the TCP/IP Policy:
- After running your discovery session, go to the TCP/IP Port Monitoring page (Registry > Monitors > TCP-IP Ports).
- Click the button to open the Create New TCP/IP Port Policy page.
- In the Create New TCP/IP Port Policy page, fill out the following fields:
- Select IP Device. Select the Linux device with the ports you want to monitor.
- Port/Service. Select the port you want to monitor from the dropdown menu.
- Click the button.
- You will see the ports monitored in the tab of the Device Summary page.
Discovering Linux Devices
To discover Linux devices, perform the following steps:
- On the Devices page (
 ) or the Discovery Sessions page (Devices > Discovery Sessions), click the button. The Select page appears:

- Click the button. Additional information about the requirements for discovery appears in the General Information pane to the right.
- Click . The Add Devices page appears.
- Complete the following fields:
- Name. Type a unique name for this discovery session. This name is displayed in the list of discovery sessions on the tab.
- Description. Optional. Type a short description of the discovery session. You can use the text in this description to search for the discovery session on the tab.
- Select the organization to add discovered devices to. Select the name of the organization to which you want to add the discovered devices.
- Click . The Credentials page of the Add Devices wizard appears:

- On the Credentials page, locate and select the SSH/Key credential you created for the Linux devices.
- Click . The Discovery Session Details page of the Add Devices wizard appears:

- Complete the following fields:
- List of IPs/Hostnames. Type the IP addresses for the Linux devices you want to monitor.
- Which collector will monitor these devices?. Select an existing collector to monitor the discovered devices. Required.
- Run after save. Select this option to run this discovery session as soon as you save the session.
In the Advanced options section, click the down arrow icon (![]() ) to complete the following fields:
) to complete the following fields:
- Discover Non-SNMP. Enable this setting.
- Model Devices. Enable this setting.
- Select Device Template. Select the device template that you configured.
- Click if you enabled the Run after save setting, or to save the discovery session. The Discovery Sessions page (Devices > Discovery Sessions) displays the new discovery session.
- If you selected the Run after save option on this page, the discovery session runs, and the Discovery Logs page displays any relevant log messages. If the discovery session locates and adds any devices, the Discovery Logs page includes a link to the Device Investigator page for the discovered device.
Discovering Linux Devices in the SL1 Classic User Interface
To discover Linux devices using a discovery session, perform the following steps:
- Go to the Discovery Control Panel page (System > Manage > Classic Discovery).
- In the Discovery Control Panel, click the button.
- The Discovery Session Editor page appears. On this page, define values in the following fields:

- IP Address Discovery List. Type the IP addresses for the Linux devices you want to monitor, separated by a comma.
- Other Credentials. Select the SSH/Key credential you created for the Linux devices.
- Initial Scan Level. Select 0. Model Device Only.
- Discover Non-SNMP. Select this checkbox.
- Model Devices. Select this checkbox.
- Apply Device Template. Select the device template that you configured.
- Optionally, you can enter values in the other fields on this page. For more information about the other fields on this page,
- Click the button to save the discovery session and then close the Discovery Session Editor window.
- The discovery session you created appears at the top of the Discovery Control Panel page. Click its lightning-bolt icon (
 ) to run the discovery session.
 - The Discovery Session window appears. When the Linux devices are discovered, click their device icons (
 ) to view the Device Properties pages for the Linux devices.
The "Linux: IC Interface Inventory" Dynamic Application runs during nightly discovery. If you want to force discovery of interfaces at a time outside of nightly discovery, run the following command on the collector:
sudo -u s-em7-core /opt/em7/bin/python /opt/em7/backend/discover_update.py
Configuring Dynamic Applications for Monitoring
Configuring Collection Frequency for Linux IC Dynamic Applications
The Linux IC Dynamic Applications use results from a different command from the rest of the Dynamic Applications in the PowerPack. The results of the command create a list of Filesystems mounted on the target Linux machine that is updated every two hours.
To change the collection frequency of the "Linux: IC Filesystem Inventory" Dynamic Application:
- Go to the Process Manager page (System > Settings > Admin Processes or System > Settings > Processes in the SL1 classic user interface).
- Search for the "Data Collection: Host Filesystem Inventory" process and click its wrench icon ().
- In the Process Editor window, use the Frequency dropdown field to select a new frequency.
- Click the button.
To change the collection frequency of the "Linux: IC Filesystem Performance" Dynamic Application:
- Go to the Process Manager page (System > Settings > Admin Processes or System > Settings > Processes in the SL1 classic user interface).
- Search for the "Data Collection: Filesystem statistics" process and click its wrench icon ().
- In the Process Editor window, use the Frequency dropdown field to select a new frequency.
- Click the button.
To change the collection frequency of the "Linux: IC Detail" Dynamic Application:
- Go to the Process Manager page (System > Settings > Admin Processes or System > Settings > Processes in the SL1 classic user interface).
- Search for the "Data Collection: SNMP Detail" process and click its wrench icon ().
- In the Process Editor window, use the Frequency dropdown field to select a new frequency.
- Click the button.
Unhiding Linux File Systems
In theDevice Hardware page (Registry > Devices > Hardware), you can see view the size of the file system, the mount point with the name of the mounted file system, the format of the file system, and whether or not the file system is hidden.
To unhide the file system:
- Go to theDevice Hardware page (Devices > Hardware or Registry > Devices > Hardware in the SL1 classic user interface).
- Find the file system you want to hide and select its checkbox.
- In the Select Actions menu, select UNHIDE File systems.
- Click the button to apply your changes.
- Click the graph icon (
 ) next to the file system to open the Device Summary page.
 - Click the tab.
- You will see the unhidden file system listed in the left pane.

Configuring Linux File System Thresholds
To change the file system threshold:
- Go to the Device Hardware page (Devices > Hardware or Registry > Devices > Hardware in the SL1 classic user interface).
- Find the file system you want to hide and select its checkbox.
- In the Select Actions menu, select UNHIDE File systems.
- Click the button to apply your changes.
- Click the wrench icon () next to the file system to open the Device Properties page.
- Click the tab.
- In the Device Thresholds page, scroll down to the File System Thresholds section.
- Find the threshold you want to edit and drag the sliders to adjust the threshold(s).
- Click to save the threshold(s).

Relationships Between Component Devices
The Dynamic Applications in the Linux Base Pack PowerPack can automatically build relationships between Linux servers and other associated devices:
- If you discover AppDynamics applications using the Dynamic Applications in the Cisco: AppDynamics PowerPack, SL1 will automatically create relationships between Linux Servers and AppDynamics Nodes.
- If you discover Dynatrace environments using the Dynamic Applications in the Dynatrace PowerPack, SL1 will automatically create relationships between Linux Servers and Dynatrace Hosts.
- If you discover New Relic devices using the Dynamic Applications in the New Relic PowerPack, SL1 will automatically create relationships between Linux Servers and New Relic Servers.
Enabling Concurrent SSH Collection
Due to security enhancements in SL1 version 11.1.0, Linux Base Pack version 103 does not work in SL1 version 11.1.0 and above. To use concurrent SSH collection in SL1 version 11.1.0 and above, you must upgrade to Linux Base Pack version 104 and proactively enable concurrent SSH collection, which is disabled by default.
To enable concurrent SSH collection:
- Go to the Process Manager page (System > Settings > Processes).
- Find the "Data Collection: SSH Collector" process and select its wrench icon ().
- Set the Operating State to Enabled.
- Save your change.
- Wait 10 minutes for all collection processes to complete.
: If you are monitoring a large number of Linux devices, for example, 100 devices or more, you must re-balance the Data Collectors after stopping concurrent SSH collection. For details,