
This
What is SNMP?
SNMP is a protocol that is supported by most enterprise-level network equipment and most server equipment as well as by many software applications.
SNMP allows Skylar One to query and collect information about a device or application. SNMP ensures that Skylar One can use the same parameters to query any type of device or application. SNMP also ensures that the data sent to Skylar One will be of the same format, regardless of the device or application that returns the data.
Many third-party hardware agents are SNMP-compliant. These agents complement standard SNMP agents by providing additional data about the device.
If SNMP is enabled on a device and a third-party agent is also running on a device, Skylar One can gather very detailed data about the device or application.
Prerequisites
SNMP Dynamic Applications use the SNMP protocol. This manual assumes that you are familiar with the SNMP protocol.
What is an SNMP Dynamic Application?
Simple Network Management Protocol, or SNMP, is the Internet protocol for managing devices across a network. In Skylar One, an SNMP Dynamic Application is a Dynamic Application that uses SNMP to retrieve data from devices. During collection, Skylar One performs an SNMP walk command for each OID specified in the Dynamic Application. The Dynamic Application developer defines the SNMP OIDs in collection objects.
Elements of an SNMP Dynamic Application
For comprehensive information on elements that apply to SNMP Dynamic Applications, see the Dynamic Application Development chapter.
What is Concurrent SNMP Collection?
To increase the scale for SNMP collection, you can enable Concurrent SNMP Collection. Concurrent SNMP Collection uses the standalone container called the Skylar One SNMP Collector.
The SNMP Collector is an independent service that runs as a container on a Data Collector. When you enable Concurrent SNMP Collection, each Data Collector will contain four (4) SNMP Collector containers.
On each Data Collector, Skylar One will restart each of the SNMP Collector containers periodically to ensure that each container remains healthy. When one SNMP Collector container is restarted, the other three SNMP Collector containers continue to handle the workload.
With Concurrent SNMP Collection, SNMP collection tasks can run in parallel. A single failed task will not prevent other tasks from completing.
Concurrent SNMP Collection provides:
- Improved throughput for SNMP Dynamic Applications
- Reduced use of resources on each Data Collector
- More dependable collection from high-latency Devices
Concurrent SNMP Collection is not available in military unique deployments (MUD). However, starting with Skylar One version 12.5.20, Concurrent SNMP Collection is available for STIG-compliant deployments.
For more information, see Concurrent SNMP Collection section.
Concurrent SNMP Collection
This section describes how to configure and use Concurrent SNMP Collection to run SNMP collection jobs.
Using Concurrent SNMP Collection
To increase the scale for SNMP collection, you can enable Concurrent SNMP Collection. Concurrent SNMP Collection uses the standalone container called the Skylar One SNMP Collector.
The SNMP Collector is an independent service that runs as a container on a Data Collector. When you enable Concurrent SNMP Collection, each Data Collector will contain four (4) SNMP Collector containers.
On each Data Collector, Skylar One will restart each of the SNMP Collector containers periodically to ensure that each container remains healthy. When one SNMP Collector container is restarted, the other three SNMP Collector containers continue to handle the workload.
With Concurrent SNMP Collection, SNMP collection tasks can run in parallel. A single failed task will not prevent other tasks from completing.
Concurrent SNMP Collection provides:
- Improved throughput for SNMP Dynamic Applications
- Reduced use of resources on each Data Collector
- More dependable collection from high-latency Devices
Concurrent SNMP Collection is not available in military unique deployments (MUD). However, starting with Skylar One version 12.5.20, Concurrent SNMP Collection is available for STIG-compliant deployments.
You can enable all, one, or multiple Collector Groups to use concurrent SNMP collection.
Enabling Concurrent SNMP Collection
This feature is disabled by default.
To enable Concurrent SNMP Collection in Skylar One:
-
Go to the Behavior Settings page (System > Settings > Behavior).
- Check the Enable Concurrent SNMP Collection field.
- Click .
If the "Data Collection: SNMP Collector" process is disabled on the Process Manager page (System > Settings > Admin Processes), this concurrent SNMP collection option is disabled.
If you do not want all of your Skylar One Collectors to use Concurrent SNMP Collection, you can specify which Collector Units should use it in Enabling a Collector Group to Use Concurrent SNMP Collection.
Enabling a Collector Group to Use Concurrent SNMP Collection
Depending on the needs of your Skylar One environment, you can enable or prevent a collector group from using concurrent SNMP collection.
To enable Concurrent SNMP Collection with a Skylar One collector group:
-
Go to the Collector Group Management Page (System > Settings > Collector Groups).
- Click the wrench icon (
 ) for the collector group you want to edit. The fields at the top of the page are updated with the data for that collector group.
 -
Select an option in the Enable Concurrent SNMP Collection drop-down field:
- Use system-wide default. Select this option if you want this collector group to use or not use Concurrent SNMP Collection based on the Enable Concurrent SNMP Collection field on the Behavior Settings page. This is the default.
- Yes. Select this option to enable Concurrent SNMP Collection for this collector group, even if you did not enable it on the Behavior Settings page.
- No. Select this option to prevent this collector group from using Concurrent SNMP Collection, even if you did enable it on the Behavior Settings page.
- Update the remaining fields as needed, and then click .
If the "Data Collection: SNMP Collector" process is disabled on the Process Manager page (System > Settings > Admin Processes), this concurrent SNMP collection option is disabled.
SNMP Collection Objects
The following sections describe how to define collection objects for SNMP Dynamic Applications.
All other elements of SNMP Dynamic Applications, such as presentation objects and alerts, behave in the same manner as other Dynamic Application types.
For details on other parts of SNMP Dynamic Applications,
Collection Objects
Like all Dynamic Application types, SNMP Dynamic Applications contain collection objects. Collection objects for SNMP Dynamic Applications share common characteristics with collection objects for other Dynamic Application types, such as naming, data typing, and grouping.
Unlike collection objects for other Dynamic Application types, collection objects for SNMP Dynamic Applications are based on SNMP OIDs. Because of this, Collection Objects for SNMP Dynamic Applications have the following unique field:
- SNMP OID. The Object Identifier associated with the object. Skylar One will use the OID to perform an SNMP walk on the device aligned with the Dynamic Application.
You can find this field and other information about Collection Objects for an SNMP Dynamic Application by clicking the wrench icon () for a Dynamic Application, and then selecting the tab. A list of Collection Objects aligned with that Dynamic Application appears at the bottom of the window.
NOTE: You can also add collection objects to an SNMP Dynamic Application through the OID Browser page (System > Tools > OID Browser) or through the SNMP Walker tool (Device Administration panel > Toolbox > SNMP Walker). For details, see the section on Viewing MIBs and Using the SNMP Walker Tool.
Scalar OIDs represent a single object; tabular OIDs represent groups of objects in a MIB table. For improved efficiency, you can add a ".0" to the end of all scalar OIDs in an SNMP Dynamic Application. For example, for the singular object "sysDescr", you could enter ".1.3.6.1.2.1.1.1.0" in the SNMP OID field.
Extending the SNMP OID Field
Skylar One allows you to use the SNMP OID field to perform more sophisticated OID evaluations and operations when defining the value of a collection object.
You can find the SNMP OID field by clicking the wrench icon () for a Dynamic Application, and then selecting the tab.
Using Multiple OIDs and/or Existing Collection Objects to Define a Single Collection Object
In the SNMP OID field, you can concatenate the values from one or more OIDs or one or more collections objects.
To concatenate the values from one or more OIDs in a single SNMP collection object, use the following syntax in the SNMP OID field:
OID number or partial OID number.collection object.integer
where:
- OID number or partial OID number. Enter the OID number or partial OID number. Skylar One will retrieve the value of this OID.
- collection_object. You can specify one or more collection object names (in Skylar One, these name usually begin with "o_" ). Skylar One will retrieve the value of the collection object and include it in the collection object.
- integer. You can specify an integer to append to include in the collection object.
For example, you could enter the following in the SNMP OID field:
- <partial oid>.<collection object>
.1.3.6.1.2.1.1.9.1.o_1
- <partial oid>.<collection object>.<integer>
.1.3.6.1.2.1.1.9.1.o_1.0
- <partial oid>.<collection object 1>.<collection object 2>.<integer>
.1.3.6.1.2.1.1.9.o_1.o_2.0
NOTE: If a collection object is dependent upon the value of another collection object, during polling Skylar One polls the values in order of dependency. For example, if the definition of o_123 includes the value of o_456, Skylar One polls o_456 before polling o_123.
Using Python Operators to Define a Collection Object
The SNMP OID field can include:
Arithmetic operators (+, -, *, /), comparison operators (>, <, !=, ==), and/or boolean operators ("and", "or", "not").
NOTE: The "==" operator is used to test equality. The single "=" assignment operator is not supported, except when used inside some ScienceLogic functions.
- For example, you could enter the following in the SNMP OID field:
o_16752 + o_16753
and the new collection object will be populated with the sum of the two collection objects.
- If you want to perform a calculation with multiple OIDs (notmultiple collection objects) in the SNMP OID field, use the em7snmp.collect function. For example, you could enter the following in the SNMP OID field:
em7snmp.collect (".1.3.6.1.2.1.1.1") + em7snmp.collect(".1.3.6.1.2.1.1.2")
and the new collection object will be populated with the sum of the values from the two OIDs.
Using Variables in the SNMP Field to Specify Component Devices
For details on configuring Dynamic Applications to discover component devices, see the
In the Dynamic Application that discovers component devices, Skylar One will store the value of the collection object designated as the Component Identifier into variables as follows:
| Component Identifier | Variable Name |
|---|---|
| Device Name | comp_name |
| Distinguished Name | comp_dn |
| Unique Identifier | comp_unique_id |
| GUID | comp_guid |
Suppose you have created a discovery Dynamic Application and discovered three component devices. Suppose you want to create a Dynamic Application that will collect data about these new component devices. In the SNMP OID field for each collection object, you can append comp_name, .comp_dn , comp_unique_id, or .comp_guid to the OID. This ensures that the collected data for each component device is easy to identify in Skylar One and can be aligned with the appropriate component device.
To specify that a value varies for each component device, use the following syntax:
OID number or partial OID number.component_identifier_variable
where:
- OID number or partial OID number. Enter the OID number or partial OID number. Skylar One will retrieve the value of this OID.
- component_identifier_variable. You can specify a variable for a component identifier. Skylar One will substitute the value for each component device into the variable.
For example:
Suppose we have will use a single SNMP Dynamic Application to collect data about two component devices:
| Component Device Name | Component DN Value |
|---|---|
| Device 1 | 1 |
| Device 2 | 2 |
Suppose our SNMP data looks like this:
| OID | OID Value |
|---|---|
| .1.2.3.1 | number1_3 |
| .1.2.3.2 | number2_3 |
| .1.2.4.1 | number1_4 |
| .1.2.4.2 | number2_4 |
Suppose we entered following in the SNMP OID field:
.1.2.3.comp_dn
- For device 1, Skylar One will collect the value of "1.2.3.1". That value is "number1_3".
- For device 2, Skylar One will collect the value of "1.2.3.2". That value is "number2_3".
Suppose we enter following in the SNMP OID field:
.1.2.4.comp_dn
- For device 1, Skylar One will collect the value of "1.2.4.1". That value is "number1_4".
- For device 2, Skylar One will collect the value of "1.2.4.2". That value is "number2_4".
Using Caching to Define a Collection Object
You can use SNMP objects to define a cache for use by one or more Dynamic Applications. For SNMP Dynamic Applications, caching is defined in the SNMP OID field in the Collection Objects page instead of for the entire Dynamic Application.
NOTE: The Caching field in the Dynamic Applications Properties Editor page does not affect caching for SNMP Dynamic Applications.
To define a cache for an SNMP collection object, you define the cache in the SNMP OID field in all Dynamic Applications that will use the cache, both those that will create the cache and those that will consume the cache. If the cache has timed out, the next request will re-populate the cache, making it available to all other Dynamic Applications. All Dynamic Applications can consume the cached value and refresh the cache.
To define a cache for an SNMP collection object, use the following syntax in the SNMP OID field:
em7snmp.collect ('collection_object_definition', enable_cache=true_or_false, time_to_expire=time_in_minutes, time_to_recollect=time_in_minutes)
where:
- collection_object_definition. The OID or extended OID for which you want Skylar One to cache a value or retrieve a cached value.
- enable_cache=true_or_false. To either create a cache or use a cached value, specify true.
- time_to_expire=time_in_minutes. Number of minutes that the collected value will remain in the cache. This value cannot be less than the value in the time_to_recollect argument..
- time_to_recollect=time_in_minutes. Frequency, in minutes, at which Skylar One will try to collect a value for the collection object. If collection succeeds, Skylar One will populate the collection object with the new value and store the new value in the cache. If collection fails, Skylar One will populate the collection object with the previously cached value.
For example:
em7snmp.collect('.1.3.6.1.2.1.25.2.3.1.3', enable_cache=True,time_to_expire=15, time_to_recollect=15)
- In this example, the collection object will be populated with the value of the OID '.1.3.6.1.2.1.25.2.3.1.3'.
- The collected value will be stored in the cache.
- The value will be re-collected every 15 minutes.
- If we use this collection object in another Dynamic Application, that collection object can both populate the cache and retrieve values from the cache.
Filtering Results to Define a Collection Object
In the SNMP OID field , you can use the function em7utils.filter to filter the results.
The em7utils.filter function also supports the following operators:
- eq (equals)
- gt (greater than)
- ge (greater than or equal to)
- lt (less than)
- le (less than or equal to)
Suppose the OID .1.3.6.1.2.1.1.9.1.4 is an SNMP table, and for device 1, the data looks like this:
| OID | OID Value |
|---|---|
| .1.3.6.1.2.1.1.9.1.4.1 | 1 |
| .1.3.6.1.2.1.1.9.1.4.2 | 3 |
| .1.3.6.1.2.1.1.9.1.4.3 | 9 |
| .1.3.6.1.2.1.1.9.1.4.4 | 2 |
| .1.3.6.1.2.1.1.9.1.4.5 | 4 |
| .1.3.6.1.2.1.1.9.1.4.6 | 8 |
| .1.3.6.1.2.1.1.9.1.4.7 | 6 |
| .1.3.6.1.2.1.1.9.1.4.8 | 10 |
| .1.3.6.1.2.1.1.9.1.4.9 | 100 |
| .1.3.6.1.2.1.1.9.1.4.10 | 1000 |
We could enter the following in the SNMP OID field :
em7utils.filter(em7snmp.collect(".1.3.6.1.2.1.1.9.1.4"), gt (10))
For device 1, the collection object would contain the array:
.9, 100
.10, 1000
For another example, suppose you want to collect information about interfaces, but you don't want any information about loopback interfaces. Loopback interfaces use the interface type "24". You could enter the following in the SNMP OID field:
em7utils.filter(em7snmp.collect(".1.3.6.1.2.1.2.2.1.3", lambda x:x!="24"))
The OID .1.3.6.1.2.1.2.2.1.3 maps to the interfacetype object in the interface table in the IF-MIB. The "lambda x " syntax creates a sub-function called "x". The logic then says "collect values where 'x' is not equal to '24'". Those values will be stored in the collection object. Skylar One retrieves all the interface types that do not have a value of "24".
For details on the lambda syntax, consult the Python documentation https://docs.python.org/2/tutorial/controlflow.html?highlight=lambda#lambda-expressions
Defining "Fallback" Values for a Collection Object
In the SNMP OID field, you can use syntax that tells Skylar One:
- If the first OID is available, use the first OID
- If the first OID is not available, use the second OID
- If the second OID is not available, use the third OID
- and so on
To include multiple OIDs in the SNMP OID field, use this syntax:
em7snmp.collect (".1.3.6.1.2.1.1.1") or em7snmp.collect (".1.3.6.1.2.1.1.2") or em7snmp.collect (".1.3.6.1.2.1.1.3")
To include multiple collection objects in the SNMP OID field:
o_1234 or o_1234 or o_1236
To include a mixture of OIDs and collection objects in the SNMP OID field:
o_1234 or em7snmp.collect ('.1.3.6.1.2.1.1.2')
Using Index Values and Parsed Index Values to Define a Collection Object
If you are creating a collection object of type "Index", in the SMNP OID field, you can collect an entire index or parse an index.
- To collect an entire index, use the syntax:
em7snmp.full_index (object_name)
For example:
em7snmp.full_index (o_1234)
This example returns the full index for the collection object o_1234 and stores the index in a new collection object.
- To parse a multi-part index, you can enter the following in the SNMP OID field:
em7snmp.parse_index (collection_object,[index_format], index_element_number)
where:
- collection_object is the collection object for which you want to retrieve an index
- index_format describes the data type and order of the elements in the index. The index_format is surrounded by square brackets and each element is separated by a comma. The basic index types used in SNMP are described in detail in RFC 2578 Section 7.7, (https://tools.ietf.org/html/rfc2578#section-7). You can include the following elements:
INDEX_TYPE_INTEGER
INDEX_TYPE_IP
INDEX_TYPE_STRING
INDEX_TYPE_IMPLIEDSTRING
INDEX_TYPE_OID
INDEX_TYPE_IMPLIEDOID
- index_element_number is the position of the index_element that you want to collect. The first element in a multi-part index has the index_element_number of "0" (zero).
For example, suppose we have a collection object "o_224". Suppose the index for the OID in o_224 includes the following elements:
ipCidrRouteDest, ipCidrRouteMask, ipCidrRouteTos, ipCidrRouteNextHop
Here is the information about the example index:
| OID Name | Data Type | Element Position in the Index |
|---|---|---|
| ipCidrRouteDest | INDEX_TYPE_IP | 0 |
| ipCidrRouteMask | INDEX_TYPE_IP | 1 |
| ipCidrRouteTos | INDEX_TYPE_INTEGER | 2 |
| ipCidrRouteNextHop | INDEX_TYPE_IP | 3 |
To retrieve this index and assign only the value of ipCidrRouteNextHop to the new index collection object , we would enter the following in the SNMP OID field :
em7snmp.parse_index (o_224, [INDEX_TYPE_IP, INDEX_TYPE_IP, INDEX_TYPE_INTEGER, INDEX_TYPE_IP], 3)
Viewing MIBs and Using the SNMP Walker Tool
Before you create SNMP Dynamic Applications, you need to identify the OIDs (Object Identifiers) that contain the data you want to collect. OIDs are defined in MIBs (Management Information Bases), standardized files provided by device or application manufacturers.
Skylar One includes an extensive library of MIBs by default, but you can import additional ones as needed. To explore available OIDs and see real-world examples of the data they return, use the OID Browser or the SNMP Walker Tool. The SNMP Walker Tool lets you "walk" OIDs on an actual device to preview data before you build your Dynamic Application.
This section describes a management information base (MIB) and how to view, import, and compile MIBs. This section also describes the OID Browser and the SNMP Walker Tool.
The Management Information Base
A management information base (MIB) is a collection of definitions associated with a device or application. A MIB is stored in a file and uses a standardized format defined by the SNMP protocol.
A MIB file is usually associated with a hardware manufacturer or software manufacturer. Some manufacturers use a single MIB that contains information about all their products. Other manufacturers create a separate MIB for each product. A MIB file is generic—it is not associated with a specific installed instance of a device, but rather applies to all devices or applications of that make and model.
Each aspect of a device or application that can be managed or monitored is represented within the MIB as an object ID (OID). In Skylar One, we use these OIDs to define Collection Objects. For example, suppose we want to monitor the temperatures of a Force 10 switch/router. The MIB for the Force 10 switch/router includes an OID that contains the current temperature of the entire unit. To monitor the temperature of a Force 10 switch/router, we could use this OID in a Dynamic Application.
Before creating a Dynamic Application, you must ensure that Skylar One contains the appropriate MIB file.
Viewing MIBs
By default, Skylar One includes an extensive set of MIBs. Before creating a new Dynamic Application, you must make sure that Skylar One already includes the MIB file and that the MIB file includes the data points that you want to monitor with Skylar One. If Skylar One does not include the MIB file, you must import it.
To view the list of MIBs included with Skylar One:
- Go to the MIB Compiler page (System > Tools > MIB Compiler).
- For each MIB file, the MIB Compiler page displays the following:
- MIB Name. Name of the MIB file.
- Vendor. For MIBs that use SMIv2, displays the vendor associated with the MIB.
- MIB Revision Date. Date the original author last revised and released the MIB.
- Language. Either SMIv1 or SMIv2.
- Compiled. Specifies whether or not the MIB has been compiled in Skylar One.
- Type Defs. Number of data types within the MIB.
- Nodes. Number of objects that can be monitored with this MIB
- Traps. Number of traps that can be monitored with this MIB.
- Logs. Number of error messages in the log file after compiling the MIB.
- Last Edit. Date and time the MIB was created or last edited.
- User Edit. User who imported or last edited the MIB.
You can sort the list by a column's values by clicking on its column heading. You can also filter the items on the page by typing or selecting filter options in one or more of the filters found above the columns. For more information, see the topic on Filtering Inventory Pages.
Viewing the Contents of a MIB file
From the MIB Compiler page, you can view the contents of a MIB file. To do this:
- Go to the MIB Compiler page (System > Tools > MIB Compiler).
- In the MIB Compiler page, find the MIB you want to view. Select its information icon (
 ).
). - The MIB Viewer modal page appears and displays the contents of the MIB file. You can view but cannot edit the MIB file from this modal page.
Importing a MIB
By default, Skylar One includes a large number of commonly-used MIB files. However, you can import additional MIB files into Skylar One. If you need to monitor a device or application for which Skylar One does not include a MIB file, you can import and compile the appropriate MIB file. You might also want to update an existing MIB file with a later version.
To import a MIB file into Skylar One:
- Go to the MIB Compiler page (System > Tools > MIB Compiler).
- Click the button.
- In the MIB Import modal page, click .
- Navigate to the location of the MIB file on your local computer. Click the button.
- The new MIB file appears in the list of MIB files in the MIB Compiler page.
- You must compile the MIB file before Skylar One can use it. To compile a MIB, click its lightning bolt icon (
 ).
). - When the MIB is done compiling, you will need to synchronize the new MIB data to all of your collectors. To sync the MIB data, go to the OID Browser page (System > Tools > OID Browser) and click the button. The status of the update displays at the top left of the page.
You can select and import multiple MIB files simultaneously by holding Ctrl (Cmd on Mac) and clicking each MIB file you want to import.
Failure to complete the update step can lead to a "no name found" error for a trap OID.
You should also run the update step when a new collector is brought online after additional MIBs have already been added to the stack. Clicking on the OID Browser page ensures that the new collector receives the latest compiled MIBs. This update might take some time. For more information, see Synchronizing the Latest Compiled MIBs to Collectors.
Compiling a MIB
Before Skylar One can use a MIB file to monitor data points on a device or an application, you must ensure that the MIB file has been compiled. When you compile the MIB file, the MIB Compiler processes and validates the object definitions using the pysmi ScienceLogic Library. This significantly improves reliability of symbolic name resolution, particularly for SNMP trap-based event policies, and addresses historical issues with lost MIBs and missing or inaccessible object definitions.
To compile a MIB:
- Go to the MIB Compiler page (System > Tools > MIB Compiler).
- In the MIB Compiler page, find the MIB you want to compile. Select its lightning bolt icon ().
- To determine if a MIB compiled successfully, you can view the Compile column for that MIB.
- If a MIB does not compile successfully, you can view information about the compile operation. To do this, find the MIB file in the list of MIBs and select its page icon (
 ).
). - If a MIB compiles successfully, but shows a value other than "0" (zero) in the Messages column, you can view information about the compile operation. To do this, find the MIB file in the list of MIBs and select its page icon (). In some cases, a MIB might compile successfully but might also include incorrectly defined data-points (called "objects" or "OIDs"). These data-points might not be included in the compiled MIB.
You The MIB recompile request now uses the HTTP POST method instead of GET. This prevents browser refresh actions from inadvertently triggering multiple redundant MIB recompilations. You can safely refresh your browser during or after the compilation process without triggering duplicate compilation jobs.
IMPORTANT: If a MIB does not compile, please view the compile-log for the MIB. MIBs that use incorrect format or syntax may fail to compile. Contact the MIB's vendor for corrections or updates. ScienceLogic is not responsible for other vendor's MIB files.
Viewing Error Logs for a MIB
After compiling a MIB file, you can view the error log for the MIB to check on the status of the compile operation. To do this:
- Go to the MIB Compiler page (System > Tools > MIB Compiler).
- In the MIB Compiler page, find the MIB you want to view information about. Select its page icon ().
- The MIB Compiler Log Messages modal page displays error messages generated when a MIB is compiled and the effect of that error.
- The format of each message is:
MIB file name:line number:error message
where:
- MIB file name. Is the name of the MIB file.
- line number. Is the line on which the error occurred.
- error message. Is a description of the error.
- Some common error messages are:
- access 'write-only' is no longer allowed in SMIv2. SMIv2 changed the MAX-ACCESS write-only to read-write.
- ACCESS is SMIv1 style, use MAX-ACCESS in SMIv2 MIBs instead. A MIB that is considered SMIv2 compliant has the label MAX-ACCESS instead of ACCESS. Either remove the SMIv2 specification from the import or rename all of the ACCESS identifiers to MAX-ACCESS.
- default value does not match underlying enumeration type. The default value for an enumeration does not match the values declared in the enumeration. The values must match.
- description missing in object definition. All objects in an SMIv2 MIB have descriptions associated with them. This can be a blank string ("") or have text describing the object.
- identifier 'identifier ' cannot be imported from module 'module name'. This means either the type definition was not found in module name. The type definition probably exists in another module.
- 'identifier' should start with a lower case letter. The identifier in a MIB element should start with a lower case alpha character. A type definition starts with an upper case alpha character.
- index element 'index identifier' of row 'identifier' must have a size restriction. All tables declared in a MIB have an index element. An index element should have a size restriction on the index element to make it a compliant MIB. To correct an integer index, add (mix.max) after the type definition to correct this issue.
- invalid status 'mandatory' in SMIv2 MIB. A MIB that is considered SMIv2 compliant has a STATUS of current, depreciated, or obsolete. Mandatory is an older SMIv1 standard that was changed with SMIv2.
- last subidentifier assigned to 'identifier' may not be zero. All SMIv2 MIBs must not have an identifier of zero in the MIB. The values have to be between 1 and 65536.
- length of hexadecimal string 'string' is not a multiple of 2. Hexadecimal strings (also called octet strings) need to have 2 elements in the default value. For example, a declaration of '0f' (zero - f) is correct as it is 2 bytes. A declaration of 'f' is not correct as it is only 1 byte.
- lexically unexpected character, skipping to end of line. There is an unknown character in the MIB file at the given line. Removing the character should allow the parser to continue parsing the file. Check for a back tick (`) and other strange characters and remove them from that line.
- macro 'macro type' has not been imported from module 'module name'. A macro was called in the MIB however the macro type was not imported at the top of the MIB. To correct this, add the import statement at the top of the MIB.
- parse error, unexpected '{', expecting UPPERCASE_IDENTIFIER or LOWERCASE_IDENTIFIER or NUMBER. The object did not parse correctly. There could be a spelling error for a MIB type or an extra comma or a single dash in the declaration. Check the MIBs syntax for any issues.
- parse error, unexpected COLON_COLON_EQUAL. There is typically a parser error above this error. If you correct the parser error, the parser will find the ::= in the MIB and correctly build this identifier.
- parse error, unexpected DESCRIPTION. There was a parser error above this line. Correct the parse error and this error will be corrected.
- parse error, unexpected MODULE_COMPLIANCE, expecting OBJECT. The MODULE_COMPLIANCE macro was not imported from SNMPv2-CONF. All macros need to be imported into the MIB for the parser to correctly build the MIB tree.
- parse error, unexpected MODULE_IDENTITY, expecting OBJECT. The MODULE-IDENTITY macro was not imported from SNMPv2-SMI. All macros need to be imported into the MIB for the parser to correctly build the MIB tree.
- parse error, unexpected VARIABLES. There was a parser error above this line. Correct the parser error and this error will be corrected.
- redefinition of identifier 'identifier'. An identifier was declared again in the MIB. Check the first declaration is correct or if the re-declaration is correct. Remove the one that is not correct.
- row's parent node must be a table node. A row in a table must have a table identifier to link together. These typically show up as a parse error above this error.
- scalar's parent node must be simple node. A scalar must have a container (OBJECT IDENTIFIER) as a parent node. A scalar cannot be part of a table, row, or another scalar.
- SMIv2 base type 'type definition' must be imported from SNMPv2-SMI. The MIB is missing an import statement for the type definition.
- subtyping not allowed. A table or scalar cannot have rows or objects typed in the scalar or table definition. They should be typed as the row declaration or as the object definition.
- table's SEQUENCE OF type does not match row type. The table was either declared out of order from the row declaration or the rows have a mistyped sequence.
- TRAP-TYPE macro is not allowed in SMIv2. Traps are to be declared in separate SMIv1 MIBs. You cannot add traps to an SMIv2 MIB.
- type of 'identifier ' in sequence and object type definition do not match. This means the sequence of an object and the object definition are not the same type definition. This is more than likely a syntax error.
- unknown object identifier label 'identifier'. The object identifier was not declared in the MIB file or it was not imported into the MIB. These typically show up as a parser error because that identifier was not parsed correctly.
- unknown object identifier label 'label name'. This means an OID was cast as a new identifier and the MIB compiler was unable to find that identifier definition. These are called type definitions in the SMIv2 specification.
- unknown type 'type definition'. The type definition was not declared in the MIB or it was not imported from another MIB definition. To correct this, add an import statement at the top of the MIB.
Rebuilding the SNMP Tree
If you have added new MIB files to Skylar One, you should rebuild the SNMP tree. When you rebuild, Skylar One searches for any newly added MIB files, compiles all the new MIB files, and rebuilds the SNMP tree to include the new files.
To rebuild the SNMP tree:
- Go to the MIB Compiler page (System > Tools > MIB Compiler).
- In the MIB Compiler page, select the button.
Exporting a MIB
If you want to examine or edit a MIB file or if you want to install a MIB file on another computer, you can export the MIB file from Skylar One. To do this:
- Go to the MIB Compiler page (System > Tools > MIB Compiler).
- In the MIB Compiler page, find the MIB you want to export. Select its save icon (
 ).
). - You will be prompted to save the MIB file to a location on your local computer.
Compiling Multiple MIB Files or Deleting Multiple MIB Files
The MIB Compiler page contains a drop-down field in the lower right called Select Action. This field allows you to apply an action to multiple MIB files at once.
To apply an action to multiple MIB files:
- In the MIB Compiler page, select the checkbox for each MIB file you want to apply the action to. To select all checkboxes for all MIB files, select the select the checkbox at the top of the page.
- In the Select Action drop-down list, select one of the following actions:
- Delete MIB and Objects. MIB and OIDs are removed from the ScienceLogic MIB library. Existing Dynamic Applications that use this MIB and OIDs are unaffected. However, users cannot create new Dynamic Applications based on this MIB.
- Compile MIB. Compiles the selected MIBs
- Select the button to apply the selected action to the selected MIB files.
The OID Browser
The OID Browser page (System > Tools > OID Browser) displays a list of all objects in all of the MIBs that have been compiled in Skylar One. The objects are arranged in the standard SNMP tree structure. The OID Browser page allows you to search a list of OIDs, "drill down" and view information under an OID, and add an OID to a Dynamic Application.
Drilling Down in OIDs
You can drill down the tree and view the information under an OID in the OID Browser page (System > Tools > OID Browser). To do so:
- Go to the OID Browser page (System > Tools > OID Browser).
- In the OID Browser page, find the OID that you want to drill down. Click on its value in the Object Name column.
- The OID Browser page is refreshed and displays only the selected OID and all the OIDs in the next level of the OID.
- You can continue clicking on values in the Object Name column to continue drilling down. When a checkbox appears for an OID, you cannot drill down any further.
NOTE: You can also find the OID that you want to drill down and select its Show OID Tree icon ( ). The OID Browser page is refreshed and displays only the selected OID and the OIDs in the next three levels of the OID's tree.
Searching the List of OIDs
You can search the list of OIDs in all MIBs that have been compiled in Skylar One in the OID Browser page (System > Tools > OID Browser). To search the list of OIDs in Skylar One:
- Go to the OID Browser page (System > Tools > OID Browser).
- The search fields at the top of the OID Browser page allow you to search for OIDs by one of the following parameters:
- Search where. Specifies the parameter you want to search by. You can select from the following:
- Where OID is like. Searches all OID definitions for those that have the same object identifier as that entered in the regular expression field.
- Where Symbolic is like. Searches all OID definitions for those that have the same symbolic name as that entered in the regular expression field.
- Where Name is like. Searches all OID definitions for those that have the same object name as that entered in the regular expression field.
- Where MIB Name is like. Searches all OID definitions for those that have the same MIB name as that entered in the regular expression field.
- regular expression. In this field you manually enter the text to search for. You can use the following special characters in this field:
- * Match zero or more characters preceding the asterisk. For example:
"dell*" would match "dell", "dell2650", "dell7250" and "dell1700N".
"*dell*" would match "mydell", "dell", "dell2650", "dell7250" and "dell1700N".
- % Match zero or more characters preceding the asterisk. This special character behaves in the same way as the asterisk.
- When you select the button, the OID Browser page will be refreshed and will display only the OIDs that match the search parameters.
Adding an OID to a Dynamic Application from the OID Browser
When you add an object to a Dynamic Application, Skylar One collects values for the object from each device and application that is monitored with the Dynamic Application.
You can view OIDs in the OID Browser page and then add them to a Dynamic Application.
To do this:
- Go to theOID Browser page (System > Tools > OID Browser).
- In the OID Browser page, drill down to an object you want to add to a Dynamic Application.
- Select the checkbox for the object you want to include in a Dynamic Application.
- Repeat steps 2 and 3 for each OID you want to include in a Dynamic Application.
- From the Select Action drop-down, choose the Dynamic Application to which you want to add the selected OIDs. You can also choose to add the selected OIDs to a new SNMP Configuration or SNMP Performance Dynamic Application.
- Select the button to add the OID to the Dynamic Application.
Synchronizing the Latest Compiled MIBs to Collectors
You will need to use the button on the OID Browser page when you bring a new collector online after additional MIBs have already been added to the stack. The event engine process requires that this information is on the collectors when generating event details for SNMP traps.
To sync the latest compiled MIBs to a new collector:
- Go to the OID Browser page (System > Tools > OID Browser).
- Click the button. The status of the update displays at the top left of the page. This process might take some time to complete.
The SNMP Walker Tool
The SNMP Walker page allows you to "walk" one or more SNMP OIDs on a single device, so you can see a "real life" example of the type of information stored in one or more OIDs. From the SNMP Walker page, Skylar One will poll the device and retrieve and display a value for each selected OID. TheSNMP Walker page allows you to examine OIDs and also to add OIDs to new or existing Dynamic Applications.
To perform an SNMP walk:
- Go to the Device Manager page (Devices > Classic Devices, or Registry > Devices > Device Manager in the classic user interface).
- In the Device Manager page, select the wrench icon () for a device on which you want to perform an SNMP walk.
- In the Device Properties page, select the tab. To perform an SNMP walk, select the SNMP Walker icon in the Device Toolbox pane.
- To execute an SNMP walk provide values in the following fields:
- Select OID. Users can select from the drop-down list or manually enter an OID. The SNMP values for all sub-OIDs under the selected OID will be displayed in the results pane.
- To enter an OID manually, select the plus sign icon. Then enter the OID in the SNMP OID field.
- To select from the drop-down list of OIDs, highlight a MIB entry or OID entry. Choices are grouped by Common OIDs, Standard RFCs, and existing Dynamic Applications.
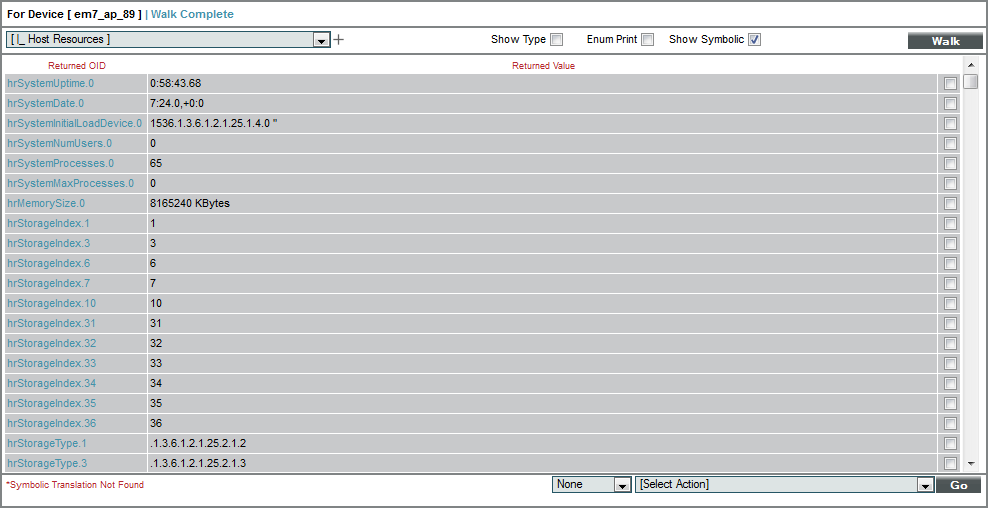
- Show Type. Displays the data-type (Integer, Counter, IP Address, etc.) at the start of the returned value field.
- ENum Print. Displays the list of possible values for each OID of type ENum.
- Show Symbolic. If selected, for OIDs for which Skylar One contains the MIB file, displays the text-based, descriptive name, rather than the numeric ID.
- The results pane displays the following:
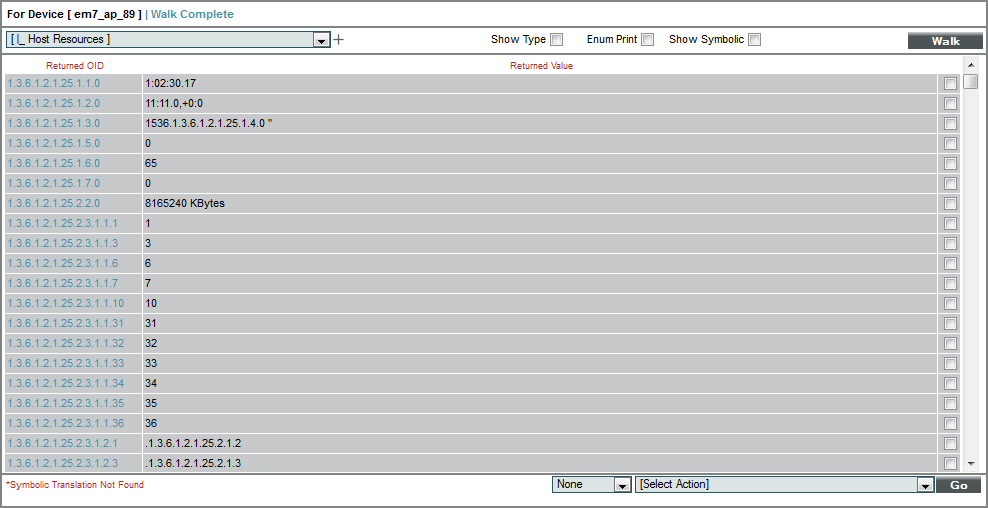
- Returned OID. Either numeric ID or symbolic (text-based) ID for each retrieved OID.
- Returned Value. Value for each OID, retrieved from the device.
- Checkbox. If the MIB is already included with Skylar One, a checkbox appears in the rows for one or more OIDs. Selecting the checkbox allows you to apply the actions from the Select Actions field to the OID
If you walked the Host Resource MIB on a device with the Show Symbolic checkbox selected, the SNMP Walker tool might return the following information:
If you walked the Host Resource MIB on a device with the Show Symbolic checkbox unselected, the SNMP Walker tool might return the following information:
Adding an OID to a Dynamic Application
From the SNMP Walker page, you can view data from an OID and determine if you want to add the OID to a Dynamic Application. To add an OID to a Dynamic Application (either new or existing):
- Execute an SNMP Walk (described in the steps above).
- In the Results pane, select the checkbox for each OID you want to add to a Dynamic Application.
- In the Select Actions field, select the Dynamic Application to which you want to add the selected OID(s).
- Select the button.
- The Collection Objects page for the new or existing Dynamic Application appears, where you can use the OID to define a collection object, edit the parameters for the collection object, and save the collection object in the Dynamic Application.
You can also add an OID to a Dynamic Application from the OID Browser page. To learn more, see the section Adding an OID to a Dynamic Application from the OID Browser.
Creating an SNMP Performance Dynamic Application
In this section we will create an SNMP Dynamic Application. Our Dynamic Application will:
- Collect information about file systems from the Host Resources MIB.
- Include collection objects that get size and usage values.
- Include a presentation object that displays percentage used.
- Include a collection object to of type "label", to label the graph.
- Include a discovery object.
Defining the Dynamic Application Properties
To create the Dynamic Application and define the general properties for this Dynamic Application, perform the following steps:
- Go to the Dynamic Applications Manager page (System > Manage > Applications).
- Select the button, and then select Create New Dynamic Application. The Dynamic Applications Create New Application page appears.
- Supply values in the following fields:
- Application Name. Enter "SNMP Performance Dynamic Application" in this field.
- Application Type. Select SNMP Performance.
- Poll Frequency. Select Every 1 Minute to see data as quickly as possible.
- For this example, you can leave the remaining fields set to their default value. Select the button to save the Dynamic Application.
Adding the Discovery Object
This Dynamic Application includes one discovery object. A discovery object helps Skylar One to align the Dynamic Application to devices that use the Host Resources MIB.
A discovery object is a variable that is unique to a specific hardware component or software application. Ideally, a discovery object is a variable that is always available if SNMP is running on a device, regardless of the processes running on the device or the state of the device. For example, an OID that contains a serial number of a hardware version number would make a good discovery object.
During initial discovery and nightly auto-discovery, Skylar One checks each discovered device against the list of already-defined Dynamic Applications. Skylar One searches each discovered device to find "discovery objects" and aligns devices with the appropriate Dynamic Application(s).
For example:
- Suppose your network includes servers from Dell.
- Suppose your Skylar One system includes a Dynamic Application for Dell servers.
- Suppose the Dynamic Application for Dell servers uses the SNMP variable for chassis ID to create a discovery object. This chassis-ID variable is defined by Dell and published in their MIB files. Following SNMP standards, the variable will have a unique, numeric name, used only for Dell servers.
- Because a chassis is included with each Dell server and because the chassis is not affected by software processes or the operating system, the chassis-ID variable will always be available if SNMP is running on a Dell server.
- During initial discovery and nightly auto-discovery, if Skylar One can retrieve a value for the unique chassis-ID variable, Skylar One concludes that the device is a Dell server. Skylar One will then assign the Dynamic Application for Dell servers to the device. Skylar One will later use the Dynamic Application for Dell servers to retrieve information from the device.
- During initial discovery and nightly auto-discovery, if Skylar One cannot retrieve a value for the chassis-ID variable, Skylar One concludes that the device is not a Dell server. Skylar One will not assign the Dynamic Application for Dell servers to the device.
For more details on discovery,
To create the discovery object to the Dynamic Application:
- Go to the Dynamic Applications Manager page (System > Manage > Applications).
- Select the wrench icon () for the SNMP Performance Dynamic Application. The Dynamic Applications Properties Editor page appears.
- Select the tab. The Dynamic Applications | Collections Objects page appears.
- Supply values in the following fields:
- Object Name. Enter "Discovery Object" in this field.
- SNMP OID. Enter ".1.3.6.1.2.1.25.2.3.1.3" in this field. This is the OID for Storage Description, as specified in the Host Resources MIB. We chose this OID to use for the discovery object because a device that uses the Host Resources MIB to report file system information will always include this OID
- Class Type. Select 100.Discovery. Skylar One will gather values from all objects in the Dynamic Application.
- Select the [Save] button, and the new object will be added and new fields will appear. Supply values in the following fields:
- Alignment Condition. Select Align if OID is present. Skylar One will align the Dynamic Application with a device only if the discovery object returns a value.
- Validity Check. We did not specify a value in this field.
- Select the button to save the discovery object.
Adding the Collection Objects
Our example Dynamic Application contains three collection objects:
- Storage size
- Storage used
- Storage description
To create these collection objects, perform the following steps:
- Go to the Dynamic Applications Manager page (System > Manage > Applications).
- Select the wrench icon () for the SNMP Performance Dynamic Application. The Dynamic Applications Properties Editor page appears.
- Select the tab. The Dynamic Applications | Collections Objects page appears.
- To create the collection object for storage size, supply values in the following fields:
- Object Name. Enter "Storage Size" in this field.
- SNMP OID. Enter ".1.3.6.1.2.1.25.2.3.1.5". This is the OID for storage size, as specified in the Host Resources MIB.
- Class Type. Storage size is a number that can go up or down between polls. Select 4 Performance Gauge in this field.
- Group Number. Select Group 1. For performance Dynamic Applications, Skylar One uses the Group Number setting to associate performance values with the appropriate labels. For the performance graph for this example to display labels correctly, all the collection objects must be in the same group.
- For this example, you can leave the remaining fields set to their default values.
- Select the button.
- Select the button to clear the form fields.
- To create the collection object for storage used, supply values in the following fields:
- Object Name. Enter "Storage Used" in this field.
- SNMP OID. Enter ".1.3.6.1.2.1.25.2.3.1.6". This is the OID for storage description , as specified in the Host Resources MIB.
- Class Type. Storage size is a number that can go up or down between polls. Select 4 Performance Gauge in this field.
- Group Number. Select Group 1. For performance Dynamic Applications, Skylar One uses the Group Number setting to associate performance values with the appropriate labels. For the performance graph for this example to display labels correctly, all the collection objects must be in the same group.
- For this example, you can leave the remaining fields set to their default values.
- Select the button.
- Select the button to clear the form fields.
- To create the collection object for the storage description label, supply values in the following fields:
- Object Name. Enter "Storage Description" in this field.
- SNMP OID. Enter ".1.3.6.1.2.1.25.2.3.1.3". This is the storage description OID specified in the Host Resources MIB.
- Class Type. Select Label (Always Polled) in this field. In performance Dynamic Applications, collection objects that use this class type are string values that Skylar One uses to label the lines on a performance graph.
- Group Number. Select Group 1. For performance Dynamic Applications, Skylar One uses the Group Number setting to associate performance values with the appropriate labels. For the performance graph for this example to display labels correctly, all the collection objects must be in the same group.
- For this example, you can leave the remaining fields set to their default values.
- Select the button.
Creating the Presentation Object
When you create a collection object in a Dynamic Application of type Performance, Skylar One automatically creates a presentation object that corresponds to that collection object. In this example, we will remove these presentation objects and create a new presentation object that displays file system usage in percent.
To create the presentation object:
- Go to the Dynamic Applications Manager page (System > Manage > Applications).
- Select the wrench icon () for the SNMP Performance Dynamic Application. The Dynamic Applications Properties Editor page appears.
- Select the tab. The Dynamic Applications Presentation Objects page appears.
- In the Dynamic Applications Presentation Objects page, the Storage Size and Storage Used collection objects have been created by default. Select each presentation object's delete icon (
 ) to delete them.
 - Select the button. To create a new presentation object that displays storage used, in percent, enter values in the following fields:
- Report Name. Enter "Percentage Used" in this field.
- Active State. Select Enabled. Skylar One will generate a report of the presentation object.
- Data Unit. Enter "Percent" into this field.
- Abbreviation/Suffix. Enter "%" into this field.
- Show as Percent. Select Yes. The graph will display percent values.
- Formula Editor. We want our graph to display Percentage Used, so we will use the following formula:
Storage Used/Storage Size * 100
We can enter this formula manually, or by selecting the Object IDs in the Formula Editor and selecting the button. Using the Object IDs provided by Skylar One, enter the following into the Formula Editor:
(o_9223)/(o_9222)*100
NOTE: The object IDs in your Dynamic Application will be unique to your system. In the provided formula, you must replace "o_5511" and "o_5513" with the object IDs for the Storage Used and Storage Size collection objects in your system.
- In this example, you can leave the remaining fields at their default value.
- Select the button to save the presentation object.
Manually Aligning the Dynamic Application to a Device
In this example we will align the Dynamic Application to a device that supports the Host Resource MIB. By manually aligning the Dynamic Application to a device, we can immediately view the Percentage Used data in the presentation object we defined.
To manually align the Dynamic Application to a device:
- Go to the Device Manager page (Devices > Classic Devices, or Registry > Devices > Device Manager in the classic user interface).
- In the Device Manager page, find the device you want to align the Dynamic Application to. In this example, we are aligning the Dynamic Application to a server. Select the device's wrench icon ().
- The Device Properties page appears. Select the tab.
- In the Dynamic Application Collections page, select the button and select Add Dynamic Application.
- The Dynamic Application Alignment page appears. Select SNMP Performance Dynamic Application to align this Dynamic Application with the server in the left pane. In the right pane, select Default SNMP Credential.
- Select the button to add the Dynamic Application to the device.
Viewing the Report
After the Dynamic Application has collected data from the aligned server, you can view the performance report for that device. To view the performance report for a device with the SNMP Performance Dynamic Application aligned to it:
- Go to the Device Manager page (Devices > Classic Devices, or Registry > Devices > Device Manager in the classic user interface).
- In the Device Manager page, find the device you want to align the Dynamic Application to. In this example, we are aligning the Dynamic Application to a server. Select the device's wrench icon ().
- The Device Properties page appears. Select the tab.
- From the Dynamic Application Collections page, select the button to update the page with the latest information.
- Locate the SNMP Performance Dynamic Application. If the graph icon (
 ) is colored, the performance report is available. Select the graph icon for the Percentage Used presentation object.
Or:
- Go to the Device Manager page (Devices > Classic Devices, or Registry > Devices > Device Manager in the classic user interface).
- In the Device Manager page, find the device you aligned the SNMP Performance Dynamic Application to. Select the device's graph icon ().
- The Device Summary page appears. Select the tab.
- In the left NavBar, select SNMP Performance Dynamic Application, then select Percentage Used.
- The SNMP Performance Dynamic Application | Percentage Used report is displayed.
- The report returns collection objects as a percentage value. You can mouseover different data point on the report, and the report will display the percentage values for the given time
- The percentage is displayed to the left of the report. The values for each label object are displayed in the graph key at the bottom of the report.
- To learn more above device performance reports,