This
Follow the procedures in this chapter only after you have configured the settings in CSM from the previous chapters.
Configuring the Cherwell Integration PowerPack
The "Cherwell Integration" PowerPack includes:
-
A Sample SL1 credential, "SL1 IS4 API Creds"
"IS4" is a now-deprecated name for SL1 PowerFlow.
- The "Cherwell Event IS4 Integration" run book action policy, which you can use to automate adding, updating, and clearing SL1 events
- The following run book automation policies to automate adding, updating, and clearing events:
- Cherwell Create Event IS4
- Cherwell Update Ticket on Acknowledge
- Cherwell Clear Event IS4
After you have configured CSM to work with the SyncPack, you will need to install and configure the "Cherwell Integration" PowerPack in SL1.
Downloading and Installing the PowerPack in SL1
To download and install the PowerPack:
- Download the PowerPack from the ScienceLogic Support Site.
- In SL1, go to the PowerPack Manager page (System > Manage > PowerPacks).
- In the PowerPack Manager page, click the button, then select Import PowerPack. The Import PowerPack dialog box appears.
- Click the [Browse] button and navigate to the PowerPack file.
- When the PowerPack Installer modal appears, click the button to install the PowerPack.
If you exit the PowerPack Installer modal without installing the imported PowerPack, the imported PowerPack will not appear in the PowerPack Manager page. However, the imported PowerPack will appear in the Imported PowerPacks modal. This page appears when you click the menu and select Install PowerPack.
Creating a SOAP/XML Credential for Cherwell Integration
You will need to create a credential in SL1 that allows SL1 to communicate with CSM. The "Cherwell Integration" PowerPack includes the SL1 IS4 API Creds credential, which you can use as a template to create this credential.
To create the SL1 credential:
- Go to the Credential Management page (System > Manage > Credentials).
-
Click the wrench icon (
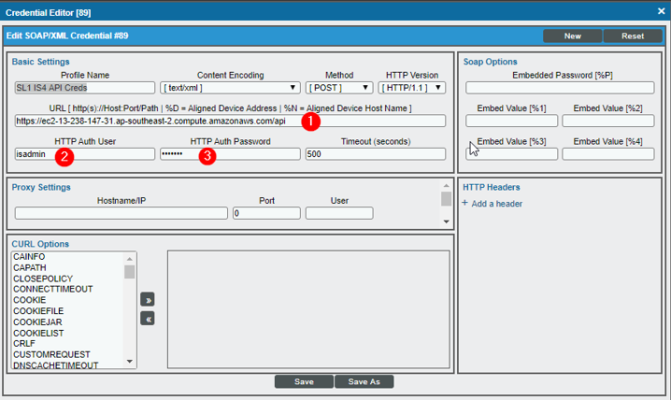
 ) for the SL1 IS4 API Creds credential. The Credential Editor modal window appears:
- Supply values in the following fields, and the leave the remaining fields at their default settings:
- URL. Type the URL for the PowerFlow API, which is the same URL that you used to create the PowerFlow Credential in the Federation Registration record. You will need to add "/api" to the end of this URL.
- HTTP Auth User. Type the PowerFlow username that will authenticate to the PowerFlow API. This is the same username that you created and configured in the Federation Registration credential.
- HTTP Auth Password. Type the PowerFlow password for the PowerFlow user that will authenticate to the PowerFlow API. This is the same username that you created and configured in the Federation Registration credential.
- Click the button and type a new name for this credential.
- When the confirmation message appears, click .
Enabling the Run Book Automation Policies
Before you can run the "Cherwell Event IS4 Integration" run book action, you must enable the three related run book automation policies in SL1:
- Cherwell Create Event IS4
- Cherwell Update Ticket on Acknowledged IS4
- Cherwell Clear Event IS4
"IS4" is a now-deprecated name for SL1 PowerFlow.
To enable the three Cherwell Run Book Automation policies:
- In SL1, go to the Automation Policy Manager page (Registry > Run Book > Automation).
-
Locate the "Cherwell Create Event IS4" automation policy and click its wrench icon (
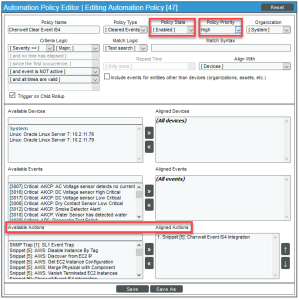
 ). The Automation Policy Editor page appears:
- Update the following fields:
- Policy State. Select Enabled.
- Policy Priority. Select High to ensure that this automation policy is added to the top of the queue.
- Available Actions. If it is not already selected, select the corresponding Cherwell Run Book Action policy.
By default, the "Cherwell Create Event IS4" automation policy will create Cherwell incidents for all devices. You can limit the devices affected by making changes to the Organization, Severity, Match Logic, Aligned Devices, and/or Aligned Events fields.
ScienceLogic highly recommends that you do not make changes to the Policy Type, Repeat Time, or Align With fields or the And event is NOT acknowledged setting.
- Click .
- Repeat steps 2-4 for the "Cherwell Update Ticket on Acknowledge" and "Cherwell Clear Event IS4" run book automation policies.
Enabling and Customizing the Run Book Action Policy
To enable the run book action:
- In SL1, go to the Action Policy Manager page (Registry > Run Book > Actions).
-
Locate the Cherwell Event IS4 Integration policy and click its wrench icon (
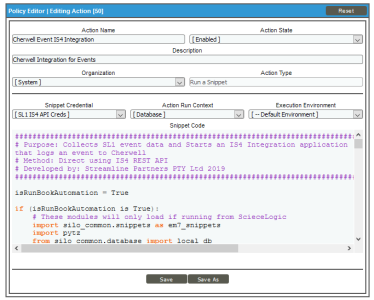
 ). The Action Policy Editor page appears:
- For the Action State filed select Enabled.
- Click . SL1 events are now synced with CSM incidents.
Aligning a Configuration Object with PowerFlow Applications
The "Cherwell" SyncPack includes the "Cherwell Integration Settings" (cherwell_config) configuration object, which you can access in the PowerFlow user interface.
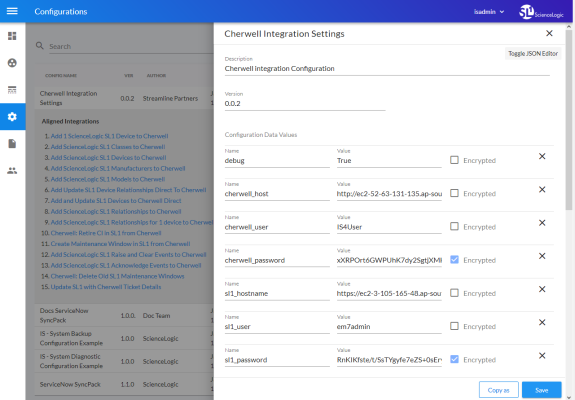
This configuration file contains default name-value pairs for the CSM and SL1 hosts, the CSM and SL1 users and passwords, the PowerFlow host, user, and password, and other keys and values. You can use this configuration file as a template for the configuration objects you need to create and align with the relevant Cherwell applications.
To view the contents of the "Cherwell Integration Settings" (cherwell_config) configuration object, go to the Configurations page of the PowerFlow user interface and click the button () next to the "Cherwell Integration Settings" configuration. The Configuration pane appears:
Adding and Editing Credentials in a Configuration Object
From the Configurations page of the PowerFlow user interface, you can edit an existing configuration object or create a new configuration object.
For example, you can edit the variables in the "Cherwell Integration Settings" configuration object that came with the SyncPack and then align that configuration object with one or more CSM-related applications. You can also use the button to make a copy of that configuration object so you can align it with other applications.
The following configuration object variables are required for the "Cherwell" SyncPack:
- cherwell_host. Type the URL you use to access the Cherwell host. This is the same URL that you used in Creating the Cherwell API Credential.
- cherwell_user. Type the CSM Login ID that will be used to authenticate to the CSM API. This is the same username that you created in Creating a New User.
- cherwell_password. Type the CSM password for the Cherwell User that will be used to authenticate to the CSM API. This is the same password that you created in Creating a New User.
- cherwell_api_key. Add the REST API Client Key that you configured in Obtaining a Client Key.
-
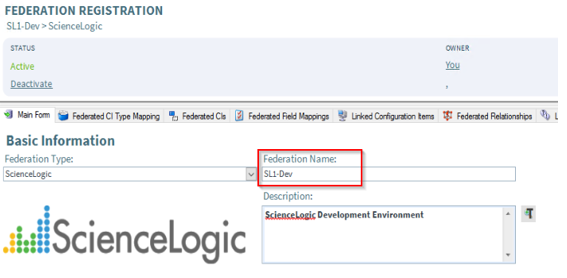
federation_source. Type the Federation Name that you used in Creating the Federation Registration Record:
Aligning a Configuration Object with a PowerFlow Application
For every application in PowerFlow, you will need to "align" a configuration object to that application to ensure that the application can properly authenticate to CSM. You can align the same configuration object with multiple applications.
To align a configuration object with an application:
- In the PowerFlow user interface, go to the Applications page (
).
- Select the application that you want to align with the configuration object, such as "Add ScienceLogic SL1 Devices to Cherwell". The Application page for that application appears.
-
Click (
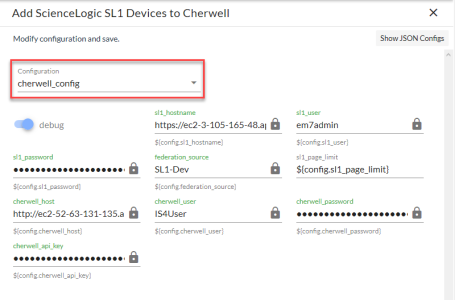
). The Configuration pane opens on the right side of the Application page:
To view a pop-up description of a field on the Configuration pane for an application, hover over the label name for that field.
-
Select a configuration from the Configuration drop-down to "align" to this application. This step is required for all applications.
Click to view the JSON configuration data for the configuration object. Click again to view the fields instead.
-
As needed, edit the other configuration values for the application. Press after editing an item to make sure your changes are saved.
To prevent potential issues with security and configuration, any fields that are encrypted and any configuration-specific fields containing a padlock icon (
) on the Configuration pane cannot be edited.
- When you are finished, click at the bottom of the Configuration pane.
Sending Additional Metadata for Incident Records
You can pass additional information from SL1 to PowerFlow and populate any additional field on the Incident record. This process uses the "Cherwell Event IS4 Integration" run book action from the "Cherwell Integration" PowerPack.
The "Cherwell Event IS4 Integration" run book action collects information about the event and sends it to PowerFlow to create an incident.
To pass additional information from SL1 to PowerFlow:
- In SL1, navigate to the Action Policy Manager page (Registry > Run Book > Action ) and edit the "Cherwell Event IS4 Integration" run book action to enable it to collect the data from SL1 using the API or some other source.
-
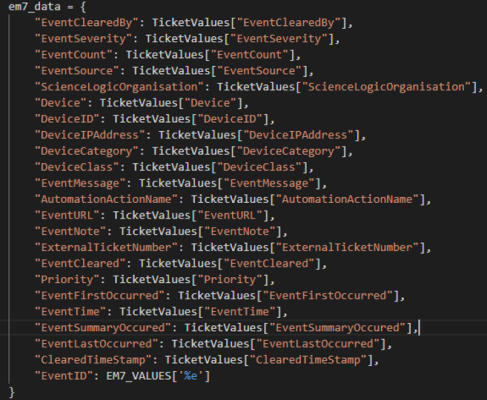
In the snippet section, update the em7_data dictionary with the key you want the value to be addressed by and the value. For example: "ClassName": EM7_VALUES[%_class_name]:
- In the PowerFlow user interface, navigate to the SyncPacks page (
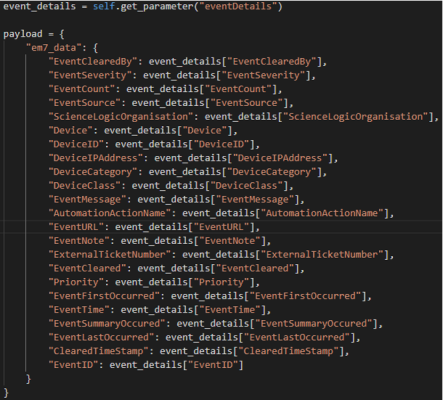
), select Cherwell SyncPack, and on the tab select the "Collect and Transform SL1 RBA Data" step. This step collects the data sent by the run book action and passes it to the "Cherwell: Create Event" step, which processes the SL1 Event into a Cherwell Event.
-
Update the payload dictionary in the step with the key and value you added. For example: "ClassName": event_details["ClassName"]
-
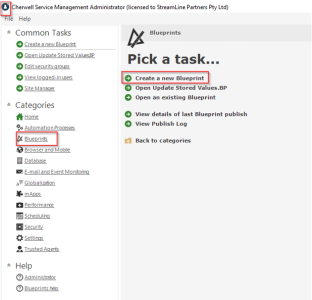
Log in to the CSM Administrator client as an administrator, select Blueprints in the Categories sub-menu on the left, and select Create a new Blueprint:
-
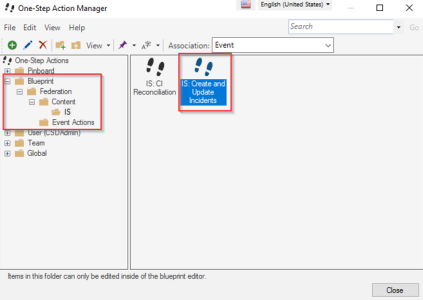
In the New Blueprint window, select the Managers > One-Step . The One-Step Action Manager window appears:
- In the Association drop-down, select Event.
-
Navigate to the "Blueprint/Federation/Content/IS" folder, right-click the "IS: Create and Update Incidents" One-Step file, and select Edit. The One-Step Editor page appears:
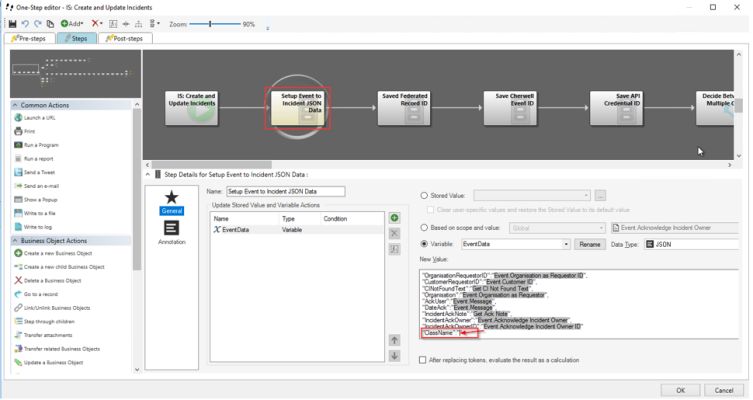
- Select the "Setup Event to Incident JSON Data" step so you can append the value you added to the dictionary in step 4 as a key-value pair at the end of the dictionary on this step. For example: "ClassName": event_details["ClassName"]
- To append the value, type the key for the new value in the New Value field, such as "ClassName".
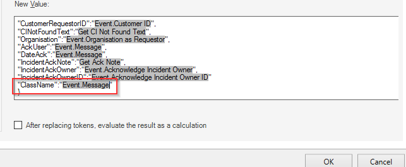
- To add a value to associate with the new key, right-click between the two quotation marks in the entry you made in step 10 in the New Value field and select Message from the pop-up dialog.
-
Type the value after the new key, such as "ClassName":"Event.Message":
Event.Message is a reference to the Cherwell Message field in the event. The Message field holds all the information about the SL1 event in it via the payload you modified in step 4.
-
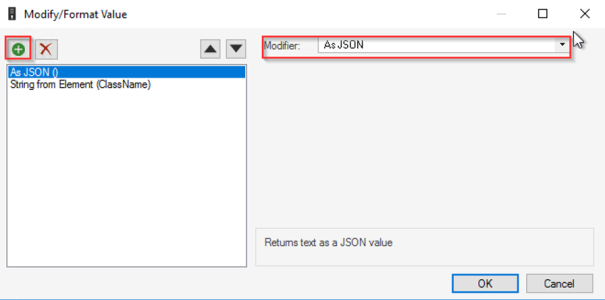
To get the field you want in the payload for ClassName, you need to apply a filter by right-clicking Event.Message and selecting Modifiers. The Modify/Format Value window appears, where you can apply filters to assign a value for ClassName:
- Click at top left and select As JSON from the Modifier drop-down.
- Click again, select String from Element from the Modifier drop-down, and type the name of the key for the new value you put in the dictionary in step 4, such as ClassName.
- Click . The relevant value in the dictionary contains the variable next to ClassName.
-
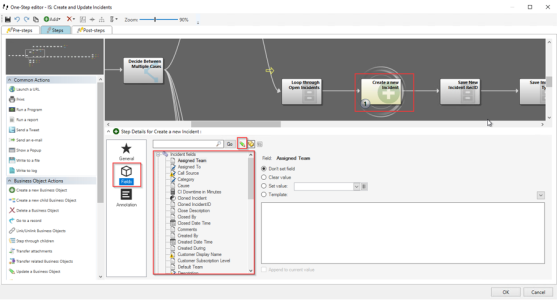
On the One-Step Editor page, select the "Create a new Incident" step and click the Fields tab:
-
Make sure that the pencil icon is unchecked so you can assign the ClassName variable to any of the fields available in the incident:
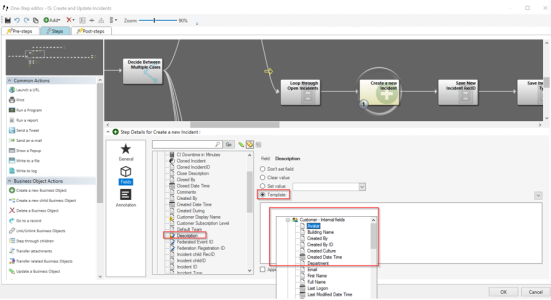
- For example, if you wanted to add ClassName to the Description field, select Description in the list of fields, select Template, and right-click on the empty text area below to bring up the variable selector.
-
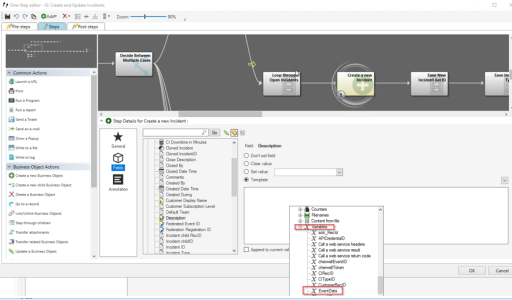
From the variable selector, scroll down to the Variables drop-down and select EventData as this is the variable we assigned to the payload in the "Setup Event to Incident JSON Data" step:
- Apply filters to the EventData" variable to assign the relevant value to it from the payload by right-clicking EventData and selecting Modifiers. The Modify/Format Value window appears.
- Click , select String from Element from the Modifier drop-down, and type the name of the key for the new value you appended in the dictionary in the step "Setup Event to Incident JSON Data".
- Click . The Manage objects page appears.
- Accept the changes you made to the One-Step and save the Blueprint by clicking Save Blueprint to disk.
- Publish the Blueprint by clicking Publish Blueprint. The Publish Options dialog appears.
- Use the default settings and click . When the publish process is complete, the next time an event occurs, you will see the enriched data in the field you selected on the form.
