Skylar Automation (formerly PowerFlow) provides a generic platform for integrations between Skylar One and third-party applications, such as ServiceNow, Restorepoint, xMatters, or Opsgenie. The Skylar Automation platform sits between Skylar One and the third-party application, where it handles the flow of data.
From the Skylar Automation user interface, you can use the Skylar Automation builder to create complex workflow automations with logical branching, using drag-and-drop components.
What is Skylar Automation?
Skylar Automation enables intelligent, bi-directional integration between Skylar One and third-party applications to promote a unified management ecosystem. Skylar Automation contains default workflows that let users translate and share data between Skylar One and third-party applications, and it also allows the development of standardized, reusable snippets called "steps" that non-developers can use to create integration workflows without writing code. In addition, Skylar Automation is designed to provide high availability and scalability.
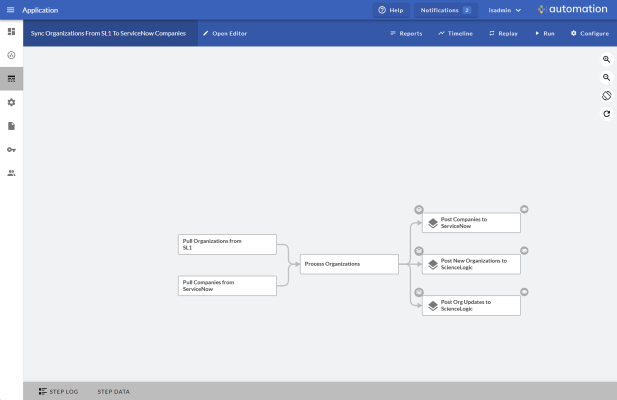
The following image shows an example of a Skylar Automation application workflow and its steps in the Skylar Automation user interface:
The key elements of the Skylar Automation user interface include the following:
-
SyncPacks. A SyncPack contains all the code and logic needed to perform integrations on the Skylar Automation platform. You can access the latest steps, applications, and configuration objects for a third-party application (such as ServiceNow, Cherwell, or Restorepoint) by downloading the most recent SyncPack for that application. You can download SyncPacks from the SyncPacks page on the ScienceLogic Support Site (Skylar Automation > SyncPacks). You can access all SyncPacks that have been uploaded to your Skylar Automation system on the SyncPacks page in the Skylar Automation user interface (
).
A SyncPack can include the following items:
-
Steps. A step is the basic building block in Skylar Automation. A step is a generic Python class that performs a single action, such as pulling data from Skylar One or a third-party application. In the image above, the steps display as part of the flowchart in the main viewing pane as well as the Steps Registry pane. You can access all steps by using the Skylar Automation builder on the Applications page (
).
For more information, see What is a Step?
-
Applications. A Skylar Automation application or workflow is a JSON object that includes all of the information required for executing an integration on the Skylar Automation platform. In the image above, the group of connected steps in the large pane make up the "Sync Organizations from Skylar One to ServiceNow Companies" application. You can access all applications on the Applications page (
), and you can create new applications using the Skylar Automation builder.
For more information, see What is a Skylar Automation Application?
-
Configuration Objects. A configuration object is a standalone JSON file that contains a set of configuration variables used as input for an application. Configuration objects can include variables like hostname, user name, password, or other credential information. You can access all configuration objects on the Configurations page (
).
For more information, see What is a Configuration Object?
-
Elements of the Skylar Automation User Interface
The Skylar Automation user interface matches the layout of the Skylar One user interface, with the navigation tabs located on the left-hand side of the window. The tabs provide access to the following pages: Control Tower, SyncPacks, Applications, Configurations, Reports, API Keys, and Admin Panel.
Logging In and Out of the Skylar Automation User Interface
You can log in to Skylar Automation using one of the following authentication types:
- Local Authentication. The same local Administrator user (isadmin) is supported by default. Local authentication only supports the isadmin administrator user.
- Basic Authentication. Skylar Automation continues to support Basic Authentication as well. Because the Skylar Automation SyncPacks, diagnostic scripts, and the iscli tool continue to use Basic Authentication, ScienceLogic does not recommend disabling Basic Authentication.
- OAuth. Lets Skylar Automation administrators use their own authentication providers to enforce user authentication and lockout policies. Authentication using a third-party provider, such as Active Directory, or using a protocol like LDAP, requires additional configuration. For optimal security, ScienceLogic recommends that you disable the local Administrator user (isadmin) and exclusively use your own authentication provider.
- Common Access Card (CAC) Authentication. Lets a Skylar Automation user provide a CAC card through a browser to the Skylar Automation root IP address. After identifying the CAC card, the ingress proxy verifies and authenticates the user. CAC authentication bypasses Dex authentication and does not use OIDC protocols. You can also use CAC authentication with LDAP, or CAC authentication with LDAP and SAN.
- API Key Authentication. Provides access to the Skylar Automation API in a controllable manner, with options to restrict which hosts may or may not use certain tokens.
Depending on the authentication used by your Skylar Automation, the Skylar Automation login page will display a single option for logging in, or more than one option.
For more information about configuring authorization for users, see Managing Users in Skylar Automation.
On a Skylar Automation system configured for Military Unique Deployment (MUD) and Department of Defense (DoDIN), a login banner containing information specific to DoDIN appears after you log in.
If you get a "SyncPacks service is not reachable" pop-up message in the user interface and the various pages are empty, log out of the Skylar Automation user interface and log back in again. You can also click in your browser to automatically log out. This situation occurs only if the user interface is idle for a long period of time.
After you log in, a pop-up notification appears at the bottom of the Skylar Automation user interface that states the last time you logged into the Skylar Automation system. This notification disappears after a short period of time, or you can close it. Additional notifications will display in this same area at the bottom left of the window.
To log out of Skylar Automation, click your user name in the navigation bar in the top right of any window and select Log off.
Skylar Automation Pages
The Control Tower page () provides a graphical view of the various tasks, workers, and applications that are running on your Skylar Automation system. This page was called the Dashboard page in previous versions of Skylar Automation. For more information, see Using the Skylar Automation Control Tower Page.
The SyncPacks page () lets you import, install, and view SyncPacks, which contain applications, steps, and configuration objects that you can use in Skylar Automation. For more information, see Managing SyncPacks.
The Applications page () provides a list of the applications available on your Skylar Automation system. This page was called the Integrations page in previous versions of Skylar Automation. From this page you can run and schedule applications. If you are a Premium solution user, you can use the Skylar Automation builder to create applications that use logical branching and data transformation between steps. For more information, see Managing Skylar Automation Applications.
The Configurations page () lets you create or use a configuration object to define a set of variables that all steps and Skylar Automation applications can use. For more information, see Managing Configuration Objects.
The Reports page () contains a list of reports associated with Skylar Automation applications that have the reporting feature enabled, such as the "Report: Identify Unmapped Device Classes" and the "System Diagnostics" application. For more information, see Generating and Viewing Reports for Skylar Automation Applications.
The API Keys page (![]() ) lets you create API keys, which you can use to send requests to Skylar Automation API endpoints, specifying them by a header or a query string. These API keys are based on Skylar Automation roles. For more information, see Creating and Using API Keys in Skylar Automation.
) lets you create API keys, which you can use to send requests to Skylar Automation API endpoints, specifying them by a header or a query string. These API keys are based on Skylar Automation roles. For more information, see Creating and Using API Keys in Skylar Automation.
The Admin Panel page () contains a list of user groups, which lets you determine the roles and access for your users. You can also manage user sessions on this page. Only users with the Administrator role for this Skylar Automation system can edit this page. For more information, see Managing Users in Skylar Automation.
While the SyncPacks, Applications, Configurations, Reports, API Keys, and Admin Panel pages are loading or running a procedure, you will see a dark blue, animated line running across the top of the page until the process completes. On the Control Tower page, the System Health widget displays an image that shows the progress of data loading in that widget.
Additional Navigation
The "Auto Refresh" counter lets you see when data on the following pages will update: SyncPacks, Applications, Configurations, and API Keys. On these pages, you can also click "Auto Refresh" to refresh the page immediately.
Also, pop-up messages have a countdown timer that displays until it closes, along with a Close icon (![]() ).
).
Clicking the button in the navigation bar in the top right of the Skylar Automation user interface opens the Help Menu pane on the right-hand side of the user interface. The Help Menu pane contains an overview of the current page, a list of actions you can take on this page (with accompanying links to the corresponding Help topics), and a link to the corresponding page in the product documentation for more information.
Clicking the button in the navigation bar opens the Notification Center pane, which contains a log of all previous pop-up notifications that appeared in the Skylar Automation system about applications that were run successfully or with warnings or failures. The button also displays a light-blue "badge" with the number of current notifications. For more information about a notification, click the link for the page where the notification appeared and review the Step Log and Step Data tabs for the application steps.
To clear the contents of the Notification Center pane, click the button. Click the Close icon (![]() ) to close the Notification Center pane.
) to close the Notification Center pane.
The user name drop-down, which is found in the navigation bar in the top right of the Skylar Automation user interface, contains the following options:
- About. Displays package versions, version information for Skylar Automation, user information for the current user, and licenses used by Skylar Automation. This page also displays whether the Skylar Automation system is licensed, and if it is licensed, it displays when the license expires.
- API Documentation. Opens the Swagger page for the Skylar Automation Content API.
- Log Off. Logs you out of the Skylar Automation user interface.
The footer at the bottom of each Skylar Automation page displays the Skylar Automation version, which you can click to open the About page.
What is a Step?
In Skylar Automation, a step is a generic Python class that performs a single action, such as gathering data about an organization.
Steps can accept zero or many input parameters or data from previous steps, and steps can specify output to be used by other steps. The input parameters are configurable variables and values used during execution.
You can use existing steps to create your own workflows, and you can re-use steps in more than one workflow. When these steps are combined in an application, they provide a workflow that satisfies a business requirement. All Python step code should be Python 3.7 or later.
The following image shows a step from the Skylar Automation user interface:

Using Steps in a Skylar Automation Application
You can create new steps or use existing steps to create your own workflows, and you can re-use steps in more than one workflow. When these steps are combined as part of a Skylar Automation application, they provide a workflow that satisfies a business requirement.
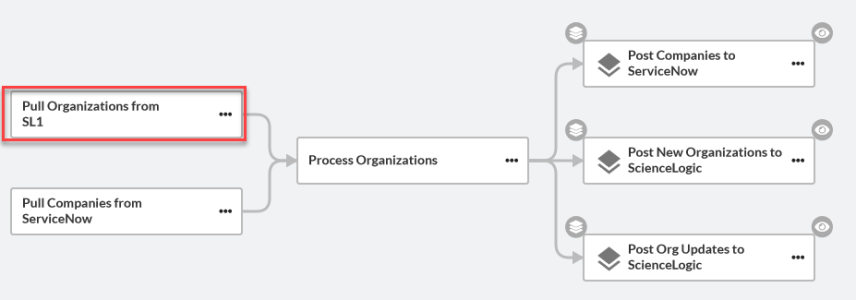
For example, the set of steps below in the "Sync Organizations from Skylar One to ServiceNow Companies" application in the Skylar Automation user interface gathers data about Skylar One organizations and ServiceNow companies, processes that data based on the configuration settings specified for that set of steps, and posts that data to Skylar One and ServiceNow to keep the organization and company data in sync in both places:
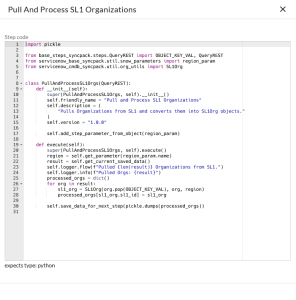
In the Skylar Automation builder user interface, if you click the ellipsis icon (![]() ) on a step, you can select View step code to view the Python code for that step:
) on a step, you can select View step code to view the Python code for that step:
Using Input Parameters to Configure a Step
You can configure how a step works by adjusting a set of arguments called input parameters. The parameters specify the values, variables, and configurations to use when executing the step. Parameters allow steps to accept arguments and allow steps to be re-used in multiple integrations.
For example, you can use the same step to query both the local system and another remote system; only the arguments, such as hostname, username, and password change.
To view and edit the input parameters for a step in the Skylar Automation builder:
-
Go to the Applications page of the Skylar Automation user interface and click the name of a Skylar Automation application.
-
Click the button.
-
Click the ellipsis icon (
 ) on the step and select Configure. The Configuration pane for that step appears.
Sharing Data Between Steps
A step can pass the data it generates during execution to a subsequent step. A step can use the data generated by another step. Also, you can run test data for that step by hovering over the button and selecting Custom Run.
Skylar Automation analyzes the required parameters for each step and alerts you if any required parameters are missing before running the step.
Types of Steps
Steps are grouped into the following types:
- Standard. Standard steps do not require any previously collected data to perform. Standard steps are generally used to generate data to perform a transformation or a database insert. These steps can be run independently and concurrently.
- Aggregated. Aggregated steps require data that was generated by a previously run step. Aggregated steps are not executed by Skylar Automation until all data required for the aggregation is available. These steps can be run independently and concurrently.
- Trigger. Trigger steps are used to trigger other Skylar Automation applications. These steps can be configured to be blocking or not (in other words, if the step is set to be blocking and it fails to trigger the application, the application will fail).
A variety of generic steps are available from ScienceLogic, and you can access a list of steps by sending a GET request using the API /steps endpoint.
What is a Skylar Automation Application?
In Skylar Automation, an application is a JSON object that specifies which steps to execute and the order in which to execute those steps. An application also defines variables and provides arguments for each step.
An application combines a set of Skylar Automation steps that execute a workflow. The input parameters for each step are also defined in the application and can be provided either directly in the step or in the parent application.
The following is an example of a Skylar Automation application:
Skylar Automation application JSON objects are defined by configuration settings, steps that make up the application, and application-wide variables used as parameters for each step. The parameters of each step can be configured dynamically, and each step can be named uniquely while still sharing the same underlying class, allowing for maximum re-use of code.
You can run an application in the Skylar Automation user interface. You can also execute an application through the REST API, and Skylar Automation will process the application as an asynchronous task. Executing an application from the REST API lets you dynamically set parameter values for the variables defined in the application.
During processing, Skylar Automation generates a unique task ID for the application and each of its tasks. Using the task IDs, you can poll for the status of the application and the status of each individual running step in the application.
The required parameters of applications are strictly enforced, and Skylar Automation will refuse to execute the application if all required variables are not provided.
For more information about Skylar Automation applications, see Managing Skylar Automation Applications.
What is a Configuration Object?
Configuration variables are defined in a standalone JSON file called a configuration object that lives on the Skylar Automation system and can be accessed by all Skylar Automation applications and their steps. Configuration objects can include variables like hostname, user name, password, or other credential information.
Each global variable is defined as a JSON object in the configuration object. Typically, the JSON code for a configuration object looks like the following:
{
   "encrypted": true,
   "name": "var_name",
   "value": "var_value"
}
Configuration objects allow the same application to be deployed in multiple Skylar Automation instances, with different configurations. Click the button from an application in the Skylar Automation user interface to access the configuration object for that application.
Configuration objects can map variables from the Skylar One platform to a third-party platform. For instance, Skylar One has device classes and ServiceNow has CI classes; the configuration object maps these two sets of variables.
Each global variable in the configuration can be encrypted. The values of encrypted variables are encrypted within Skylar Automation upon upload through the REST API.
You can access a list of all available configurations on the Configurations page () of the Skylar Automation user interface. You can also create and edit configuration objects on this page.
For more information about configuration objects, see Managing Configuration Objects.
What is the Skylar Automation Builder?
You can use the Skylar Automation builder in the Skylar Automation user interface to create complicated applications with logical branching and data transformation features using drag-and-drop components. You access the Skylar Automation builder on the Applications page in the Skylar Automation user interface.
If your current ScienceLogic Skylar One solution subscription does not include the Skylar Automation builder, contact your ScienceLogic Customer Success Manager or Customer Support to learn more.
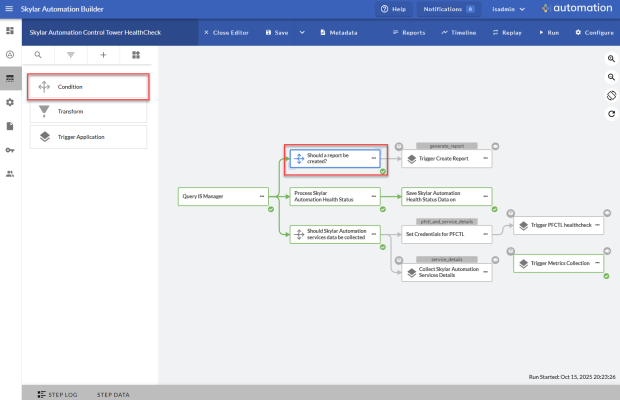
From the Steps Registry pane on an Application page, you can drag a Condition operator (![]() ) onto an application workflow to create the option for branching flows, such as If-Else or If-Then-Else statements:
) onto an application workflow to create the option for branching flows, such as If-Else or If-Then-Else statements:
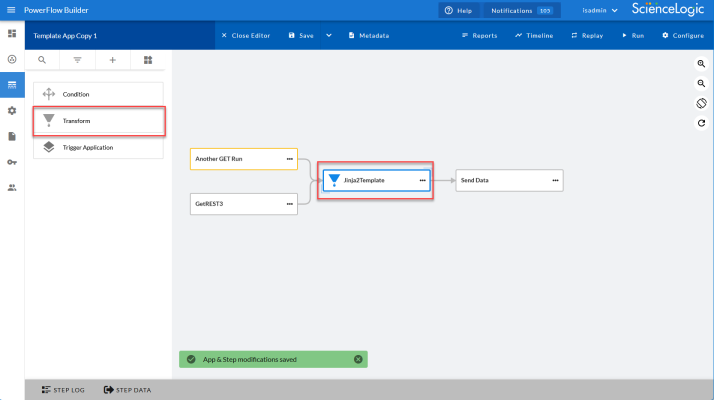
You can drag a Transform operator (![]() ) from the Steps Registry pane onto an application workflow to pull data gathered by a previous step and modify or transform the data to fit into the next step:
) from the Steps Registry pane onto an application workflow to pull data gathered by a previous step and modify or transform the data to fit into the next step:
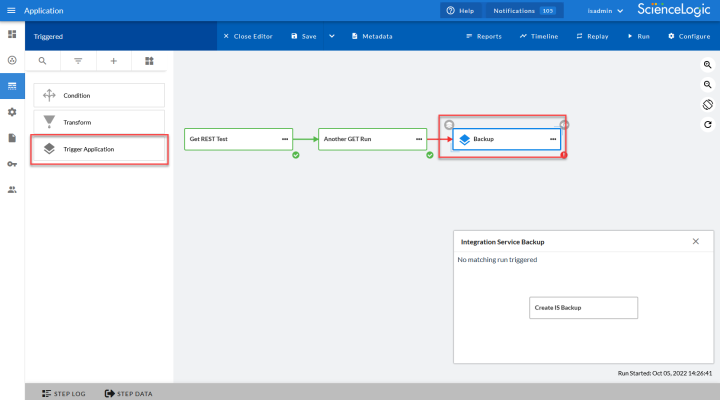
You can also use the Trigger Application operator (![]() ) to launch one or more Skylar Automation applications from within a new or existing Skylar Automation application. This operator uses the same functionality as the "Trigger Application" step from the Base Steps SyncPack:
) to launch one or more Skylar Automation applications from within a new or existing Skylar Automation application. This operator uses the same functionality as the "Trigger Application" step from the Base Steps SyncPack:
Clicking the eye icon (![]() ) next to a triggered application generates a smaller window, also called a "picture-within-a-picture", that displays the step or steps for the triggered application.
) next to a triggered application generates a smaller window, also called a "picture-within-a-picture", that displays the step or steps for the triggered application.
For more information about the Skylar Automation builder and Skylar Automation applications, see Managing Skylar Automation Applications.
Using the API or Command Line Tool to Create Skylar Automation Components
Instead of using the Skylar Automation user interface, you can create steps, applications, and configurations in your own editor and then upload them using the API or the command line tool (iscli).
For more information, see Skylar One Skylar Automation for Developers.
