![]()
Use the following menu options to navigate the Skylar One user interface:
- To view a pop-out list of menu options, click the menu icon (
 ).
). - To view a page containing all of the menu options, click the Advanced menu icon (
 ).
).
How Skylar One Generates Events
Skylar One (formerly SL1) includes pre-defined events for the most commonly encountered conditions on the most common platforms. Skylar One allows you to customize these events. If the pre-defined events do not meet the needs of your organization, you can define new events. You can edit existing event policies and create new event policies in the Event Policies page (or the Event Policy Manager page in the classic Skylar One user interface).
Skylar One monitors devices (and their applications and components). Skylar One then generates log messages based on incoming trap and syslog data, incoming email messages, and user-defined policies. Each message is associated with a specific monitored device, organization, asset record, IP network, interface, IT service, vendor, user account, or virtual interface. Skylar One then uses these log messages to generate events. Skylar One examines each incoming log message and compares it to each event policy. If a log message matches an event policy, Skylar One generates an instance of the event and displays the instance in the Events page (or the Event Console page in the classic Skylar One user interface). The event instance will be associated with the entity that triggered the original log message.
Skylar One generates events by collecting logs and messages from the following:
- Syslog. Message is generated by the syslog protocol. Syslogs can be sent by devices and proxy devices such as managers of managers (MoM). A syslog is an unsolicited message from a device to Skylar One. Syslog is a standard log format supported by most networking and UNIX-based devices and applications. Windows log files can be converted to syslog format using conversion tools. For more information on syslogs,
- Internal. Message is generated by a ScienceLogic process. The message is about the Skylar One system itself, instead of the devices that the Skylar One system monitors.
- Trap. Message is generated by an SNMP trap. SNMP traps can be sent by devices and proxy devices like MoMs. An SNMP trap is an unsolicited message from a device to Skylar One. A trap indicates that an emergency condition or a condition that merits immediate attention has occurred on the device. For more information on traps,
- Dynamic. Message is generated by a Dynamic Application alert. Dynamic Applications are customizable policies that tell Skylar One how to monitor applications and devices. You can define alerts in Dynamic Applications. An alert can trigger events based on the data collected by the Dynamic Application. Alerts allow you to examine and manipulate values retrieved by Dynamic Applications. When an alert evaluates to TRUE, the alert inserts a message in the associated device's device log. Skylar One examines each new message in the device log and determines if the message matches an event definition. If the message matches an event definition, Skylar One generates an instance of that event. For example, an alert might be defined to evaluate to TRUE if the temperature of a chassis exceeds 100 degrees Fahrenheit. If the chassis temperature exceeds 100 degrees at some point in the future, Skylar One inserts a message in the associated device's log files. Skylar One then matches that message with an existing event, and then triggers the event.
- Email. Message is generated by an email message sent to Skylar One.
- API. Message is generated by inserting a message into the main database. These messages can be inserted by a snippet automation action, a snippet Dynamic Application, or by a request to the ScienceLogic API. For more information on snippet automation actions,
- Skylar One agent. Message is generated by log file messages collected by the Skylar One agent.
- Skylar Automated RCA. Message is generated by Skylar Automated RCA alerts. Skylar One receives an alert from Skylar Automated RCA and creates an event from it.
Viewing the List of Event Policies
From the Event Policies page (Events > Event Policies, or Registry > Events > Event Manager in the classic user interface), you can view a list of all event policies in Skylar One.
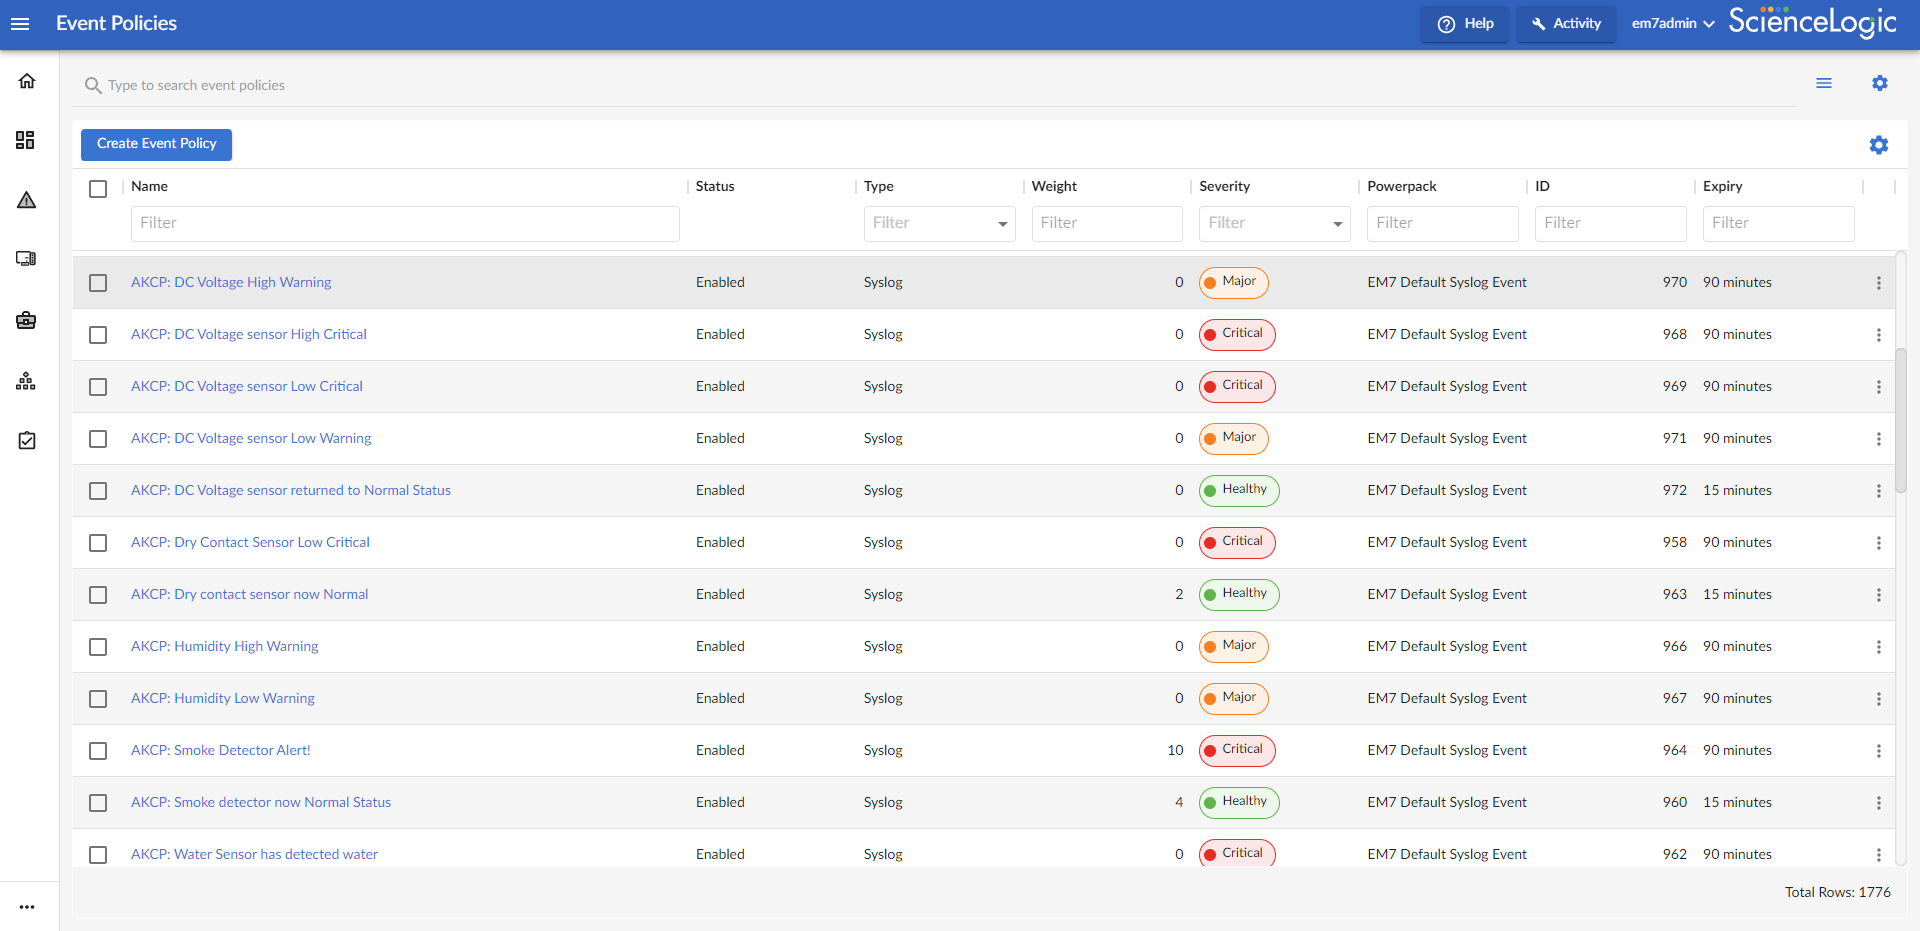
The Event Policies page displays the following about each event policy:
- Name. The name of the event policy.
- Status. Specifies whether the event policy is to be operational or not. Possible values are "Enabled" or "Disabled."
- Type. Specifies the source for the event policy. Possible values are:
- Syslog. Message is generated by the syslog protocol. Syslogs can be sent by devices and proxy devices such as managers of managers (MoM). A syslog is an unsolicited message from a device to Skylar One. Syslog is a standard log format supported by most networking and UNIX-based devices and applications. Windows log files can be converted to syslog format using conversion tools. For more information on syslogs,
- Internal. Message is generated by a ScienceLogic process. The message is about the Skylar One system itself, instead of the devices that the Skylar One system monitors.
- Trap. Message is generated by an SNMP trap. SNMP traps can be sent by devices and proxy devices like MoMs. An SNMP trap is an unsolicited message from a device to Skylar One. A trap indicates that an emergency condition or a condition that merits immediate attention has occurred on the device. For more information on traps,
- Dynamic. Message is generated by a Dynamic Application alert. Dynamic Applications are customizable policies that tell Skylar One how to monitor applications and devices. You can define alerts in Dynamic Applications. An alert can trigger events based on the data collected by the Dynamic Application. Alerts allow you to examine and manipulate values retrieved by Dynamic Applications. When an alert evaluates to TRUE, the alert inserts a message in the associated device's device log. Skylar One examines each new message in the device log and determines if the message matches an event definition. If the message matches an event definition, Skylar One generates an instance of that event. For example, an alert might be defined to evaluate to TRUE if the temperature of a chassis exceeds 100 degrees Fahrenheit. If the chassis temperature exceeds 100 degrees at some point in the future, Skylar One inserts a message in the associated device's log files. Skylar One then matches that message with an existing event, and then triggers the event.
- Email. Message is generated by an email message sent to Skylar One.
- API. Message is generated by inserting a message into the main database. These messages can be inserted by a snippet automation action, a snippet Dynamic Application, or by a request to the ScienceLogic API. For more information on snippet automation actions,
- Skylar One agent. Message is generated by log file messages collected by the Skylar One agent.
- Skylar Automated RCA. Message is generated by Skylar Automated RCA. You can view Skylar Automated RCA events, including suggestions, custom alerts, and accepted alerts.
- Weight. If two event definitions are very similar, the weight field specifies the order in which Skylar One should match messages against each event definition. This field is most useful for event policies that use expression matching. The event definition with the lowest weight will be matched first.
- Severity. The severity of the event. Choices are:
- Healthy. Healthy events indicate that a device or condition has returned to a healthy state. Frequently, a healthy event is generated after a problem has been fixed.
- Notice. Notice events indicate a condition that does not affect service but about which users should be aware.
- Minor. Minor events indicate a condition that does not currently impair service, but the condition needs to be corrected before it becomes more severe.
- Major. Major events indicate a condition that impacts service and requires immediate investigation.
- Critical. Critical events indicate a condition that can seriously impair or curtail service and requires immediate attention (i.e., service or system outages).
- Edited By. Name of the user who created or last edited the event.
- Expiry. If enabled, the time in which an active event will be cleared automatically if there is no re-occurrence of the event.
- Ext. Category. The category for the event. This is an optional field. If Skylar One will be sending this event to an external system, this field defines the event category for use by the external system.
- External ID. The external event ID for the event. The external event ID is an optional field that can be used to correlate an event policy with an event ID on another network-monitoring system or on another Skylar One system where the event has a different event ID.
- Last Edited. Date and time the event was created, imported into Skylar One, or last edited.
- ID. Unique numeric ID for the event policy, generated by Skylar One.
- PowerPack. Specifies whether the event is included in a PowerPack.
- Alignment. Displays the organization alignment of an event policy.
- Threshold. If enabled, the number of instances of an identical event from the identical source that must occur before creating a new event message in the Events page.
- Time. If enabled, the maximum amount of time to wait between multiple identical messages from the same source before creating a new event message in the Event Monitor. This allows related events to be rolled-up and posted together, under one event description.
You can filter the items on this inventory page by typing filter text or selecting filter options in one or more of the filters found above the columns on the page. For more information, see
You can adjust the size of the rows and the size of the row text on this inventory page. For more information, see the section on
To rearrange the columns in the list, click and drag the column name to a new location. You can adjust the width of a column by clicking and dragging the right edge of the column. For more information about editing and adding columns, see
Defining an Event Policy
Skylar One includes pre-defined events for the most commonly encountered conditions on the most common platforms. However, if the pre-defined events do not meet the needs of your organization, you can define new events that better suit your needs.
From the Event Policies page (or the Event Policy Manager page in the classic Skylar One user interface), you can define a new event. You can define custom events to meet your business requirements. You can also define events to be triggered by any custom Dynamic Application alerts you have created.
To create an event definition:
- Go to Event Policies page (Events > Event Policies).
- In the Event Policies page, click the button. The Event Policy Editor page appears, displaying the tab:

- On the Event Policy Editor page and its tabs, you can define a new event. The Event Policy Editor page contains the following tabs:
- . The landing page when viewing or editing an existing event policy. This tab provides an at-a-glance view of the event policy properties.
- . The starting point when creating a new event policy, and the tab where you define the fundamental configuration options for the event policy.
- . Contains more advanced configuration options, such as topology masking, device sub-entity settings, external system integration fields, and event auto-clear mapping.
-
New event policies are global by default and apply to all devices unless specified in the Suppressions field for an event policy, but you can also align the event policy to a specific organization or organizations to apply the event policy to only devices in the chosen organizations. To select a specific organization:
- Click at the top of the event policy. The Policy Alignment window will appear.
- Select the Specific Organizations radio button.
- Select the organizations to which the event policy should belong, and then click the button to return to your event policy.
You can use the box under Choose Organizations to filter the list of organizations. You can enter an alpha-numeric string in the box, and the list will include only organizations that match the string.
The Summary Tab
On the tab, you can view an at-a-glance summary of the event policy that highlights key information or edit the following field:
-
Troubleshooting Tips and Links. You can use the rich text editor to add useful information about the event policy, such as an event definition, probable cause, potential resolution, or any troubleshooting resources.

The Basic Tab
On the tab, you can define or edit the following fields:
- Event Policy Name. Enter a name for the event policy.
- Enable Event Policy. This checkbox allows you to enable and disable the event policy.
Configuring Event Source
- Event Source. Specifies the source for the event. The fields below this field will change based on your selection. Your options are:
- Syslog. Message is generated by the syslog protocol. Syslogs can be sent by devices and proxy devices such as managers of managers (MoM). A syslog is an unsolicited message from a device to Skylar One. Syslog is a standard log format supported by most networking and UNIX-based devices and applications. Windows log files can be converted to syslog format using conversion tools. For more information on syslogs,
-
Syslog Facility. Select the facility information used by syslog to match an event message.
-
Syslog Severity. Select the severity information used by syslog to match an event message.
-
Syslog Application Name. Type the application name used by syslog to match an event message.
-
Syslog Message ID. Type the message ID used by syslog to match an event message.
-
Syslog Process ID. Type the process ID used by syslog to match an event message.
NOTE: For more information on the syslog fields for events, see https://datatracker.ietf.org/doc/html/rfc5424.
- Internal. Message is generated by a ScienceLogic process. The message is about the Skylar One system itself, instead of the devices that the Skylar One system monitors. The following option will appear:
-
Link-Message. Click the button to specify the message generated by Skylar One. The Link-Message window will appear with a list of messages to select from. Once you have selected a message, click the button.
You can use the field at the top of the Link-Message field to filter the list of ScienceLogic messages. If you enter an alpha-numeric string in the field, the Link-Message field will include only ScienceLogic messages that match the string.
- Trap. Message is generated by an SNMP trap. SNMP traps can be sent by devices and proxy devices like MoMs. An SNMP trap is an unsolicited message from a device to Skylar One. A trap indicates that an emergency condition or a condition that merits immediate attention has occurred on the device. For more information on traps,
-
Link-Trap. Manually enter a custom trap OID as an alternative to selecting a Link-Trap using the button. You can use an asterisk (*) as a wildcard character at the end of the trap OID. If you add the wildcard character to the end of the trap OID, the event policy will match all trap OIDs that start with the specified OID string. This is useful for creating "catch all" event policies.
-
Select Existing Link-Trap. Click this button to display a list of trap OIDs that are included in the MIB files that have been compiled in Skylar One. Select one of the listed trap OIDs to associate with the event. The Link-Trap window will appear with a list of traps to select from. After you have selected a trap, click the button.
You can use the field at the top of the Link-Trap field to filter the list of SNMP traps. If you type an alpha-numeric string in the field, the Link-Trap field will include only traps that match the string.
NOTE: Before selecting a trap OID, check the SNMP Trap Filters page (Evnts > SNMP Trap Filters, or Registry > Events > SNMP Trap Filters in the classic user interface) to be sure that the trap is not being filtered out. For more information on the SNMP Trap Filters page,
- Source Host Varbind. For events with a source of "trap", specifies an OID that is included in the trap. This OID will contain either the IP address or hostname to align with the event. This field allows you to align an event with a device other than the trap's sender.
- If a value is specified in this field, Skylar One examines the OID specified in this field. If the value stored in the OID matches the primary IP address or hostname of a device in Skylar One, the resulting event will be aligned with that device.
- If a value is specified in this field, Skylar One examines the OID specified in this field. If the value stored in the OID does not match a primary IP address or hostname of a device in Skylar One, the resulting event will be aligned with the device that sent the trap.
- If no value is specified in this field, but the trap includes the default snmpTrapAddress OID, Skylar One will examine the value stored in the snmpTrapAddress OID. If the value stored in the default snmpTrapAddress OID matches the primary IP address or hostname of a device in Skylar One, the resulting event will be aligned with that device.
- If no value is specified in this field and the trap does not include the snmpTrapAddress OID, Skylar One will align the resulting event with the device that sent the trap.
- Dynamic. Message is generated by a Dynamic Application alert. Dynamic Applications are customizable policies that tell Skylar One how to monitor applications and devices. You can define alerts in Dynamic Applications. An alert can trigger events based on the data collected by the Dynamic Application. Alerts allow you to examine and manipulate values retrieved by Dynamic Applications. When an alert evaluates to TRUE, the alert inserts a message in the associated device's device log. Skylar One examines each new message in the device log and determines if the message matches an event definition. If the message matches an event definition, Skylar One generates an instance of that event. For example, an alert might be defined to evaluate to TRUE if the temperature of a chassis exceeds 100 degrees Fahrenheit. If the chassis temperature exceeds 100 degrees at some point in the future, Skylar One inserts a message in the associated device's log files. Skylar One then matches that message with an existing event, and then triggers the event.
- Link-Alert. Click the button to display a list of alerts defined in Dynamic Applications. A Link-Alert window displays a list of alerts. After you search for and select an alert, click . The alert is added to the Link-Alert field.
- API. Message is generated by inserting a message into the main database. These messages can be inserted by a snippet automation action, a snippet Dynamic Application, or by a request to the ScienceLogic API. For more information on snippet automation actions,
- Email. Message is generated by an email message sent to Skylar One.
- ScienceLogic Agent. Message is generated by log file messages collected by the Skylar One agent.
- Log Policy. Select the Log File Monitoring Policy the agent will use to collect the log message.
- Skylar Automated RCA. Message is generated by Skylar Automated RCA alerts. Skylar One receives an alert from Skylar Automated RCA and creates an event from it. The following options appear:
- Skylar Automated RCA Alert Type. Select the alert type used by Skylar Automated RCA to match an event message.
- Skylar Automated RCA Severity. Select the severity used by Skylar Automated RCA to match the severity in the event message. The default value for this field is P1.
- Skylar AI. Message is generated by Skylar AI alerts. Skylar One receives an alert from Skylar AI and creates an event from it.
- Skylar AI Severity. Select the severity used by Skylar AI to match the severity in the event message. The default value for this field is Disregard Severity.
After selecting and defining your Event Source, enter values in the following fields :
- Type of Match. Use this field to select String or Regular Expression.
- Match String (Optional). A string used to correlate the event with a log message. Can be up to 512 characters in length. To match this event policy, the text of a log message or alert must match the value you enter in this field. Can be any combination of alpha-numeric and multi-byte characters. Skylar One's expression matching is case-sensitive. This field is recommended for events generated with a source of Syslog, API, and Email.
- Second Match String (Optional). A secondary string used to match against the originating log message. Can be up to 512 characters in length. Can be any combination of alpha-numeric and multi-byte characters. To match this event policy, the text of a log message or alert must match the value you enter in this field and the value you entered in the Match String field. This field is optional.
Message and Severity
-
Event Message. The message that appears in the Event Console page or the Viewing Events page when this event occurs. This field defaults to "%M" for new event policies upon creation. The message can be any combination of alphanumeric and multi-byte characters. Variables include the characters "%" (percent) and "|" (bar). You can also use regular expressions and variables that represent text from the original log message to create the Event Message:
-
To include regular expressions in the event message, surround the regular expression with %R and %/R. For example:
%RFilename: .*? %/R
This example would search for the first instance of the string "Filename: " (Filename-colon-space) followed by any number of any characters up to the line break. The %R indicates the beginning of a regular expression. The %/R indicates the end of a regular expression.
Skylar One will use the regular expression to search the log message and use the matching text in the event message.
For details on regular expression syntax, see the documentation at http://www.python.org.
NOTE: If an event policy with a source of "Email" or "Trap" includes a poorly formed regular expression in the event message, Skylar One will stop evaluating the event after 10 seconds and will generate a system event with a severity of Minor, alerting you to the issue.
-
You can also use the following variables in this field:
-
%I (capital "eye"). Depending on the context, this variable contains one of the following:
-
For events with a source of "dynamic", this variable contains the index value from SNMP; this index value will be displayed in the Event Message. For Dynamic Applications, %I maps to the raw index that comes back from SNMP. For example, a walk of the MIB at .1.3.6.1.4.1.999.3.2.1 might return the following OIDs, in which case %I would return .1.1, .2.1, and .3.1, respectively:
1.3.6.1.4.1.999.3.2.1.1.1
1.3.6.1.4.1.999.3.2.1.2.1,
1.3.6.1.4.1.999.3.2.1.3.1.
-
For events with a source of "syslog" or "trap", this variable contains the value that matches the Identifier Pattern field in the tab.
-
For events with a source of "internal", this variable contains the "yName" (sub-entity name) value that matches the Identifier Pattern field in the tab.
-
-
%M. The full text of the log message that triggered the event will be displayed in Event Message field.
-
%V. Data Value from log file will be displayed in the Event Message field.
-
%T. Threshold value from the log file will be displayed in Event Message field.
NOTE: Events with a Source of Rules Engine contain the variable %_event_detail_uri. This variable resolves to the URL of the incident and provides ScienceLogic users with more details about the event.
-
-
-
Event Severity. Defines the severity of the event. Choices are:
-
Healthy. Healthy events indicate that a device or condition has returned to a healthy state. Frequently, a healthy event is generated after a problem has been fixed.
-
Notice. Notice events indicate a condition that does not affect service but about which users should be aware.
-
Minor. Minor events indicate a condition that does not currently impair service, but the condition needs to be corrected before it becomes more severe.
-
Major. Major events indicate a condition that impacts service and requires immediate investigation.
-
Critical. Critical events indicate a condition that can seriously impair or curtail service and requires immediate attention (i.e., service or system outages).
-
-
Use Interface Severity Modifier. If selected, when the event is triggered, Skylar One will check to see if the interface associated with this event has a custom severity modifier. If so, the event will appear in the Event Console with that custom severity modifier applied to the severity in the Event Severity field. For example, if an interface with an Event Severity Adjust setting of Sev -1 triggers an event with an Event Severity of Major and that event has the Use Interface Severity Modifier checkbox selected, the event will appear in the Event Console with a severity of Minor.
Trigger Frequency And Expiry
- Event Auto Expiration. If selected, enter the time in which an active event will be cleared automatically if there is no reoccurrence of the event in the fields that appear:
- Expiration Time Frame. Enter the amount of time before an active event will be cleared automatically if there is no reoccurence.
- Unit of Time. Select minutes or hours.
- Multiple Matches Required to Trigger Event. If selected, enter the number of alerts and the time in which an event requires multiple triggers to occur in the fields that appear:
- Number of Alerts. Enter the number of alerts required to trigger an event within the time frame.
- Time Frame. Enter the time frame within which multiple alerts will trigger an event.
- Unit of Time. Select minutes or hours.
Event Policy Evaluation Configuration
- Detection Weight. If two event definitions are very similar, this field specifies the order in which Skylar One should match messages against the similar event definitions. The event definition with the lowest weight will be matched first. This field is most useful for events that use expression matching. Options range from 0 (first) - 20 (last).
- Multimatch. By default, Skylar One will match a log message or alert to only one event policy. If a log message or alert matches multiple event polices, Skylar One will use the Detection Weight setting to determine which event policy the log message or alert will match. If you select the Multimatch checkbox in all event policies that can match the same log message or alert, Skylar One will generate an event for every event policy that matches that single log message or alert.
- Message Match. If Skylar One has generated an event and then a second log message or alert matches the same event policy for the same entity, Skylar One will not generate a second event, but will increase the count value for the original event on the Events page and in the Viewing Events page. By default, this behavior occurs regardless of whether the two log messages or alerts contain the same message. If you select the Message Match checkbox, this behavior will occur only if the log messages or alerts contain the same message.
Suppressions
You can suppress the event on selected devices or all devices in selected device groups. When you suppress an event, you are specifying that, in the future, if this event occurs again on a specific device, the event will not appear on the tab for the device.
A manually suppressed event is suppressed only for the selected devices and devices in the selected device groups. If the event occurs on another device on which it is not suppressed, the event will appear on the Events page and on the tab for that device.
NOTE: If you want to disable an event for all devices, see the section on disabling an event.
- . Click this button to specify the devices or device groups for which to suppress the event. The Select Suppressions window will appear on the tab. Once you have selected the devices or device groups you want to suppress, click the button. The Select Suppressions window includes the following tabs:
- . To suppress the current event on one or more devices, select those devices from the list.
You can use the box at the top of the Select Suppressions window to filter the list of devices. You can enter an alpha-numeric string in the box, and the list will include only devices that match the string.
- . To suppress the current event on all devices in one or more device groups, select those device groups from the list.
You can use the box at the top of the Select Suppressions window to filter the list of device groups. You can enter an alpha-numeric string in the box, and the list will include only device groups that match the string.
Device groups that have Event/View Suppression enabled will appear in this window. For information on creating device groups, see
After entering information in each tab, click the button to save your new event.
The Advanced Tab
In the tab, you can define or edit the following fields:
Configurations for External System
-
Correlate events with an external system. Select this checkbox if you want to correlate the event with an external system. Enter the External ID in the field that appears when this is selected.
-
Categorize events with an external system. Select this checkbox if you want to categorize this event for an external system. Enter the External Category in the field that appears when this is selected.
Topology Masking
-
Masking. This option allows you to nest events under parent devices' events if there are parent-child relationships between devices.
Enabling a discovered device configured with CDP or LLDP topology in Skylar One will cause the device to provide information on its neighbor. This information identifies only that there is a neighbor device, not which device is the parent or the child. This might cause the parent-child relationship to switch, which requires you to manually reverse the issue within Skylar One. Skylar One allows you to manually build parent-child relationships between specific device categories. For more information, see Defining Parent and Child Devices.
Select one of the following options:
-
Disabled. Topology masking is disabled for this event.
-
Mask events on child devices. If this event occurs on a parent device, Skylar One will search all related children devices for masked events.
-
If you have assigned a Category to this event, Skylar One will search all the children devices and mask all events that have been defined as masked and are assigned to the same Category.
-
If you have not assigned a Category to this event, Skylar One will search all children devices and mask all events that have been defined as masked and are not assigned to a Category.
-
The masked events will not appear on the Events page. They will be nested under the parent event.
-
-
Maskable under a parent device's event. This type of event is masked on a child device only when a maskable event occurs on the parent device.
-
If you have assigned a Category to this event, Skylar One will mask this event when it occurs on a child device and an event that has been defined as masked occurs on its parent device. The masked event must have the same Category as the maskable event.
-
If you have not assigned a Category to this event, when a masked event that is not assigned to a Category occurs on the parent device, Skylar One will search all children devices and mask all events that have been defined as maskable and are not assigned to a Category.
-
The maskable events will not appear on the Events page. They will be nested under the parent event.
-
-
Both. If selected, then if this event occurs on a parent device, it behaves as a masked event. If this event occurs on a child device, it behaves as a maskable event.
-
-
Choose Category. When you define a hierarchy between events, you can include a Category. A Category allows Skylar One to more efficiently align masked events with maskable events. When you align an event category to a masked or maskable event, that event will be correlated with only events that are aligned with the same category. An event can be aligned to multiple categories; for event correlation to occur, the masked event and the maskable event must both be aligned with a common category.
-
Click the button to open the Available Categories window and select the categories you want to add.
For more details on event categories, see the section on event correlation.
If you assign a topology category to an event that is neither suppressing nor suppressible, Skylar One does not use the Category. The Category will have no effect.
-
If you have assigned a Category to a masked event, Skylar One will search all the children devices and suppress all events that have been defined as maskable and are assigned to the same Category.
-
If you have not assigned a Category to a masked event, when the event occurs on the parent device Skylar One will search all children devices and suppress all events that have been defined as maskable and are not assigned to a Category.
-
Settings for Device Sub-Entities
-
Extract sub-entity using a regular expression. Select this checkbox if you want to extract a sub-entity using a regular expression. Enter values in the following fields that appear when this is turned on:
- Identifier pattern. A regular expression used to extract the name of a sub-entity (like the name of a network interface ) from within the log entry. By identifying the sub-entity, Skylar One can create a unique event for each sub-entity, instead of a single event for the entire device. For an event to auto-clear another event, both events must have the same sub-entity name. The regular expression can be up to 512 characters in length and can include multi-byte characters.
- Result order for multiple entities. If the Identifier Pattern field returns multiple results, users can specify which results to use and in which order. Each result is represented by a variable. For example, users could specify "%2:%1" for "Interface %2: Peer %1", where %1 is the first match with identifier pattern and %2 is the second match with identifier pattern. This field is optional.
- Sub-entity type (y-type). Specifies a sub-entity type (yType). A sub-entity is a hardware component (CPU, disk, interface, etc). The "yType" value is stored as an integer in a database table; each sub-entity type is associated with a unique integer value (for example, Interfaces = 7). If Skylar One knows an interface's "yName" (specified in the Identifier Pattern field) and the "yType" (specified in this field), Skylar One can determine the unique "yID" for the interface. The "yID" is stored in the table in which all instances of a specific sub-entity are stored. For example, for "yType" of "interface," the "yID" is a unique numeric ID for a specific interface on a specific device. This "yID" is stored in the table of all discovered interfaces (if_id in master_dev.device_interfaces) and is unique within this table.
If you used the previous three fields to associate an event with an interface, then on the Events page, the link icon for this event will be for an interface and will lead to a performance report for the specific interface.
The %Y variable (yName) and %y variable (yID) can be used in policies associated with events that use the previous three fields. That is, run book action policies and related ticket templates that are triggered by the event can use the %Y variable and the %y variable.
For events generated by Dynamic Application alerts, the %Y variable value is pre-populated with a unique index value that is used to ensure that events roll up correctly. If an event policy does not specifically override the %Y variable, this variable will be populated with the "yName" (sub-entity name) value, which is taken from an index value that might not be human-readable.
Skylar One populates the "yName" (sub-entity name) value in varying ways based on the event source.
For example, for events generated by Dynamic Application alerts, the yName is typically pulled from the event message using the Identifier Pattern and Result order for multiple entities that are defined in the event policy.
Meanwhile, for internal events, the yName is determined by the process that creates the alert, based on which element reported the condition. So, for instance, if a filesystem exceeds a particular threshold, the yName is the filesystem identifier.
Auto-Clear
-
Auto-Clear. If enabled, this field specifies that the current event will clear each selected event. Select Auto-Clear, then click the button to select one or more events from the list. The Available Event Policies page appears. Select the event policies you want to auto-clear and then click the button.
-
When the current event occurs, Skylar One automatically removes each selected events event from the Events page. For example, suppose you have a "Device not responding to ping" event. If the next polling session produces the "Device now responding normally to ping " event, the auto-clear feature could automatically clear the original event from the Events page.
After entering information in each tab, click the button to save your new event.
Editing an Event Policy
Skylar One includes pre-defined events for the most commonly encountered conditions on the most common platforms. However, Skylar One allows you to customize these events to meet the needs of your organization. You can edit existing event policies in the Event Policies page.
If you edit an event policy that was imported into your Skylar One system in a PowerPack, you should remove the event policy from the PowerPack. If you do not remove the event policy from the PowerPack and the same PowerPack is updated and re-imported into your system, any changes you have made in the and tabs for the event policy will be over-written. For more information on PowerPacks, see
To edit an existing event policy:
- Go to the Event Policies page (Events > Event Policies).
- Click the Actions icon (
 ) for the event policy you want to edit and select Edit.
 - The selected event policy is displayed in the Event Policy Editor page, where you can edit one or more properties of the event policy. The Event Policy Editor page contains the following fields and tabs:
- . The landing page when viewing or editing an existing event policy. This tab provides an at-a-glance view of the properties of the event policy. This tab is described in the Summary Tab section.
- . The starting point when creating a new event policy, and the tab where you define the fundamental configuration options for the event policy. This tab is described in the Basic Tab section.
- . Contains more advanced configuration options, such as topology masking, device sub-entity settings, external system integration fields, and event auto-clear mapping. This tab is described in the Advanced Tab section.
- Click to save your changes to the event policy.
Duplicating an Event Policy
If you are creating a new Event Policy that is similar to an existing Event Policy, you can duplicate the existing Event Policy. You can then edit the duplicated Event Policy as needed to create your new Event Policy.
To duplicate an Event Policy:
- Go to the Event Policies page (Events > Event Policies, or Registry > Events > Event Manager in the classic user interface).
- Click the Actions icon () for the event policy you want to duplicate and select Duplicate. A new Event Policy will appear in the list. It will have the same name as the Event Policy you duplicated, with the addition of "-Copy" at the end. For example, if you duplicated an Event Policy with the name "Temperature Critical", then the new Event Policy would be named "Temperature Critical-Copy".
- Follow the instructions in the Editing an Event Policy section to edit the new Event Policy.
Deleting an Event Policy
To delete an Event Policy:
- Go to the Event Policies page (Events > Event Policies, or Registry > Events > Event Manager in the classic user interface).
- Click the Actions icon () for the event policy you want to duplicate and select Delete.
Selecting Multiple Event Policies
On the Event Policies page (Events > Event Policies, or Registry > Events > Event Manager in the classic user interface), you can use the checkboxes to the left of the Event Policies to select more than one Event Policy at a time:

After you select the Event Policies, you can click one of the following buttons at the bottom of the page:
- Delete. Deletes all of the selected Event Policies. When you click , a confirmation window appears. To confirm that you want to delete the selected Event Policies, click in the confirmation window.
- Enable. Enables all of the selected Event Policies. When an Event Policy is enabled, it appears on the Events page for any device that meets the Event Policy's match logic criteria.
- Disable. Disables all of the selected Event Policies. When an Event Policy is disabled, it will no longer appear on the Events page for any device, even if a device meets the Event Policy's match logic criteria.
- Clear Suppressions. Clears all suppressions for all of the selected Event Policies. In the future, if the Event Policy is triggered on a device on which it was previously suppressed, the event will appear on the Events page for that device.
If you want to select all of the Event Policies that are currently showing on the page, click the button.
If you do not want to take action on the selected Event Policies, click the button to deselect the checkboxes.
NOTE: To use these features on the Event Policies page, accounts of type "user" must be granted one or more access keys that include the following access hooks: Registry, Registry>Events>Event Manager, and Event:Add/Rem. For more information on access hooks, see the
Using Event Policies in the Classic Skylar One User Interface
This section describes how to view, define, and edit event policies using the Event Policy Manager in the classic Skylar One user interface.
Viewing the List of Event Policies in the Classic Skylar One User Interface
From the Event Policy Manager page of the classic user interface, you can view a list of all event policies in Skylar One. To access the Event Policy Manager page:
- Go to the Event Policy Manager page (Registry > Events > Event Manager). The Event Policy Manager page appears.
- The Event Policy Manager page displays the following about each event policy:
To sort the list of event policies, click on a column heading. The list will be sorted by the column value, in ascending order. To sort by descending order, click the column heading again. The Last Edited column sorts by descending order on the first click; to sort by ascending order, click the column heading again.
- Event Policy Name. The name of the event.
- Type. Specifies the source for the event. Possible values are:
- Syslog. Message is generated by the syslog protocol. Syslogs can be sent by devices and proxy devices such as managers of managers (MoM). A syslog is an unsolicited message from a device to Skylar One. Syslog is a standard log format supported by most networking and UNIX-based devices and applications. Windows log files can be converted to syslog format using conversion tools. For more information on syslogs,
- Internal. Message is generated by a ScienceLogic process. The message is about the Skylar One system itself, instead of the devices that the Skylar One system monitors.
- Trap. Message is generated by an SNMP trap. SNMP traps can be sent by devices and proxy devices like MoMs. An SNMP trap is an unsolicited message from a device to Skylar One. A trap indicates that an emergency condition or a condition that merits immediate attention has occurred on the device. For more information on traps,
- Dynamic. Message is generated by a Dynamic Application alert. Dynamic Applications are customizable policies that tell Skylar One how to monitor applications and devices. You can define alerts in Dynamic Applications. An alert can trigger events based on the data collected by the Dynamic Application. Alerts allow you to examine and manipulate values retrieved by Dynamic Applications. When an alert evaluates to TRUE, the alert inserts a message in the associated device's device log. Skylar One examines each new message in the device log and determines if the message matches an event definition. If the message matches an event definition, Skylar One generates an instance of that event. For example, an alert might be defined to evaluate to TRUE if the temperature of a chassis exceeds 100 degrees Fahrenheit. If the chassis temperature exceeds 100 degrees at some point in the future, Skylar One inserts a message in the associated device's log files. Skylar One then matches that message with an existing event, and then triggers the event.
- Email. Message is generated by an email message sent to Skylar One.
- API. Message is generated by inserting a message into the main database. These messages can be inserted by a snippet automation action, a snippet Dynamic Application, or by a request to the ScienceLogic API. For more information on snippet automation actions,
- Skylar One agent. Message is generated by log file messages collected by the Skylar One agent.
- State. Specifies whether event is to be operational or not. Possible values are "enabled" or "disabled."
- P-Pack. Specifies whether the event is included in a PowerPack.
- Severity. The severity of the event. Choices are:
- Healthy. Healthy events indicate that a device or condition has returned to a healthy state. Frequently, a healthy event is generated after a problem has been fixed.
- Notice. Notice events indicate a condition that does not affect service but about which users should be aware.
- Minor. Minor events indicate a condition that does not currently impair service, but the condition needs to be corrected before it becomes more severe.
- Major. Major events indicate a condition that impacts service and requires immediate investigation.
- Critical. Critical events indicate a condition that can seriously impair or curtail service and requires immediate attention (i.e., service or system outages).
- Weight. If two event definitions are very similar, the weight field specifies the order in which Skylar One should match messages against each event definition. This field is most useful for events that use expression matching. The event definition with the lowest weight will be matched first.
- ID. Unique numeric ID for the event, generated by Skylar One.
- Expiry. If enabled, the time in which an active event will be cleared automatically if there is no reoccurrence of the event. Choices are:
- Disabled
- 1 minute – 24 hours
- Time. If enabled, the maximum amount of time to wait between multiple identical messages from the same source before creating a new event message in the Event Monitor. This allows related events to be rolled-up and posted together, under one event description. Choices are:
- Disabled
- 1 minute – 24 hours
- Thresh. If enabled, the number of instances of an identical event from the identical source that must occur before creating a new event message in the Event Console page. Choices are:
- Disabled
- 1- 100
- Edited By. Name of the user who created or last edited the event.
- Last Edited. Date and time the event was created, imported into Skylar One, or last edited.
- External ID. The external event ID for the event. The external event ID is an optional field that can be used to correlate an event policy with an event ID on another network-monitoring system or on another Skylar One system where the event has a different event ID.
- Category. The category for the event. This is an optional field. If Skylar One will be sending this event to an external system, this field defines the event category for use by the external system.
Filtering the List of Event Policies in the Classic Skylar One User Interface
The Filter-While-You-Type fields appear as a row of blank fields at the top of the list. These fields let you filter the items that appear in the list.
The list is dynamically updated as you select each filter. For each filter, you must make a selection from a drop-down menu or type text to match against. Skylar One will search for entries that match the text, including partial matches. Text matches are not case-sensitive, and you can use special characters in each text field.
By default, the cursor is placed in the first Filter-While-You-Type field. You can use the <Tab> key or your mouse to move your cursor through the fields.
You can filter by one or more of the following parameters. Only items that meet all of the filter criteria are displayed on the page.
The following describes each filter on the Event Policy Manager page:
- Event Policy Name. You can enter text to match, including special characters (comma, ampersand, and exclamation mark), and the Event Policy Manager page will display only policies that have a matching policy name.
- Type. You can enter text to match, including special characters (comma, ampersand, and exclamation mark), and the Event Policy Manager page will display only policies that have a matching source.
- State. You can enter text to match, including special characters (comma, ampersand, and exclamation mark), and the Event Policy Manager page will display only policies that have a matching state (enabled or disabled).
- P-Pack. You can enter text to match, including special characters (comma, ampersand, and exclamation mark), and the Event Policy Manager page will display only policies that are or are not included in a PowerPack (yes or no).
- Severity. You can enter text to match, including special characters (comma, ampersand, and exclamation mark), and the Event Policy Manager page will display only policies that are defined with a matching severity.
- Weight. You can enter text to match, including special characters (comma, ampersand, and exclamation mark), and the Event Policy Manager page will display only policies defined with a matching weight.
- ID. You can enter text to match, including special characters (comma, ampersand, and exclamation mark), and the Event Policy Manager page will display only policies that have a matching event policy ID.
- Expiry. You can enter text to match, including special characters (comma, ampersand, and exclamation mark), and the Event Policy Manager page will display only policies that have a matching expiry delay time.
- Time. You can enter text to match, including special characters (comma, ampersand, and exclamation mark), and the Event Policy Manager page will display only policies that have a matching occurrence time.
- Thresh. You can enter text to match, including special characters (comma, ampersand, and exclamation mark), and the Event Policy Manager page will display only policies that have a matching occurrence count.
- Edited By. You can enter text to match, including special characters (comma, ampersand, and exclamation mark), and the Event Policy Manager page will display only policies that have been created or edited by a matching user.
- Last Edited. You can enter text to match, including special characters (comma, ampersand, and exclamation mark), and the Event Policy Manager page will display only policies that have been created or last edited within the matching time span. Choices are:
- All. Display all event policies that match the other filters.
- Last Minute. Display only event policies that have been created within the last minute.
- Last Hour. Display only event policies that have been created within the last hour.
- Last Day. Display only event policies that have been created within the last day.
- Last Week. Display only event policies that have been created within the last week.
- Last Month. Display only event policies that have been created within the last month.
- Last Year. Display only event policies that have been created within the last year.
- External ID. You can enter text to match, including special characters, and the Event Policy Manager page will display only policies that have a matching external ID.
- Category. You can enter text to match, including special characters, and the Event Policy Manager page will display only policies that have a matching category.
Special Characters
You can include the following special characters to filter by each column except those that display date and time:
When searching for a string, Skylar One will match substrings by default, even if you do not include any special characters. For example, searching for "hel" will match both "hello" and "helicopter". When searching for a numeric value, Skylar One will not match a substring unless you use a special character.
String and Numeric
- , (comma). Specifies an "OR" operation. Works for string and numeric values. For example:
"dell, micro" matches all values that contain the string "dell" OR the string "micro".
- & (ampersand). Specifies an "AND " operation. Works for string and numeric values. For example:
"dell & micro" matches all values that contain both the string "dell" AND the string "micro", in any order.
- ! (exclamation point). Specifies a "not" operation. Works for string and numeric values. For example:
NOTE: You can also use the "!" character in combination with the arithmetical special characters (min-max, >, <, >=, <=, =) described below.
- * (asterisk). Specifies a "match zero or more" operation. Works for string and numeric values. For a string, matches any string that matches the text before and after the asterisk. For a number, matches any number that contains the text. For example:
"hel*er" would match "helpers" and "helicopter" but not "hello".
"325*" would match "325", "32561", and "325000".
"*000" would match "1000", "25000", and "10500000".
- ? (question mark). Specifies "match any one character". Works for string and numeric values. For example:
"l?ver" would match the strings "oliver", "levers", and "lover", but not "believer".
"135?" would match the numbers "1350", "1354", and "1359", but not "135" or "13502"
String
- ^ (caret). For strings only. Specifies "match the beginning". Matches any string that begins with the specified string. For example:
"^sci" would match "scientific" and "sciencelogic", but not "conscious".
"^happy$" would match only the string "happy", with no characters before or after.
"!^micro" would match all values that do not start with "micro".
"!^$" would match all values that are not null.
"!^" would match null values.
- $ (dollar sign). For strings only. Specifies "match the ending". Matches any string that ends with the specified string. For example:
"ter$" would match the string "renter" but not the string "terrific".
"^happy$" would match only the string "happy", with no characters before or after.
"!fer$" would match all values that do not end with "fer".
"!^$" would match all values that are not null.
"!$" would match null values.
NOTE: You can use both ^ and $ if you want to match an entire string and only that string. For example, "^tern$" would match the strings "tern" or "Tern" or "TERN"; it would not match the strings "terne" or "cistern".
Numeric
- min-max. Matches numeric values only. Specifies any value between the minimum value and the maximum value, including the minimum and the maximum. For example:
"1-5 "would match 1, 2, 3, 4, and 5.
- - (dash). Matches numeric values only. A "half open" range. Specifies values including the minimum and greater or including the maximum and lesser. For example:
"1-" matches 1 and greater. So would match 1, 2, 6, 345, etc.
"-5" matches 5 and less. So would match 5, 3, 1, 0, etc.
- > (greater than). Matches numeric values only. Specifies any value "greater than". For example:
">7" would match all values greater than 7.
- < (less than). Matches numeric values only. Specifies any value "less than". For example:
"<12" would match all values less than 12.
- >= (greater than or equal to). Matches numeric values only. Specifies any value "greater than or equal to". For example:
"=>7" would match all values 7 and greater.
- <= (less than or equal to). Matches numeric values only. Specifies any value "less than or equal to". For example:
"=<12" would match all values 12 and less.
- = (equal). Matches numeric values only. For numeric values, allows you to match a negative value. For example:
"=-5 " would match "-5" instead of being evaluated as the "half open range" as described above.
Examples
- "!dell" matches all values that do not contain the string "dell".
- "!^micro" would match all values that do not start with "micro".
- "!fer$" would match all values that do not end with "fer".
- "!^$" would match all values that are not null.
- "!^" would match null values.
- "!$" would match null values.
- "!*" would match null values.
- "happy, !dell" would match values that contain "happy" OR values that do not contain "dell".
- "aio$". Matches only text that ends with "aio".
- "^shu". Matches only text that begins with "shu".
- "^silo$". Matches only the text "silo", with no characters before or after.
- "!silo". Matches only text that does not contains the characters "silo".
- "!^silo". Matches only text that does not start with "silo".
- "!0$". Matches only text that does not end with "0".
- "!^silo$". Matches only text that is not the exact text "silo", with no characters before or after.
- "!^". Matches null values, typically represented as "--" in most pages.
- "!$". Matches null values, typically represented as "--" in most pages.
- "!^$". Matches all text that is not null.
- silo, !aggr". Matches text that contains the characters "silo" and also text that does not contain "aggr".
- "silo, 02, !aggr". Matches text that contains "silo" and also text that contains "02" and also text that does not contain "aggr".
- "silo, 02, !aggr, !01". Matches text that contains "silo" and also text that contains "02" and also text that does not contain "aggr" and also text that does not contain "01".
- "^s*i*l*o$". Matches text that contains the letter "s", "i", "l", "o", in that order. Other letters might lie between these letters. For example "sXiXlXo" would match.
- "!^s*i*l*o$". Matches all text that does not that contains the letter "s", "i", "l", "o", in that order. Other letters might lie between these letters. For example "sXiXlXo" would not match.
- "!vol&!silo". Matches text that does not contain "vol" AND also does not contain "silo". For example, "volume" would match, because it contains "vol" but not "silo".
- "!vol&02". Matches text that does not contain "vol" AND also contains "02". For example, "happy02" would match, because it does not contain "vol' and it does contain "02".
- "aggr,!vol&02". Matches text that contains "aggr" OR text that does not contain "vol" AND also contains "02".
- "aggr,!vol&!infra". Matches text that contains "aggr" OR text that does not contain "vol" AND does not contain "infra".
- "*". Matches all text.
- "!*". Matches null values, typically represented as "--" in most pages.
- "silo". Matches text that contains "silo".
- " !silo ". Matches text that does not contain "silo".
- " !^silo$ ". Matches all text except the text "silo", with no characters before or after.
- "-3,7-8,11,24,50-". Matches numbers 1, 2, 3, 7, 8, 11, 24, 50, and all numbers greater than 50.
- "-3,7-8,11,24,50-,a". Matches numbers 1, 2, 3, 7, 8, 11, 24, 50, and all numbers greater than 50, and text that includes "a".
- "?n". Matches text that contains any single character and the character "n". For example, this string would match "an", "bn", "cn", "1n", and "2n".
- "n*SAN". Matches text the contains "n", zero or any number of any characters and then "SAN". For example, the string would match "nSAN", and "nhamburgerSAN".
- "^?n*SAN$”. Matches text that begins with any single character, is following by "n", and then zero or any number of any characters, and ends in "SAN".
Defining an Event Policy in the Classic Skylar One User Interface
Skylar One includes pre-defined events for the most commonly encountered conditions on the most common platforms. However, if the pre-defined events do not meet the needs of your organization, you can define new events that better suit your needs.
From the Event Policy Manager page in the classic Skylar One user interface, you can define a new event. You can define custom events to meet your business requirements. You can also define events to be triggered by any custom Dynamic Application alerts you have created.
To create an event definition in the classic Skylar One user interface:
- Go to Event Policy Manager page (Registry > Events > Event Manager).
- In the Event Policy Manager page, click the button. The Event Policy Editor page appears.
- In the Event Policy Editor page and set of tabs, you can define a new event. The Event Policy Editor page contains three tabs:
- Policy. Allows you to define basic parameters for the event. This tab is described in the following section.
- Advanced. Allows you to define pattern-matching for the event and also define event roll-ups and suppressions.
- Suppressions. Allows you to suppress the event on selected devices. When you suppress an event, you are specifying that, in the future, if this event occurs again on a specific device, the event will not appear in the Event Console page or the Viewing Events page for the device.
Defining Basic Event Parameters in the Policy Tab
In the Event Policy Editor, the tab allows you to define or edit the basic parameters for an event. In the tab, you can define or edit the following fields:
- Event Source. Specifies the source for the event. Choices are:
- Syslog. Message is generated by the syslog protocol. Syslogs can be sent by devices and proxy devices such as managers of managers (MoM). A syslog is an unsolicited message from a device to Skylar One. Syslog is a standard log format supported by most networking and UNIX-based devices and applications. Windows log files can be converted to syslog format using conversion tools. For more information on syslogs,
- Internal. Message is generated by a ScienceLogic process. The message is about the Skylar One system itself, instead of the devices that the Skylar One system monitors.
- Trap. Message is generated by an SNMP trap. SNMP traps can be sent by devices and proxy devices like MoMs. An SNMP trap is an unsolicited message from a device to Skylar One. A trap indicates that an emergency condition or a condition that merits immediate attention has occurred on the device. For more information on traps,
- Dynamic. Message is generated by a Dynamic Application alert. Dynamic Applications are customizable policies that tell Skylar One how to monitor applications and devices. You can define alerts in Dynamic Applications. An alert can trigger events based on the data collected by the Dynamic Application. Alerts allow you to examine and manipulate values retrieved by Dynamic Applications. When an alert evaluates to TRUE, the alert inserts a message in the associated device's device log. Skylar One examines each new message in the device log and determines if the message matches an event definition. If the message matches an event definition, Skylar One generates an instance of that event. For example, an alert might be defined to evaluate to TRUE if the temperature of a chassis exceeds 100 degrees Fahrenheit. If the chassis temperature exceeds 100 degrees at some point in the future, Skylar One inserts a message in the associated device's log files. Skylar One then matches that message with an existing event, and then triggers the event.
- Email. Message is generated by an email message sent to Skylar One.
- API. Message is generated by inserting a message into the main database. These messages can be inserted by a snippet automation action, a snippet Dynamic Application, or by a request to the ScienceLogic API. For more information on snippet automation actions,
- Skylar One agent. Message is generated by log file messages collected by the Skylar One agent.
- Skylar Automated RCA. Message is generated by Skylar Automated RCA. You can view Skylar Automated RCA events, including suggestions, custom alerts, and accepted alerts.
NOTE: Currently, users cannot create or edit an event with a Source of Rules Engine.
- Policy Name. The name of the event. Can be any combination of alphanumeric characters, up to 48 characters in length.
- Operational State. Specifies whether event is to be operational or not. Choices are Enabled or Disabled.
- Event Message. The message that appears in the Event Console page or the Viewing Events page when this event occurs. Can be any combination of alphanumeric and multi-byte characters. Variables include the characters "%" (percent) and "|" (bar). You can also use regular expressions and variables that represent text from the original log message to create the Event Message:
- To include regular expressions in the Event Message:
Surround the regular expression with %R and %/R. For example:
%RFilename: .*? %/R
Would search for the first instance of the string "Filename: " (Filename-colon-space) followed by any number of any characters up to the line break. The %R indicates the beginning of a regular expression. The %/R indicates the end of a regular expression.
Skylar One will use the regular expression to search the log message and use the matching text in the event message.
For details on regular expression syntax, see the documentation at http://www.python.org.
NOTE: If an event policy with a source of "Email" or "Trap" includes a poorly formed regular expression in the event message, Skylar One will stop evaluating the event after 10 seconds and will generate a system event with a severity of Minor, alerting you to the issue.
- You can also use the following variables in this field:
- %I ("eye"). Depending on the context, this variable contains one of the following:
- For events with a source of "dynamic", this variable contains the index value from SNMP; this index value will be displayed in the Event Message. For Dynamic Applications, %I maps to the raw index that comes back from SNMP. For example, a walk of the MIB at .1.3.6.1.4.1.999.3.2.1 might return the following OIDs, in which case %I would return .1.1, .2.1, and .3.1, respectively:
1.3.6.1.4.1.999.3.2.1.1.1
1.3.6.1.4.1.999.3.2.1.2.1,
1.3.6.1.4.1.999.3.2.1.3.1.
- For events with a source of "syslog" or "trap", this variable contains the value that matches the Identifier Pattern field in the tab.
- For events with a source of "internal", this variable contains the "yName" (sub-entity name) value that matches the Identifier Pattern field in the tab.
- %M. The full text of the log message that triggered the event will be displayed in Event Message field.
- %V. Data Value from log file will be displayed in the Event Message field.
- %T. Threshold value from the log file will be displayed in Event Message field.
NOTE: Events with a Source of Rules Engine contain the variable %_event_detail_uri. This variable resolves to the URL of the incident and provides ScienceLogic users with more details about the event.
- Event Severity. Defines the severity of the event. Choices are:
- Healthy. Healthy events indicate that a device or condition has returned to a healthy state. Frequently, a healthy event is generated after a problem has been fixed.
- Notice. Notice events indicate a condition that does not affect service but about which users should be aware.
- Minor. Minor events indicate a condition that does not currently impair service, but the condition needs to be corrected before it becomes more severe.
- Major. Major events indicate a condition that impacts service and requires immediate investigation.
- Critical. Critical events indicate a condition that can seriously impair or curtail service and requires immediate attention (i.e., service or system outages).
- Use Modifier. If selected, when the event is triggered, Skylar One will check to see if the interface associated with this event has a custom severity modifier. If so, the event will appear in the Event Console with that custom severity modifier applied to the severity in the Event Severity field. For example, if an interface with an Event Severity Adjust setting of Sev -1 triggers an event with an Event Severity of Major and that event has the Use Modifier checkbox selected, the event will appear in the Event Console with a severity of Minor.
- Policy Description. Text that explains what the event means and what possible causes are. You can use the editor to format the description text, insert content from a saved template, and add an attachment, link, or image to the description. This text is displayed in the Event Console page and the Ticket Console page.
After defining the basic properties, click to save your new event.
Defining Pattern Matching and Advanced Behavior in the Advanced Tab
The tab in the Event Policy Editor page allows you to define or edit pattern-matching for the event and also define event roll-ups and suppressions. In the tab, you can define or edit the following fields:
- Occurrence Count. If enabled, the number of instances of an identical event from the identical source (that is, on the same device) that must occur before creating a new event message on the Events page. Options include:
- Disabled
- 1- 1,000 times
- Occurrence Time. The time span during which the instances of an identical event (specified in the Occurrence Count field) from the identical source must occur before Skylar One will create a new event message on the Events page. For example, if the Occurrence Count field contains the value "2" and the Occurrence Time field contains the value "5 minutes," the event instance must occur twice in five minutes on the same device before Skylar One will generate an event message. Options include:
- Disabled
- Time periods from 1 minute - 2 days
When an event has met the Occurrence Count and Occurrence Time thresholds, Skylar One will create a new event message on the Events page. On the Events page, the Age/Elapsed column will specify the time since the very first occurrence of the event, even though that occurrence did not appear on the Events page. The Count column will specify the number of times the event has occurred, even though the event does not appear on the Events page multiple times.
- Expiry Delay. If enabled, the time in which an active event will be cleared automatically if there is no reoccurrence of the event. Options include:
- Disabled
- 1 minute - 24 hours
- Detection Weight. If two event definitions are very similar, the weight field specifies the order in which Skylar One should match messages against the similar event definitions. The event definition with the lowest weight will be matched first. This field is most useful for events that use expression matching. Options range from 0 (first) - 20 (last).
The weight field allows users to define detailed event definitions to be used for specific log messages, while having catch-all event definitions with less-specific matches.
For example, suppose Skylar One receives the following log message:
2011/04/23 12:34:22 KTLD [ERROR] Message task exception 347 while handling return
Now suppose two events have been defined:
- Event 1:
Will match the expression:
KTLD [ERROR]
Has a weight of "10"
- Event 2:
Will match the two expressions:
KTLD [ERROR]
and
exception 347
Has a weight of "5"
Both event definitions match the log message. However, Skylar One uses only the event definition with the lowest weight. So Skylar One would first validate the incoming message against Event 2.
- Log Policy. Select the Log File Monitoring Policy the agent will use to collect the log message.
NOTE: The Log Policy field appears only when you select Skylar One agent in the Event Source field of the Policy tab. See Defining Basic Event Parameters in the Policy Tab for more information.
- Link-Message. For events with a source of "internal," specifies the message generated by Skylar One.
You can use the field at the top of the Link-Message field to filter the list of ScienceLogic messages. If you enter an alpha-numeric string in the field, the Link-Message field will include only ScienceLogic messages that match the string.
- Link-Alert. For events with a source of "dynamic," displays a list of alerts defined in Dynamic Applications. Select an alert to associate with the event.
You can use the field at the top of the Link-Alert field to filter the list of alerts from Dynamic Applications. If you enter an alpha-numeric string in the field, the Link-Alert field will include only alerts that match the string.
- Link-Trap. For events with a source of "trap," displays a list of trap OIDs that are included in the MIB files that have been compiled in Skylar One. You can either select one of the listed trap OIDs to associate with the event or manually enter a custom trap OID. You can use an asterisk (*) as a wildcard character at the end of the trap OID. If you add the wildcard character to the end of the trap OID, the event policy will match all trap OIDs that start with the specified OID string. This is useful for creating "catch all" event policies.
You can use the field at the top of the Link-Trap field to filter the list of SNMP traps. If you enter an alpha-numeric string in the field, the Link-Trap field will include only traps that match the string.
NOTE: Before selecting a trap OID, check the SNMP Trap Filters page (Evnts > SNMP Trap Filters, or Registry > Events > SNMP Trap Filters in the classic user interface) to be sure that the trap is not being filtered out. For more information on the SNMP Trap Filters page,
- Source Host Varbind. For events with a source of "trap," specifies an OID that is included in the trap. This OID will contain the IP address to align with the event. This field allows you to align an event with a device other than the trap's sender. For more information about traps in Skylar One, see the
- If a value is specified in this field, Skylar One examines the OID specified in this field. If the value stored in the OID matches the primary IP address of a device in Skylar One, the resulting event will be aligned with that device.
- If a value is specified in this field, Skylar One examines the OID specified in this field. If the value stored in the OID does not match a primary IP address of a device in Skylar One, the resulting event will be aligned with the device that sent the trap.
- If no value is specified in this field, but the trap includes the default snmpTrapAddress OID, Skylar One will examine the value stored in the snmpTrapAddress OID. If the value stored in the default snmpTrapAddress OID matches the primary IP address of a device in Skylar One, the resulting event will be aligned with that device.
- If no value is specified in this field and the trap does not include the snmpTrapAddress OID, Skylar One will align the resulting event with the device that sent the trap.
- Syslog Facility. Facility information used by syslog to match an event message.
- Syslog Severity. Severity information used by syslog to match an event message.
- Syslog Application Name. Application name used by syslog to match an event message.
- Syslog Process ID. Process ID used by syslog to match an event message.
- Syslog Message ID. Message ID used by syslog to match an event message.
NOTE: For more information on the syslog fields for events, see https://datatracker.ietf.org/doc/html/rfc5424.
- Component Type. Appears for events from all sources. Optional field. If applicable, specifies the hardware component associated with the event. Options include:
- N/A
- CPU
- Disk
- File system
- Memory
- Swap
- Interface
- External Event Id. Optional. If Skylar One will be sending an event trap to an external system, this field helps identify the event for the external system. If you need to correlate this event with an event ID on another network-monitoring system or on another Skylar One system where the event has a different event ID, you can reference that external event ID in this field. For details on sending traps to external systems, see the
- External Category. Optional. If Skylar One will be sending an event trap to an external system, this field helps categorize the event for the external system. For details on sending traps to external systems, see the
- Match Logic. Specifies whether Skylar One should process the First Match String field and Second Match String as regular expressions or as simple text matches.
NOTE: If you selected Regex Match in the Match Logic field, you cannot define a "match all" expression by leaving the First Match String and Second Match String fields empty.
- Use Multi-match. By default, Skylar One will match a log message or alert to only one event policy. If a log message or alert matches multiple event polices, Skylar One will use the Detection Weight setting to determine which event policy the log message or alert will match. If you select the Use Multi-match checkbox in all events that can match the same log message or alert, Skylar One will generate an event for every event policy that matches that single log message or alert.
- Use Message-match. If Skylar One has generated an event and then a second log message or alert matches the same event policy for the same entity, Skylar One will not generate a second event, but will increase the count value for the original event on the Events page and in the Viewing Events page. By default, this behavior occurs regardless of whether the two log messages or alerts contain the same message. If you select the Use Message-match checkbox, this behavior will occur only if the log messages or alerts contain the same message.
- First Match String. A string used to correlate the event with a log message. Can be up to 512 characters in length. To match this event policy, the text of a log message or alert must match the value you enter in this field. Can be any combination of alpha-numeric and multi-byte characters. Skylar One's expression matching is case-sensitive. This field is required for events generated with a source of Syslog, API, and Email.
- Second Match String. A secondary string used to match against the originating log message. Can be up to 512 characters in length. Can be any combination of alpha-numeric and multi-byte characters. To match this event policy, the text of a log message or alert must match the value you enter in this field and the value you entered in the First Match String field. This field is optional.
NOTE: The Match Logic field specifies whether Skylar One should process First Match String and Second Match String as simple text matches or as regular expressions.
NOTE: You can define an event so that it is triggered only when it occurs on a specific interface. You can then include the interface name and Skylar One's unique interface ID for the interface in the event message. When defining an event, you can use the following three fields below to associate an event with an interface.
- Identifier Pattern. A regular expression used to extract the name of a sub-entity (like the name of a network interface ) from within the log entry. By identifying the sub-entity, Skylar One can create a unique event for each sub-entity, instead of a single event for the entire device. For an event to auto-clear another event, both events must have the same sub-entity name. The regular expression can be up to 512 characters in length and can include multi-byte characters.
For example, a log message indicating a link has gone down may include the network interface name. So the Identifier Pattern field could extract the network interface name from the log message. Skylar One will assign this value as the "yName" (sub-entity name) of the interface in the database table for interfaces. This name tends to be more descriptive of the interface (for example eth01, eth02, s01, s01) and is unique on the device, but is not unique in Skylar One.
NOTE: Skylar One's expression matching is case-sensitive.
For details on the regular-expression syntax allowed by Skylar One, see
- Override YType. Specifies a sub-entity type (yType). A sub-entity is a hardware component (CPU, disk, interface, etc). The "yType" value is stored as an integer in a database table; each sub-entity type is associated with a unique integer value (e.g. Interfaces = 7). If Skylar One knows an interface's "yName" (specified in the Identifier Pattern field) and the "yType" (specified in the Override YType field), Skylar One can determine the unique "yID" for the interface. The "yID" is stored in the table in which all instances of a specific sub-entity are stored. For example, for "yType" of "interface," the "yID" is a unique numeric ID for a specific interface on a specific device. This "yID" is stored in the table of all discovered interfaces (if_id in master_dev.device_interfaces) and is unique within this table.
- Identifier Format. (Optional.) If the Identifier Pattern field returns multiple results, you can use variables to specify which results to use and in which order. Additional text strings can also be added with the variables to provide descriptions and make event messages more readable. When an Event Message definition contains the variable %I (capital "eye"), the %I variable will be replaced with the output specified in the Identifier Format field. You can use the following variables in this field, in addition to text strings:
- %1. The first match with the identifier pattern. This is the default behavior if no value is supplied in the Identifier Format field.
- %2. The second match with identifier pattern.
- %3. The third match with the identifier pattern. And so forth.
NOTE: If you used the previous three fields to associate an event with an interface, then on the Events page, the link icon for this event will be for an interface and will lead to a performance report for the specific interface.
NOTE: The %Y variable (yName) and %y variable (yID) can be used in policies associated with events that use the previous three fields. That is, Run Book Action Policies and related Ticket Templates that are triggered by the event can use the %Y variable and the %y variable. For details on Run Book Actions Policies and using Ticket Templates, see
NOTE: For events generated by Dynamic Application alerts, the %Y variable value is pre-populated with a unique index value that is used to ensure that events roll up correctly. If an event policy does not specifically override the %Y variable, this variable will be populated with the "yName" (sub-entity name) value, which is taken from an index value that might not be human-readable.
Skylar One populates the "yName" (sub-entity name) value in varying ways based on the event source.
For example, for events generated by Dynamic Application alerts, the yName is typically pulled from the event message using the Identifier Pattern and Identifier Format that are defined in the event policy.
Meanwhile, for internal events, the yName is determined by the process that creates the alert, based on which element reported the condition. So, for instance, if a filesystem exceeds a particular threshold, the yName is the filesystem identifier.
For example, given the following incoming message:
component: Primordial Pool; details: Pool not found; nodeID: 003; There is extra data here we do not care about until the messageCode: 867-5309; state: Unknown
And given this Identifier Pattern:
component: ([^;]+); details: ([^;]+); nodeID: ([^;]+);.*messageCode: ([^;]+); state: ([^;]+);
An Identifier Format could be specified as such:
3PAR message code: %4 - Node and component: %3-%1 - Current State: %5
Which would cause variable %I (capital "eye") used in an Event Message to return the following sting:
3PAR message code: 867-5309 - Node and component: 003-Primordial Pool - Current State: Unknown
-
Auto-Clear. If enabled, this field specifies that the current event will clear each selected event. Click the button to select one or more events from the list. When the current event occurs, Skylar One automatically removes each selected events event from the Event Console page.
-
For example, suppose you have a "Device not responding to ping" event. If the next polling session produces the "Device now responding normally to ping " event, the auto-clear feature could automatically clear the original event from the Event Console page.
NOTE: You can use the field at the top of the Auto-Clear field to filter the list of events. If you enter an alpha-numeric string in the field, the Auto-Clear field will include only events that match the string.
- Topology Suppression. Defines event correlation. This setting is used when events occur on devices that have a parent/child relationship. Skylar One automatically defines parent/child relationships when it discovers layer-2, CDP, LLDP, layer-3, and VMware topology. You can also manually define parent/child relationships between devices. For event correlation to occur, two types of events must be defined: Suppressing Events and Suppressible Events. For more details on topology suppression, see the section on event correlation.
The Topology Suppression field contains the following options:
- Disabled. This event is neither a parent event nor a child event.
- Suppressing. If this event occurs on a parent device, Skylar One will search all related children devices for suppressible events.
- If you have assigned a Category to this event, Skylar One will search all the children devices and suppress all events that have been defined as Suppressible and are assigned to the same Category. For more details on event categories, see the section on event correlation.
- If you have not assigned a Category to this event, Skylar One will search all children devices and suppress all events that have been defined as Suppressible and are not assigned to a Category. For more details on event categories, see the section on event correlation.
- The suppressible events will not appear on the Event Console page. They will be nested under the parent event.
- Suppressible. This type of event is suppressed on a child device only when a suppressing event occurs on the parent device.
- If you have assigned a Category to this event, Skylar One will suppress this event when it occurs on a child device and an event that has been defined as Suppressing occurs on its parent device. The suppressing event must have the same Category as the suppressible event. For more details on event categories, see the section on event correlation.
- If you have not assigned a Category to this event, when a Suppressing event that is not assigned to a Category occurs on the parent device Skylar One will search all children devices and suppress all events that have been defined as Suppressible and are not assigned to a Category. For more details on event categories, see the section on event correlation.
- The suppressible events will not appear on the Event Console page. They will be nested under the parent event.
- Both. If this event occurs on a parent device, it behaves as a suppressing event. If this event occurs on a child device, it behaves as a suppressible event. See the descriptions of Suppressing and Suppressible for details on each type of event.
-
Category. When you define a hierarchy between events, you can include a Category. A Category allows Skylar One to more efficiently align suppressing events with suppressible events. When you align an event category to a suppressing or suppressible event, that event will be correlated with only events that are aligned with the same category. An event can be aligned to multiple categories; for event correlation to occur, the suppressing event and the suppressible event must both be aligned with a common category. For more details on event categories, see the section on event correlation.
NOTE: You can use the field at the top of the Category field to filter the list of events. If you enter an alpha-numeric string in the field, the Category field will include only events that match the string.
NOTE: If you assign a topology category to an event that is neither suppressing nor suppressible, Skylar One does not use the Category. The Category will have no effect.
- If you have assigned a Category to a Suppressing event, Skylar One will search all the children devices and suppress all events that have been defined as Suppressible and are assigned to the same Category.
- If you have not assigned a Category to a Suppressing event, when the event occurs on the parent device Skylar One will search all children devices and suppress all events that have been defined as Suppressible and are not assigned to a Category.
Defining Event Suppressions in the Suppressions Tab
The tab in the Event Policy Editor page allows you to suppress the event on selected devices or all devices in selected device groups. When you suppress an event, you are specifying that, in the future, if this event occurs again on a specific device, the event will not appear on the Events page.
A manually suppressed event is suppressed only for the selected devices and devices in the selected device groups. If the event occurs on another device, the event will appear on the Events page.
NOTE: If you want to disable an event for all devices, see the section on disabling an event.
In the tab, you can define or edit the following:
- Available Device Groups. Device groups on which you can suppress the current event. To suppress the current event on all devices in a device group, highlight the device group and select the . button. The device group should now appear in the Suppressed Device Groups field. To select multiple device groups, hold down the <Shift> key and select device groups. For information on device groups, see
- Suppressed Device Groups. Device groups on which the event is already suppressed. For information on device groups, see
- Available Devices. Devices on which you can suppress the current event. To suppress the current event on a device , highlight the device and select the . button. The device should now appear in the Suppressed Devices field. To select multiple devices, hold down the <Shift> key and select devices.
- Suppressed Devices. Devices on which the event is already suppressed.
You can use the box at the top of the Available Device Groups field to filter the list of device groups. You can enter an alpha-numeric string in the box, and the Available Device Groups field will include only device groups that match the string.
Device groups that have Event/View Suppression enabled will appear in this field. For information on creating device groups, see
You can use the box at the top of the Available Devices field to filter the list of devices. You can enter an alpha-numeric string in the box, and the Available Devices field will include only devices that match the string.
You can use the arrow buttons ( and ) to move device groups and devices from the Available and Suppressed lists.
Defining an Event Policy for a Specific Interface
You can define an event so that it is triggered only when it occurs on a specific interface.
You can also include the interface name and Skylar One's unique interface ID in automation policies associated with the event.
This section describes how to define an event policy for an interface.
There are three database fields that Skylar One uses to associate an event with an interface:
- yType. The type of sub-entity (CPU, disk, interface, etc.). This value is stored as an integer; each sub-entity type is associated with a unique integer value (e.g., Interfaces = 7).
- yID. The unique ID of the instance of a sub-entity. This value is stored in the table in which all instances of a specific sub-entity are stored. For example, for yType of interface, the yID is a unique numeric ID for a specific interface on a specific device. This yID is stored in the table of all discovered interfaces (if_id in master_dev.device_interfaces) and is unique within this table.
- yName. The name of the sub-entity. This name tends to be more descriptive of the interface (for example eth01, eth02, s01, s02) and is unique on the device, but is not unique in Skylar One.
When defining an event, you can use the following three fields to associate an event with an interface:
- Identifier Pattern. A regular expression used to extract the specific sub-entity (like the name of a network interface) within the log entry. Skylar One will use this value as the yName of the interface. By identifying the sub-entity, Skylar One can create a unique event for each sub-entity, instead of a single event for the entire device. For example, a log message indicating a link has gone down may include the network interface name. So this field could extract the network interface name from the log message. Skylar One's expression matching is case-sensitive.
For details on regular expression syntax, see the documentation at http://www.python.org.
- Identifier Format. (Optional.) If the Identifier Pattern field returns multiple results, users can use variables to specify which results to use and in which order. Additional text strings can also be added with the variables to provide descriptions and make event messages more readable. When an Event Message definition contains the variable %I (capital "eye"), the %I variable will be replaced with the output specified in the Identifier Format field. You can use the following variables in this field, in addition to text strings:
- %1. The first match with the identifier pattern. This is the default behavior if no value is supplied in the Identifier Format field.
- %2. The second match with identifier pattern.
- %3. The third match with the identifier pattern. And so forth.
For an example of how to use the Identifier Pattern and Identifier Format fields to customize event messages, see the section on Defining Pattern Matching and Advanced Behavior in the Advanced Tab.
- Override YType. Specifies a yType for the interface (yType for interfaces is 7). If Skylar One knows the device name, the interface's yName (specified in the Identifier Pattern field) and the yType (specified in the Override YType field), Skylar One can determine the unique yID for the interface.
NOTE: For events generated by Dynamic Application alerts, the %Y variable value is pre-populated with a unique index value that is used to ensure that events roll up correctly. If an event policy does not specifically override the %Y variable, this variable will be populated with the "yName" (sub-entity name) value, which is taken from an index value that might not be human-readable.
If these fields are used in an event:
- On the Events page page, the link icon for this event will be for an interface and will lead to a performance report for the specific interface.
- The %Y variable (yName) and %y variable (yID) can be used in policies associated with this event. That is, run book action policies and related ticket templates that are triggered by the event can include the %Y variable and the %y variable. For details on run book action policies and using ticket templates, see
Defining Custom Severity for an Interface
In the Interface Properties page, you can define a custom severity for an interface. You can then configure an event to use this custom severity when the event occurs for that interface. For details on the Interface Properties page, see
For example, suppose interface Gi1/0/1 on a Cisco switch named cisco_switch_network1 is part of a mission-critical service. By default, event policies for interface events have a severity of "notice" or "major." You could define a custom severity modifier that increases the severity of those events to "critical" when they are generated for the Gi1/0/1 interface.
You could then edit the following events and tell them to use the custom severity for each interface that includes a custom severity:
- Poller: Interface Admin down (usually has a default severity of "Notice").
- Poller: Interface operationally down (usually has a default severity of "Minor").
- Poller: Interface reporting discards (usually has a default severity of "Minor").
- Poller: Interface reporting packet errors (usually has a default severity of "Minor").
Now when any of those events occur on interface Gi1/0/1 on the switch cisco_switch_network1, the event will have an increased severity.
To define a custom severity for an interface:
- Go to the Network Interfaces page (Registry > Networks > Interfaces).
- Select the wrench icon (
 ) for the interface for which you want to view the Interface Properties page.
 - Supply a value in the Event Severity Adjust field. Click [Save].
To edit an event policy to use custom severities for interfaces:
- Go to the Event Policy Manager page (Registry > Events > Event Manager).
- Select the wrench icon () for the event policy you want to edit.
- Select the tab.
- In the Event Policy Editor page, select the Use Modifier checkbox .
- Click .
Editing an Event Policy in the Classic Skylar One User Interface
Skylar One includes pre-defined events for the most commonly encountered conditions on the most common platforms. Skylar One allows you to customize these events to meet the needs of your organization. You can edit existing event policies in the Event Policy Manager page of the classic user interface.
CAUTION: If you edit an event policy that was imported into your Skylar One system in a PowerPack, you should remove the event policy from the PowerPack. If you do not remove the event policy from the PowerPack and the same PowerPack is updated and re-imported into your system, any changes you have made in the and tabs for the event policy will be over-written. For more information on PowerPacks, see
To edit an existing event policy:
- Go to the Event Policy Manager page (Events > Event Policies).
- In the Event Policy Manager page, select the wrench icon () of the event policy you want to edit.
- The selected event policy is displayed in the Event Policy Editor page, where you can edit one or more properties of the event policy.
- The Event Policy Editor page contains three tabs:
- Policy. Allows you to define basic parameters for the event. The fields in this tab are described in the section Defining Basic Event Parameters in the Policy tab.
- Advanced. Allows you to define pattern-matching for the event and also define event roll-ups and suppressions. The fields in this tab are described in the section .
- Suppressions. Allows you to suppress the event on selected devices. When you suppress an event, you are specifying that, in the future, if this event occurs again on a specific device, the event will not appear on the Events page. This tab is described in the section Defining Event Suppressions in the Suppressions tab.
- Click to save your changes to the event policy.
Best Practices for Event Definitions
The Event Policy Editor page was designed to be an intuitive tool that allows technical users to quickly create customized events from standard collection methodologies. The following best practices will help make event definitions efficient and effective:
- For quicker setup and consistency across platforms, you can export and import event definitions using PowerPacks (System > Manage > PowerPacks), which allows for easy sharing and backing-up. A PowerPack is an exportable and importable package of one or more Dynamic Applications, event policies, device categories, device classes, device templates, device groups, reports, dashboard widgets, dashboards, run book automations, run book actions, ticket templates, credentials, XSL transformations, UI themes, and/or IT Service policies. You can use PowerPacks to share customized content among Skylar One systems and to download customized content from ScienceLogic. For details on creating and using PowerPacks, see
- When creating new event definitions, make sure to set the Event Source field to the type of message you will be working with.
- Regular-expression matching in Skylar One is case-sensitive.
- Use care when creating regular expressions. For example, remember that variables within messages (such as date, device name, and IP address) might differ from device to device.
- Using the "weight" function can help better qualify events and allow for greater definition of environment-specific events. For example, suppose you created three slightly different event definitions:
- Event 1:
- First Match String = Server Down
- Second Match String = left blank
- Detection Weight = 10
- Severity = Minor
- Event 2:
- First Match String = Server Down
- Second Match String = dev
- Detection Weight = 5
- Severity = Major
- Event 3:
- First Match String = Server Down
- Second Match String = dev-mssql-001
- Detection Weight = 0
- Severity = Critical
Because it has the lowest weight, Event 3, the critical event, would always be checked first. Event 2, the major event, would be checked second. The least specific event, Event 1, would be checked third.