This chapter describes how you can add administrators to Skylar Compliance (formerly Restorepoint) and configure administrator roles.
Skylar Compliance supports three levels of user access:
- Admin. Super User who has full access (can create/modify/delete devices and users, initiate backups/restores and change the appliance configuration). Admins also have an encryption password that allows Skylar Compliance to transition from the locked state to the normal state.
- Backup. Backup Operator who can perform device backups and restores, but cannot modify devices, users, or appliance settings.
- View Only. Monitor Operator who can only view existing backups, access logs, and verify that the system is operating normally.
Listing Logged-in Users
You can view a list of currently logged in users in the tab (Administration > Users > Logged-in Users). The number of Logged-in users is also displayed on the Dashboard (Info > Status).
Adding a New User
To add or modify administrators, navigate to the Users page (Administration > Users). Administrator passwords and encryption passwords, by default, must be at least 8 characters long. For more information, see Password Policies.
To add a new user:
- Navigate to the Users page (Administration > Users). The User Management page appears.
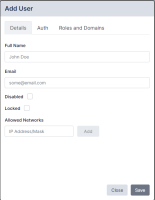
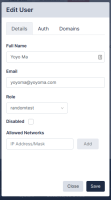
- Click Add User. The New User page appears:
- Complete the following fields on the Details tab:
- Full Name. Type the full name of the user.
- Email. Type the user email address.
- Disabled. Select this checkbox to prevent the user from logging in.
- Allowed Networks. If set, this field allows the user to connect to Skylar Compliance only from certain subnets. Enter an IP range in CIDR format in the IP Address/Mask box, and click Add.
- Complete the following fields on the Auth tab.
- Username. Type the new username. Usernames may be up to 16 characters long.
- Password. Enter the password for the new user. By default, passwords must be between 8 and 24 characters long. The field color will range from red to green to indicate the password strength, according to the policy set in the Password Policies page. For more information, see Password Policies.
- Encryption Password. This field appears if an Admin-level administrator is selected. The encryption password must be between 8 and 24 characters long, and must be different from the administrator password. The field color will range from red to green to indicate the password strength.
- Email Activation Link. This field allows you to set up a user without specifying a password. The user will receive an activation email to let them set their own password.
- Expire Password. This field allows you to override the global password expiry rules for this user. See Timeouts for the global password expiry settings.
- Use RADIUS. Select this checkbox if you want the user to authenticate against an external RADIUS server. See RADIUS Authentication on how to configure a RADIUS server.
- Complete the following fields in the Domains tab.
- Role. Assign a role to one or more domains. Choose between No Role, View Only, Back Up, or Admin.
- Domain. Assign a domain to each role. Choose from Global, Domain 1, Domain 2, Domain 3.
- Click .
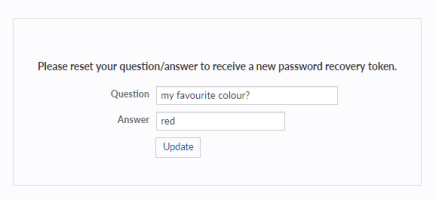
When a new administrator first logs in, they will be prompted to configure a password recovery question and answer. Skylar Compliance suggests that administrators assign an email and recovery question and answer in case you need to reset your password. For more information, see Password Reset.
Editing an Existing User
To edit the details of an existing user:
- Navigate to the Users page (Administration > Users).
- Click on the name of the user that you want to edit.
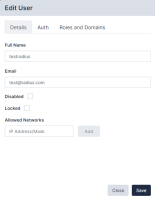
- Edit the user as needed and then click Save.
- When editing an administrator's user details, there are two additional fields in the Auth tab:
- Recovery Question/Answer. Type a Recovery Question / Answer for password recovery.
- New Token. Generates and emails a new recovery token to the user. This allows the user to recover their encryption password, if forgotten. For more information, see Password Reset.
A new token is generated any time an administrator's recovery details are updated. Take note of the new token as this token will be used later if you forget your password.
Broadcasting to Users
You can use Skylar Compliance to send a notification message to a user or group of users. Select the checkbox next to the users you want to message and click . This opens the Broadcast Message dialog, where you can enter the message. When finished, click the button to send the message.
A message type appears as a pop-up in the user’s session while logged into Skylar Compliance. If the user is not currently logged in, the message will appear when they log in to the appliance until the Persist time is reached. An Email message type will send the notification to the user’s email address registered on the appliance.
Deleting a User
To delete one or more existing users:
-
Select the checkbox of the user you want to remove. You can remove multiple users at a time.
-
Click .
Password Reset
Skylar Compliance provides a password reset mechanism based on two-factor authentication.
Password Recovery Configuration
During the initial configuration procedure, or when an administrator logs in for the first time, the following information must be set:
- A password recovery question and related answer. For security reasons, only an administrator should know these.
- The administrator’s email address.
Skylar Compliance will then email a recovery token, which can be used by the administrator to reset their password and encryption password, if the administrator knows the recovery question and answer.
Recovery Procedure
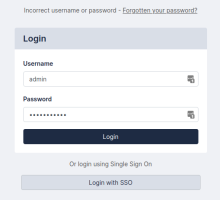
When logging on with an incorrect password for the given account, the Forgotten password link displays:
To reset your password:
- Click the Forgotten password? link and the Reset Password pane displays.
- Complete the following fields:
- Username. Type your Skylar Compliance username.
- Recovery Token. Enter your recovery token. This field only displays and is only required for administrators.
- Recovery Question. Administrators should have entered a recovery question when you set up your Skylar Compliance account. Your recovery question displays then type your recovery question answer. This field only displays and is only required for administrators.
- New Password. Type a new password.
- Confirm Password. Type the same password you entered above.
- New Encryption Password. Type a new encryption password. This field is only required for administrators.
- Confirm New Encryption Password. Type the same password you entered above. This field is only required for administrators.
- Click and if your reset is successful, a notification appears.
Users with specific permissions can change another user's password.
Custom User Roles
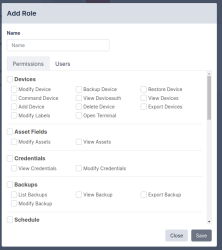
In addition to the standard built-in administrator roles ( Admin, Backup, and View Only), which cannot be edited, it is possible to define custom roles that define which product elements are accessible to the user. This feature is only available with an Enterprise license.
In order to define a custom role:
- Navigate to the User Roles page (Administration > User Roles).
- Click , and enter a name for the role.
- Select the allowed actions for this role on the tab. Scroll down for a the full range of choices.
- Click Save.
After you add a role, it is immediately available in the list on the User Roles page. Note that any changes to custom roles take effect immediately upon save.
For example, you can create a user role called Compliance Officer that can only create and modify compliance rules, and apply those to devices.
In addition to the global View (read-only) and Modify (read-write) permissions, you can allow the following actions:
|
Reports |
|
|---|---|
|
Backup |
Allows backup reports |
|
Config |
Allows configuration reports |
|
Assets |
Allows assets reports |
|
Compliance |
Allows compliance reports |
|
Admin |
Allows administration reports |
|
Monitor |
Allows monitoring reports |
|
Dashboard |
Allows dashboard reports |
|
Modify |
Allows users to modify and schedule reports |
|
Logs |
|
|---|---|
|
View Logs |
Allows users to view the system log |
|
View Syslogs |
Allows users to view the device syslogs |
|
Devices |
|
|---|---|
|
View |
Allows users to view the device list and device details (excluding authentication details) |
|
View Auth |
Allows users to view device authentication details |
|
Backup |
Allows device backup operations |
|
Command |
Allows device remote control |
|
Configurations |
|
|---|---|
|
List |
Allows users to view the device configuration list |
|
Export |
Allows users to export device configurations |
|
Restore |
Allows users to restore a configuration to a device |
|
Templates |
|
|---|---|
|
List |
Allows users to view the template list |
|
Push |
Allows users to push templates to devices |
|
Firmware |
|
|---|---|
|
Push |
Allows users to push firmware images to devices |
|
Assets |
|
|---|---|
|
List |
Allows users to view custom asset fields |
|
Compliance Rules |
|
|---|---|
|
Apply |
Allows users to apply compliance rules to devices |
|
System |
|
|---|---|
|
Archive |
Allows system archive operations |
|
Users |
|
|---|---|
|
View |
Allows user to view the user list and user details (excluding authentication details) |
|
View Auth |
Allows users to view user authentication details |
Authentication Servers
External servers (such as LDAP, RADIUS, storage, SMTP, SNMP, NTP, Syslog, and/or DNS) can be v4 or v6. Host fields across Skylar Compliance can accept an IPv4/IPv6 address or a hostname (excluding DNS servers (IP address-only). If a hostname field is specified, it is resolved at run-time.
RADIUS Authentication
You can use this page to configure parameters for authenticating administrators via RADIUS. If Use RADIUS is selected for a user, Skylar Compliance will use RADIUS instead of the internal authentication database. Skylar Compliance supports the PAP and CHAP (not MS-CHAP) authentication protocols.
The following field are:
- NAS Identifier. A string identifying Skylar Compliance to the RADIUS server
- Primary Server.
- Address. IP address of the RADIUS server
- Port. UDP port used by the RADIUS server (usually 1812)
- Secret. a string shared between Skylar Compliance and the RADIUS Server
- Secondary Server. (optional) A second RADIUS server, configured as above.
- Resolve button. The button is available for you to attempt DNS-resolution for hostname verification.
LDAP Authentication
This page can be used to connect to an LDAP (Active Directory) user authentication server.
The following fields are:
- Base DN. The top-level LDAP DN. This is usually (but not always) the DNS domain name, such as dc=company,dc=com.
- User Search.
- Base DN. For example, cn=users,dc=company,dc=local.
- Username Field. The LDAP field to use as the Skylar Compliance login id, for instance uid or samAccountName.
- Group Search.
- Base DN. For example, cn=security groups,dc=company,dc=local.
- Search String. The group search filter, for instance objectClass=Group or objectClass=posixGroup, depending on the directory type.
- Primary Server.
- Address. The IP address of the LDAP server.
- Port. UDP port used by the LDAP server (usually 389). LDAP over SSL may use 636. Use 3268 to query the Active Directory Global Catalogue (useful for multi-domain forests).
- Bind DN. The DN to bind the LDAP with. For instance, gbh.
- Bind Password. The the bind password for the LDAP Server.
- Use TLS. Allows you to require encrypted connections to the LDAP Server.
- Secondary Server. (optional) A second LDAP server, configured as above.
- Resolve button. The button is available for you to attempt DNS-resolution for hostname verification.
LDAP groups will need user roles and domains configured on the Administration >Users>LDAP Groups tab before they can log in. You will also need to enter the Group DN string: cn=users,ou=Groups,dc=mycompany,dc=com.
SAML Authentication
This page can be used to connect to a SAML authentication server. The following fields are:
- Service Provider Settings.
- ACS URL. The ACS URL to communicate with your SAML server.
- Entity URL. The entity ID to communicate with your SAML server.
- Identity Provider Settings.
- IdP Metadata. The IdP metadata for your system.

