![]()
The System Settings page allows you to configure appliance-related settings, such as networking parameters and date/time settings.
System Settings
To access the System Settings page, expand the Administration menu and select System Settings.
Network Settings
On the tab (Administration > System Settings), you can configure your interfaces, network access, IP configuration, manage bandwidth, and configure additonal IPv4 and IPv6 static routes.
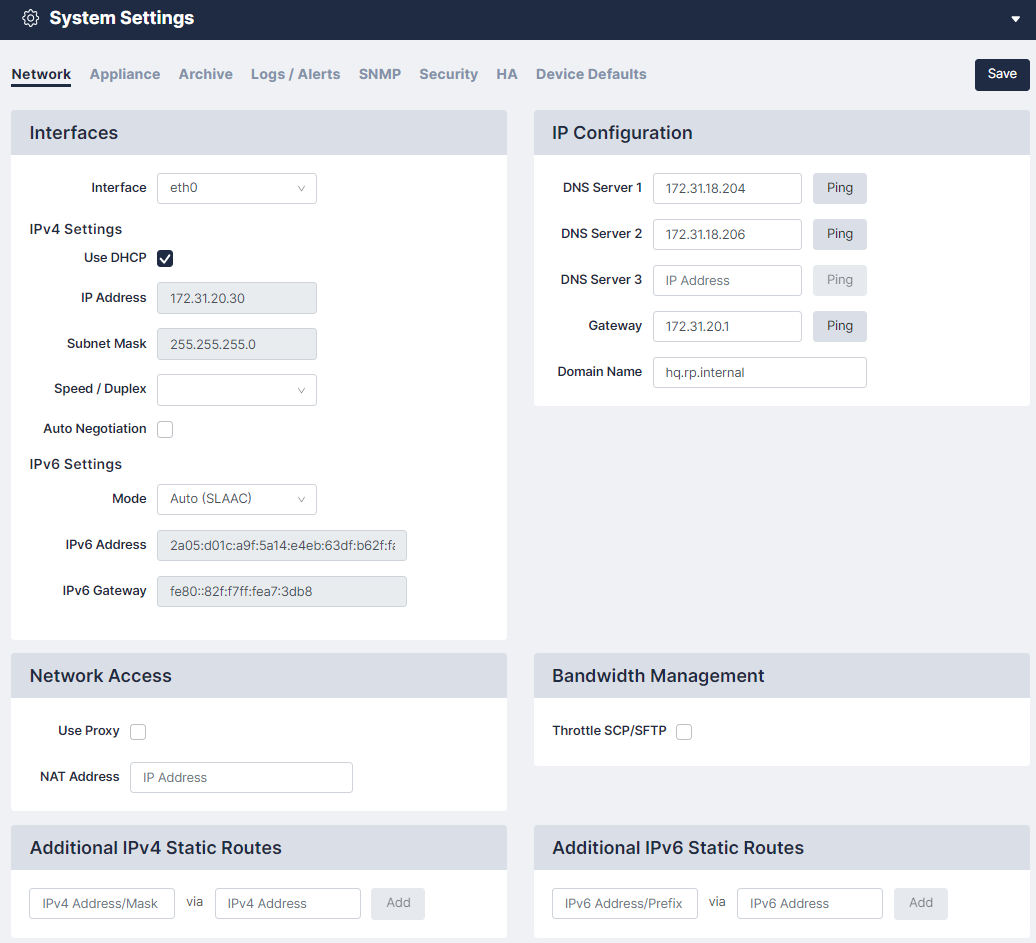
Network Interfaces
Use the drop-down menu to override the default auto-detect setting of the Ethernet interface(s).
Primary / Secondary Interface
Use the tab (Administration > System Settings > Network) to set or update the network address for Skylar Compliance. The initial settings are entered when you first set up your appliance. Select your Interface first and then supply values in the following fields. Click Save when all updates have been made.
- Use DHCP. Select this checkbox if you use DHCP for your interface. When you select the checkbox, all other options on the page are disabled.
- IP Address. Complete the specific address fields for your IPv4 and/or IPv6 Settings.
- Subnet Mask. Enter the subnet mask associated with the IP address.
- Speed/Duplex. Select the link speed and duplex from the drop-down list.
- Auto Negotiation. Check whether or not you'd want to include Auto Negotiation for your interface.
- Mode. Select your Mode type from the drop-down list. If you select this checkbox, Speed/Duplex is disabled, and the Auto-Negotiated Speed field appears. This contains a value showing the value it set.
IP Configuration
To set up your IP routing configuration, complete the following fields:
- DNS Server. The DNS server addresses for your network. You can configure up to three servers. The DNS servers must be able to resolve public names (for example, support.restorepoint.com), or the Skylar Compliance appliance cannot retrieve software updates and license details. This option is for IPv4 addresses only.
- DNS Sever 2. (Optional) A second DNS server. This option is for IPv4 address only.
- DNS Sever 3. (Optional) A third DNS server. This option is for IPv6 address only.
- Gateway. The default gateway for your network. You can Ping these servers to check connectivity.
- Domain Name. The default domain name of the network where this appliances is hosted.
ScienceLogic recommends that you ping the servers you entered to ensure they are reachable.
Network Access
Skylar Compliance needs internet access (HTTP/HTTPS) to retrieve software and plugin updates. If a proxy is required for Internet access, select Use Proxy, and supply the following information:
- IP address of the proxy server. Complete the specific address fields for your servers.
- Proxy port. Type the port for your proxy port.
- Username/password, if your proxy requires authentication. Otherwise, leave this field empty. Use the Test Proxy button to verify that the configuration is correct.
Network Address Translation (NAT)
Skylar Compliance may use back connections (typically TFTP or FTP) to backup certain devices. If Skylar Compliance is accessing a device using back connections through a NAT router or firewall, back connections will fail because the device will attempt to connect to the original, untranslated IP address. To avoid this problem:
- On your firewall, create a 1:1 NAT mapping (often referred to as Static NAT or Mapped IP) to translate the Skylar Compliance IP address to a public/routable IP address.
- Enter the public IP address for Skylar Compliance in the NAT Address box. The system-wide NAT IP address defined here can be overridden in the Domain settings, or in each individual device’s settings.
The Back Connection NAT option needs to be selected in any device that is accessed by Restorepoint through NAT. For more information, see Adding a New Device Manually.
Skylar Compliance supports multiple NAT addresses. The NAT IP address defined in this page can be overridden by the Domain or Device NAT IP setting.
Additional IPv4 and/or IPv6 Static Routes
If the devices that you want to add to Skylar Compliance are located on different networks, you might need to define additional IPv4 or IPv6 static routes.
To define a static route:
- IP Address / Mask length: Enter the network address/netmask (in CIDR notation).
- Via IP address: Enter the destination gateway IP address.
- Click Add.
- Click Save.
To remove a static route:
- Click Delete next to the static route you want to remove.
- Click Save.
Bandwidth Management
You may limit the amount of network bandwidth Skylar Compliance uses by selecting Throttle SCP/SFTP and specifying a speed (in kbps).
Appliance Settings
You can manage your appliance operations on the tab (Administration > System Settings). Complete your desired platform, software updates, branding, and date/time operations, and click .

Platform
To manage your platform, enable the following buttons and/or complete the following fields:
- Restart Software. Restarts the Skylar Compliance domain. May leave the system in an unstable state, use when directed by Skylar Compliance support.
- Abort All Tasks. Aborts all currently-running tasks. This could leave network devices in an unstable state.
- Reboot. Enables you to reboot your Skylar Compliance appliance. However, try to Restart software first.
- Shutdown. Enables you to shutdown and power off your Skylar Compliance appliance. This is the safest way to shut down your Skylar Compliance appliance. Wherever possible, avoid using the front panel buttons to reset or shutdown Skylar Compliance.
- Remote Support. Click Start to enable Technical Support to securely connect to your Skylar Compliance appliance for troubleshooting. To stop the remote support tunnel, click the Stop button on this page, or click the running task in the Activity Display. Then, click Stop Remote Support to terminate the secure connection.
- Open Console. Opens a console terminal to Skylar Compliance's shell menu to allow users to access the terminal via HTTPS.
- Debug. Generates an appliance debug file that may help Technical Support diagnose your issue. Click the , , , or buttons to debug your appliance.
- The button launches the debug process, removing any previous debug logs and setting the log level of the application to debug. It also starts collecting logs and system information like memory usage, CPU usage, stack trace, and so on.
- The button only appears after the debug process has started. It stops the debug collection by changing the log level back to the information level logs.
- The button generates and downloads the file containing the stack trace of all the running routines in the application.
- The button allows users to download the debug log that was written as the debug process was started.
- After Power On. Defines what Skylar Compliance should do when returning from a power-off state. If Skylar Compliance should Run Due Schedules, and treat any missed backups as Overdue, or Recalculate Schedule and just return to the normal backup schedule.
Note: The Remote Support feature requires that your firewall allows SSH connections (TCP port 22) from Skylar Compliance to jmp1.restorepoint.com and jmp2.restorepoint.com. For more information, see Firewall Requirements for notes on firewall configuration.
Branding
You can replace the Skylar Compliance logo with your company's logo in the upper-left corner of the appliance user interface. Click and then Browse to locate a suitable image file on your PC. For best results, the logo should be exactly 30 pixels tall and up to 150 pixels wide, and no more than 40KB in size. Click to return the logo to the default Skylar Compliance logo.
You can further customize the user interface for Domain users in the Domains page. For more information, see Managing Domains.
Software Updates
You can view the following software details in this section:
- The current Skylar Compliance version.
- The appliance's connection to the Internet. If your system is air-gapped, the checkbox This appliance is not connected to the internet should be selected. In this case, click to check for appliance updates and to perform a manual upgrade of the version. A license statement will be displayed that indicates the license status and the installed plug-in(s).
- You can control the configuration of your appliance updates by selecting one of the check boxes that follow. To accept all updates, do not select the check boxes:
- Disable Automatic Version Upgrades.
- Disable Automatic Minor Updates.
For more information, see System Updates.
Date and Time
Use the selectors to set the Time Zone on the appliance. Alternatively, you can choose to use a Network Time Protocol server by selecting Use NTP and entering up to two NTP servers.Network Time Protocol (NTP) and enter up to two NTP servers, such as pool.ntp.org.

Archive
On the tab (Administration > System Settings) you can configure your schedule, set the primary and secondary server archiving, and set the operations archive.

You can prepare for disaster recovery scenarios by archiving the Skylar Compliance configuration from the Administration > System Settings > Archive tab. Archiving the Skylar Compliance configuration allows you to back up the Skylar Compliance appliance automatically to up to two remote servers, including all device configurations stored on Restorepoint.
Taking an Archive
You can define the following settings for archiving:
- For Primary and Secondary Archive servers, you can use a pre-defined server, or select [New Server] to enter the details for a server that you have not defined. For details on how to define a file server, See File Storage.
- For each Archive Server, you can define the following:
- Retain. Enter the maximum number of archives to keep on the chosen fileserver. As you reach this number, older archives will be removed.
- Max Backups. Select the maximum number of backups that will be stored in the archive.
To be clear, Retain settings control the number of archives while Max Backups pertains to the number of backups in a particular archive.
Then , you have the options to:
- Click .
- Click to start a manual archive operation.
Restoring from an Archive
Restoring from an archive allows you to quickly recover from a failure. For example, when installing a replacement appliance after a hardware problem. To restore the appliance from an archive:
- Click the button on the System Archive page to display the list of available archives.
- Select the archive to be restored.
- Click .
You will need the password and encryption password for the admin account in order to complete the operation.

Workstation DB Archives
You can also execute a database-only export/import to a workstation instead of a fileserver. While not suitable for most disaster recovery scenarios, it allows for a quick migration of your Skylar Compliance settings from one appliance to another. You can filter the number backups you want to include in the archive with the Database only option in the Max Backups drop-down menu on the tab (Administration > System Settings > Archive > Primary Server).

Log Settings and Alerts
You can use the log settings and alerts section to define your default log retention policy and the email address for system error notifications.
Navigate to the tab (Administration > System Settings) and supply values in the given fields. Then, click when finished.

- Delete logs after. Enter a maximum age for events. Events older than this value are permanently deleted from the system. The default value is one month.
- Send Syslogs. Select this checkbox to forward all log messages to an external syslog server. Log entries will still be available by clicking on Information > Logs or Information > Syslogs. If you use a syslog server, you will need to enter its IP address and choose the syslog facility. If you want to use the Skylar Compliance hostname as the syslog message source, add the hostname to Syslog Source Hostname. Note that the facility setting only applies to forwarded Skylar Compliance logs, not forwarded operating system events.
- Syslog Version. Choose the syslog version from the drop-down menu.
- Syslog Source Hostname. Type in the hostname for your Syslog source.
- Protocol. Chose the protocol from the drop-down menu.
- Primary Server.
- Host. Type the Host name or IP address for your primary server. You can also click to verify communication.
- Port. Type the port you primary server will use. For more information, see Firewall Requirements.
- Secondary Server.
- Host. Type the Host name or IP address for your primary server. You can also click to verify communication.
- Port. Type the port you secondary server will use. For more information, see Firewall Requirements.
- Facility. Select the facility for your server from the drop-down menu.
- Use SNMP Traps. Select this checkbox to forward log messages as SNMP traps to a Network Management Server (NMS). You will need to enter the NMS IP Address, the SNMP Version, and the community string.
- Enable Email Alerts. Select this checkbox to receive emails if an alert is triggered.
SNMP
If your network has a Network Management System, you can use SNMP to perform some basic monitoring of your Skylar Complianceappliance. Skylar Compliance supports SNMP v1, v2c, and v3. To configure SNMP:
- Navigate to the SNMP page (Administration > System Settings > SNMP).
- Supply values in the following fields:
- Select which SNMP versions should be enabled by selecting the relevant checkbox.
- If you enable SNMP v1 or v2c, you must enter a Community String in the appropriate field.
- If you enable SNMP v3, you must define a username. Depending on the SNMP v3 security level, you may need to enter additional integrity/encryption passwords and integrity/encryption algorithms.
Click Save.

SNMP settings (Administration> System Settings>SNMP) may need to be reset/updated after upgrading to 5.6.
Security
The Security tab (Administration > System Settings) allows you to configure various global settings to mandate a higher level of network security for the Skylar Compliance appliance.
Applying some of these settings may cause compatibility problems with legacy devices and clients.
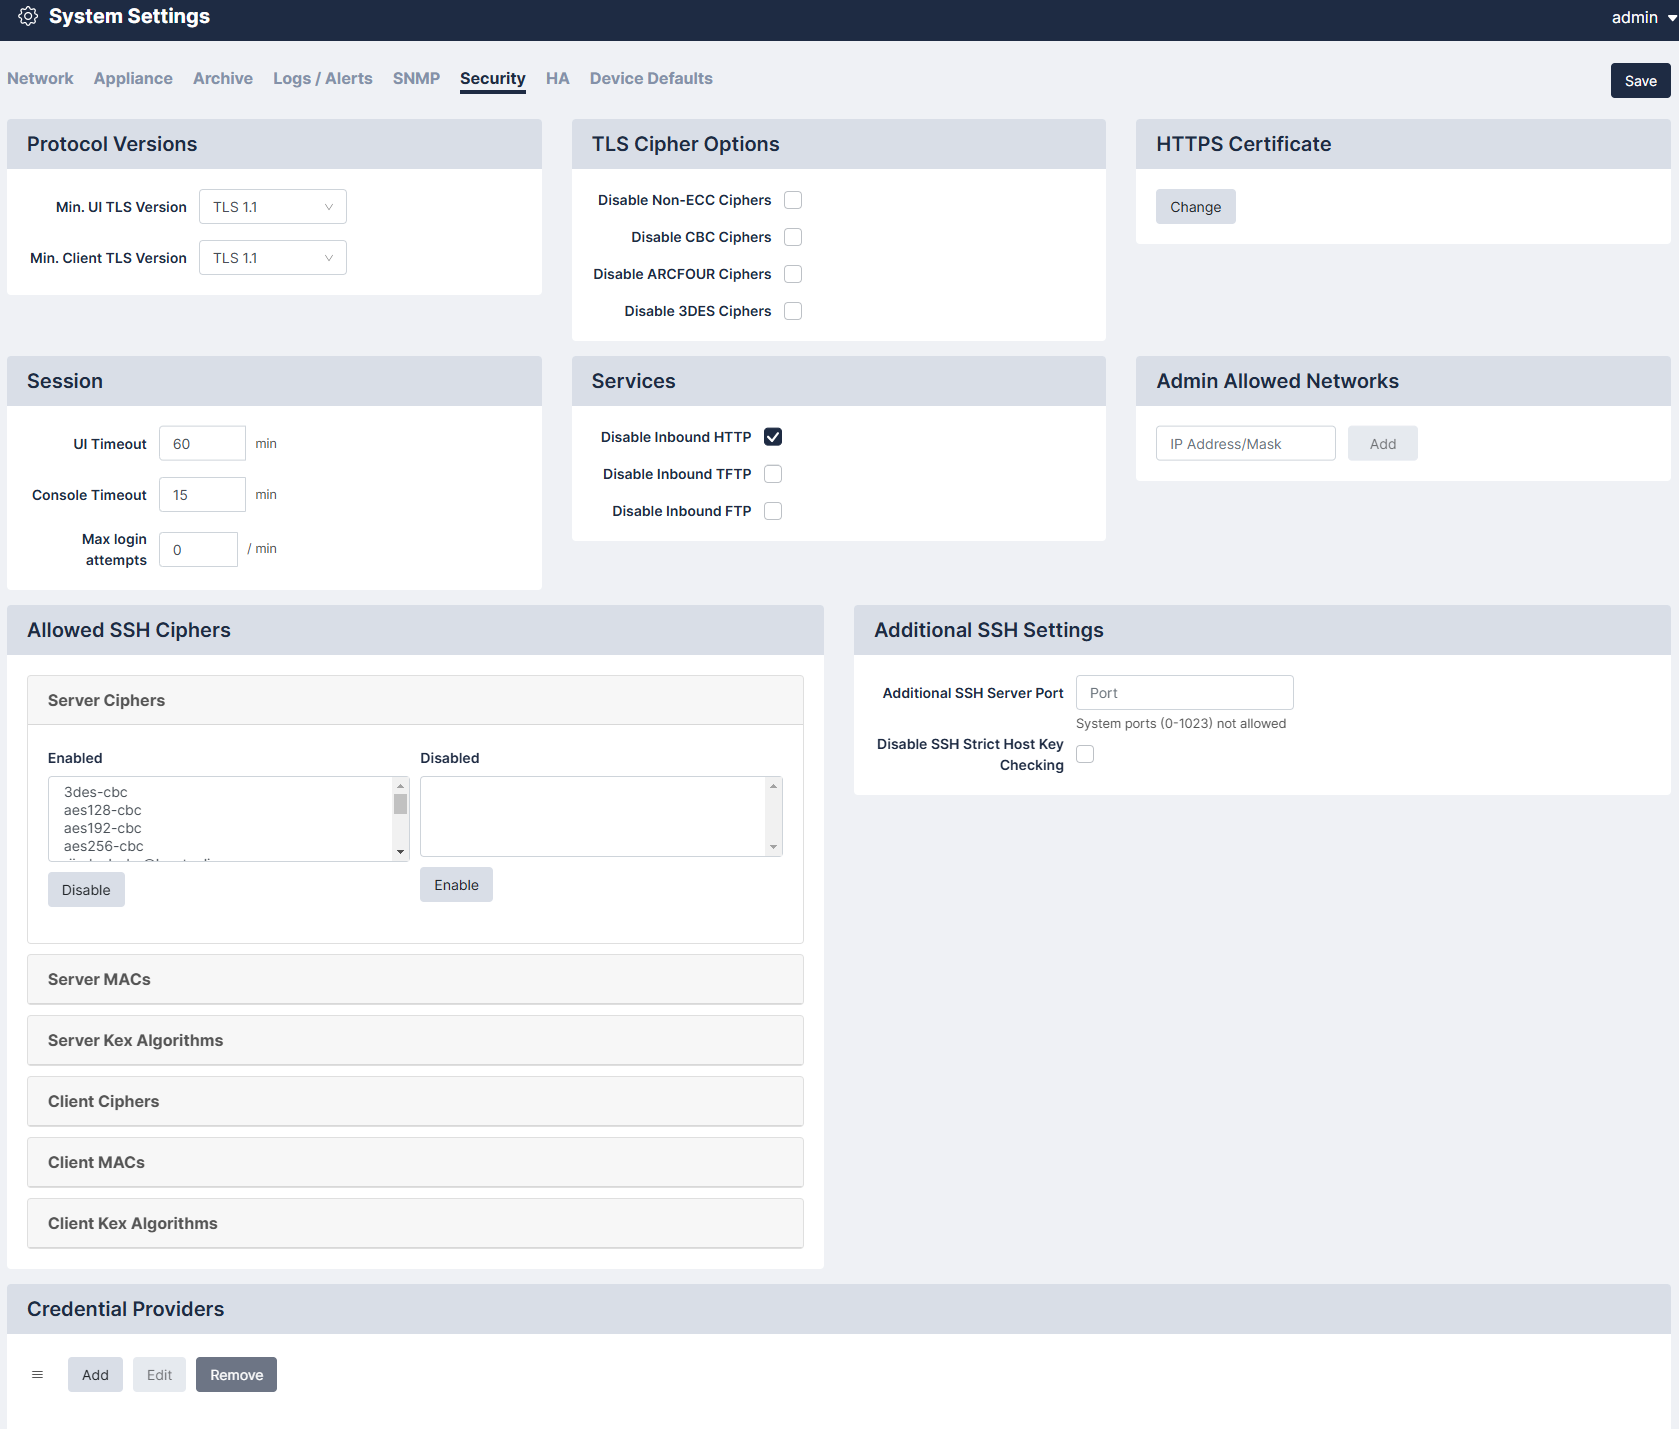
Protocol Versions
The Protocol tab allows you to specify the minimum version of TLS that the Skylar Compliance UI can use and can communicate with devices. You can also prevent Skylar Compliance from falling back to SSHv1, if TLS is unavailable.
TLS Cipher Options
To set your TLS Cipher Options, select the checkbox that you desire.
Services
You may wish to disable some functionality of Skylar Compliance for reasons such as PCI Compliance.
HTTPS Certificate
Click Change to modify the HTTPS certificate used by Skylar Compliance. The following dialog appears:

The Type drop-down will show you the different options available:
- Self-Signed. Generates a self-signed HTTPS certificate with the current keypair.
- New Key. Allows you to generate a new private/public keypair of the given length.
- Create CSR. Allows you to generate a Certificate Signing Request, which your Certificate Authority (CA) will need to produce a signed certificate.
- Upload Certificate. Once you have a signed certificate from the CA, you can upload it here.
- Upload All. Alternatively, if you have a key/certificate pair already from your CA, you can upload both of them here.
Session
To set the timeout values, complete the following fields:
- UI Timeout. How long a user may stay logged-in to the Skylar Compliance user interface without making a change or initiating an action. Default value is 60 minutes.
- Console Timeout. How long to keep a session for the VM Console open without an action. The default value is 15 minutes.
- Max login attempts. Allows you to automatically set users' maximum login attempts per minute. Default value is 0 minutes. For more information, see Managing Users.
Admin Allowed Networks
This pane allows you to set a range of IPs (in CIDR format) that administrator accounts can connect from. For a per-user setting, see Managing Users.
Allowed SSH Ciphers
Skylar Compliance allows you to configure several different SSH ciphers. The Allowed SSH Ciphers pane (Administration > System Settings > Security) contains the following allowed SSH ciphers:
- Server Ciphers
- Server MACs
- Server Kex Algorithms
- Client Ciphers
- Client MACs
- Client Kex Algorithms
Additional SSH Settings
The additional SSH Settings allow you to configure your system settings further.
- Additional SSH Server Port. Enables users to define another SSH host port the appliance should listen to for incoming SSH connections. This allows the agent to establish the initial SSH connection to the appliance. Defining the value changes the sshd_config to listen on that port in addition to port 22 and adapts the firewall rule accordingly.
- Disable SSH Strict Host Key Checking. Disables the SSH host key validation for all devices and logs when the key changed.
Request Settings
Request settings allows you to configure the maximum body size for requests. These new options enhance system security:
- Max body size (in MB). Sets the maximum requests for body size for all requests. The default is 100MB.
- Max file size (in MB). Sets the maximum file size for requests that upload files. The default is 10MB.
Credential Providers
The Credential Providers pane is currently only available for CyberArk users. The credential provider allows you to import credential sets and assign them to devices.

High Availability
High Availability (HA) provides a way to minimize the effects of hardware failure, by configuring two Skylar Compliance appliances in a cluster.
Under normal operating conditions, the primary cluster member is active and the secondary is in standby mode; the active appliance performs all network operations, and replicates all settings and device configurations to the standby appliance. Skylar Compliance replicates data both incrementally (for example, just after a backup is retrieved from a device) and by performing full synchronizations on a regular basis.
If the primary member becomes unavailable because of a hardware failure, other network problem, or from losing power, the secondary member will automatically become Active, and carry on as normal. If the primary recovers, it will automatically take over from the secondary and become active.
HA does not require the appliance to be installed on the same network, as long as the traffic requirements are met (see below).
Software updates and upgrades are managed at the cluster level; updating the active appliance will automatically update the standby appliance.
HA Requirements
- HA is a separately licensed feature.
- Only appliances of the same model can be clustered and appliances must be running the same software version.
- Cluster members must be able to communicate over HTTPS to exchange heartbeat information and data synchronization. TCP/443 traffic should be permitted bidirectionally between the appliances.
Creating a Cluster
To create a cluster, on the Primary Skylar Compliance appliance:
- Click .
- Type a password to be used between appliances in the cluster.
- Click Save.
On the secondary Skylar Compliance appliance:
- Click .
- Enter the same password you entered on the Primary appliance.
- Enter the IP Address of the Primary appliance.
- Click . The cluster will perform the initial full sync.
After the cluster is created, this screen can be used to monitor the status of the cluster or to leave the cluster.
- Role displays which position the appliance takes in the cluster (Primary or Secondary).
- The Member Status displays if the current appliance is Active or Standby.
- The Cluster Status displays the status of the Secondary appliance on the Primary or the amount of time between heartbeat synchronizations on the Secondary.
You can use the Leave Cluster button to break the cluster. When you click Leave Cluster, all synchronization will stop, the two appliances will keep the existing configuration, and the appliances will carry on independently.
Device
The tab allows you set the device defaults for your system. Complete the following fields in the Device Defaults section for your device's default settings:
- Global Device Settings. Set the backup size alert when you have reached backup size limits. Available for administrators only. See Global Devices.
- Device Defaults.
- Retention Policy. First, select what versions to keep. Then, choose when to Always delete after (in days/weeks/months) and Never delete before (in days/weeks/months).
- Config Filename. Enter your Filename Prefix, what to include (Device ID or Device Name), and see your selection's Preview.
- Email Alerts. Choose whether or not you'd like an email to be sent when there is a Config Change, Backup Start, and/or Backup End.
- Monitoring. Choose your monitor device settings. These include your Type, Email when down, and Email when up.
- Failure Policy. Set when your failure policy should Retry, alert (Always, First Failure, or Never), and/or when to Retry after (in minutes).
- Plugins. Configure your plugin options and redact rules. See Plugins.

Global Devices
The Global Device Setting on the tab allows users to set backup size alerts when you reach the backup size limits.
- Global Device Setting. Select the Backup Size Alert to a value in megabytes (MB).
- If the value is larger than 0, every new backup size will be compared against this value. If the backup size exceeds this value, an alert will trigger an email to the appliance owner.
- If the value is 0, no alert will be triggered and no email will be sent.
Click when finished.

Plugins
The Plugins on the tab allows users to set the Redact Rules for each of your plugins. Users must have permissions for ViewPluginOptions and ModifyPluginOptions to view and edit the plugin options and the Redact Rules for the plugin.

To add a Redact Rule:
- Go to Plugins on the tab.
- Click on your plugin. The Plugin Options modal appears.
- Click the button for Redact Rules. The Add Plugin Redact Rule modal appears.
- Complete the following fields:


- Name. Type a name for your Redact Rule.
- Regex. Choose the Regex Expression to redact the file. You can redact a whole or partial line.
- To redact a whole line, use a Regex without a capture group. Any lines that match will be completely redacted. For example:
- Line: Server IP: 1.2.3.4
- Regex: IP: \d+\.\d+\.\d+\.\d+
- Result: [REDACTED]
- To redact part of a line, use a Regex with a capture group to specify the exact part of the line to redact. For example:
- Line: Password = "secret"
- Regex. Password = "(.*)"
- Result. Password= "[REDACTED]"
- Config Types. Select the type of configuration that applies to your Redact Rule.
- Enabled. Select the checkbox to enable your Redact Rule.
- Click .
- The Redact Rule will appear under your plugin options.

Plugin Redact Rules Caveats
The following permissions apply to the Plugin Redact Rules:
- Users can configure plugin Redact Rules on a plugin basis.
- All users with the ViewBackup permission also have the ViewUnredactedBackup permission which allows you to view unredacted backups.
- When you configure a rule, users without the ViewUnredactedBackup permission will see the backups redacted.
- Redaction rules were applied to the following backups:
- View Backup
- Compare Config
- Download Config
- View Config on the Global Search
- Emails are not redacted for email notifications when ta configuration is changed.
- Adding redaction rules to devices with large backups (>100mb) might significantly increase their download time.
Advanced Settings
You can configure several advanced settings on the tab of the Administration page (Administration>System Settings>Advanced Settings).
To access the tab, Restorepoint requires that you contact ScienceLogic Support to enable it. Access will be restricted until you contact Support.
To configure your advanced settings complete the following fields:

- Full Transcript. Select this option to enable or disable the ability to write the entire transcript file or to maximize size buffer. The default is set to False.
- No Redact. Select this option to enable or disable the ability to redact sensitive information from log messages, such as passwords. The default is set to False.
- Clip Progress. Number of characters to clip from the beginning and end of a progress message. The minimum value is 0 and the maximum value is 500. The default value is set to 0.
- LDAP Nested Groups. Select this option to enable or disable the use of nested LDAP groups. The default is set to False.
- Max Concurrent Monitors. Maximum number of rpmonitors that can be enabled. The minimum value is 50 and the maximum value is 300. The default value is set to 300.
- Max Replication Buffer. Maximum buffer size for jobs a replication worker can have. The minimum value is 15000 and the maximum value is 25000. The default value is set to 20000.
- Max Jobs. Maximum number of concurrent jobs that you can run. The minimum value is 50 and the maximum value is 150. The default value is set to 50.