![]()
The Skylar Compliance (formerly Restorepoint) user interface pages share some common features. These features include:
- A menu bar at the top of the page, for navigating between the different functions
- The username of the logged in user at the top right-hand side of the screen
- A footer that displays the current software version, serial number, license expiry, and time

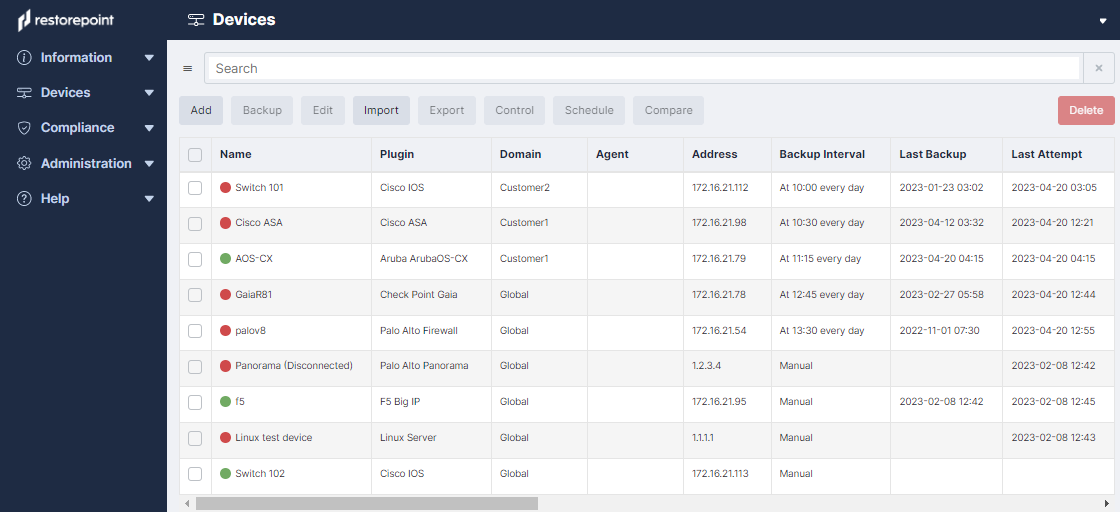
Tables display a gray header. For example, in the Device page shown below, you can change column widths by double-clicking on the header, or by clicking and dragging the heading separators. You can change the sorting criterion by clicking on a column heading. You can also perform a full text search by typing in the Search field.

My Account
You can hover over the username on the top of the user interface and two options appear. A Logout option that features a clock that shows how many minutes until a user is automatically logged out, and the My Account option that allows you to edit the following user settings:
-
Full Name
-
Email
-
New Password
-
Encryption Password
-
Recovery Question
-
Recovery Answer
To change a password, you need to specify the Old Password.

For more information on the My Account options, see Adding a new user.
Activity Display
The Activity Display, shown below, displays a list of tasks that are currently running. This list is displayed on every page while tasks are in progress:

You can click on the magnifying glass icon to show the Progress Log, which displays real-time information about the running task:

Editing Views
In addition to the built-in views, every data table in Skylar Compliance can have multiple customized views. You can access these by clicking on the menu icon ( ) at the top left of a table. You can use this icon to reorder columns by clicking the up/down arrows and selecting the checkbox to show/hide columns.
You can define a name and save column orders, widths, and display settings using the button. You can delete saved views using the button.
Views stored in your browser’s local storage are only available on the browser and workstation where they were set. If you clear your browser storage, you will clear any saved views.
Encryption
All sensitive data stored in Skylar Compliance, including device configurations, is protected by encryption. Skylar Compliance encrypts data when it is written to a disk and decrypts it as it is read. Cleartext data is only held in volatile memory. Therefore, the data disappears when the appliance is shut down or rebooted, which renders data theft impossible without a valid encryption key. It is important to note that Skylar Compliance is encrypted-at-rest for the secure storage of backups and databases. Any use of third-party tools to perform a scan of Skylar Compliance backups or databases may result in a error message.
Skylar Compliance has two operational states:
- Locked State. When the appliance is powered up and no encryption password is entered by an administrator. In this state, Skylar Compliance cannot read its own database and therefore cannot perform any operations. An administrator must log in and provide the encryption password to unlock the database.
- Normal State. Once an administrator provides the encryption password at login, all system functions are enabled. Subsequent administrator logins will not require an encryption password until the appliance is powered down or rebooted.
The entire Skylar Compliance database is encrypted. Therefore, it is vital that administrators remember both their normal and encryption passwords. Administrators must also keep their emailed password-recovery tokens safe. For more information, see Connecting to Skylar Compliance After a Reboot and Password Reset.
System Status Page
The System Status page or Dashboard, displays an overview of the health of your Skylar Compliance system and displays the number of devices that are being backed up. The following image is the default page when you first login to Skylar Compliance. You can display this page at any time by clicking Info on the menu:
The following type of graphs can be displayed on the Dashboard page:
- Backups (24h). Successful and failed scheduled backups in the last 24 hours. Additionally, mouseover mention devices not scheduled for backup.
- Device compliance. The number of compliant and non-compliant devices, and the number of devices with no policy assigned.
- Devices Up. The number of devices that are currently being monitored and responding to Skylar Compliance. If you click on the graph, a moving average chart covering the past 24 hours is displayed.
- Storage. The amount of disk space used and the total amount of disk space for the Skylar Compliance appliance
- Devices. The total number of devices configured on the appliance, and the maximum devices allowed on your current license.
- Memory. The amount of RAM currently being used by the Skylar Compliance appliance and the total amount of RAM available.
- Network Activity. The current network activity, as seen by the Skylar Compliance appliance
- Load Average. The Load Average [https://en.wikipedia.org/wiki/Load_(computing) ] of the Skylar Compliance appliance, over the last 30s.
The following information is displayed in text panes on the Dashboard page:
- Appliance Status. The uptime, number of logged in users, High Availability status (if enabled), Agents status (if enabled), and number of running tasks.
- Appliance Software. The serial number, version, build number (including a link to the change log for that version), and license expiration date of the Skylar Compliance installation. This information is also available in the footer.
- Latest User Activity. Administrator logins/logouts, and other user-initiated operations.
- Latest Critical Events. Any backup failures, bad logins, or other important information.
- Latest Configuration Changes. Any devices that have reported modified configurations.
Scheduled Tasks
The Schedule page (Information > Schedule) displays upcoming scheduled tasks, including the next backup for each device.

For each task, the Schedule page displays the following information:
- Date. Date and time when the next task is due.
- Event. Name of the scheduled event.
- Type. Type of task. Possible types are backup, discovery, archive, etc.
- Object. Device, user, or system configuration object to which the task refers.
Postponing Tasks
You can postpone any scheduled event to remove the next occurrence of a scheduled task. To postpone a scheduled task:
- Find the task that you want to postpone and select it's checkbox.
- Click the button.
Pausing Tasks
You can pause a scheduled task so it doesn't run until you unpause the task. To pause a scheduled task:
- Find the task that you want to pause and select it's checkbox.
- Click the button.
Adding Devices to Skylar Compliance
You can add devices to Skylar Compliance using the following methods:
The Device page allows you to:
- Display all the existing backups for a device
- Compare the configurations of two devices
The Discovery page allows you to:
- Define the networks you wish to scan
- Schedule a periodic network scan
- Import discovered devices into the main device list
Adding a New Device Manually
How you configure a new device may vary slightly from one device to another. Please see device specific information in the Plugin Guide (Help > Plugin Guide).
To create a new device:
- Go to the Device Management page (Devices > Device List).

- Click the button on the top left hand corner of the page. The Add device page appears.
Complete the following fields:
- Device Name. Type a name for the device that is up to 64 characters long.
- Type. Select the device type. You can start typing in the Select Plugin field to filter the list. This list only displays the device types that are currently available on your license. The button can return data regarding header banners, like SSH or FTP, if you enter an IP address in the device Address field.
- Domain. Select the domain that the device is assigned to. This field is only present if Domain Administration is enabled on your appliance. For more information, see Administration Domains.
- Agent. If the device is managed via an agent, select the appropriate agent from the dropdown list.
- Labels. Select and set Labels to be applied to your devices; these help filter and group devices.
- Address. Type the device IP address. You can click the button to automatically fill the IP Address field. Skylar Compliance will keep the IP address up to date with your DNS and manual changes to the IP address will be ignored.
- Open Terminal. You can click this button to open a web-based virtual terminal to the device that you can use for troubleshooting. If you select Restorepoint Credential, the field uses the credentials you have defined on the Connection tab. Otherwise, you will need to provide your own credentials for logging into the device. For more complex terminal use, ask your account manager about Restorepoint Universal Console.
- Owner Email. Type the email address(es) of the device administrator(s). By default, this field is filled with the notification email address defined on the System Configuration page.
- Email on Config Change. Select this checkbox to automatically trigger an email notification to the device owner when a device configuration change is detected. This option is not available for all device types.
- Email on Start Backup. Select this checkbox to automatically trigger an email notification before a backup starts for this device. This notification creates a 1 minute delay before the backup starts.
- Email on End Backup. Select this checkbox to automatically trigger an email notification when a backup completes. If this checkbox is not selected, Skylar Compliance will only send an email notification if the backup fails, or if a configuration change is detected and Email Config Change is selected.
- Syslog Change Detection. If this field is available on your Skylar Compliance system, select the checkbox for Skylar Compliance to automatically detect when a device is modified and automatically retrieve its configuration. Note that this feature is only available for specific devices. For more information, see the Plugin Guide (Help > Plugin Guide).
- Log Transcript. Select this checkbox to create a full transcript log for this device for debugging purposes. A transcript log is automatically saved if the backup fails, so this is rarely needed.
- Types. Select the types of configurations to backup for this device.
- Filename Prefix. Optionally type a custom filename prefix for the device configuration files, and check the relevant fields to include. A preview of the filename will appear in the Preview field.
- Monitor. Select this checkbox to monitor the device. For more information, see Device Monitoring.

- Click the tab and complete the following fields:
- Protocol. Select the appropriate connection protocol for your device, such as telnet or SSH. The options may vary depending on the device type.
- Username. Type the administrator account username for the target system.
- Password. Type the password associated with the administrator account. For some devices you may need to enter more than one password. The field color ranges from red to green to indicate the password strength, according to the policy set in the Password Policies page.
- Use Restorepoint Credentials?. You can select this checkbox and select a Credential Set instead of entering a username and password. Credential sets are reusable username/password combinations that can be shared among different devices (See Credential sets).
- Back Connection NAT. Select this checkbox if Skylar Compliance accesses this device through a NAT router or firewall. This option will only be displayed if the device requires back-connections and if Use NAT is selected in the System page. If a NAT IP Address is configured here, it will override the corresponding Domain (Section Administration Domains) and System (Section Network Address Translation (NAT)) settings.
- Use SSHv2 PKA. Select this checkbox if you want to use SSH Public Key Authentication instead of password-based authentication when connecting to the device. Click the button to display Skylar Compliance’s public SSH keys.
- Disable SSH Strict Host Key Checking. Disables the SSH host key validation and logs when the key changed.
- Clear Cache. If you have replaced a device, Skylar Compliance may refuse to connect to it because it will detect that the device key has changed and display a connection error. This is a security feature of SSH. In order to override this feature, click the button.
- Backup Port. If required for your device, enter the backup port you want to use.
- Click the tab to configure the backup schedule for the device and click to add one or more backup intervals. You can bulk add or remove schedules if multiple are selected on the Device Management page.

For each schedule interval, you can override the config types to backup by selecting any of the Config Type checkboxes, or override the default retention policies by unselecting Use Default Policy. You can also override the Failure Policy on this page. For more information, see Backup failures.
- Click the Assets tab and enter optional asset management details for the device:
- Serial. Type the serial number for the device.
- Firmware. Type the firmware the device has.
- Asset ID. Type the device ID for the device.
- Notes. Type any additional notes that you would like to include for the device.
- Purchase Date. Select the date you or your organization purchased the device.
- Purchased From. Type the business that you purchased the device from.
- Manufacturer. Type the manufacturer of the device.
- Model. Type the device model.
- History. Type any relevant history related to the device.
- Owner. Type the device owner.
- Customer No. Type the customer number.
- Build Document. Select to upload a build document or to remove a build document.
- The tab, if available, displays additional information retrieved from the device, such as license details, routing table, and network interfaces. You can also display the output of a saved action on this page using the New Info Command drop-down field. For more information on creating actions, see Controlling a device.
- Click the tab and assign compliance policies to this device. For more information on compliance policies, see Device Policies.
- Click the Notifications & Monitoring tab and enter optional notification details for the device:
- Owner Emails. Type the email address(es) that you want to receive device notifications.
- Email on. Select a task that you want to trigger a notification.
- Log transcript. Select this checkbox if you want the notification to include a transcript of the task.
- Monitor Device. Select this checkbox if you want to monitor the device.
- Type. Select how you want to monitor the device, using TCP connection or ping.
- Email when down. Select this checkbox if you want a notification to trigger when the device is down.
- Fail after. Type a number or use the scroll to define after how many attempts connecting to a device that a notification should be triggered.
- Email when up. Select this checkbox if you want a notification to trigger when the device connects after failing.
- Click to finish creating the new device. The Device page appears and the new device is added.

-
Once you add the device, you can select the checkbox next to the device and click the button to perform a manual backup, if required. The backup progress and completion will be shown in the Activity Display. If the backup is completed successfully, the indicator next to the device name is green, and the date of the last backup is added to the Device Management page.

Custom fields can be added in the Custom Asset Fields page. For more information, see Asset Fields.

Importing Multiple Devices Using a CSV File
If you need to add a large number of devices, you can click the Import button and select a comma-separated values (.CSV) file, that contains the device details.
When you create a comma-separated value (CSV) text file to import, include a line at the top of the file to indicate the columns for the attributes you want to import. Fields can be in any order. For example:
name,plugin,protocol,ip_address,username,password,password2,backup_port,keep_backup,owner,serial_no,asset_id,location,notes
The following table lists the column name and its description:
| Field | Description |
|---|---|
| domain_name |
If there is not a domain_name present and you have permissions to create devices on the global domain, then the device will be saved on a global domain. If not, Skylar Compliance will find a domain with the same name and if you have permissions to create devices on that domain, it will be created there. This field is optional. |
| name | The device name. This field is required. |
| plugin | The device type (e.g. ‘Cisco ASA’ or ‘cisco_asa’). |
| protocol | The connection protocol (e.g. ‘telnet’ or ‘ssh’ ). This field is required. |
| ip_address | The device IP address. |
| username, password, password2 | The login credentials for the device. |
| backup_port | The port to use to connect to the device, if required |
| keep_backup | The backup retention policy (days). |
| owner, serial, no, asset_id, location, notes | Device details and descriptors. These fields are optional. |
Device Discovery
The Skylar Compliance device discovery engine uses a variety of methods to discover hosts on your network that can be imported to the main device list. You can also be notified by email of new devices that are installed on your network.
Device discovery is not guaranteed to discover all the relevant devices on your network. Firewalls or the device configuration itself may negatively affect the discovery process. Similarly, the device type may not always be detected correctly. When you import a device, you are able to override the detected type.
Discovery Setup
To configure discovery:
-
Go to the tab (Devices > Discovery > Setup).
-
Type one or more network ranges (in CIDR notation) to scan in the Search Networks field, for example:
10.20.0.0/16and click . -
If you do not wish to scan a particular range, for example
10.20.10.0/24, add this to the Ignored Ranges list. -
You can optionally add one or more SNMP communities in use on your network: choose the SNMP version, enter a community string, and then click the button.
-
If you want to be notified of a new device, select the Notify of new devices checkbox.
-
If you want to use the Cisco Discovery protocol (https://en.wikipedia.org/wiki/Cisco_Discovery_Protocol), select the Use CDP checkbox.
-
If you want to use the Link Layer Discovery protocol (https://en.wikipedia.org/wiki/Link_Layer_Discovery_Protocol), select the Use LLDP checkbox.
-
Choose a scan schedule.
-
Click .
-
Click to start the scan.


Discovered Devices
At the end of a discovery scan, a list of discovered devices is displayed is displayed in the tab:

You must import the newly added devices into the main device list. To manually import your devices:
To automatically import your devices, see Automatic Import.
- Go to the tab (Devices > Discovery > Devices).
- Once the list of discovered devices is displayed, select the checkbox to the left of one or more devices.
- Click .
- You must then finish the configuration:
- If you only select one device to import, the New Device page appears which includes automatically populated discovery information. After you review the information and make any required changes, click .
- If you selected multiple devices, the devices will be imported without review. The devices are marked as incomplete and are displayed in red in the devices list. You can then complete the configuration and add authentication details or edit any default parameters and click .
Ignored Devices
The Ignored devices page displays a list of devices that will be ignored in future scans. To remove devices from the ignore list, select the devices then click Un-ignore.
You can review the list of ignored devices and make changes. To remove devices from the Ignored Devices list:
- Go to the Ignored tab (Devices > Discovery > Ignored).
- Once the list of ignored devices is displayed, select the checkbox to the left of one or more devices.
- Click .
- Click .
Device Types
The Device Type Override page allows you to force discovery scans to import a device as a certain type based on a hostname pattern. To override a device type:
- Go to the Device Types tab (Devices > Discovery > Device Types).
- Click and enter values in the following fields:
- For hostname pattern. Enter a hostname value to be assigned the device type.
- use plugin. Select a device type.
- Click .
Automatic Import
You can automatically import your devices to the Device page after setting up discovery. To automatically import your devices:

- Go to the Auto-import tab (Devices > Discovery > Auto-import).
- Select the Use Auto-import checkbox.
- Click .
Running a Manual Backup
To run a manual backup:
- Go to the Device page (Devices > Device List).
- Select the checkbox to the left the devices that you want to back up and click Backup.
You can also run a manual backup by clicking the Backup Now button on the Edit Device page (Devices > Device List > Select Device > Edit).
Scheduling an Automatic Backup
You can automatically schedule backups for a large group of devices by spreading the backups over a day, a week, or a month. To automatically schedule backups:
- Select the checkbox to the left of the relevant devices on the Devices page (Devices > Device List), and click the button.
- Select the desired time interval, and the daily Start/End time and/or the Start/End day. For example, you can configure the schedule to run backups only at night or during the weekend.
Exporting the Device List
Click the button to save the device database in a CSV file.
Editing an Existing Device
To edit an existing device:
- Go to the Devices page (Devices > Device List).
- Click on the name of the device that you want to edit. The Edit Device page appears
- Make any required changes and click the button.
Editing Multiple Devices
To edit multiple devices:
- Go to the Devices page (Devices > Device List).
- Select the checkbox to the left of the devices that you want to edit and click . The Edit devices page appears.
- Edit your desired fields and click .
Fields that have different values between devices display a [Multiple] value.
Deleting an Existing Device
To delete an existing device:
-
Select the device(s) you want to remove.
-
Click , and ensure that the Disabled field is set to Yes to prevent accidentally deleting a device you have not disabled.
-
Click Save.
-
The devices you want to remove are selected. Click .
Device Monitoring
Skylar Compliance can monitor devices by periodically checking that the TCP port used for backup (for example, telnet or SSH) is accepting connections, or by sending ICMP Echo Requests (pings) to the device. Monitoring is disabled by default and can be enabled or disabled for each individual device.
Enabling Monitoring
To enable monitoring, open the relevant device Edit screen:
-
Select the Monitor Device checkbox
-
Select the Type of monitoring required. Normally, the device’s TCP port used for backup is polled; if the Ping option is selected, the ICMP Echo Request (ping) will be used.
-
You can select Email when down to send an email notification if the device appears to be down. You can also choose to receive Email when up.
-
If the device fails to respond after the number of attempts specified in the Fail after box, it is considered “down”.
Displaying Monitoring Information
You can hover over status information to display a Round Trip Time graph between Skylar Compliance and the device, in 5 minute intervals.

Clicking will display the monitoring graph for the device.
You can select any other monitored device from the field at the top of the page to display its graphs.
Configuration Templates
Templates are configurations that can be pushed to multiple devices. For example, during a large deployment of similarly configured devices. Each template can contain parameters, which are substituted for entered values for each device. For example, a section may be marked “IP Address”, and the field will be applied when pushed to devices.
Creating and Editing Templates
- Navigate to the Template page (Devices > Templates). Click Add, or click on an existing template name.
- For new templates, select a device and configuration to base the template on.
- After your template has loaded, select the configuration fields that you want to be substituted.
- Click Mark Variable to name and store a highlighted value.
- Once your template is created, the template values can be renamed or deleted with the relevant buttons.
- Click . If you don’t provide a name and comment, a name and comment will be automatically generated.


Pushing Templates
To push a template to a device, select the template from the Template Management page. Choose one or more devices using the device selector, and click Push.

If the template has any parameters, you must enter the values for each of the devices selected above:

Click OK to complete the operation.
Software
Skylar Compliance can be used as a repository for device firmware/software that allows you to upload files like firmware images and ISO images to the appliance. Software images can also be pushed to supported devices.

Uploading and Editing Firmware Images
- Click , or an existing firmware name.
- For new firmware, click the button and navigate to the file from your hard drive.
- Supply values in the Device Type and Description fields.
- Click .

Pushing Firmware
Skylar Compliance can upgrade the firmware of a supported device using an image stored in the repository. Select a firmware image using the tickboxes, then click . Select the device from the menu, then click again; Skylar Compliance will perform the upgrade procedure recommended by the device vendor.

Please check the Plugin Guide (Help > Plugin Guide) for a list of devices that support this function.
Credential Sets
Skylar Compliance can use predefined Credential Sets to authenticate to a device instead of individual usernames and passwords. Credential Sets are useful if several devices share the same authentication credentials. To create a Credential Set:
- Go to the Credential Sets page (Devices > Credential Sets).
- Click , or click on an existing Credential Set name.
- Type a name for the set and type your authentication details .
- Select a Domain from the drop-down menu to restrict the scope of this set to a particular domain; otherwise choose Global to make this set available to all domains.
- Click .

Using Credential Sets
To authenticate to a device using an existing credential set, leave the authentication details empty, check Use Credentials, and then select the correct credential set. Click .

To view which devices are currently using a selected Credential set, click the name on the Devices > Credential Sets page, and navigate to the Devices tab.
Integrating Skylar Compliance and CyberArk
You can integrate your CyberArk Vault with Skylar Compliance to populate credential information. To integrate CyberArk with a predefined Skylar Compliance device:
- Identify the device and credential field that you want populated by the CyberArk Vault.
- Go to the Credential Sets page (Devices > Credential Sets).
- Click and supply values in the following fields:
- Set Name. Type a name for the credential.
- Username. Type your device username. If you want CyberArk to populate this value, leave this field blank.
- Password. Type your device password. If you want CyberArk to populate this value, leave this field blank.
- Password 2. Type your second device password. If you want CyberArk to populate this value, leave this field blank.
- Add Custom Fields. Click the button and type the name of the field that you want to query from CyberArk so that CyberArk can populate the corresponding value in Skylar Compliance.
- Click .
- Go to the System Settings page (Administration > System Settings) and select the tab.
- In the Credential Providers pane, click , and supply values in the following fields:
- Name. Type a name for the credential provider.
- URL. Enter the URL for your CyberArk Vault, specifically the GetPassword Web Service endpoint of the Central Credential Provider (CCP). You should not include any query parameters here, but add them to the Query Mappings section below.
- Application ID. Type the application ID that identifies Skylar Compliance application to your CyberArk vault.
- Request Timeout (sec). Type a value, in seconds, after which Skylar Compliance will stop trying to communicate with CyberArk. Default value is 10 seconds.
- RootCA Certificate. Upload the PEM-encoded X.509 Root CA certificate required for secure TLS communication with CyberArk.
- Client Certificate. Upload the PEM-encoded X.509 client certificate required for secure TLS communication with CyberArk.
- Client Key. Upload the PEM-encoded client private key required for secure TLS communication with CyberArk.
Query Mappings
Click and supply values in the following fields:
- Credential. Select the credential that you created in steps 2-4 of this section.
- Field. Select the field that you want CyberArk to populate.
- Query. Type the query to retrieve field data from CyberArk. This is a required parameter to retrieve a secret value from the vault in conjunction with the Application ID.
- Query. The query is a string with the following format:
- 'Property=Value;Property=Value;...Propery=Value'
- where Property is one of the properties of the CyberArk account where the credentials are stored. Different types of accounts contain different properties, but most contain UserName and Address.
- For a successful query, you must include enough properties to return exactly one account, otherwise you will receive an error. For example:
- 'safe=test;Database=hr;UserName=sa;Address=dbserver1.cyberark.local'
- Click .
- Go to the Devices page (Devices > Device List).
- Select the checkbox to the left of your device and click .
- Go to the tab.
- Select the Use Restorepoint Credentials? checkbox and select the credential that you created in steps 2-4 of this section from the drop-down.
- Click .
If the field does not populate in the user interface, you can click when editing the device to view the device logs and the value that was populated from CyberArk.
Asset Fields
In addition to the built-in Asset Management fields, you can also define custom fields. To do this, navigate to the Assets Fields page (Devices > Asset Fields). Custom fields can be of type Date, Text (single-line), Textarea (multiple-line), and File.
Once defined, date fields can be set to give an Expiry Notification:
- 60 days before
- 30 days before
- When Reached
If set, an email is automatically sent to the device’s owner on the specified expiration date. Expiry date is also used in reports.


Any custom fields defined in this page become immediately available in the Assets page of all devices managed by Skylar Compliance.
Global Search
Skylar Compliance offers two types of searches to find the correct configuration backups on the Global Search page (Devices > Global Search). You can search via a string search or with a regular expression search.
To perform a string search:
- Select the search criteria in the Filter field that you want to search for. Click the and/or operator toggle to narrow your search. The Filter field will filter as you select or type your search criteria and will update the results in the table below the search modal.
- Select String from the drop-down menu and type in any text you want to match specifically in the Match String field. For more information, click (
 ) for String Search Criteria help.
 - If desired, select a time limit and version limit from the Limit Time and Limit Versions drop-down menus.
- Select the devices you want to search and click . The Global Search will display a preview of every search result in the Results pane on the right.

To perform Regex search:
- Select Regex from the drop-down menu to search by regular expression for a more advanced search.
- Type in any text you want to match specifically in the Match Regex field. For more information, click () for Regex Search Criteria help.
- If desired, select a time limit and version limit from the Limit Time and Limit Versions drop-down menus.
- Select the devices you want to search and click . The Global Search will display a preview of every search result in the Results pane on the right.
- Select the results that you want to export and click the button to export to a .csv file.

Viewing the List of Configurations for a Device
You can access the list of configurations for a device from the Device Management page by clicking the last backup column of the corresponding device, or by clicking the tab when you edit the device.
A configuration may contain more than one file. For example, a Cisco IOS device has a start-up and a running configuration; you can choose which configurations should be backed up in the Device Details page.

If a device supports firmware identification, Skylar Compliance will display the firmware version detected at the time of backup, next to each configuration. A sample list is shown below:
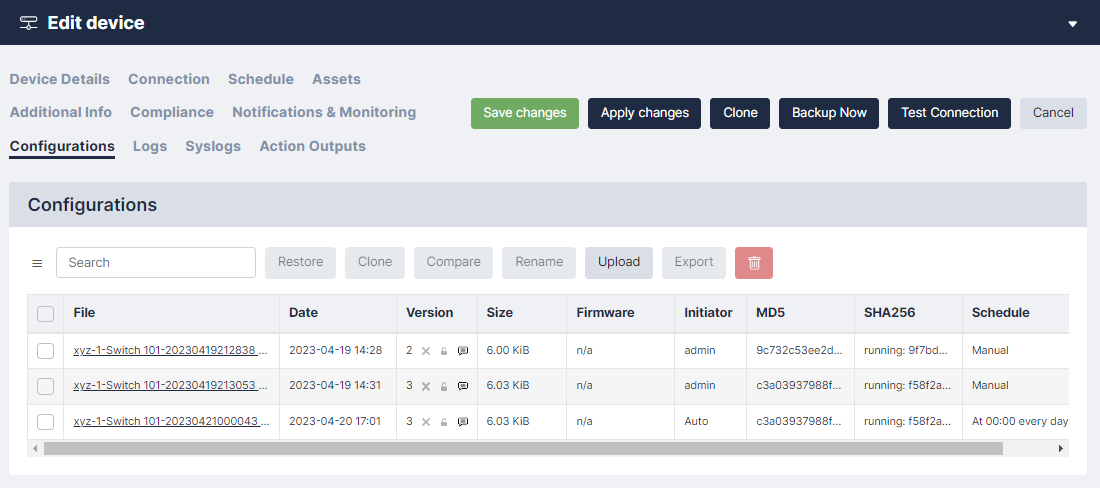
Skylar Compliance keeps track of configuration changes by assigning a version ID to each unique configuration retrieved from a device. Identical configurations are not stored multiple times.
|
View |
|
|
Baseline version |
The checkmark shows the baseline version of a configuration. To set a baseline version, select the checkmark. The checkmark will become solid. Restoring a non-baseline configuration version to a device with a baseline configuration version will cause a compliance alert. For more information, see Configuration Baselines. |
|
Retaining a version |
You may want to retain a configuration indefinitely (a milestone configuration), that overrides your configured retention policy. For example, a backup taken just before a device upgrade. To retain a configuration, click the padlock icon next to the file name; the padlock will become solid. To undo this action, click the padlock icon again. |
|
Adding comments |
You can add a comment to a configuration by clicking the gray note icon next to the relevant configuration. Enter your comment in the pop-up dialog box and click OK; the icon will change color . To remove a comment, click the icon , delete the text, and click OK. |
The above options apply to a configuration version, rather than an individual backup.
|
Compare configurations |
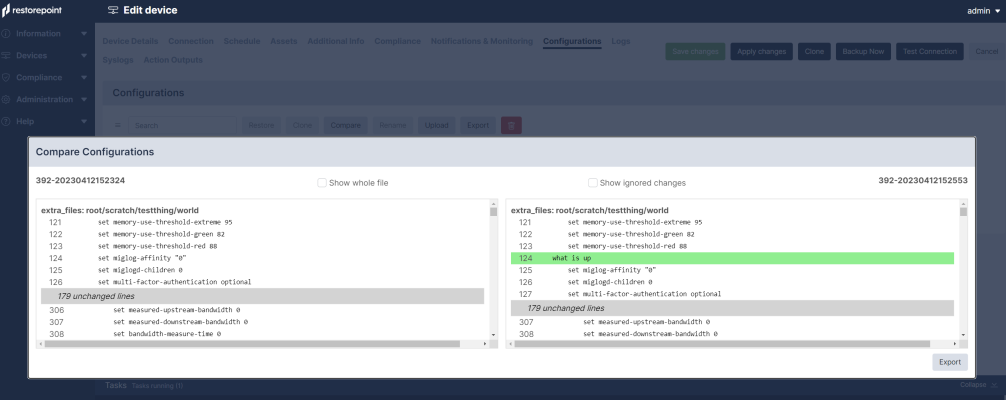
The Compare option is only available for the devices with text file or a tar/tgz archive of text files configurations. To compare two configurations, select two items using the checkbox to the left of the item, and click Compare. If the configurations are archives, Skylar Compliance will expand the archives and compare the individual files. Skylar Compliance will display the chosen configuration files side by side and highlight the differences; inserted lines will be displayed in blue and changed lines will be displayed in red. When Only differences is selected, Skylar Compliance will not display lines which are identical in both files, except those preceding or following a change. Note: Some devices embed a timestamp or fingerprint in the configuration every time a backup is performed. Wherever possible, Skylar Compliance ignores lines that only differ by such fingerprints when comparing configurations, so that only relevant changes are displayed. |
|
Delete a configuration |
Select a configuration using the checkbox and click Delete. This operation is usually only required to delete a milestone configuration (one you have chosen to retain indefinitely), because old configurations are automatically removed according to the retention policy. |
|
Restore a configuration |
To restore a configuration, select a configuration using the checkbox and click Restore. Additional options may be displayed, for instance which configuration type should be restored, or whether the device should be reset to complete the operation. |
|
Upload Backup |
This option allows you to upload a new device configuration file to Skylar Compliance from your PC. |
|
Export Backup |
You can export a device configuration from Skylar Compliance through your browser, email, make it available for FTP/TFTP/SFTP collection by a device, or export it to one of your pre-configured file servers. |
Comparing Device Configurations
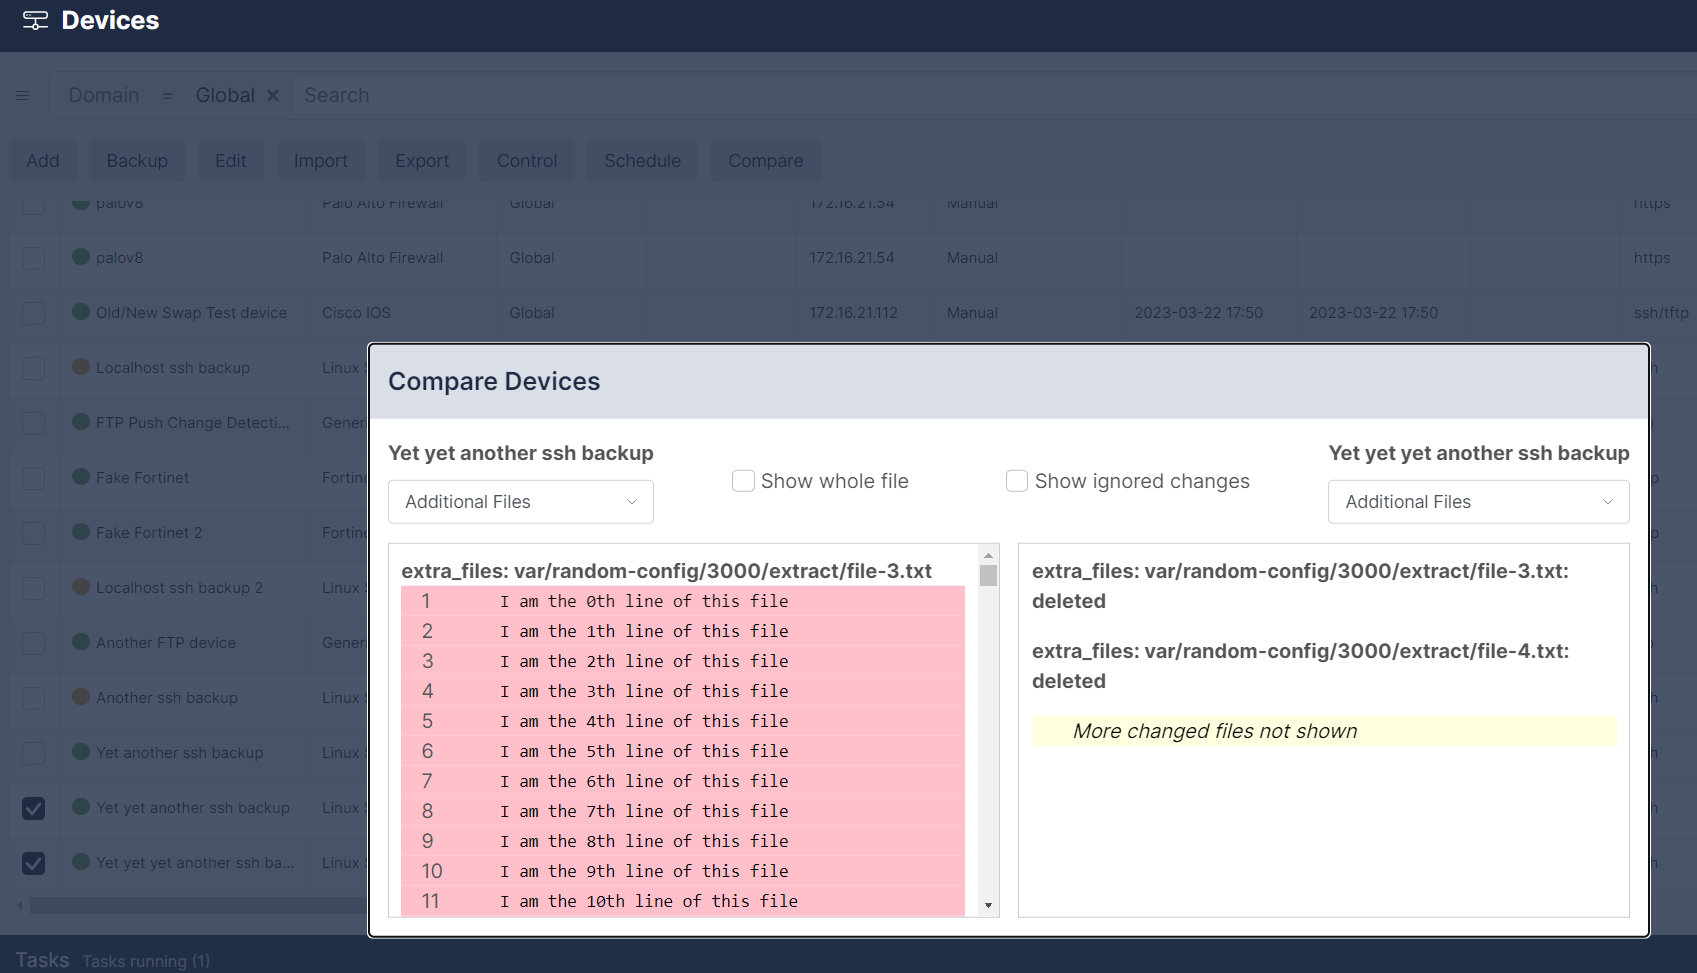
Skylar Compliance allows you to compare Device Configurations and sift through whole files to analyze any changes between them. You can use the compare function located on either the Device Management page (Devices > Device List) or Configurations tab on the Edit device page. You can also select Show ignored changesin the Compare Devices window to view any changes that Skylar Compliance deems "not actual changes".
Examples of "not actual changes" that can be ignored include:
-
Run-time variables (e.g. Cisco IOS ntp clock-period value)
-
Salted hashes (e.g. hashed passwords, certificates, keys)
-
Log files
You can now set Skylar Compliance to specifically ignore phrasing/words (like matching a regex), entire text-blocks (given the start/stop delimiters), and entire files (within tar/tgz/zip/xz config files).
To compare device configurations from the Devices page (Devices > Device List) or tab on the Edit device page:
-
Select the checkboxes next to the two devices/configurations you want to compare.
-
Click . The Compare Devices window or Compare Configurations window appears.
-
You can view configuration changes between the selected files in this window. To help refine your viewing, you can select the Show ignored changes checkbox to view any "non-actual changes" and/or view the entire files by selecting Show whole file checkbox to review entire files.

There are multiple parameters regarding specific config diff limits when you are comparing configs:
- 1000 lines is a cutoff for HTML diff before only changes are forced to be shown.
- 2000 lines is a cutoff for HTML diff when the diff gets truncated (for rpcmd diff, it is 5000).
- 2 million lines is a max number of lines for any of the two files before the diff is considered too large to be displayed.
It is important to note that both 1000 lines and 2000 lines refer to the number of lines in the diff, not the configurations themselves."Diff" in this context refers to the whole set of lines to be displayed including unchanged lines, added lines, and deleted lines.
For example, if the produced diff has more than 1000 lines, it will be forced to show changes only.
Another example is if the diff has more than 2000 lines, it will be truncated and only the first 2000 lines of the diff will be used for generating the HTML output. The remainder or its changes will not be shown in the user interface. A message alerting you that the output was truncated will display at the bottom of the modal.

An Email Alert of your compare results is also sent when finished comparing configurations and/or devices.
Backup File Operations
If a device configuration is a plain text file or a tar/tgz archive of text files, you can view the configuration contents by clicking the relevant tab or file name in the configuration page. If the configuration is an archive of text files, Skylar Compliance will attempt to unpack the archive and display each individual file. If the configuration is a binary file, or if the file is too large, Skylar Compliance will not display the contents.
From this page, you can copy this file to your local machine by clicking the button. After you export the file, you can use a text editor to edit the backup file, and then upload it back to Skylar Compliance using the button on the tab. You can push the edited configuration file to the device by clicking the button.
Backup Failures
By default, after a device fails to back up, Skylar Compliance will retry the operation every hour until it succeeds, and it will send an error notification by email on every failed attempt. This behavior can be modified by changing the Failure Policy, configured in the device tab:
- From the Retry field, choose how many times to retry a failed backup. Backups are attempted every hour.
- Next, choose whether to revert to the set schedule or disable further backups when the last allowed failure occurs.
- Finally, choose when to be notified of a failure.
Restoring to an Existing Device
To restore a device:
-
Select Devices from the menu. Skylar Compliance displays the Device Management page.
-
Click the entry in the Last Backup column next to the device you want to restore. Skylar Compliance displays all the available configurations.
-
Select a configuration by selecting its checkbox and click . Skylar Compliance prompts you to confirm the restore operation. Depending on the device type, you may be prompted for additional options.

-
If the restore operation fails, you will see an activity in the activity display. You can click on the magnifying glass icon next to the progress bar to show a real-time progress log, which will aid in determining the cause of the failure. There is also a Transcript in the Logs tab for failed backups, which contains the details of the conversation with the device.

Restoring to a New Device
When a device is replaced, for instance due to failure, the following conditions must be met:
- The new device must run the same software version as the original.
- The new device must be configured with the same IP address and authentication details as the old device. Alternatively, you can temporarily change the IP addresses or credentials stored on Skylar Compliance to match those of the new device.
- If Skylar Compliance connects to the device using SSH, you may to need clear the SSH cache in Skylar Compliance in the tab of Device Management.
Cloning
The Clone button restores a configuration to a device that is different than the original, which produces a duplicate of the original device. This operation should be used with caution, as it may produce a duplicate IP address on your network.