This
See the Microsoft Hyper-V Automation section for information about that PowerPack.
What is the Windows PowerShell AutomationsPowerPack?
The Windows PowerShell Automations PowerPack includes:
- A custom action type for running PowerShell commands on remote devices
- A dynamic device group with rules that include only Windows devices
- A set of automation actions that run diagnostic commands on Windows systems via PowerShell
-
A set of automation policies that tie events from monitoring PowerPacks to the automation actions
The Windows PowerShell Automations actions are executed on the SL1 All-In-One Appliance or Data Collector.
In addition to using the standard content, you can use the content in the Windows PowerShell Automations PowerPack to:
- Create your own automation policies that include the pre-defined actions that run different sets of diagnostic commands.
- Use the supplied “Execute PowerShell Request” custom action type to configure your own automation action by supplying a set of commands to be executed via PowerShell.
Installing the Windows PowerShell AutomationsPowerPack
Before completing the steps in this
IMPORTANT: You must install the Datacenter Automation Utilities PowerPack before using the Windows PowerShell Automations PowerPack.
The Windows PowerShell AutomationsPowerPack requires SL1 version 8.10.0 or later. For details on upgrading SL1, see the appropriate SL1Release Notes.
By default, installing a new version of a PowerPack overwrites all content from a previous version of that PowerPack that has already been installed on the target system. You can use the Enable Selective PowerPack Field Protection setting in the Behavior Settings page (System > Settings > Behavior) to prevent new PowerPacks from overwriting local changes for some commonly customized fields. For more information, see the section on Global Settings.
To download and install the PowerPack:
- Search for and download the PowerPack from the PowerPacks page (Product Downloads > PowerPacks & SyncPacks) at the ScienceLogic Support Site.
- In SL1, go to the PowerPacks page (System > Manage > PowerPacks).
- Click the button and choose Import PowerPack. The Import PowerPack dialog box appears.
- Click [Browse] and navigate to the PowerPack file from step 1.
- Select the PowerPack file and click . The PowerPack Installer modal displays a list of the PowerPack contents.
- Click . The PowerPack is added to the PowerPacks page.
If you exit the PowerPack Installer modal without installing the imported PowerPack, the imported PowerPack will not appear in the PowerPacks page. However, the imported PowerPack will appear in the Imported PowerPacks modal. This page appears when you click the menu and select Install PowerPack.
Standard Automation Policies
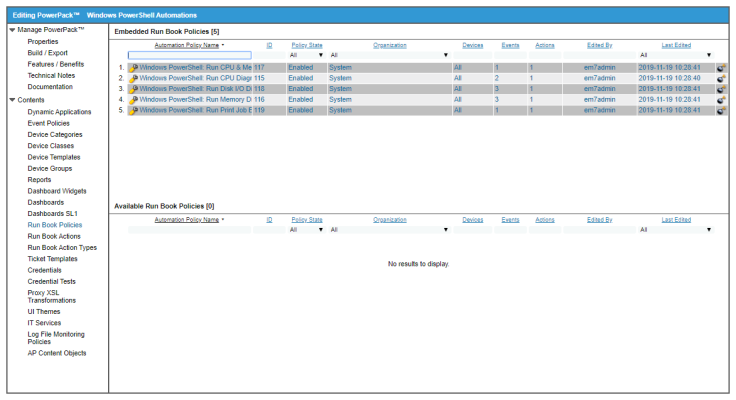
The Windows PowerShell Automations PowerPack includes five standard automation policies, shown in the following figure. Each policy triggers a single automation action that collects diagnostic data within a PowerShell session, and an action that formats the output as HTML. All of the automation actions use the same custom action type, "Execute PowerShell Request", which is supplied in the PowerPack.
All of the standard automation policies are tied to included ScienceLogic SL1 events generated by the Dynamic Applications from the Windows Server PowerPack.
Several of the automation actions use the substitution character feature of the “Execute PowerShell Request” custom action type. If an event variable is included in a command (such as "%Y" for the sub-entity name), the custom action type automatically replaces that variable with the value from the triggering event.
The following table shows the standard automation policies, their aligned events, and the automation action that runs in response to the events.
The aligned events are included as part of the Microsoft Windows Server PowerPack and are not installed with the SL1 platform. You must install the Microsoft Windows Server PowerPack to obtain these events.
| Automation Policy Name | Aligned Events | Automation Action |
|---|---|---|
| Windows PowerShell: Run CPU & Memory Diagnostic Commands |
|
Windows CPU and Memory Diagnostic Commands |
| Windows PowerShell: Run CPU Diagnostic Commands |
|
Windows CPU Diagnostic Commands |
| Windows PowerShell: Run Disk I/O Diagnostic Commands |
|
Windows Disk I/O Diagnostic Commands |
| Windows PowerShell: Run Disk Usage Diagnostic Commands |
This automation policy is aligned with the Windows Automation device group. |
|
| Windows PowerShell: Run Memory Diagnostic Commands |
|
Run Memory Diagnositc Commands |
| Windows PowerShell: Run Print Job Error Diagnostic Commands |
|
Windows Print Job Error Diagnostic Commands |
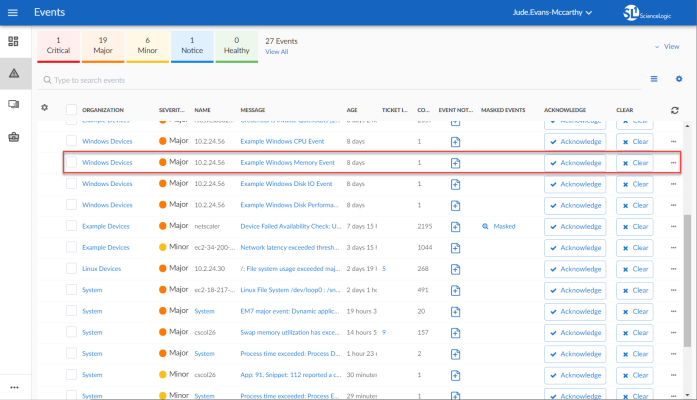
The following figure shows a memory event with a classification of "Major" appears on the Events page. Click the [Actions] button () for an event, and select View Automation Actions to see the automation actions triggered by the events.
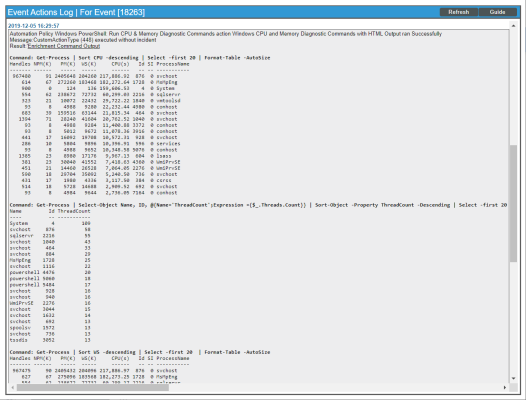
The results shown for this event, in the Event Actions Log, include the automation policy that ran (shown at the top of the following figure), along with the automation actions (commands) that ran. Results for each command are also displayed. The following figure shows an example of this HTML output.
To learn more about which commands are executed by default for a given automation action, see Customizing Actions.
Although you can edit the automation actions described in this section, it is a best practice to use "Save As" to create a new automation action, rather than to customize the standard automation policies.
Authentication for Windows Devices with the Windows PowerShell Automations PowerPack
The "Execute PowerShell Request" custom action type supports hard-coded credentials (wherein you specify the ID of a credential in the automation action), or the custom action type can dynamically determine the credential to use. By default, the automation actions use the dynamic method (by specifying credential ID 0 in the input parameters). The dynamic method uses the first credential that matches the following rules:
- If the "Microsoft: Windows Server Configuration Cache" Dynamic Application (from the Microsoft: Windows ServerPowerPack) is aligned to the device associated with the triggering event, the credential aligned to that Dynamic Application is used.
- If the "Microsoft: Windows Server Performance Cache" Dynamic Application (from the Microsoft: Windows ServerPowerPack) is aligned to the device associated with the triggering event, the credential aligned to that Dynamic Application is used.
- If the "Microsoft: Windows Server OS Configuration" Dynamic Application (from the Microsoft: Windows ServerPowerPack) is aligned to the device associated with the triggering event, the credential aligned to that Dynamic Application is used.
- If none of the listed Dynamic Applications are aligned to the device associated with the triggering event, the first available credential aligned to the device as a secondary credential is used.
Creating a Credential for Windows PowerShell
If you do not have the Microsoft: Windows Server PowerPack installed, you must create a credential that includes the username and password to communicate with your Windows devices. To create a credential, refer to the Creating a Credential section for more information.
To prepare your Windows systems for monitoring, follow the instructions in Configuring Windows Servers for Monitoring with PowerShell.
If you have the Microsoft: Windows Server PowerPack installed and configured, you may skip this section.
For more information about configuring credentials in SL1, see Credentials.
Creating Custom Windows PowerShell Automation Policies
To create and customize Automation Policies for the Windows PowerShell Automations PowerPack, see the Creating and Customizing Automation Policies section.
Creating a Custom Action Policy
You can use the "Execute PowerShell Request" action type included with the Windows PowerShell Automations PowerPack to create custom automation actions that you can then use to build custom automation policies.
To create a custom action policy using the "Execute PowerShell Request" action type:
- Navigate to the Action Policy Manager page (Registry > Run Book > Actions).
- In the Action Policy Manager page, click the button.
- The Action Policy Editor modal appears.
- In the Action Policy Editor page, supply a value in each field.
- Action Name. Specify the name for the action policy.
- Action State. Specifies whether the policy can be executed by an automation policy (enabled) or cannot be executed (disabled).
- Description. Allows you to enter a detailed description of the action.
-
Organization. Organization to associate with the action policy.
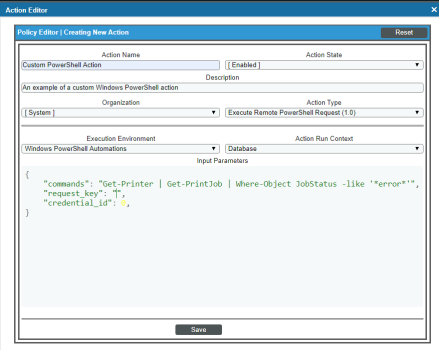
- Action Type. Type of action that will be executed. Select the "Execute PowerShell Request (1.0)" action type (highlighted in the figure above).
- Execution Environment. Select from the list of available Execution Environments. The default execution environment is System.
- Action Run Context. Select Database or Collector as the context in which the action policy will run.
- Input Parameters. A JSON structure that specifies each input parameter. Each parameter definition includes its name, data type, and whether the input is optional or required for this Custom Action Type. For more information about the available input parameters, see the table in Creating a New Windows PowerShell Automation Action.
Input parameters must be defined as a JSON structure.
-
Click [Save]. If you are modifying an existing action policy, click . Supply a new value in the Action Name field, and save the current action policy, including any edits, as a new policy.
Customizing Automation Actions
The Windows PowerShell Automations PowerPack includes 5 automation actions that execute the "Execute PowerShell Request" action type to request diagnostic information or remediate an issue. You can specify the host and the options in a JSON structure that you enter in the Input Parameters field in the Action Policy Editor modal.
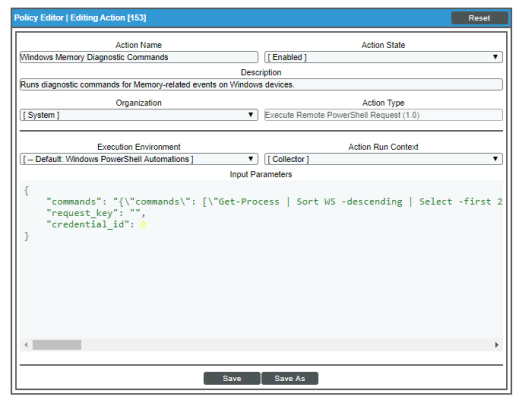
The following automation actions that use the "Execute PowerShell Request" action type are included in the Windows PowerShell Automations PowerPack. Compare the commands run with the example in the image above. For more information about input parameter fields, see the table in Creating a New Windows PowerShell Automation Action.
| Action Name | Description | Commands Run |
|---|---|---|
|
Windows CPU and Memory Diagnostic Commands |
Runs diagnostic commands for CPU and Memory events on Windows devices |
|
|
Windows CPU Diagnostic Commands |
Runs diagnostic commands for CPU-related events on Windows devices |
|
| Windows Disk I/O Diagnostic Commands | Runs diagnostic commands for Disk I/O events on Windows devices |
|
| Windows Get Largest Event Log Files | Gets the 20 largest Windows Event Log files. |
|
| Windows Get Largest Files on Disk | Gets the 20 largest files on the disk specified in the event. |
|
| Windows Memory Diagnostic Commands | Runs diagnostic commands for Memory-related events on Windows devices. |
|
| Windows Print Job Error Diagnostic Commands | Runs diagnostic commands for Print Job Error events on Windows devices. |
|
For more information about substitution variables, see Appendix A.
Creating a New Windows PowerShell Automation Action
You can create a new automation action that runs remote PowerShell requests using the supplied “Execute PowerShell Request” custom action type. To do this, select “Execute PowerShell Request” in the Action Type drop-down list when you create a new automation action. You can also use the existing automation actions in the PowerPack as a template by using the [Save As] option.
The Windows PowerShell automation actions accept the following parameters in JSON:
| Parameter | Input type | Description |
|---|---|---|
| commands | string | Specifies a single command or a list of commands, in JSON format, to execute. You can use substitution variables in the commands. |
| request_key | string |
(Optional field) Default value: empty The unique key for each instance (row) returned by the request. This unique key must be a property name, and the request must include that property (column) and return values from that property name (column). Example: Suppose you want to get the ID, number of cores, name, and maximum clock speed of every CPU installed on a Windows system, run the following command, where "DeviceID" is the request key. Get-WmiObject -Class Win32_Processor -Property DeviceID, NumberOfCores, Name, MaxClockSpeed | Format-List DeviceID, NumberOfCores, Name, MaxClockSpeed |
| credential_id | integer |
Default value: 0 Specifies the credential_id to use for the connection.
|
Using Substitution Values. The commands input can contain substitution values that match the keys in EM7_VALUES.
For more information about substitution variables, see Appendix A.
For a description of all options that are available in Automation Policies, see the
