![]()
The Devices page allows you to view all of your managed devices in Skylar One (formerly SL1) and also run a discovery to find more devices to monitor. You can select a device from the list on the Devices page to view detailed data on the
The list of devices on the Devices page matches the list of devices on the Device Manager page (Devices > Classic Devices) in the classic Skylar One user interface.
Use the following menu options to navigate the Skylar One user interface:
- To view a pop-out list of menu options, click the menu icon (
 ).
). - To view a page containing all of the menu options, click the Advanced menu icon (
 ).
).
Viewing the List of All Devices
The Devices page allows you to view all of your managed devices in Skylar One. This section explains how to gather more information about a device from this page.
To navigate to the Devices page, click the Devices icon (![]() ):
):

If you do not see one of these columns, click the gear icon (![]() ) and then select Column Preferences to add or remove columns. You can also drag columns to different locations on the page or click on a column heading to sort the list by the values in that column. Skylar One retains any changes you make to the columns that appear on the page and will automatically recall those changes the next time you visit the page. For more information,
) and then select Column Preferences to add or remove columns. You can also drag columns to different locations on the page or click on a column heading to sort the list by the values in that column. Skylar One retains any changes you make to the columns that appear on the page and will automatically recall those changes the next time you visit the page. For more information,
You can filter the items on this inventory page by typing filter text or selecting filter options in one or more of the filters found above the columns on the page. For more information, see
You can adjust the size of the rows and the size of the row text on this inventory page. For more information, see the section on
By default, the Devices page footer displays the total number of devices discovered. If you apply a filter, the footer will display the total number of search returns that satisfy your filter and the total number of devices available on your machine.
For each device, the Devices page can display the following information:
- ID. The Device ID. This is a unique number that Skylar One automatically assigns to the device during discovery.
- Device Name. Name of the device. For devices running SNMP or with DNS entries, the name is discovered automatically. For devices without SNMP or DNS entries, the device's IP address will appear in this field.
- IP Address. The device's IP address.
- Class. The manufacturer and type of device. The device class is automatically assigned during discovery, at the same time as the category.
- Category. The category assigned to the device. Categories include servers, routers, switches, firewalls, and printers, among others. The category is automatically assigned during discovery, at the same time as the as device class. For more information about device categories, see the
- Organization. The organization to which the device is assigned.
- State. The current condition of the device, based upon events generated by the device. The device can have one of the following States:
- Critical. Device has a serious problem that requires immediate attention.
- Major. Device has a problem that requires immediate attention.
- Minor. Device has a less-serious problem.
- Notice. Device has an informational event associated with it.
- Healthy. Device is running with no problems.
- Collection State. The current condition of data collection for the device. The device can have one or more of the following Collection States:
- Active. Skylar One is collecting data from the device.
- Unavailable. Skylar One cannot connect to the device, and will not collect data from the device until the device becomes available. A physical device falls back to executing the availability ping every five minutes, unless you have critical ping enabled. Component devices get their availability calculated by the component discovery Dynamic Application of the parent device.
- User-Disabled. Skylar One is not currently collecting data from the device because the user has disabled collection.
- System-Disabled. Skylar One is not currently collecting data from the device because the system has disabled collection.
- Scheduled Maintenance. Skylar One is not currently collecting data from the device because it is currently in scheduled maintenance mode.
- User-Initiated-Maintenance. Skylar One is not currently collecting data from the device because it has manually been put into maintenance mode by a user.
- Component Vanished. The component device has vanished, i.e. is not currently being reported by its root device. Skylar One cannot collect data from the device at this time.
Depending on the circumstances, more than one collection state might appear for a single device. For example, if a device is in a scheduled maintenance mode, the Collection State might be Unavailable / Scheduled Maintenance / System-Disabled.
- Collector Group. The collector group to which the device belongs. Collector groups are groups of Skylar One Data Collectors, which are defined on the Collector Groups page (Manage > Collector Groups).
- SNMP Credential. The name of the SNMP credential used to monitor the device.
- SNMP Version. The version of SNMP used to monitor the device.
- Hostname. The fully qualified hostname for the device, for devices that are discovered and managed by hostname (instead of IP address). This column does not appear by default, but you can add it by clicking Grid Settings > Column Preferences.
- Date Created. The date and time on which the device was created.
- Organization ID. The unique numeric identifier of the organization to which the device is assigned.
- Class ID. The unique numeric identifier of the device class.
- Category ID. The unique numeric identifier of the device category assigned to the device.
- Type. The type of device. Options include:
- Physical. A hardware-based device with an IP address.
- Component. An entity that runs under the control of a management device.
- Virtual. A container for collected data.
- Collector Group ID. The unique numeric identifier of the collector group to which the device belongs.
- Asset ID. The ID of any asset associated with the device. The asset ID displays as a hyperlink that you can click to view the asset's properties. For more information about assets, see
- Last Poll. The date and time at which Skylar One last polled the device.
- Uptime. The amount of time since the device was last initialized.
- SL Agent. Indicates whether an Skylar One agent is installed on the device. If so, you can click the Yes hyperlink to display a modal where you can update the agent's configuration.
If you have defined any custom attributes for your devices, you can also add those custom attributes as columns that appear on the Devices page.
Viewing Additional Data about a Device
On the Events page and the Devices page, you can click the Open icon (![]() ) next to an event or device to open a Device Summary modal:
) next to an event or device to open a Device Summary modal:
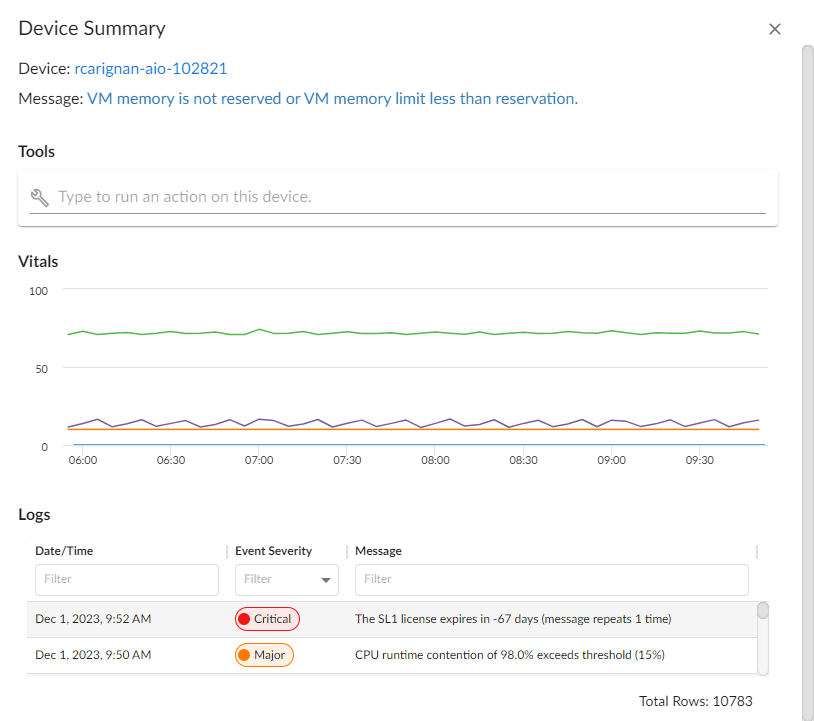
NOTE: On the Events page, the Device Summary modal displays only for events that are aligned with devices.
The detail window for that device contains the Tools pane, the Vitals graphs, and the Logs pane:
- The Tools pane enables you to run a set of diagnostic tools or user-initiated actions in the Activity Center, or to click on custom links that will open in a separate browser window. Click the search bar to search for tools, actions, or custom links that are available for the device.
- The Vitals pane displays graph data for the past four hours of CPU usage, memory usage, and latency for that device, where relevant. You can zoom in on a shorter time frame in the Vitals graph by clicking and dragging, and you can go back to the original time span by clicking the button.
- The Logs pane displays a list of events associated with that device.
To open the detail or Investigator page for an item, click the link for the item name at the top of the detail window.
Adding Devices with Discovery
On the Devices page, you can click the button to run a guided or unguided network discovery session, a process that searches for and adds more devices to Skylar One for monitoring.
For more information about adding devices using guided or unguided discovery, see
Creating a Physical Device without Running Discovery
Skylar One (formerly SL1) allows you to manually create physical devices without running discovery. When you do so, a device record exists in Skylar One before Skylar One can communicate with the device.
In some cases, service providers find it useful to pre-populate a Skylar One system with device records but set the status of the manually created devices to Disabled. When network and firewall work are completed, the provider can then enable the devices and use discovery to keep the device data up-to-date.
You can manually create a physical device in three ways:
- In the user interface
- By uploading device data via a CSV file
- With the ScienceLogic API
In the user interface, one of the places you can create a physical device without running discovery is on the Devices page. To do so, click the down arrow icon (![]() ) next to the button and then select Create Physical Device or Create Physical Device from File.
) next to the button and then select Create Physical Device or Create Physical Device from File.
For more information, see the section Creating a Physical Device from the Devices Page.
Creating a Virtual Device
A virtual device is a container for collected data. A virtual device can be used when you want to:
- Monitor a device or application that doesn't support TCP/IP, SNMP, or both. The device's data can be pushed to Skylar One via another method (for example, email) and stored in a virtual device.
- Monitor multiple SNMP agents on a single device. In such a case, one of the SNMP agents (for example, a hardware agent) can be associated with the device and another SNMP agent (for example, an agent that monitors a software application) can be associated with a virtual device.
- Isolate and monitor specific parameters separately from their originating device. For example, you might want to monitor a database and keep its data separate from the hardware data you are collecting from the host device.
You can create a virtual device on the Devices page. To do so, click the down arrow icon (![]() ) next to the button and then select Create Virtual Device.
) next to the button and then select Create Virtual Device.
For more information, see the section Creating a Virtual Device from the Devices Page.
Installing an Agent
If you are using a distributed Skylar One system without the Skylar One Extended Architecture (which includes Compute Nodes, Storage Nodes, and a Management Node), you can install a Skylar One agent from the Devices page. To do so, click the down arrow next to the button and then select Download/Install Agent.
For more information, see
Designating Favorite Devices
In Skylar One, you can select one or more devices to always display at the top of the Devices page. This process is called favoriting devices.
To make a device a favorite, click the Favorite Device star icon (![]() ) to add the device to your favorites list. Click the icon (
) to add the device to your favorites list. Click the icon (![]() ) again to remove the favorite status.
) again to remove the favorite status.
With favorite devices, you can:
- View your favorite devices at the top of the Devices page by default.
- Include favorites in the multi-sort function.
- Filter devices by favorite.
Aligning a Device with a Different Organization
To align a single device with a different organization:
-
On the Devices page, click the Actions button (
 ) for the device and select Align Organization. The Align to Organization window appears.
 - In the Align to Organization window, use the Organization drop-down to search for and select an organization.
- Click the button. The organization you selected now appears in that Info drop-down on the Device Investigator page for that device.
You can also bulk-align multiple devices with an organization. For more information, see the section on Performing Bulk Actions on One or More Devices.
Assigning a New Icon to a Device
You can customize the look and feel of the devices that appear on the Devices page by assigning an icon a device, device class, or device category.
To assign an icon to a device, device class, or device category:
-
On the Devices page, Device Classes page (Devices > Device Classes), or Device Categories page (Devices > Device Categories), locate the device, class, or category for which you want to add an icon.
-
Click the Actions button (
) for that item and select Assign Icon. The Select an Icon window appears.To assign an icon to more than one device, device class, or device category, select the checkboxes to the left of those items and click the button.
-
In the Select an Icon window, do one of the following:
-
To use an existing icon, proceed to step 7.
-
To upload a new icon from your local drive, make sure that the image file meets the following criteria, then proceed to step 4:
- The image file should be in .SVG format.
- The file should not be larger than 40 KB.
- The file should not be animated.
- The file should not contain bitmaps.
-
- To start the upload process, click the button. The Add an Icon window appears.
- Complete the following fields in the Add an Icon window:
- In the Icon name field, type a name for the icon you want to upload.
- In the Add Tags field, type a short descriptor for the icon, without spaces. You can use this tag for searching later.
- You can click the Browse or Drop area to browse for and select the icon, or you can drag and drop the icon file onto the Add an Icon window.
- Click the button. The icon is added to the Select an Icon window.
- Select the icon from the list of icons and click the button. The icon is assigned to the device, device class, or device category.
You can use the Search field to search for a specific icon or narrow down the list of icons.
Deleting a Device
To delete a single device on the Devices page:
- On the Devices page, click the Actions button () for the device and select Delete Device.
- A dialog appears asking you to confirm that you want to permanently delete the device(s). To confirm, click .
If you attempt to delete one or more devices that have associated asset records, you are given the option to delete those associated assets at the same time.
You can also bulk-delete multiple devices. For more information, see the section on Performing Bulk Actions on One or More Devices.
Running a Device Report
From the Devices page or from the Device Investigator page for a specific device, you can generate a detailed report for a single device. You can specify the information to include in the report and the format that Skylar One will use to generate the report, including HTML, PDF, XLS, and more.
To run a device report:
-
Do one of the following:
-
On the Devices page, click the Actions button (
) for a specific device and select Device Report. -
On the Device Investigator page for a specific device, click the button in the top navigation bar.
The Device Report modal page appears.
-
-
In the Type drop-down, select the type of report you want to generate. Your options include:
- . Includes information about device status, status of all device policies, status of all monitors, status of hardware components, status of all thresholds defined for the device, a list of all active events associated with the device, and information about the last collection time and last entry to the device log.
- . Includes information about device status, status of all monitors, status of hardware components, status of all thresholds defined for the device, and information about the last collection time and last entry to the device log.
- . Includes status of all monitors, status of all thresholds defined for the device, and information about the last collection time and last entry to the device log.
- . Includes contact information for the device's organization and contact information for all vendors and warranty or support accounts.
- . Includes overview of hardware components for the device.
- . Includes all notes created in the Notepad Editor page.
- . Displays a list of software installed on the device.
- . Displays a list of all processes running on the device.
- . Includes information about network ports and network configuration.
- . Includes a list of all active events associated with the device.
- . Includes information about device status, status of all monitors, status of all Dynamic Applications associated with the device, status of all thresholds defined for the device, and a list of all active events associated with the device.
- In the Format drop-down, select the format for the report. Your options include:
- HTML. Create the report as an HTML document.
- PDF. Create the report as a PDF document.
- DOC. Create the report as a Microsoft Word document.
- XLS. Create the report as Microsoft Excel spreadsheet.
- CSV. Create the report using comma-separated values.
- Click to generate the report.
Performing Bulk Actions on Multiple Devices
On the Devices page, you can select the checkboxes for one or more devices in the list and then click the button to perform certain tasks on the selected devices. The following options are available when you click the button:
-
Add To Device Group. Select the device groups you want to add the selected devices to and then click . For more information about device groups, see
-
Align Device Investigator Layout. Select a device tab layout you want to apply to the selected devices and then click . For more information about device tab layouts, see the section on Applying a Custom Device Investigator Layout to Other Devices.
When bulk-aligning a device tab layout to one or more devices, you can apply the layout to all users only if you have the permissions to do so. Otherwise, the layout change will be applied only for you.
-
Align Organization. Select an organization from the drop-down field and then click . For more information about organizations, see
-
Align SNMP Read Credential. Select an SNMP read-only credential from the list and then click . For more information on SNMP credentials, see
-
Assign Icon. Select an icon from the list and then click . You can also add a new icon for selection. For more information, see the section on Assigning a New Icon to a Device.
-
Change Collection State. Enables you to change the data collection status of the device in Skylar One. Your options are:
-
Disable (toggled off), in which Skylar One does not poll the device. If selected, the data displayed about the device in Skylar One is not updated.
-
Enable (toggle on), in which Skylar One actively polls the device on a regular basis and updates the data displayed about the device.
-
-
Change Collector Group. Select a collector group from the list and then click . For more information about collector groups, see
-
Change User Maintenance Mode. To enable or disable user maintenance mode for the selected device(s), select one of the following maintenance mode options and then click :
-
Enabled without Collections. This option puts the selected devices into user maintenance mode with collection disabled. The devices will remain in this state until you or another user disables user maintenance mode.
-
Enabled with Collections. This option puts the selected devices into user maintenance mode with collection enabled. The devices will remain in this state until you or another user disables user maintenance mode.
-
Disable. This option disables user maintenance mode for the selected devices.
For more information about user maintenance mode, see the section on Device Maintenance.
-
-
Create Asset Record. Creates an asset record for each selected device. Skylar One automatically populates as many fields as possible, using retrieved data. For more information about asset records, see
-
Delete Devices. A dialog appears asking you to confirm that you want to permanently delete the device(s). To confirm, click .
If you attempt to delete one or more devices that have associated asset records, you are given the option to delete those associated assets at the same time.
-
Find Collection Label Duplicates. Displays a list of currently duplicated collection labels for the selected devices. From this modal, you can edit the presentation object that is aligned with a collection label.
-
To select a collection label, use the drop-down list in the upper left.
-
To change the aligned presentation object for one or more devices:
-
Click on the radio button for the desired presentation object for the device.
-
For each additional device you want to edit, click on the radio button for the desired presentation object.
-
In the Select Action menu (lower right), select Align Presentation for Device and then click the button.
-
For more information about collection labels, see
-
-
Modify By Template. Displays the Modify by Template modal, which allows you to select a device template to change the configuration of the selected device(s). For more information, see
-
Schedule Maintenance. Displays the Schedule Editor modal, which allows you to schedule maintenance for the selected device(s). For more information, see the section on Defining a Scheduled or Recurring Device Maintenance Window for a Single Device.