
The Device Investigator provides a view of detailed data for a specific device in Skylar One. This
What is the Device Investigator?
The Device Investigator displays a customizable, detailed set of data about a specific device.
From the Devices page, click the name of a particular device to open the Device Investigator for that device.

The tabs on the Device Investigator provide access to all of the data associated with the device. The tabs are similar to the tabs on the Device Administration and Device Properties panels in the classic Skylar One user interface.
Only tabs relevant to the selected device are available on the Device Investigator. For example, the and tabs do not display if the selected device does not use agents or AI-based anomaly detection.
The Device Investigator can include the following menus and buttons:
-
- Report. Click this button to generate a detailed report on the device.
- Tools. Click this button to open the Activity Center, where you can run a set of diagnostic tools or user-initiated actions, or click custom links that open in a separate browser window.
The Device Investigator contains the following tabs:
- Investigator. Displays panels that provide basic information and metric data about a device. For most devices, the default panels include a Device Overview panel, Events, Logs, Availability, and combined charts for metrics such as utilization, discards, and errors. You can customize the panel layout on this page to meet your specific business needs. You can also select additional metrics to display.
- Settings. Use this tab to manage your preferences for that device, such as whether to auto-clear events, accept all logs, run daily port scans, and more. You can also set user maintenance preferences and disable or enable collection on that device.
- Anomaly Detection. Displays a list of anomaly detection metrics that are enabled for the device.
- Attributes. Lists the custom descriptive fields that are currently aligned with this device. On this tab, you can add custom attributes to this device and remove them from it.
- Changes. Displays active and cleared Change Events for a device.
- Collections. Use this tab to align or un-align Dynamic Applications with this device, enable or disable collection for the Dynamic Applications, and run a Dynamic Application. You can also change credentials and update the poll frequency for a Dynamic Application.
- Configs. Displays configuration information collected from the device by Dynamic Applications. If this device does not have any configuration data, this tab does not appear.
- Events. Displays a list of active and cleared events for the device. You can acknowledge events from this tab and add event notes.
- Interfaces. Displays information about the interfaces used by the device. If this device does not use interfaces, this tab does not appear.
- Journals. Displays journal entry information collected from the device by Dynamic Applications.
- Logs. Displays all of the messages that Skylar One and the Skylar One agent, if applicable, collect from the device.
- Map. Opens a map of that device and the devices it is related to (for systems that have the Maps page enabled).
- Monitors. Use this tab to define monitoring policies for the device.
- Notes. Displays notes and attachments associated with the device. You can also edit and create notes.
- Performance Metrics. Displays performance graphs for hardware, monitoring policies, and Dynamic Applications aligned with the device.
- Ports. Displays a list of all open ports on the device.
- Processes. Displays a list of system processes running on the device.
- Redirects. Use this tab to redirect log entries from an IP-based device to the current device. This is most useful when the current device is a virtual device, but you can also redirect log entries from one IP-based device to another IP-based device.
- Relationships. Displays information about parent-child relationships between devices.
- Schedules. Use this tab to view and manage all the scheduled processes you have defined in your system.
- Services. Displays a list of all services enabled on the device.
- Software. Displays a list of all the software installed on the device.
- Summary. Displays an overview of device details through device dashboards and widgets that display various metrics.
- Thresholds. Use this tab to define space and performance thresholds for a device.
- Tickets. Displays all open, pending, or working tickets associated with the device.
- More. This drop-down menu lets you select additional tabs to display on the Device Investigator by clicking the star icon next to the tab name. You can search for specific items on a tab, such as Device Class, Uptime, or Category, and the relevant tab appears in the search results. To remove a tab, click the star icon again. The icon changes from blue to white. Your tab selections remain in place even after you log out.

Click the forward-slash button (/) to open the More drop-down menu. You can highlight search results using the Up and Down Arrow keys on your keyboard, and select a result by pressing Enter. To close the drop-down menu, click the word More.
Using the Info Drawer on the Device Investigator Page
On the Device Investigator, you can view read-only information about the device in the Info drawer.

The Info drawer displays the following information for the device:
- Status. The status of the device.
- Collector. The collector group that was last used to collect data from the device. For All-In-One Appliances, this field contains the name of the default, built-in Collector Group.
- Collecting. Shows the collection status. A green check mark icon (
 ) means Skylar One periodically collects data from the device. A prohibition icon (
 ) means Skylar One does not currently collect data from the device.
- IP. IP address of the device.
- Organization. The organization to which this device belongs. Click the organization name to view a detail page for the organization.
- Device Class. Device class for the device. A device class usually describes the manufacturer of the device.
- Category. The device category associated with the device. The device category usually describes the primary function of the device, such as a "server," "switch," or "router."
- Device Type. Specifies whether the device is a physical device or a virtual device.
- Location Name. The device's location name as it might appear in a geographic map. Depending on your access, you might be able to edit or only view this field.
- Collection Time. Date and time of the most recent collection.
- Uptime. The number of days and hours that the device has been continuously up and communicating with Skylar One.
- More Attributes. This lower section lists any custom attributes that might be aligned with this device.
The Location Name field appears if you have installed AP2 9.13.1-14 (Quesito) or later.
Running a Device Report
From the Devices page or from the Device Investigator for a specific device, you can generate a detailed report for a single device. You can specify the information to include in the report. You can also specify the format that Skylar One uses to generate the report, such as HTML, PDF, or XLS.
To run a device report:
-
Do one of the following:
-
On the Devices page, click the actions icon (
 ) for a specific device and select Device Report.
-
On the Device Investigator for a specific device, click the button in the top navigation bar.
The Device Report modal appears.
-
-
In the Type drop-down field, select the type of report you want to generate. Your options include:
- Full Report. Includes information about device status, status of all device policies, status of all monitors, status of hardware components, status of all thresholds defined for the device, a list of all active events associated with the device, and information about the last collection time and last entry to the device log.
- Status. Includes information about device status, status of all monitors, status of hardware components, status of all thresholds defined for the device, and information about the last collection time and last entry to the device log.
- Config. Includes status of all monitors, status of all thresholds defined for the device, and information about the last collection time and last entry to the device log.
- Contact. Includes contact information for the device's organization and contact information for all vendors and warranty or support accounts.
- Hardware. Includes overview of hardware components for the device.
- Notes. Includes all notes created on the Notepad Editor page.
- Software. Displays a list of software installed on the device.
- Processes. Displays a list of all processes running on the device.
- Network. Includes information about network ports and network configuration.
- Events. Includes a list of all active events associated with the device.
- Health. Includes information about device status, status of all monitors, status of all Dynamic Applications associated with the device, status of all thresholds defined for the device, and a list of all active events associated with the device.
- In the Format drop-down field, select the format for the report. Your options include:
- HTML. Create the report as an HTML document.
- PDF. Create the report as a PDF document.
- DOC. Create the report as a Microsoft Word document.
- XLS. Create the report as a Microsoft Excel spreadsheet.
- CSV. Create the report using comma-separated values.
- Click to generate the report.
Using Device Tools in the Action Runner
On the Device Investigator, you can click the button to display the Action Runner. The Action Runner includes a set of diagnostic tools or user-initiated actions, and custom links that open in a separate browser window.
The tools and actions available in the Action Runner depend on the device type and your user permissions. Your organization assignment and access hooks determine these permissions. For example, if a device does not have an IP address, only the Availability tool is available.
For more information about user-initiated actions, see
To use the Action Runner:
- Access the Action Runner for devices in one of the following ways:
- On the Devices page, open the device drawer for a particular device. Click the search bar in the Tools pane.
- On the Device Investigator, click the button in the top navigation bar.
- Click in the top navigation bar of any page in Skylar One. Click the search bar.
- When you click the search bar, a list of the default tools, actions, or custom links that are available for the selected device appears. Click one of these tools, actions, or custom links, or use the search bar to search for a tool or action that is not listed. The following default tools are available in the Action Runner:
- Availability. Displays the results of an availability check of the device, using the port and protocol specified in the Availability Port and Availability Protocol fields on the tab for this device.
- Ping. Displays statistics returned by the ping tool. The ping tool sends a packet to the device's IP address (the one used by Skylar One to communicate with the device) and waits for a reply. Skylar One then displays the number of seconds it took to receive a reply from the device and the number of bytes returned from the device. If the device has an IPv6 address, Skylar One uses the appropriate IPv6 ping command.
- Who Is. Displays information about the device's IP, including the organization that registered the IP and contacts within that organization.
- Port Scan. Displays a list of all open ports on the device at the time of the scan.
- Deep Port Scan. Displays a list of all open ports and as much detail about each open port as the deep port scanner can retrieve.
- ARP Lookup. Displays a list of IP addresses for the device and the resolved Ethernet physical address (MAC address) for each IP address.
- ARP Ping. Displays the results from the ARP Ping tool. The ARP Ping tool is similar in function to ping, but it uses Address Resolution Protocol (ARP) instead of Internet Control Message Protocol (ICMP). You can use the ARP Ping tool only on the local network.
- Trace Route. Displays the network route between Skylar One and the device. The tool provides details on each hop to the endpoint. If the device has an IPv6 address, Skylar One uses the appropriate IPv6 traceroute command. When you run a traceroute, you can select whether it uses ICMP or User Datagram Protocol (UDP).
The tools in the Action Runner are also available in the Device Toolbox in the classic Skylar One user interface.
- If you clicked a custom link, the link opens in a new browser window. If you clicked a tool or action, then as it runs, its progress and results appear in a log in the Activity Center.
- After the tool or action has run, if you want to run it again, click the button. This button appears only for activities completed during your current session.
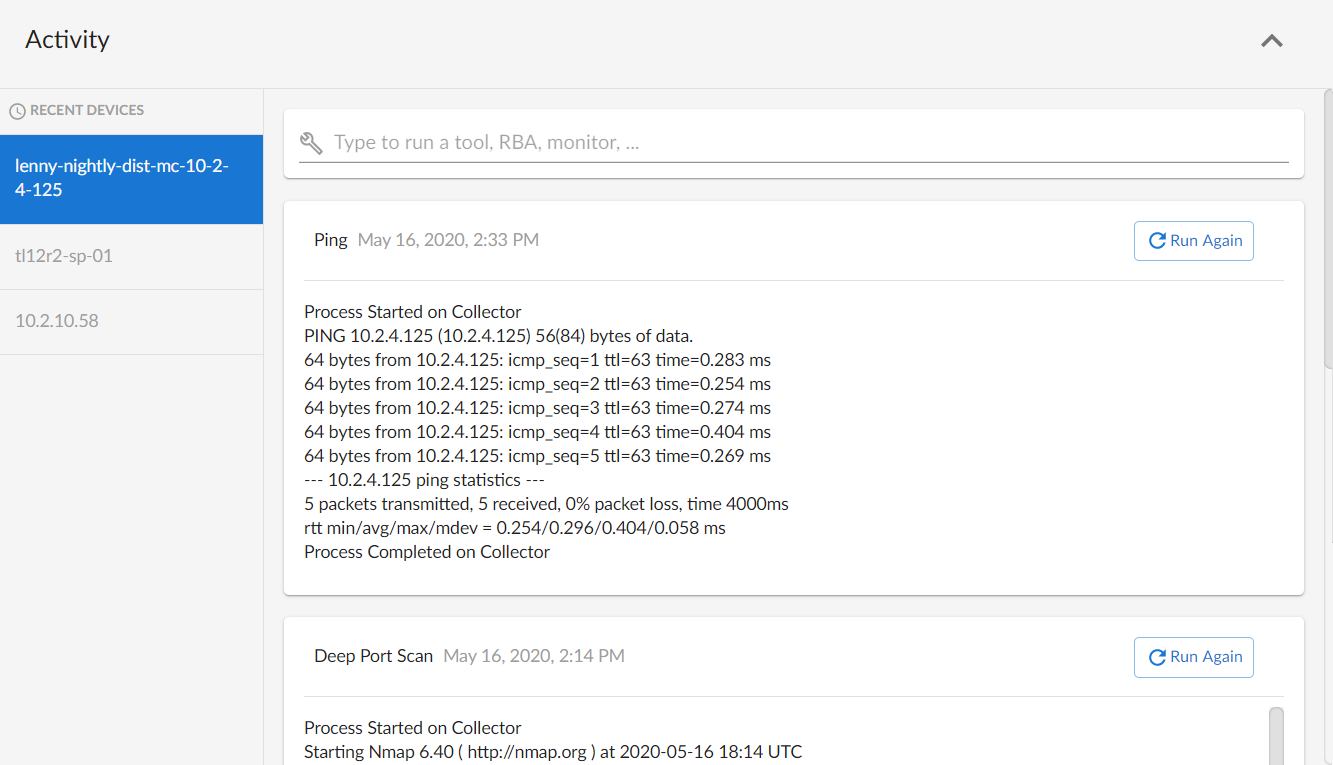
The left pane of the Activity Center displays a list of devices for which you have most recently used the Action Runner, with the current device at the top of the list. To use the Action Runner for another recently used device, or to view the logs of tools and actions that you ran on that device, click the device name.
Overview of the Device Investigator Tabs
The following section provides an overview of how to use the tabs on the Device Investigator for a selected device.
The Investigator Tab
The tab of the Device Investigator displays a customizable set of metrics about the selected device.
The device type determines which metrics appear on the tab. For most devices, the following panels appear by default:
-
Device Overview. Displays a panel that includes basic information about the device, including its current state, device class, IP address, uptime, collection status, unacknowledged event count, Skylar AI insights, automated actions count, and configuration changes count.
The device's Skylar AI insights count displays the sum of all open root cause analysis events (accepted, suggested, or custom) plus all open anomaly index score events plus all open predictive alert events. The Skylar AI insights count does not appear if your Skylar One system is not connected to Skylar AI.
- Events. Displays a panel with the list of events aligned with this device. In the right-hand pane, you can click the ID or Message field to view the Event Investigator page for that event.
- Logs. Displays a panel with a list of the logs for the device, sorted from newest to oldest by default. You can use the Search field to search device logs for specific event messages, event IDs, date ranges, source types, and other relevant text for troubleshooting. You can also click the column headers for Date/Time, Source, Event ID, Severity, and Message to sort by that column.
- Relationships and Membership. Displays a panel that includes details about the other devices that have relationships to the selected device, as well as the device groups and services to which the device belongs or has membership.
- The tab displays the name, relationship type, relationship discovery method, and health for each device that has a relationship with the selected device. You can click the hyperlink in the Device Name column to go to the Device Investigator for the related device.
- The tab displays the name, device count, and ID for each device group to which the selected device belongs or has membership.
- The tab displays the name, type, status, description, health, availability, and risk for each service to which the selected device belongs or has membership. You can click the hyperlink in the Service Name column to go to the Service Investigator for the related service.
- Map. Displays a panel with a map of the device and all of the devices with which the device has relationships. You can also click the Map panel heading to go to the tab for that device. This panel is off by default. To turn it on, click the button and then select the Map checkbox.
If your device has Skylar Automated RCA suggestions, custom alerts, or accepted alerts, you can click the link on the banner that appears at the top of the Device Investigator to go to the tab for that device to review the Skylar Automated RCA content.
From the Event Investigator or Service Investigator pages, if you click the name of the device where an event occurred, the Device Investigator for that device opens with an event context panel at the top of the page. From this panel, you can acknowledge, clear, or view causes and resolutions relating to that specific event.
You can customize the appearance of the widgets on the page, including changing their height or width. For more information, see the section on Customizing the Appearance of Widgets on the Investigator Tab.
The Device Investigator also includes the following sidebar buttons:
- Edit. Click the button on the right panel to edit the content that appears on the tab and its layout. For example, you can add or remove metrics, edit the metric panel order, or combine charts on the tab.
- Timespan. Click the timespan button on the right panel to adjust the time span of data that appears in all of the metric panels on the tab. The default time span is Last 24 Hours.
Select the Always display raw data checkbox at the top of the time span selector to ensure that the metric data that appears in the panels on the tab always includes the most recent data available. If you do not select that checkbox, Skylar One still displays raw data when you select a time span of less than two days. It automatically displays rolled up hourly data when you select a timespan of 2-45 days. It automatically displays rolled up daily data when you select a timespan of more than 45 days.
Customizing the Appearance of Widgets on the Investigator Tab
The tab panel layout is responsive. The system automatically resizes or relocates the panels when you add or remove a pane, rearrange the panels on the page, or change the size of the browser window.
You can customize a widget's appearance on the tab by clicking the menu icon () for that widget and then doing one of the following:
- To change the widget's name, select Edit Widget Name and then enter a new name.
- To change the widget's height, select Small, Medium, or Large.
- To change the widget's width, select either Columns or Full width.
You can also click the contract icon ( ) in the widget header to display only the header or click the expand icon (
 ) to display the widget's full contents.
For leaderboard widgets for interfaces, file systems, and Dynamic Applications, click the leaderboard bar chart icon ( ) to switch to a line chart. Click the line chart icon (
 ) to switch back to a leaderboard bar chart.
Adding and Removing Metrics on the Investigator Tab
Optionally, you can add metrics to the tab for Dynamic Applications, interfaces, and the Skylar One Agent (if applicable), among other things. You can also remove metrics from the tab.
To add and remove metrics on the tab:
- To add a metric panel that is not currently on the tab, click the button on the right sidebar. The layout panel expands. Click . Click the Add a metric field. A list of metrics appears.
- Select a metric from the list, or type the name of a metric and select it from the list. The right panel lists the metric, and a corresponding widget appears in the left panel.
- Some metrics might require you to make additional selections, such as the network interfaces associated with a device. Click the field and add one or more additional metrics, as needed.
You can select up to eight additional metrics per widget.
- To remove a metric panel from the tab, clear the corresponding checkbox in the right panel. The metric remains listed in the right panel, but the panel is removed from the tab.
- To completely remove the metric and its corresponding panel from the tab, click the button (
 ) for that metric in the right panel.
The tab retains any changes you made to the set of device metrics displayed for each device, on a per-user basis. To reset these changes to their default settings, click the button at the bottom of the right panel. Optionally, you can apply these changes to other Device Categories, Device Classes, or devices. For more information, see the section on Applying a Custom Device Investigator Layout to Other Devices.
Editing the Metric Panel Order on the Investigator Tab
On the tab of the Device Investigator, when you click the button, the right panel lists the metric panels in the same order as the widgets in the left panel. You can drag the panels up or down in the right panel to edit the order in which the metric panels appear on the left panel. You can then prioritize the information on the page.
To edit the order in which widgets appear on the tab:
- On the tab of the Device Investigator, click the button on the right sidebar. The layout panel expands. Click .
- Hover your mouse over the "Panel" heading of the panel that you want to move until you see an open hand icon appear.
- Click and hold the left mouse button on the panel. Drag the panel to a different location in the list. When you do so, the open hand icon becomes a closed hand icon, and a blue dotted box appears around the panel.
- Release the left mouse button to drop the panel in your desired location. The left panel shows the new order.
The tab retains any changes you made to the set of device metrics displayed for each device, on a per-user basis. To reset these changes to their default settings, click the button at the bottom of the right panel. Optionally, you can apply these changes to other Device Categories, Device Classes, or devices. For more information, see the section on Applying a Custom Device Investigator Layout to Other Devices.
Combining Charts on the Investigator Tab
On the tab of the Device Investigator, you can combine charts for different time-series metrics to see all of the combined data for those metrics in a single chart.
To combine charts:
- On the tab of the Device Investigator, click the button on the right sidebar. The layout panel expands. Click .
- Hover your mouse over a time-series metric name until you see an open hand icon appear.
- Click and hold the left mouse button on the metric. Drag the metric into the panel of a different time-series metric in the list. When you do so, the open hand icon becomes a closed hand icon, and the panel containing the combined metrics turns blue.
- Release the left mouse button to drop the metric into the desired panel. The newly combined metric panel is reflected in a "Combined Charts" widget in the left-hand widget panel.
The tab retains any changes you made to the set of device metrics displayed for each device, on a per-user basis. To reset these changes to their default settings, click the button at the bottom of the right panel. Optionally, you can apply these changes to other Device Categories, Device Classes, or devices. For more information, see the section on Applying a Custom Device Investigator Layout to Other Devices.
Applying a Custom Device Investigator Layout to Other Devices
The device tab has a default layout that includes Device Overview, Events, and Logs widgets. Initially, this layout is assigned to all devices.
You can also create custom tab layouts and apply those layouts to individual devices, entire device classes, or entire device categories, and then apply those updates either to only yourself or to all system users.
To apply a custom device layout to other devices:
- On the tab of the Device Investigator, click the button on the right sidebar to expand the layout panel. When you do so, the tab name appears at the top of the layout panel, along with one of the following labels:
- Default. Indicates the layout has not been changed from the default settings.
- Private. Indicates the layout has been changed from the default settings but only applied to the logged-in user.
- Public. Indicates the layout has been changed from the default settings and has been applied to all system users.
- From this panel, you can do one or more of the following:
- Create a new custom Investigator layout.
- Select an existing custom Investigator layout.
- Manage the custom Investigator layouts.
Creating a New Custom Investigator Layout
To create a new custom device layout:
- On the tab of the Device Investigator, click the button on the right sidebar. The layout panel expands. Click .
- Make updates to the layout as needed, such as by adding or removing metrics, editing the metric panel order, or combining one or more charts into a single panel. When you do so, the label at the top of the layout panel changes to "Private", if it was not already labeled as such.
- To save the custom layout for other devices, device classes, or device categories, or for all system users, click the button and go to step 4. To keep the layout for only your account, do one of the following:
- To save the custom layout for only the current device and your user account, leave the page. When you do so, Skylar One automatically saves the custom layout and displays it when you return to the tab for that device.
- To revert your layout changes to the default settings, click the button.
- On the Apply "Custom Investigator" to... modal, use the following tabs and fields to specify the devices and users to which you want to apply the custom layout, as well as its name:
- Categories, Classes, and Devices tabs. Click the appropriate tab or tabs at the top of the modal and then use the search field to locate the specific Device Categories, Device Classes, or individual devices to which you want to apply the custom layout. Select the checkbox for each category, class, or device that you want to select.
- Name. Enter a new name for the custom layout.
- Apply Investigator for. Select one of the following options:
- Myself. Applies the custom layout to only your user account.
- All System Users. Applies the custom layout to all users in your Skylar One system.
- Click . A summary of your selections appears.
- To confirm your selections, click .
Selecting an Existing Custom Device Investigator Layout
To select an existing custom device layout:
- On the tab of the Device Investigator, click the button on the right sidebar. The layout panel expands. Click . The tab displays a list of layouts that you have access to or own.
- Select the radio button for the layout that you want. When you do, the tab automatically updates to use that layout.
You can also bulk-align device layouts to multiple devices. For more information, see the section on Performing Bulk Actions on One or More Devices.
Managing Custom Device Investigator Layouts
You can view and manage the list of custom device layouts that you own or have access to on the Device Investigator Layouts page.
To view the Device Investigator Layouts page, your user account must be aligned to an access key that includes the DEV_VIEW access hook. To delete layouts from this page, your user account must have an access key that includes the DEVICE_INVESTIGATOR_REMOVE or DEVICE_DASH_EDIT access hooks.
To manage the list of custom device layouts:
- Go to the Device Investigator Layouts page (Devices > Device Investigator Layouts).
You can also access this page from the tab of the Device Investigator by clicking the button on the right sidebar and then clicking Choose Layout > Manage Layouts.
- For each layout, the following information displays:
- Layout Name. The name assigned to the layout. This name displays as a hyperlink. Click the hyperlink to view or update the list of devices, device classes, and device categories to which the layout is aligned.
- ID. The unique ID for the layout, generated by Skylar One.
- Owner. The owner of the layout. Typically, the creator of the layout is the owner.
- Categories. The number of device categories aligned to the layout.
- Classes. The number of device classes aligned to the layout.
- Devices. The number of devices aligned to the layout.
- Alignment Last Edited By. The user who configured or last edited the layout alignment.
- Alignment Last Edited. The date and time the layout alignment was configured or last edited.
You can sort the list by a column's values by clicking its column heading. You can also filter the items on the page by typing or selecting filter options in one or more of the filters found above the columns. For more information, see the topic on Filtering Inventory Pages.
You can adjust the size of the rows and the size of the row text on this inventory page. For more information, see the topic on Adjusting the Row Density.
- From the Device Investigator Layouts page, you can take the following actions:
- You can view or edit the alignment of a device, device class, or device category for layouts that you own.
- You can delete layouts that you own. When you do so, any devices that are currently using the selected layouts default to the next applicable layout.
- You can view or edit the alignment of a device, device class, or device category for layouts that you own.
- To view or update the list of devices, device classes, and device categories to which a layout is aligned, click the hyperlink in the Layout Name column for that layout on the Device Investigator Layouts page. On the layout page that appears, you can click the , , and tabs to view the layout's current alignments in read-only format.
- To update the layout's current alignments, click and then select the checkbox next to any device category, device class, or device that you want to align to the selected layout.
You can select the checkbox at the top of the table to select all of the rows in that table.
- If you are the layout owner and you want to edit the layout's name, click its name at the top of the page and then enter a new name.
- To save your changes, click .
- To delete one or more layouts that you own, select their checkboxes on the Device Investigator Layouts page and then click . When you do so, a warning appears informing you that any devices that are currently using the selected layouts default to the next applicable layout.
- To confirm that you want to delete the selected layouts, click .
The Settings Tab
On the tab of the Device Investigator, you can manage your preferences for that device, such as whether to auto-clear events, accept all logs, run daily port scans, and more.

Click the button to change your settings. When you are done making changes, click .
The Agent section appears only for agent-type devices.
Set the following Agent data collection preferences:
-
Disk Space. Specify the amount of disk space in MB that the agent can use to store data. If the agent loses connectivity to Skylar One, the agent uses this disk space to store collected data until the connection to Skylar One returns. When connectivity is re-established, the agent uploads all of its stored data.
-
Excludes. Enter a list of processes and directories, separated by semicolons, that you do not want the agent to monitor.
-
Includes. Enter a list of processes and directories, separated by semicolons, that you want the agent to monitor. Use this field to make sure that the agent monitors specific processes.
If you list a process or directory in both the Excludes field and the Includes field, the item in the Includes field overrides the item in the Excludes field.
-
Collect File Information. Select this option if you want the agent to report the names of files accessed by each monitored process.
-
Collect Named Pipe Information. Select this option if you want the agent to collect named pipe information.
-
Collect Socket Information. Select this option if you want the agent to collect socket information.
-
Collect Thread Information. Select this option if you want the agent to collect thread information.
-
Collect Non-Intercepted Processes. Select this option if you want the agent to collect limited information for processes that do not contain the agent library.
-
Processes Aggregation. Specify how the agent collects limited information for processes that do not have the agent library. Also specify how the agent aggregates short-lived processes. Your options include the following:
- All. Aggregate every short-lived process into its parent.
- None. Do not aggregate any short-lived process.
- Without Sockets. Aggregate short-lived processes unless those processes have sockets.
- Upload Interval. Specify how often the agent should upload data. Your options include the following:
-
20 Seconds. Upload a data snapshot every 20 seconds.
-
60 Seconds. Upload a data summary every 60 seconds. This is the default setting. This option uses an improved data format that requires fewer Skylar One resources. The Skylar One agent continues to internally collect and poll data every 20 seconds, but the agent summarizes and uploads that data every 60 seconds. There is no data loss even though the data is uploaded less frequently.
If you specify 60 seconds for the upload interval, the summary upload now includes "watched" or "monitored" files, just like the snapshot upload does.
-
300 seconds. Upload a data summary every 300 seconds (five minutes).
Set the following Collection preferences:
- Enable Collection. Select this option to enable collection using the collector group specified in the following field.
- Collection Poller. Select the name of the collector group that you want to use for collection on this device.
- Collection Type. Select the type of collection you want to use on this device. Your options include Standard or DHCP.
Set the following Monitoring preferences:
- SNMP Read. Select the community string for read-only access to SNMP information on the device.
- SNMP Write. Select the community string for read-and-write access to SNMP information on the device.
- Availability Protocol. Select the protocol to monitor that determines if the device is available.
- Availability Port. Select the port to monitor that determines if the device is available.
- Latency Protocol. Select the protocol to monitor that determines latency for the device.
- Latency Port. Select the port to monitor that determines latency for the device.
- Auto-Update. This checkbox specifies whether you want Skylar One to perform a nightly auto-discovery of the device and update records with changes to the device. If you clear this checkbox, Skylar One does not perform auto-discovery. Changes to the device, including newly opened ports, are not recorded by Skylar One.
- Scan All IPs. If the device uses multiple IP Addresses, Skylar One scans for open ports on all IPs during initial discovery and nightly auto-discovery.
Set the following Topology preferences:
The device initially uses the system-wide topology settings that you set on the Behavior Settings page (System > Settings > Behavior), or from the topology settings for the device's class. You can change these settings for one device by editing one or more of the following fields. For more information about the system-wide topology settings, see
-
L2. Select the Override checkbox to override the system-wide Layer-2 topology settings that are set on the Behavior Settings page (System > Settings > Behavior). When selected, this field becomes editable, and you can select from the following options:
-
Disabled. Disables Layer-2 topology collection and processing for the device.
-
Processing Enabled. Enables Layer-2 topology processing for the device. The "Enterprise Database: Topology Crunch" process determines Layer-2 topology relationships based on device category and connects network devices to each other using methods other than the standard SNMP protocol for collection.
-
Collection and Processing Enabled. Enables Layer-2 topology collection and processing for the device. The system uses the standard SNMP collection methods and the "Enterprise Database: Topology Crunch" process to determine Layer-2 topology relationships based on device category, with the purpose of connecting network devices to each other.
-
Enhanced Processing Enabled. Enables advanced Layer-2 topology processing for the device, but using methods other than the standard SNMP for collection. This enhanced processing can form Layer-2 relationships between any devices that match a MAC address from the BRIDGE-MIB or are sourced from Dynamic Applications, regardless of device category.
-
Collection and Enhanced Processing Enabled. Enables advanced Layer-2 topology processing and collection for the device using the standard SNMP collection methods. This enhanced processing can form Layer-2 relationships between any devices that match a MAC address from the BRIDGE-MIB or are sourced from Dynamic Applications, regardless of device category.
-
-
L3. Select the Override checkbox to override the system-wide Layer-3 topology settings that are set on the Behavior Settings page (System > Settings > Behavior). When selected, this field becomes editable, and you can select from the following options:
-
Disabled. Disables Layer-3 topology collection and processing for the device.
-
Processing Enabled. Enables Layer-3 topology processing for the device using the "Enterprise Database: Topology Crunch" process to determine Layer-3 topology relationships. This option requires all hops in a traceroute to respond and match devices within Skylar One to form the relationship.
-
Collection and Processing Enabled. Enables Layer-3 topology collection and processing for the device using the "Enterprise Database: Topology Crunch" process to determine Layer-3 topology relationships. This option requires all hops in a traceroute to respond and match devices within Skylar One to form the relationship.
-
Enhanced Processing Enabled. Enables advanced Layer-3 topology processing for the device, where the system forms relationships between any two hops that respond and match devices in Skylar One rather than discarding incomplete traceroutes or results that include unmatched hops.
-
Collection and Enhanced Processing Enabled. Enables advanced Layer-3 topology processing and collection for the device, where the system forms relationships between any two hops that respond and match devices in Skylar One rather than discarding incomplete traceroutes or results that include unmatched hops.
-
-
CDP. Select the Override checkbox to override the system-wide Cisco Discovery Protocol (CDP) topology settings that are set on the Behavior Settings page (System > Settings > Behavior). When selected, this field becomes editable, and you can select from the following options:
-
Disabled. Disables CDP topology collection and processing for the device.
-
Processing Enabled. Enables CDP topology processing for the device. The "Enterprise Database: Topology Crunch" process determines CDP topology relationships between two devices that both respond with CDP neighbor data, show each other as neighbors, and are managed devices in Skylar One. This option uses methods other than standard SNMP for collection.
-
Collection and Processing Enabled. Enables CDP topology collection and processing for the device. The system uses standard SNMP collection methods and the "Enterprise Database: Topology Crunch" process to determine CDP topology relationships between two devices that both respond with CDP neighbor data, show each other as neighbors, and are managed devices in Skylar One.
-
Enhanced Processing Enabled. Enables advanced CDP topology processing for the device, but using methods other than standard SNMP for collection. This advanced processing can form CDP relationships between two devices if at least one of those devices responds with CDP neighbor data and is a managed device in Skylar One.
-
Collection and Enhanced Processing Enabled. Enables advanced CDP topology processing and collection for the device using standard SNMP collection methods. This enhanced processing can form CDP relationships between two devices if at least one of those devices responds with CDP neighbor data and is a managed device in Skylar One.
-
-
LLDP. Select the Override checkbox to override the system-wide Link Layer Discovery Protocol (LLDP) topology settings that are set on the Behavior Settings page (System > Settings > Behavior). When selected, this field becomes editable, and you can select from the following options:
-
Disabled. Disables LLDP topology collection and processing for the device.
-
Processing Enabled. Enables LLDP topology processing for the device. The "Enterprise Database: Topology Crunch" process determines LLDP topology relationships between two devices that both respond with LLDP neighbor data, show each other as neighbors, and are managed devices in Skylar One. This option uses methods other than standard SNMP for collection.
-
Collection and Processing Enabled. Enables LLDP topology collection and processing for the device. The system uses standard SNMP collection methods and the "Enterprise Database: Topology Crunch" process to determine LLDP topology relationships between two devices that both respond with LLDP neighbor data, show each other as neighbors, and are managed devices in Skylar One.
-
Enhanced Processing Enabled. Enables advanced LLDP topology processing for the device, but using methods other than standard SNMP for collection. This enhanced processing can form LLDP relationships between two devices if at least one of those devices responds with LLDP neighbor data and is a managed device in Skylar One.
-
Collection and Enhanced Processing Enabled. Enables advanced LLDP topology processing and collection for the device, using the standard SNMP collection methods. This enhanced processing can form LLDP relationships between two devices if at least one of those devices responds with LLDP neighbor data and is a managed device in Skylar One.
-
Set the following User Maintenance preferences:
- Enable User Maintenance. Specifies whether the device is in user maintenance mode. User maintenance is an option that allows a user to manually put a device into "maintenance mode". During maintenance mode, for the selected devices, Skylar One generates only events with a severity less than the system-wide Maintenance Minimum Severity setting. If you select Enabled, the device is put in user maintenance mode, and the device remains in this state until you or another user disables user maintenance mode.
- Enable Collection During Maintenance. Specifies whether Skylar One polls the device when user maintenance mode is enabled. If you select Enabled, Skylar One continues to poll and collect data from this device during user maintenance mode.
Set the following Alerts and Events preferences:
- Event Mask. Specify the time frame for masking events. When a device uses the Event Mask setting, Skylar One groups together events that occur on that device within the specified span of time.
- Always Create Latency Alert. Select this option to generate two alerts when availability and latency checks fail. Clear this checkbox to generate only an availability alert and suppress latency alerts.
- Allow Events to Auto-Clear. Clear this checkbox to override an event policy's auto-clear setting for this device.
- Critical Ping. Pings the device and creates an event if the device does not respond. When enabled, you can select between five and 120 seconds.
Set the following Other device preferences:
- Accept All Logs. This checkbox specifies whether you want to keep and save all logs for this device. If you want to retain only logs associated with events, clear this checkbox.
- Daily Port Scans. This checkbox specifies whether you want Skylar One to perform a daily scan of the device for open ports.
- Preserve Device Name. If you select this checkbox, the name of the device in Skylar One remains the same, even if the name of the actual device changes. If you clear this checkbox, the Skylar One name for the device updates if the name of the actual device changes.
- Disable Asset Update. If selected, Skylar One does not automatically create a new asset record for the device or update the existing asset record for the device. For the single device, this checkbox overrides any settings defined on the Asset Automation page (System > Settings > Assets).
- Bypass Interface Inventory. Specifies whether the discovery session should discover network interfaces. Your options include:
- Selected. Skylar One does not attempt to discover interfaces for this device during rediscovery and nightly auto-discovery.
- Not Selected. Skylar One attempts to discover network interfaces for this device during rediscovery and nightly auto-discovery using the Interface Inventory Timeout value and Maximum Allowed Interfaces value specified on the Device Thresholds page.
- Dynamic Discovery. If selected, Skylar One automatically assigns the appropriate Dynamic Applications to the device during discovery.
The Anomaly Detection Tab
On the tab of the Device Investigator, you can view a list of anomaly detection metrics that are enabled for the device.

The tab appears only if the device is collecting data for Skylar Analytics.
For more information on the tab, see
The Attributes Tab
On the tab of the Device Investigator, you can view a list of custom attributes that are already aligned with that device, and you can also add and remove extended custom attributes for the device.

For more information on the tab, see the section on Adding Custom Attributes for a Device.
The Changes Tab
On the tab of the Device Investigator, you can view a list of the active and cleared change events for a device.

Skylar Automation (formerly PowerFlow) users can use the tab to view a list of events that Skylar Automation creates when it pulls change data from ServiceNow and Restorepoint SyncPacks.
Based on your third-party integrations, the tab displays the following information:
- ServiceNow planned change events
- ServiceNow emergency change events
- Skylar Compliance configuration change events
About the Changes Widget
The Changes tab uses data from the Changes widget, which is also used on the Service Investigator page to show change events for Business Services.
The Changes widget is available to customers who have purchased Configuration and Change Management as part of their Skylar One Standard or Premium subscription. This widget displays a list of events that Skylar Automation creates when it pulls change data from ServiceNow or Skylar Compliance, including both active and cleared change events.
The Changes widget appears only if it has been properly configured and enabled.
The Changes widget tile displays the number of active change events that affect the service. Events on the widget automatically clear after 30 minutes.
From the Changes widget, you can do the following:
- Use the drop-down menu to select which type of change events display in the widget: Active Events or Cleared Events. Active Events are events that are currently active and whose most recent detection occurred within the selected time range. Cleared Events are events that were cleared within the selected time range, up to a maximum of 12 hours.
- Filter and search for events by date: 5, 7, 14, 30, or more than 30 days.
- Use the Search field to search for specific change events.
- For active events that are aligned to devices, click the arrow icon (
 ) next to the event to display the following information:
- Tools. A set of network diagnostic tools or user-initiated actions that you can run on the device associated with the event. Click the search bar to find a tool or action to run. Or click one of the default tools or actions that are available based on the device type and your user permissions.
- Vitals. A widget that shows the past 24 hours of CPU and memory usage for the device related to the event. To zoom in on a shorter time frame, click and drag on the chart. To go back to the original timespan, click the button.
- Logs. A list of the log entries from the device's log file, sorted from newest to oldest by default.
- View the Organizational Summary page for the organization aligned with an active event by clicking the link in the Organization column.
- View the Service Investigator or Device Investigator for the service or device aligned with an active event by clicking the link in the Name column.
- View the Event Investigator page for an active event by clicking the link in the Message column or the Event ID column.
- For ServiceNow integrations, view the ServiceNow ticket associated with an event by clicking the link in the External Ticket column.
- Acknowledge an active event by clicking the button. When you acknowledge an event, you let other users know that you are aware of that event, and you are working on a response.
- Clear an active event by clicking the button. When you clear an event, you let other users know that the event has been addressed.
- Create a ticket from an active event.
- Align an event to an existing ticket.
- View the event policy for an active event.
- Select multiple active events for action using the checkboxes next to the events.
Configuring and Enabling the Changes Widget
To use the Changes widget, you must first configure and enable the widget. To do so, you must meet the following prerequisites:
- You are running Skylar One version 11.2.0 or later.
- You have "Business Services Base Pack" PowerPack version 2.2.0 or later installed in Skylar One.
- You are running Skylar Automation version 2.2.2 or later.
- You have the following SyncPacks and PowerPacks installed, depending on your integration:
- For a ServiceNow integration:
- "ServiceNow CMDB" SyncPack version 3.2.0 or later installed in Skylar Automation
- "ServiceNow Change Management" SyncPack version 3.2.1 or later installed in Skylar Automation.
- For a Skylar Compliance integration:
- "Skylar Compliance" (formerly "Restorepoint") SyncPack version 1.2.0 or later installed in Skylar Automation.
- "Skylar Compliance" (formerly "Restorepoint") PowerPack version 102 or later installed in Skylar One.
- "Skylar Compliance Automation" (formerly "Restorepoint Automation") PowerPack version 102 or later installed in Skylar One.
To configure the widget:
In Skylar One, create a SOAP/XML credential to connect with Skylar Automation. Make note of its credential ID. This number appears at the top of the Edit SOAP/XML Credential modal and in the ID column on the Credentials page (Manage > Credentials) or Credential Management page (System > Manage > Credentials).
For a ServiceNow integration:
In Skylar Automation, sync Skylar One devices with ServiceNow. Make note of the Configuration field value in the "Sync Devices from Skylar One to ServiceNow" application.
In Skylar One, open the "ServiceNow: Send Change Request Event to Skylar Automation" run book action and edit the input parameters to include the credential ID and the Configuration field values that you previously noted.
For a Skylar Compliance integration, follow the steps in the section on syncing Skylar One devices with Skylar Compliance in Skylar Automation.
Finally, do one of the following:
Permanently enable the Changes widget by editing the NextUI configuration file on your Skylar One system.
Temporarily enable the Changes widget by running a GraphQL mutation on your Skylar One system.
Editing the Run Book Action (ServiceNow Integrations only)
To edit the input parameters in the "ServiceNow: Send Change Request Event to PowerFlow" run book action:
- Go to the PowerPack Manager page (System > Manage > PowerPacks).
- Locate the "Business Services Base Pack" PowerPack and click its wrench icon (
 ). The Editing PowerPack modal appears.
- In the Editing PowerPack modal, click Run Book Actions in the left navigation bar. The Embedded Run Book Actions page appears in the modal.
- Click the wrench icon () for the "ServiceNow: Send Change Request Event to PowerFlow" run book action. The Policy Editor modal appears.
- In the Policy Editor modal, make the following edits to the Input Parameters field:
- Replace <sl1 credential id for powerflow> with the credential ID of the SOAP/XML credential you created for Skylar Automation.
- Replace <pf config id> with the Configuration field value from the "Sync Devices from Skylar One to ServiceNow" application in Skylar Automation.
- Click . Close the Policy Editor modal.
- Close the Editing PowerPack modal.
Syncing Skylar One Devices with Skylar Compliance (Skylar Compliance Integrations Only)
To sync Skylar One devices with Skylar Compliance:
- Follow the steps in the section on Configuring the "Skylar Compliance: Sync Devices" application.
- In Skylar Automation, open the Configuration pane for the "Skylar Compliance: Sync Devices" application. Select Enable for the restorepoint_config field to enable device change detection.
- Make a note of the restorepoint_id value on the Configuration pane for the "Skylar Compliance: Sync Devices" application.
- In Skylar One, go to the Device Investigator for a device synced from Skylar Compliance. Click the tab. Verify that the same restorepoint_id value appears in the Values column.
Permanently Enabling the Widget
To permanently enable the Changes widget or tab using the NextUI configuration file, run the following steps on all appliances, including the Administration Portal, the Data Collector, the Database Server, the Data Engine, and the All-In-One Appliance.
To permanently enable the Changes widget or tab:
Start an SSH session into one of the Skylar One appliances.
Use vi or another text editor to edit the /opt/em7/nextui/nextui.conf file. To do so, type the following at the shell prompt:
sudo vi /opt/em7/nextui/nextui.conf
Add the following line at the bottom of the NextUI configuration file:
BUSINESS_SERVICES_CHANGE_EVENTS_TAB=enabled
Save your changes. To restart the NextUI service, run the following command:
sudo systemctl restart nextui
Repeat steps 1–4 for the remaining Skylar One appliances.
Temporarily Enabling the Widget
To temporarily enable the Changes widget or tab using GraphQL:
To access the GraphiQL interface, log in to Skylar One and go to the GQL Browser page (System > Tools > GQL Browser).
In the main query pane, type the following mutation:
mutation updateChangeEventsTab {
	updateFeatureToggle(
		id: "system:BUSINESS_SERVICES_CHANGE_EVENTS_TAB"
		value: "enabled"
	) {
		id
		value
	}
}
Click the button to format the mutation and to add syntax highlighting to make the mutation easier to read. Note that the function removes the query syntax if only one query is present in the main query pane.
Click the (Play) button. The mutation executes, and the results appear in the pane on the right side.
If the Changes widget or tab does not appear in Skylar One after you execute the mutation, press the key or click the refresh button in your web browser.
For more information about GraphQL, see the GraphQL documentation. For more information about the GraphiQL user interface, see the GraphiQL user interface documentation.
The Collections Tab
On the tab of the Device Investigator, you can view a list of the Dynamic Applications associated with the device.

For more information on the tab, see the section on Managing the Dynamic Applications Associated with a Device.
Even if you turn off data collection for a device, that device still consumes a single ScienceLogic device license. For more information on non-billable devices, see the Non-billable Devices section.
The Configs Tab
On the tab of the Device Investigator, you can view configuration information that the system collects from the device through Dynamic Applications. You can also view a list of all changes that occurred with a Dynamic Application between two specific snapshot reference points.

You can find all "config" objects on the tab. Usually, "config" objects contain static information about hardware and configuration settings, such as serial numbers, version numbers, and hardware status.
You can also see all changes between two snapshots of a Dynamic Application in the tab of the Device Investigator. For more information, see the
For more information on the tab, see
The Events Tab
On the tab of the Device Investigator, you can view a list of events associated with the device.
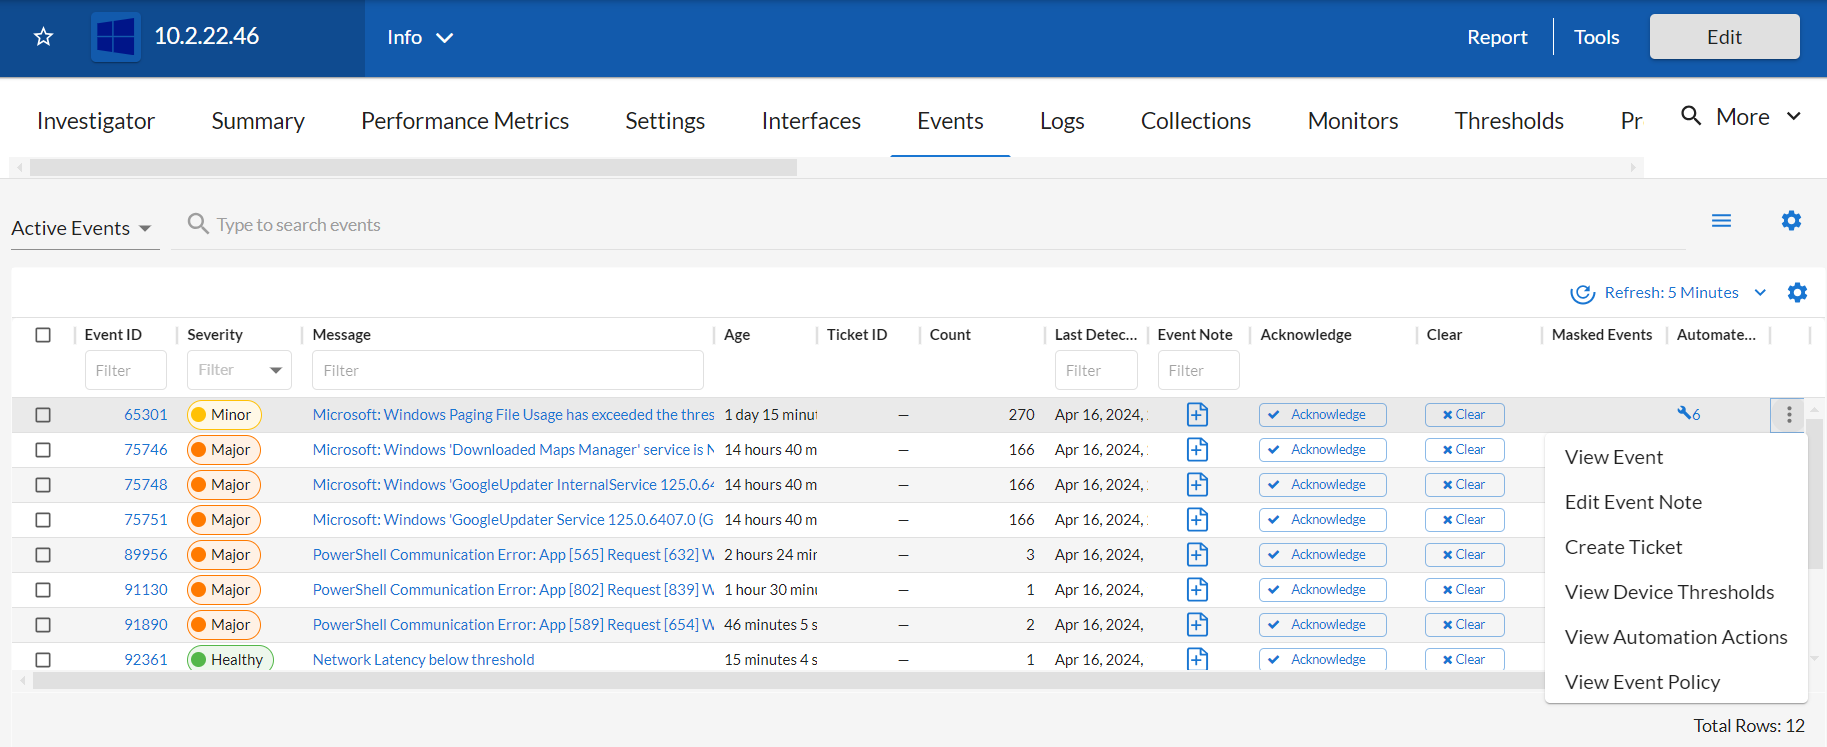
For more information on the tab, see
The Interfaces Tab
On the tab of the Device Investigator, you can view information about the various interfaces used by the device, including Port, Hardware Description, MAC Address, Connection Speed, and other details for each interface.

For more information on the tab, see
The Journals Tab
On the tab of the Device Investigator, you can view journal entry information that the system collects from the device through journal Dynamic Applications.
For more information on the tab, see
The Logs Tab
You can view logs and messages for a device on the tab of the Device Investigator. This is the same set of logs that display on the tab for this device.

The tab displays all of the messages that Skylar One and the Skylar One Agent, if applicable, collect from the device. If the system has collected the same message multiple times, the log indicates how many times the message has repeated. You can view these log entries to troubleshoot or to check the status of a device.
You can sort the list by a column's values by clicking its column heading. You can also filter the items on the page by typing or selecting filter options in one or more of the filters found above the columns. For more information, see the topic on Filtering Inventory Pages.
You can adjust the size of the rows and the size of the row text on this inventory page. For more information, see the topic on Adjusting the Row Density.
For more information on the tab, see
The Map Tab
On the tab of the Device Investigator, you can view a map of the selected device and all of the devices with which the device has relationships.

For more information on the tab, see the section on Viewing Device Topology Maps. For more information about maps, see the
The Monitors Tab
On the tab of the Device Investigator, you can define monitoring policies for a device.
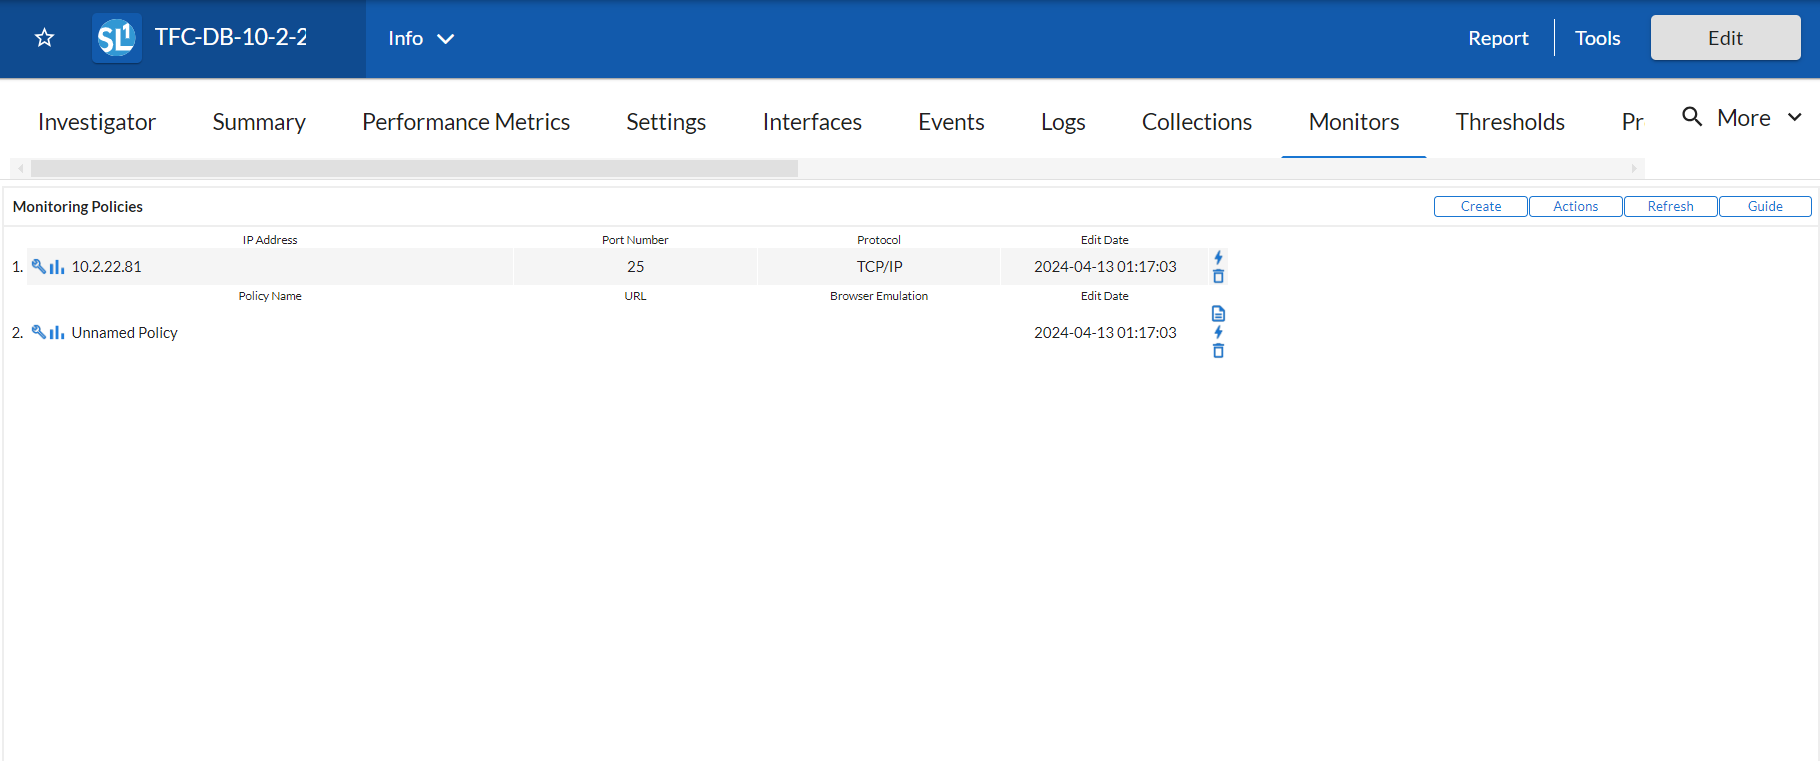
Use the tab to define policies that monitor:
- System processes. Monitors the device and looks for the specified system process.
- Domain-name availability and lookup speed. Monitors the availability and lookup time for a specific domain-name server and a specific record on a domain name server.
- Email round-trip speed. Monitors the amount of time it takes to send an email message from Skylar One to an external mail server and then back to Skylar One.
- SOAP and XML transaction speeds. Monitors any server-to-server transactions that use HTTP and can post files or forms (for example, SOAP/XML or email). Periodically, Skylar One sends a request and some data and then examines the result of the transaction and compares it to a specified expression match.
- TCP/IP port availability. Monitors ports for availability every five minutes. If a port is not available, Skylar One creates an event. The system uses the data that the port policy gathers to create port-availability reports.
- Web-content availability. Monitors a website for specific content. Skylar One periodically checks the website for specified content. If the content cannot be found on the website, Skylar One generates an event.
- Services. Monitors the device and looks for the specified service.
All of these monitoring policies can generate events. Skylar One uses the data collected by these policies to create performance reports and graphs.
The Notes Tab
On the tab of the Device Investigator, you can add and view notes and other attachments associated with the device.
To add a note to a device:
- Go to the tab of the Device Investigator.
- Click the button and then select Notepad Editor. The Notepad Editor modal appears.
- In the Notepad Editor modal, you can enter notes or comments about the device.
- You can format the text and include links, images, and videos in the note.
- You can also include a document template (System > Customize > Document Templates) in the field.
- When you are finished adding content to the note, click . The note appears on the tab, along with any other notes about the device. Each note includes the username, date and time, and text of the comment. You can perform the following on each note entry:
- To view a note's attachment, click the paperclip icon (
 ).
- To edit the content of a note, click the wrench icon (). The Notepad Editor modal appears. You can update the note; format the text; insert content from a saved template; and add an attachment, image, or video to the note. Click the button to save your changes.
- To delete a note, click its delete icon (
 ).
For information about adding a note to a device in the classic Skylar One user interface, see the section on Adding a Note in the Device Administration Panel.
The Performance Metrics Tab
On the tab of the Device Investigator, you can view performance graphs for hardware, monitoring policies, and Dynamic Applications aligned with the device.

For more information on the tab, see
The Ports Tab
On the tab of the Device Investigator, you can view a list of all open ports on a device.

Every night, Skylar One scans all the ports of each managed device. If a device opens new ports, Skylar One adds each new port to the list on the tab.
For more information on the tab, see
The Processes Tab
A process is a program that runs on a monitored device, or that ran in the past and is now idle.
On the tab of the Device Investigator, you can view information about the processes running on the device. The tab displays a combined list of processes collected via SNMP and the agent, where applicable.

For more information on the tab, see
The Redirects Tab
On the tab of the Device Investigator, you can redirect log entries from one IP-based device to another IP-based device, or from an IP-based device to a virtual device.

For more information on the tab, see
The Relationships Tab
On the tab of the Device Investigator, you can view information about parent-child relationships between the selected device and other devices.
For more information on the tab, see the section on Viewing Relationships for a Single Device.
The Schedules Tab
On the tab of the Device Investigator, you can manage all the scheduled processes you have defined in your system. You can define scheduled processes for backup management, dashboards, devices, and run book automation policies.
For more information on the tab, see the section on Scheduling Maintenance for a Single Device.
The Services Tab
On the tab of the Device Investigator, you can view a list of all services enabled on the device.
For more information on the tab, see
The Software Tab
On the tab of the Device Investigator, you can view a list of all the software installed on the device.

For each installed software title, the tab displays the following information:
- Name. Name of the software.
- Install Date. Date and time the software was installed on the device.
For more information on the tab, see
The Summary Tab
On the tab of the Device Investigator, you can view an overview of device details through device dashboards and widgets that display various metrics.

For more information on the tab, see
The Thresholds Tab
On the tab of the Device Investigator, you can define usage and performance thresholds and data retention thresholds for a device.

When a device exceeds a performance threshold, Skylar One generates an event for the device. When a device exceeds a space threshold, Skylar One removes the oldest data from the database. For each of these thresholds, Skylar One defines a default value. You can edit the thresholds to meet your needs.
For more information on the tab, see the section on Device Thresholds.
The Tickets Tab
On the tab of the Device Investigator, you can view all tickets associated with the device and create new tickets to associate with the device.
The tab displays critical information about each ticket. If you require more detail, you can access the Ticket Editor from this page by clicking the ticketing icon ( ) for that ticket.
You can also create a new ticket from this page.
To create a new ticket for a device:
Go to the tab of the Device Investigator.
Click the button and then select Create a Ticket. The Ticket Editor page appears.
On the Ticket Editor page that appears, define the basic parameters for the ticket.
The Description and Element fields automatically populate with information about the device.
When you are finished, click .